
Chapter 262: USB HID (Human Interface) Implementation
Chapter Objectives
By the end of this chapter, you will be able to:
- Understand the purpose and function of the USB Human Interface Device (HID) class.
- Grasp the fundamental concept of HID Report Descriptors and their role in device enumeration.
- Configure an ESP-IDF project to create a custom USB HID device using the TinyUSB stack.
- Implement the code to emulate a USB keyboard and send keystrokes to a host computer.
- Implement the code to emulate a USB mouse and send movement and click reports.
- Create a simple composite device that acts as both a keyboard and a mouse.
Introduction
Following our exploration of USB Mass Storage, we now turn to another ubiquitous USB device class: the Human Interface Device (HID). This class is the foundation for nearly every peripheral you use to interact with a computer, including keyboards, mice, gamepads, and joysticks. The primary advantage of the HID class is that it is standardized to the point where operating systems have built-in drivers, making HID devices “plug and play.”
For an embedded developer, harnessing the power of HID on an ESP32 opens up a vast array of creative possibilities. You can design custom input devices like macro keypads for productivity, specialized controllers for simulators, accessibility aids for users with disabilities, or even devices that automate tasks by injecting keyboard and mouse commands into a host system.
As with the previous chapter, this capability is exclusive to the ESP32-S2 and ESP32-S3 variants, which possess the necessary USB On-The-Go (OTG) hardware. We will continue to use the versatile TinyUSB library integrated within ESP-IDF to abstract the low-level USB protocol complexities.
Theory
USB Human Interface Device (HID) Class
The HID class was designed to be a flexible, low-latency protocol for devices that provide input to or receive output from humans. Unlike the high-throughput bulk transfers of the Mass Storage Class, HID typically relies on Interrupt Endpoints.
An Interrupt Endpoint allows a device to send small amounts of data to the host at regular, polled intervals. This is perfect for HID, where a keystroke or a small mouse movement needs to be reported quickly and reliably, but the volume of data is not large. The host polls the device (e.g., every 10 milliseconds), and if the device has a new report to send (like a key being pressed), it sends it during that polling interval.
The HID Report Descriptor: The Device’s Blueprint
The single most important and often most complex concept in HID is the Report Descriptor. Before a host can use an HID device, it must understand what the device is and how its data is structured. The Report Descriptor is a block of specialized bytecode that the device provides to the host during the enumeration process.
Think of the Report Descriptor as a detailed form or blueprint that describes the device’s capabilities. It defines every piece of data the device can send or receive.
For example, a keyboard’s Report Descriptor would state:
- “I am a keyboard.”
- “I can report the state of modifier keys like Ctrl, Shift, and Alt (8 bits).”
- “I can report up to 6 simultaneous standard key presses.”
A mouse’s Report Descriptor would state:
- “I am a mouse.”
- “I have 3 buttons (reported in 1 byte).”
- “I will report relative X and Y movement (as signed 8-bit integers).”
- “I have a vertical scroll wheel.”
%%{ init: { 'theme': 'base', 'themeVariables': { 'fontFamily': 'Open Sans' } } }%%
sequenceDiagram
    participant Host
    participant Device

    Host->>Device: Device Connected (VBUS Power)
    Device-->>Host: Announce Presence (Pull-up on D+)

    Host->>Device: Get Device Descriptor
    Device-->>Host: Respond with Device Info (VID, PID)

    Host->>Device: Set Address
    Device-->>Host: Acknowledge

    Host->>Device: Get Configuration Descriptor
    Device-->>Host: Respond with Interfaces (e.g., 1 HID Interface)

    Host->>Device: Get HID Report Descriptor
    Device-->>Host: Respond with Blueprint (e.g., "I am a keyboard, I have these keys")

    Host->>Host: Parse Report Descriptor
    Host->>Host: Load Generic HID Driver

    Note over Host,Device: Enumeration Complete! Host is ready.

    loop Polling Loop (e.g., every 10ms)
        Host->>Device: Poll Interrupt IN Endpoint ("Anything to report?")
        alt Device has data (e.g., key pressed)
            Device-->>Host: Send HID Report
        else No new data
            Device-->>Host: NAK (No data to send)
        end
    end
Fortunately, TinyUSB provides default Report Descriptors for common devices like a generic keyboard and mouse, so you often don’t need to write them from scratch unless you are creating a highly custom device.
HID Reports
Once the host understands the device’s blueprint (the Report Descriptor), the device can start sending data. This data is sent in packets called HID Reports. The structure of each report must perfectly match the format defined in the Report Descriptor.
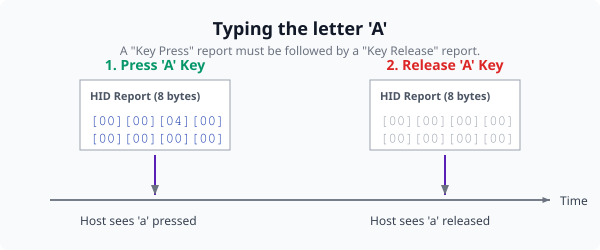
For a standard keyboard, a report is an 8-byte array:
| Byte Index | Content | Description |
|---|---|---|
| Byte 0 | Modifier Keys | A bitmask representing the state of modifier keys. Each bit corresponds to a key.
Bit 0: L_CTRL, Bit 1: L_SHIFT, Bit 2: L_ALT, Bit 3: L_GUI Bit 4: R_CTRL, Bit 5: R_SHIFT, Bit 6: R_ALT, Bit 7: R_GUI |
| Byte 1 | Reserved | This byte is reserved for OEM use and should be set to 0. |
| Bytes 2-7 | Keycode Array | An array that can hold up to 6 simultaneous key presses. Each byte contains the HID keycode for one key. If fewer than 6 keys are pressed, the remaining bytes are 0. A report of all zeros signifies that all keys are released. |
To signal a key press, the device sends a report with the corresponding keycode. To signal a key release, it must send another report with that keycode removed (or an all-zero report if no other keys are pressed). If you fail to send the release report, the host will think the key is stuck down!
Variant Notes: USB-OTG Peripheral
The requirements for HID are identical to those for MSC.
- ESP32-S2 & ESP32-S3: Supported. Their full-speed USB-OTG peripheral is essential for implementing custom HID devices.
- Original ESP32: Not Supported. Lacks the required USB hardware.
- ESP32-C3, ESP32-C6, ESP32-H2: Not Supported for custom HID. Their USB Serial/JTAG controller cannot be configured to act as a generic HID keyboard or mouse.
You must use an ESP32-S2 or ESP32-S3 development board for the examples in this chapter.
Practical Examples
Example 1: USB Keyboard Macro Pad
Let’s create a simple macro pad. When a button connected to the ESP32 is pressed, it will type the string “Hello from ESP32!” into the host computer.
1. Project Setup and Configuration
- Create a new ESP-IDF project in VS Code.
- Open the ESP-IDF Configuration Editor (
menuconfig). - Navigate to
Component config->TinyUSB Stack.- Set the
USB Device VIDandPIDto unique values for your device. - Under
TinyUSB Main configuration, setUSB Device product nameto “ESP32-S3 Keyboard”. - Under
(Top)->Component config->TinyUSB Stack->CDC, disableCommunication Device Class (CDC). - Under
(Top)->Component config->TinyUSB Stack->HID, enableHuman Interface Device (HID). - Set
Number of HID deviceto1. - Set
HID interface protocoltoKEYBOARD.
- Set the
2. Writing the Application Code (main.c)
This code configures a GPIO pin as an input for our button and sends a sequence of keyboard reports when it’s pressed.
#include <stdio.h>
#include "freertos/FreeRTOS.h"
#include "freertos/task.h"
#include "esp_log.h"
#include "driver/gpio.h"
#include "tinyusb.h"
#include "class/hid/hid_device.h"

static const char *TAG = "HID_KEYBOARD_EXAMPLE";

#define BUTTON_GPIO GPIO_NUM_0 // Use BOOT button on most dev boards

// Array of HID keycodes to be sent
const uint8_t keycodes[] = {
    HID_KEY_H, HID_KEY_E, HID_KEY_L, HID_KEY_L, HID_KEY_O,
    HID_KEY_SPACE,
    HID_KEY_F, HID_KEY_R, HID_KEY_O, HID_KEY_M,
    HID_KEY_SPACE,
    HID_KEY_E, HID_KEY_S, HID_KEY_P, HID_KEY_3, HID_KEY_2, HID_KEY_EXCLAMATION
};

void app_main(void)
{
    // Configure the button GPIO
    gpio_set_direction(BUTTON_GPIO, GPIO_MODE_INPUT);
    gpio_set_pull_mode(BUTTON_GPIO, GPIO_PULLUP_ONLY);

    ESP_LOGI(TAG, "Initializing TinyUSB for HID Keyboard");
    const tinyusb_config_t tusb_cfg = {
        .device_descriptor = NULL,
        .string_descriptor = NULL,
        .external_phy = false,
        .configuration_descriptor = NULL, // Will use the descriptor from menuconfig
    };
    ESP_ERROR_CHECK(tinyusb_driver_install(&tusb_cfg));
    ESP_LOGI(TAG, "USB HID device initialized");

    while (1) {
        // Wait for button press (active low)
        if (gpio_get_level(BUTTON_GPIO) == 0) {
            ESP_LOGI(TAG, "Button pressed, sending text...");

            // Wait until the host is ready to receive reports
            while (!tud_hid_ready()) {
                vTaskDelay(pdMS_TO_TICKS(10));
            }

            // Press and release each key in the sequence
            for (size_t i = 0; i < sizeof(keycodes); i++) {
                uint8_t keycode[6] = {0};
                keycode[0] = keycodes[i];

                // Send key press report
                tud_hid_keyboard_report(HID_ITF_PROTOCOL_KEYBOARD, 0, keycode);
                vTaskDelay(pdMS_TO_TICKS(50)); // Small delay between press and release

                // Send key release report (all zeros)
                tud_hid_keyboard_report(HID_ITF_PROTOCOL_KEYBOARD, 0, NULL);
                vTaskDelay(pdMS_TO_TICKS(50)); // Small delay between characters
            }
             // Wait for button to be released
            while(gpio_get_level(BUTTON_GPIO) == 0) {
                vTaskDelay(pdMS_TO_TICKS(100));
            }
        }
        vTaskDelay(pdMS_TO_TICKS(10));
    }
}
3. Build, Flash, and Observe
- Connect your ESP32-S2/S3 board via its native USB port.
- Build and flash the project.
- Open a text editor on your computer (e.g., Notepad, VS Code).
- Press the
BOOTbutton (GPIO 0) on your ESP32 board. - Observe the text “Hello from ESP32!” being typed into the editor.
Example 2: USB Mouse Jiggler
Let’s create a device that moves the mouse in a small square to prevent the computer from going to sleep.
1. Project Setup and Configuration
- Open
menuconfig. - Navigate to
Component config->TinyUSB Stack->HID. - Change
HID interface protocoltoMOUSE. - Set
USB Device product nameto “ESP32-S3 Mouse”.
2. Writing the Application Code (main.c)
This code runs in a continuous loop, sending mouse movement reports to the host.
#include <stdio.h>
#include "freertos/FreeRTOS.h"
#include "freertos/task.h"
#include "esp_log.h"
#include "tinyusb.h"
#include "class/hid/hid_device.h"

static const char *TAG = "HID_MOUSE_EXAMPLE";

void app_main(void)
{
    ESP_LOGI(TAG, "Initializing TinyUSB for HID Mouse");
    const tinyusb_config_t tusb_cfg = {
        .device_descriptor = NULL,
        .string_descriptor = NULL,
        .external_phy = false,
        .configuration_descriptor = NULL, // Will use the descriptor from menuconfig
    };
    ESP_ERROR_CHECK(tinyusb_driver_install(&tusb_cfg));
    ESP_LOGI(TAG, "USB HID device initialized");

    int8_t const move_delta = 5;

    while (1) {
        // Wait until the host is ready
        if (tud_hid_ready()) {
            ESP_LOGI(TAG, "Moving mouse...");
            // Move right
            tud_hid_mouse_report(HID_ITF_PROTOCOL_MOUSE, 0, move_delta, 0, 0, 0);
            vTaskDelay(pdMS_TO_TICKS(500));

            // Move down
            tud_hid_mouse_report(HID_ITF_PROTOCOL_MOUSE, 0, 0, move_delta, 0, 0);
            vTaskDelay(pdMS_TO_TICKS(500));

            // Move left
            tud_hid_mouse_report(HID_ITF_PROTOCOL_MOUSE, 0, -move_delta, 0, 0, 0);
            vTaskDelay(pdMS_TO_TICKS(500));

            // Move up
            tud_hid_mouse_report(HID_ITF_PROTOCOL_MOUSE, 0, 0, -move_delta, 0, 0);
            vTaskDelay(pdMS_TO_TICKS(500));
        }
    }
}
3. Build, Flash, and Observe
- Connect your ESP32-S2/S3 board via its native USB port.
- Build and flash the project.
- After reset, your computer should detect a new mouse.
- Observe your mouse cursor moving on the screen in a small square pattern every two seconds.
Common Mistakes & Troubleshooting Tips
| Mistake / Issue | Symptom(s) | Troubleshooting / Solution |
|---|---|---|
| Stuck or Repeating Keys/Clicks | A character types endlessly (aaaaaaaaa…). Mouse cursor keeps moving in one direction. A mouse button seems stuck down. | You sent a “press” report but never sent a corresponding “release” report. The host OS thinks the action is still happening.
Solution: After sending a report with a keycode or mouse button pressed, you must send another report with that key/button set to zero. tud_hid_keyboard_report(…, 0, keycode); tud_hid_keyboard_report(…, 0, NULL); // Release |
| “Unknown Device” Error | Windows shows a “USB device not recognized” error. macOS or Linux may show similar “device malfunctioned” messages. | This is almost always an issue with the HID Report Descriptor. The blueprint you provided to the host is invalid or doesn’t match the reports you’re sending.
Solution: 1. For simple devices, ensure the correct protocol is set in menuconfig (e.g., KEYBOARD or MOUSE). 2. If using a custom descriptor, validate it with an online tool. 3. For composite devices, ensure the configuration descriptor, interface numbers, and report descriptor are all consistent. |
| Device Works Intermittently | Keystrokes are missed. Mouse movements are jerky or stop and start. The device seems to work for a bit and then fails. | The ESP32 is trying to send an HID report before the host is ready to receive it. The USB bus may be busy or enumeration might not be fully complete.
Solution: Always wrap your report-sending code in a check to see if the interface is ready. if (tud_hid_ready()) { … } Or, use a while loop to wait: while (!tud_hid_ready()) { vTaskDelay(10); } |
| Wrong Characters Typed | You send the keycode for ‘!’ but get ‘/’ or another character. | This is a keyboard layout mismatch. The HID keycodes are based on a standard US QWERTY layout. If the host computer’s OS is set to a different layout (e.g., UK, German), it will interpret the keycodes differently.
Solution: There is no simple code fix. The device sends a “key location,” and the OS decides what character that is. For custom devices, you may need to create a mapping or instruct the user to set their OS keyboard layout to US. |
Exercises
- Keyboard with Modifiers: Modify the keyboard example to type a capital ‘H’. This requires sending a report that includes both the
HID_KEY_Hkeycode and theHID_KEY_MOD_LSHIFTmodifier bit in the first byte of the report. - Mouse with Clicks: Modify the mouse jiggler to perform a left-click after it completes its square movement. The
tud_hid_mouse_report()function takes a bitmask for button presses as its second argument (MOUSE_BUTTON_LEFT). Remember to send a separate report with the button released. - Composite Device (Keyboard & Mouse): This is more advanced. In
menuconfig, setHID interface protocoltoNONE (custom). You will then need to provide your own custom HID report descriptor that describes both a keyboard and a mouse. You will also need to use the more generictud_hid_n_report()function, specifying the report ID for the keyboard or mouse report you wish to send. - Volume Knob: Create a device that acts as a multimedia controller. Connect a rotary encoder to the ESP32. When the encoder is turned clockwise, send the “Volume Up” consumer keycode. When turned counter-clockwise, send “Volume Down.” This requires modifying the HID descriptor to include the “Consumer” usage page and sending consumer reports with
tud_hid_consumer_report().
Summary
- The USB HID class provides a standardized, driverless protocol for input devices like keyboards and mice.
- The HID Report Descriptor is a critical blueprint the device gives the host to describe its capabilities and data format.
- HID devices typically use Interrupt Endpoints for low-latency communication.
- Data is sent in HID Reports, which must match the structure defined in the descriptor.
- TinyUSB provides simple functions like
tud_hid_keyboard_report()andtud_hid_mouse_report()to easily send standard reports. - Custom HID functionality is only possible on ESP32-S2 and ESP32-S3 variants.
- Always remember to send a “release” report after a key press or mouse click to avoid “stuck” inputs.
Further Reading
- ESP-IDF TinyUSB HID Documentation: Espressif TinyUSB API Guide for HID
- USB.org HID Information: Official HID Specification Documents from usb.org
- Online HID Descriptor Tool: A useful tool for creating and visualizing custom HID report descriptors. A web search for “USB HID Descriptor Tool” will yield several good options.
