
Chapter 254: ESP32-C3 Architecture (RISC-V Based)
Chapter Objectives
By the end of this chapter, you will be able to:
- Describe the single-core RISC-V CPU architecture of the ESP32-C3.
- Explain the significance of Espressif adopting the RISC-V open standard.
- Detail the C3’s connectivity features, including Wi-Fi 4 and Bluetooth 5 LE.
- Understand the C3’s target applications as a secure, cost-effective IoT node.
- Recognize the programming implications of moving from Xtensa to RISC-V.
- Identify the C3’s key security features and I/O limitations.
Introduction
In our journey through the ESP32 variants, we now encounter a pivotal moment in the family’s evolution: the ESP32-C3. This System-on-Chip marks Espressif’s first major foray into the world of RISC-V, an open-standard instruction set architecture (ISA). Unlike the proprietary Xtensa cores used in the original, S2, and S3 variants, RISC-V is a free and open standard, fostering a global community of innovation and collaboration.
The ESP32-C3 is not designed to be a powerhouse like the S3. Instead, it’s a highly optimized, secure, and cost-effective solution aimed at the vast number of applications that require reliable connectivity and robust security without the need for multiple cores or a vast peripheral set. It is often seen as the modern, more secure successor to the legendary ESP8266, providing a low-cost entry point into the ESP32 ecosystem with the latest connectivity standards. This chapter will explore the architecture of this efficient little chip and what its RISC-V core means for you as a developer.
Theory
The ESP32-C3’s design philosophy is centered on efficiency, security, and value. This is reflected in every aspect of its architecture.
1. CPU Architecture: A Shift to RISC-V
The single most important feature of the C3 is its processor. It moves away from the Xtensa architecture entirely.
%%{init: {'theme': 'base', 'themeVariables': {'fontFamily': 'Open Sans, sans-serif'}}}%%
graph TD
    subgraph "Proprietary ISA (e.g., Xtensa)"
        A{"<b>Core Design</b><br>by 3rd Party<br><i>(e.g., Tensilica)</i>"} --> B(Espressif Licenses Core);
        B --> C{<b>Black Box</b><br>Limited Customization};
        C --> D[ESP32 / S2 / S3];
    end

    subgraph "Open-Standard ISA (RISC-V)"
        E{<b>Open Specification</b><br>Managed by RISC-V Int'l} --> F(Espressif Designs/Extends Core);
        F --> G{<b>Full Control</b><br>Flexibility & No Licensing Fees};
        G --> H[ESP32-C3 / C6 / H2];
    end

    subgraph "Benefits for Ecosystem & Espressif"
        I(Innovation & Collaboration)
        J(No Vendor Lock-in)
        K(Growing Toolchain Support)
    end

    G -.-> I;
    G -.-> J;
    G -.-> K;

    %% Styling %%
    classDef prop fill:#FEE2E2,stroke:#DC2626,stroke-width:1px,color:#991B1B;
    classDef open fill:#D1FAE5,stroke:#059669,stroke-width:1px,color:#065F46;
    classDef benefit fill:#FEF3C7,stroke:#D97706,stroke-width:2px,color:#92400E;

    class A,B,C,D prop;
    class E,F,G,H open;
    class I,J,K benefit;
- Single-Core RISC-V (RV32IMC) CPU: The C3 is built around a 32-bit single-core RISC-V CPU that can run at up to 160 MHz. The “RV32IMC” designation specifies its capabilities:
- RV32I: The base integer instruction set.
- M: Standard extension for integer multiplication and division.
- C: Standard extension for compressed instructions, which reduces code size.
- Why RISC-V? Adopting an open-standard ISA means Espressif is not dependent on a single third-party core designer. It allows them to freely customize and extend the core for future designs and benefits from a growing global ecosystem of tools, compilers, and expertise. For the developer, while high-level ESP-IDF code remains the same, this architectural change is fundamental.
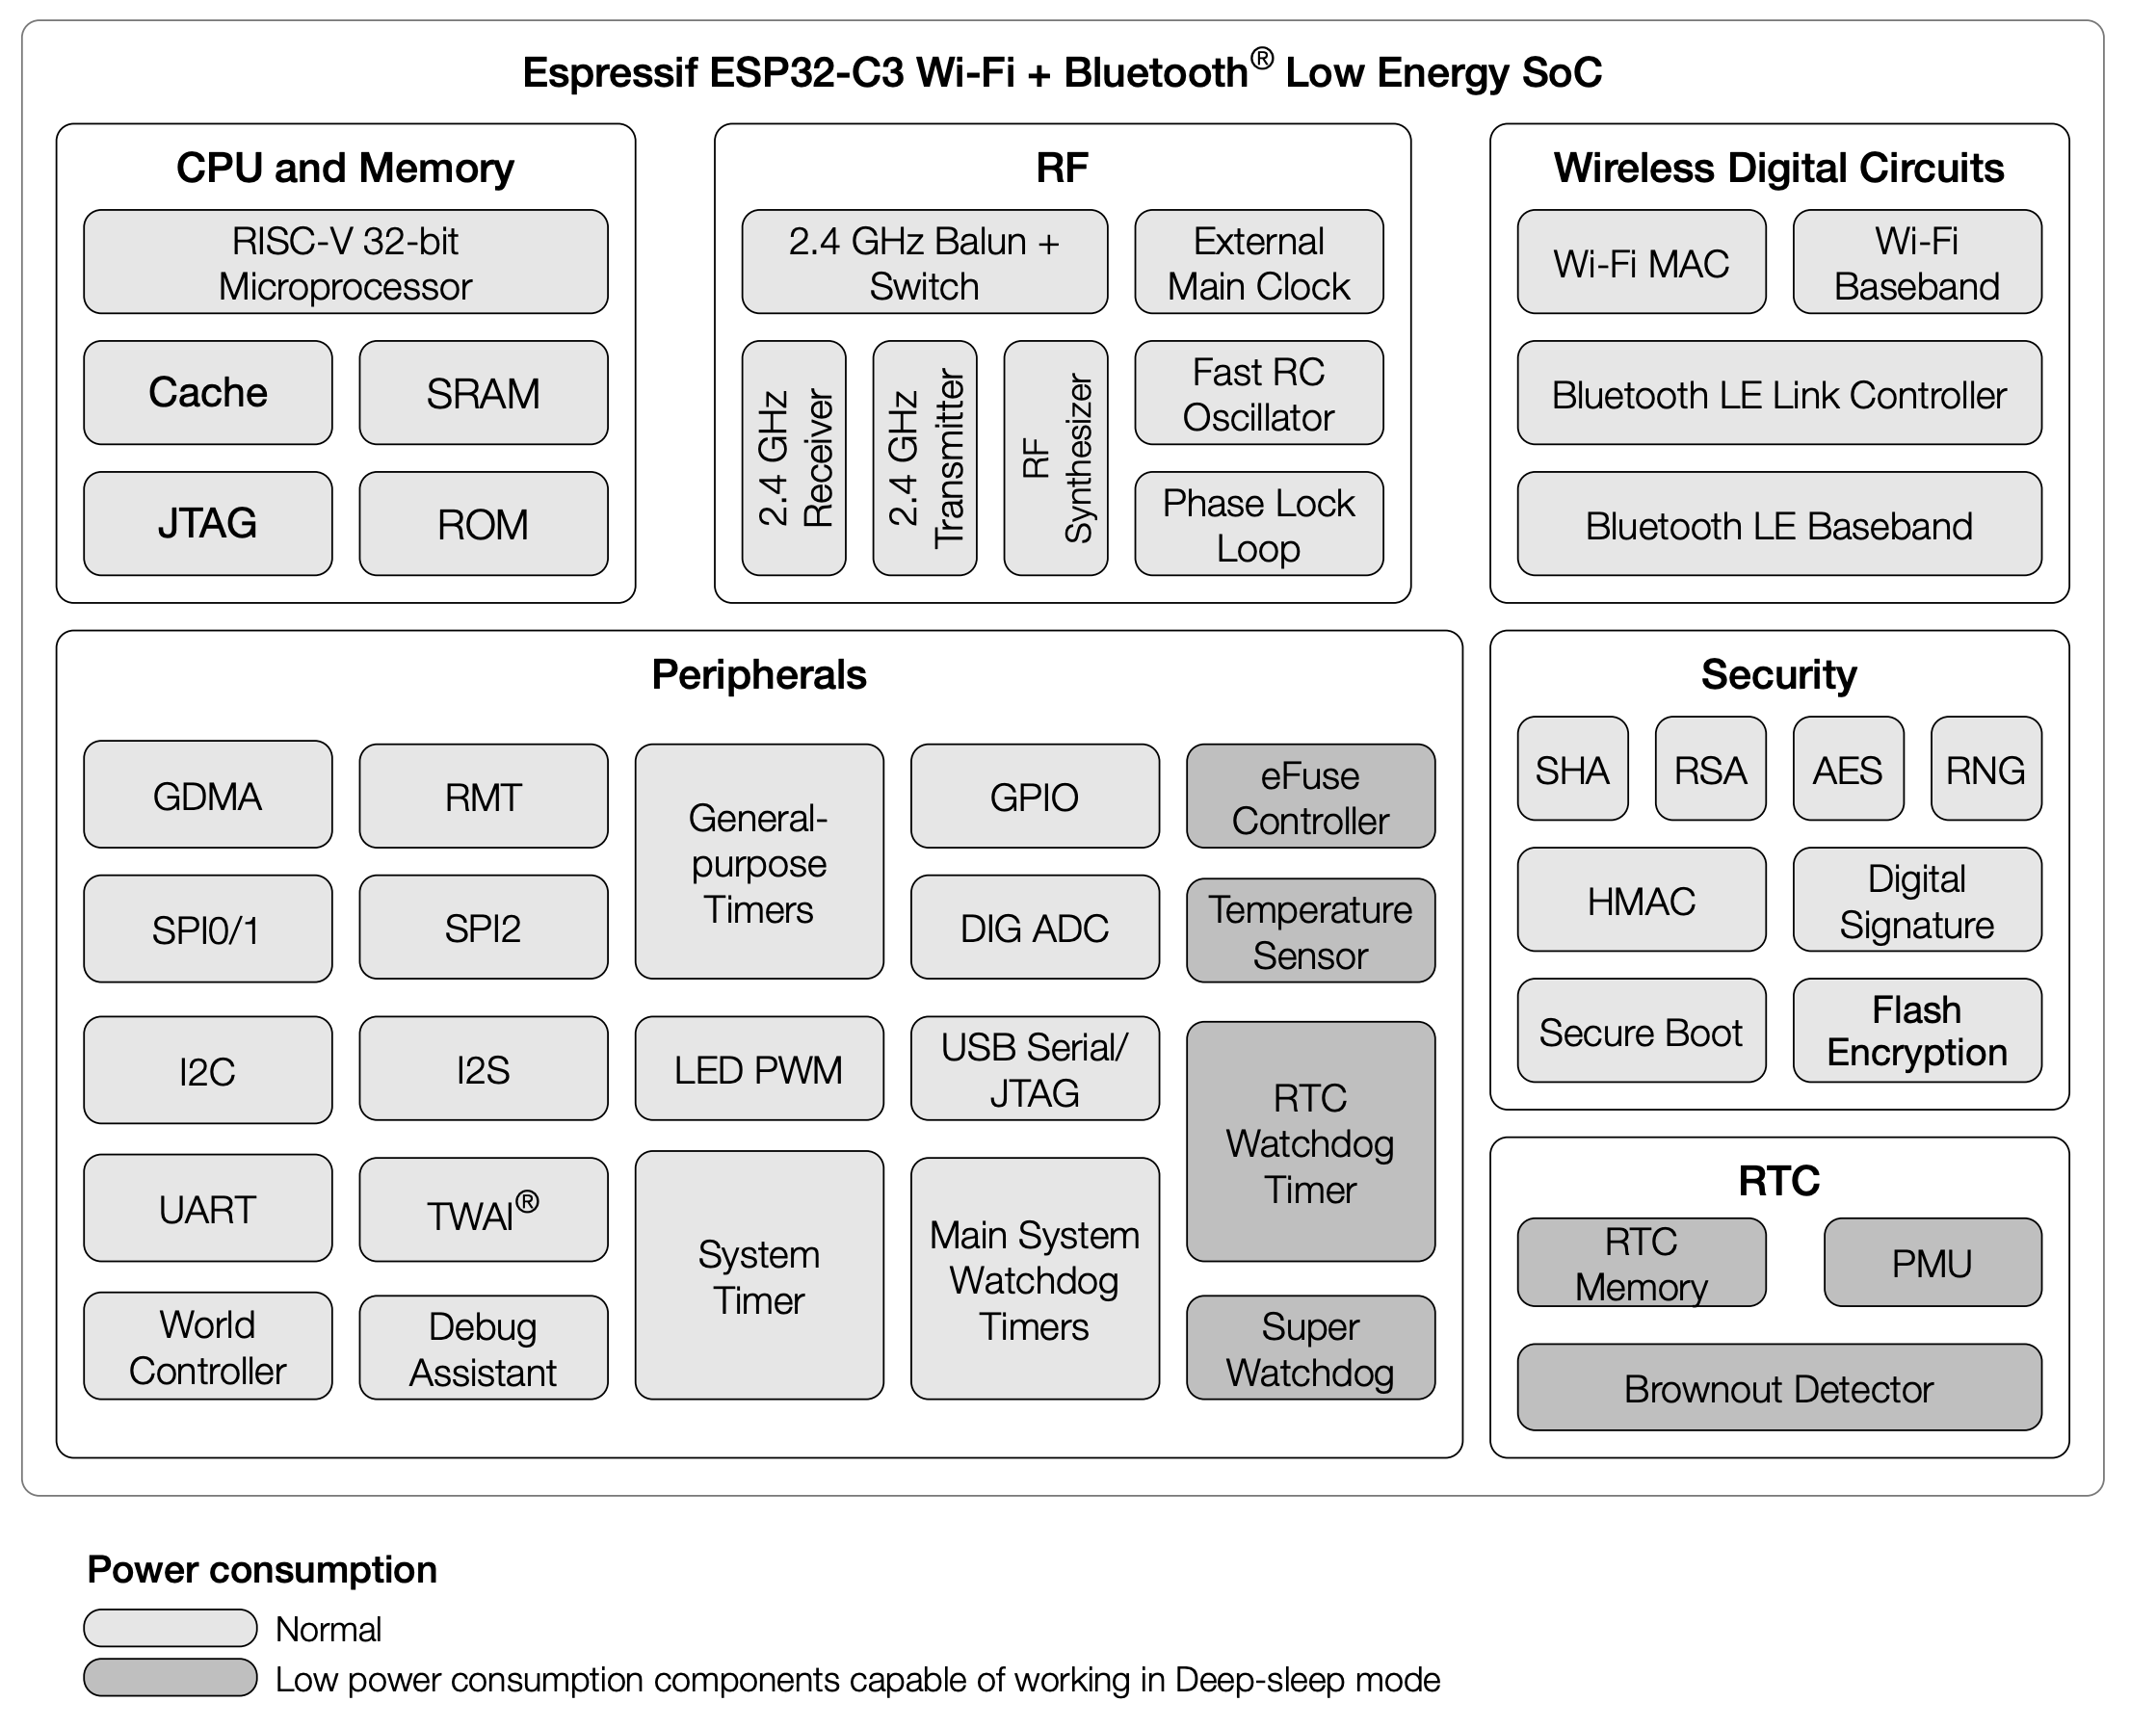
2. Connectivity: Modern and Efficient
The C3 is equipped with the two most important wireless protocols for modern IoT devices.
- Wi-Fi 4 (802.11 b/g/n): Provides standard, reliable Wi-Fi connectivity.
- Bluetooth 5 (LE): The C3 includes a full-featured Bluetooth 5 Low Energy radio. This is a significant advantage over the ESP8266 and makes it perfect for applications involving device provisioning, beacons, or communication with low-power sensors and smartphones. It supports features like extended advertising and the 2Mbps PHY for higher throughput.
3. Memory and I/O: Lean and Focused
To achieve its cost target, the C3 has a more constrained set of memory and I/O resources.
- Memory: It contains 400 KB of on-chip SRAM and 384 KB of ROM. This is ample for a wide range of IoT applications that are not performing memory-intensive tasks like graphics processing.
- GPIO: The C3 has a much smaller pin count than the S-series, offering up to 22 GPIO pins. This is a critical consideration during hardware design and makes it unsuitable for products requiring a large number of wired connections.
- No Native USB: Like the original ESP32, the C3 does not have a native USB OTG controller. It relies on an external USB-to-UART bridge chip on the development board for programming and serial logging.
4. A Strong Security Foundation
Despite being a low-cost variant, the C3 does not compromise on security. It inherits many of the advanced security features from the more expensive S-series.
- Secure Boot: Ensures that the device only boots authentic, signed firmware.
- Flash Encryption: Protects the application code stored in external flash from being read out.
- Digital Signature (DS) Peripheral: The hardware accelerator for creating secure digital signatures, allowing the device to prove its identity to a cloud service.
- World Controller: A peripheral that allows for creating isolated execution environments for enhanced security.
Practical Examples
The beauty of the ESP-IDF is how it abstracts the underlying CPU architecture. A “Hello World” program for the C3 looks identical to one for an Xtensa-based chip at the C-code level. The key is in the project configuration and the toolchain that compiles the code.
Example 1: RISC-V “Hello World”
This example confirms we are running on a C3 and demonstrates that our familiar ESP-IDF functions work perfectly on the new architecture.
1. Code: Create a new project in VS Code, ensuring you select ESP32-C3 as the target. The main.c file is straightforward.
#include <stdio.h>
#include "freertos/FreeRTOS.h"
#include "freertos/task.h"
#include "esp_log.h"
#include "esp_chip_info.h"

static const char *TAG = "C3_TEST";

void app_main(void)
{
    ESP_LOGI(TAG, "Hello from the RISC-V World!");

    // This code is portable across ESP32 variants
    esp_chip_info_t chip_info;
    esp_chip_info(&chip_info);

    ESP_LOGI(TAG, "This is an %s chip with %d CPU core(s), WiFi%s%s, ",
             CONFIG_IDF_TARGET,
             chip_info.cores,
             (chip_info.features & CHIP_FEATURE_WIFI_BGN) ? "/b/g/n" : "",
             (chip_info.features & CHIP_FEATURE_WIFI_AX) ? "/ax" : "");

    ESP_LOGI(TAG, "silicon revision %d, ", chip_info.revision);

    ESP_LOGI(TAG, "%dMB %s flash", spi_flash_get_chip_size() / (1024 * 1024),
             (chip_info.features & CHIP_FEATURE_EMB_FLASH) ? "embedded" : "external");

    ESP_LOGI(TAG, "Minimum free heap size: %d bytes", esp_get_minimum_free_heap_size());
}
2. Build and Flash:
- Connect your ESP32-C3 board.
- Use the standard “ESP-IDF: Build, Flash and Monitor” command. Behind the scenes, VS Code will invoke the RISC-V toolchain (compilers, assemblers, and linkers) instead of the Xtensa toolchain.
3. Observe:
The monitor output will clearly identify the chip as an ESP32-C3 with a single RISC-V core.
I (291) C3_TEST: Hello from the RISC-V World!
I (291) C3_TEST: This is an esp32c3 chip with 1 CPU core(s), WiFi/b/g/n,
I (301) C3_TEST: silicon revision 3,
I (311) C3_TEST: 4MB external flash
I (311) C3_TEST: Minimum free heap size: 345678 bytes
Variant Notes
The ESP32-C3 establishes a new category in the Espressif lineup, focused on high-volume, cost-sensitive applications.
| Feature / Variant | ESP32-S3 | ESP32-C3 | ESP32-C6 |
|---|---|---|---|
| CPU Core | Dual-Core Xtensa LX7 | Single-Core RISC-V | Single-Core RISC-V |
| CPU Speed | 240 MHz | 160 MHz | 160 MHz |
| AI Acceleration | Yes (Vector Instr.) | No | No |
| Connectivity | Wi-Fi 4 + BLE 5 | Wi-Fi 4 + BLE 5 | Wi-Fi 6 + BLE 5 + 802.15.4 |
| USB | Yes (OTG) | No | No |
| GPIOs (Max) | ~45 | ~22 | ~30 |
| Primary Focus | AIoT, Rich HMI | Cost-Effective, Secure Node | Next-Gen Connectivity (Matter) |
Common Mistakes & Troubleshooting Tips
| Mistake / Issue | Symptom(s) | Troubleshooting / Solution |
|---|---|---|
| Using Xtensa-Specific Code | Code using __asm__ or Xtensa intrinsics fails to compile with errors about unknown instructions. | Stick to portable ESP-IDF APIs. If low-level code is necessary, it must be rewritten using RISC-V assembly/intrinsics. Avoid architecture-specific code unless absolutely required. |
| Trying to Pin Task to Core 1 | Runtime error, abort, or assertion failure when calling xTaskCreatePinnedToCore with xCoreID = 1. | Only Core 0 exists. Use the standard xTaskCreate function. For the C3, any task pinning must target core 0. |
| Running out of GPIOs | During hardware design, you discover there aren’t enough pins for all required components (SPI, I2C, buttons, etc.). | Plan your pinout first. Carefully budget your ~22 available GPIOs before committing to the C3. If more I/O is needed, consider an S-series variant or a GPIO expander IC. |
Exercises
- Code Porting Challenge: Take the dual-core parallel processing example from Chapter 251. Your task is to modify it so that it compiles and runs correctly on the ESP32-C3. This will involve removing the second task and all calls to
xTaskCreatePinnedToCore. This demonstrates how to adapt multi-core code for a single-core environment. - Secure BLE Beacon: Write an application that turns the ESP32-C3 into a simple BLE beacon. It should advertise a device name like “C3_Secure_Sensor” and a manufacturer-specific data field containing a simulated temperature reading that updates every 5 seconds. This is a classic C3 application.
- GPIO Budgeting: Design a schematic or pinout table for a small weather station project using an ESP32-C3. The project requires:
- An I2C connection for a BME280 sensor (SDA, SCL).
- A UART connection for a GPS module (TX, RX).
- A single GPIO for a status LED.
- A single GPIO for a user input button.Calculate the total number of GPIOs needed and assign them to valid pins on the C3. This exercise highlights the importance of resource planning.
Summary
- The ESP32-C3 represents a major architectural shift to the open-standard RISC-V ISA, using a single-core RV32IMC CPU.
- It is optimized for cost-effective, high-volume IoT applications.
- It combines modern connectivity with Wi-Fi 4 and Bluetooth 5 LE.
- Despite its low cost, it features a strong security suite, including Secure Boot and Flash Encryption.
- It has significant I/O constraints compared to other variants, with only ~22 GPIO pins and no native USB.
- The ESP-IDF abstracts away most architectural differences, allowing for a smooth development experience, but low-level code is not portable from Xtensa.
Further Reading
- ESP32-C3 Technical Reference Manual: The official and complete hardware documentation.
- Espressif Blog: “Why We Switched to RISC-V for ESP32-C3”: A great article explaining the company’s strategy and the benefits of the new architecture. (A web search for this title will find it).
- RISC-V International: The official organization for the RISC-V standard.
