
Chapter 249: ESP-IDF Component Testing Framework
Chapter Objectives
By the end of this chapter, you will be able to:
- Understand the principles and importance of unit testing in embedded firmware development.
- Describe the architecture of the ESP-IDF testing framework, which is based on Unity.
- Write, register, and organize test cases for custom components.
- Use the
idf.pycommand-line tool to build, flash, and run tests on a target device. - Interpret test results from the serial monitor output.
- Recognize and troubleshoot common issues encountered when writing and running tests.
Introduction
As our projects grow in complexity, so does the risk of introducing bugs. A small change in one part of the code can have unintended and disastrous consequences elsewhere. In an embedded system, where software is intimately tied to hardware, these bugs can be particularly difficult to find and fix. Manually re-testing every feature after every change is tedious, time-consuming, and prone to human error.
To solve this, professional software development relies on automated testing. The ESP-IDF provides a powerful, integrated testing framework that allows you to write formal, repeatable tests for your code components. By building a suite of tests, you create a safety net that verifies your code’s correctness automatically. This chapter will teach you how to leverage this framework to build more reliable, maintainable, and robust ESP32 applications.
Theory
The ESP-IDF testing framework is built upon a popular open-source testing framework for C called Unity. It enables a practice known as unit testing, where individual “units” of code (typically functions or modules) are tested in isolation to verify they behave as expected.
1. What is a Test Case?
A test case is a C function designed to test a single, specific aspect of a unit’s behavior. For example, if you have a function int add(int a, int b), you might have several test cases:
- A test for adding two positive numbers.
- A test for adding a positive and a negative number.
- A test for adding zero.
- A test for potential overflow conditions.
Inside a test case, you use special macros called assertions to check for expected outcomes.
2. The Unity Framework and Assertions
Unity provides a rich set of assertion macros to validate conditions. If an assertion passes, the test continues. If it fails, the test case stops immediately, is marked as failed, and the framework moves on to the next test.
All test cases are defined using the TEST_CASE macro. Here are some of the most common assertion macros:
| Assertion Macro | Checks If… | Example |
|---|---|---|
| TEST_ASSERT_EQUAL(a, b) | The two values are equal. Works for integers, pointers, etc. | TEST_ASSERT_EQUAL(5, add(2, 3)); |
| TEST_ASSERT_EQUAL_STRING(a, b) | The two null-terminated strings are identical. | TEST_ASSERT_EQUAL_STRING(“hi”, my_str); |
| TEST_ASSERT_TRUE(cond) | The condition cond evaluates to true. | TEST_ASSERT_TRUE(x > 0); |
| TEST_ASSERT_NOT_NULL(ptr) | The pointer ptr is not NULL. | char* m = malloc(10); TEST_ASSERT_NOT_NULL(m); |
| TEST_ASSERT_NULL(ptr) | The pointer ptr is NULL. | char* d = duplicate(NULL); TEST_ASSERT_NULL(d); |
| TEST_FAIL_MESSAGE(msg) | Always fails the test, printing a custom message. | TEST_FAIL_MESSAGE(“This should not happen.”); |
A simple test case function would look like this:
#include "unity.h"

// The function we want to test
int add(int a, int b) {
    return a + b;
}

// The test case
TEST_CASE("addition of two positive numbers", "[math]")
{
    TEST_ASSERT_EQUAL(5, add(2, 3));
    TEST_ASSERT_EQUAL(100, add(50, 50));
}
Notice the two arguments to TEST_CASE:
- Description: A string describing what the test does.
- Tags: A string in brackets (
[tag]) used to group related tests. You can run tests based on these tags.
3. Test Component Structure
In ESP-IDF, tests are organized within the component they are testing. You create a special test subdirectory inside your component’s folder. The build system recognizes this convention and knows to build the contents of this folder only when running tests.
my_project/
├── main/
│   └── main.c
├── components/
│   └── math_utils/
│       ├── include/
│       │   └── math_utils.h
│       ├── math_utils.c
│       ├── CMakeLists.txt
│       └── test/              <-- Test subdirectory
│           └── test_math_utils.c  <-- Test source file
└── CMakeLists.txt
%%{init: {'theme': 'base', 'themeVariables': { 'fontFamily': '"Open Sans", sans-serif'}}}%%
graph TD
    subgraph "Project Directory"
        direction LR
        subgraph "components/"
            direction TB
            subgraph "my_component (e.g., math_utils)"
                direction LR
                subgraph "Source"
                    A["math_utils.c<br>math_utils.h<br>CMakeLists.txt"]
                end
                subgraph "Tests"
                    B["test/test_math_utils.c"]
                end
            end
        end
    end

    B -- "Includes & Links To" --> A

    %% Styling
    classDef component fill:#DBEAFE,stroke:#2563EB,stroke-width:1px,color:#1E40AF
    classDef test fill:#FEF3C7,stroke:#D97706,stroke-width:1px,color:#92400E

    class A component
    class B test
4. Running Tests on Target
A key philosophy of the ESP-IDF framework is testing on the target hardware. This is crucial because code that works perfectly on a PC (the “host”) may fail on the ESP32 due to hardware differences, memory constraints, or peripheral interactions.
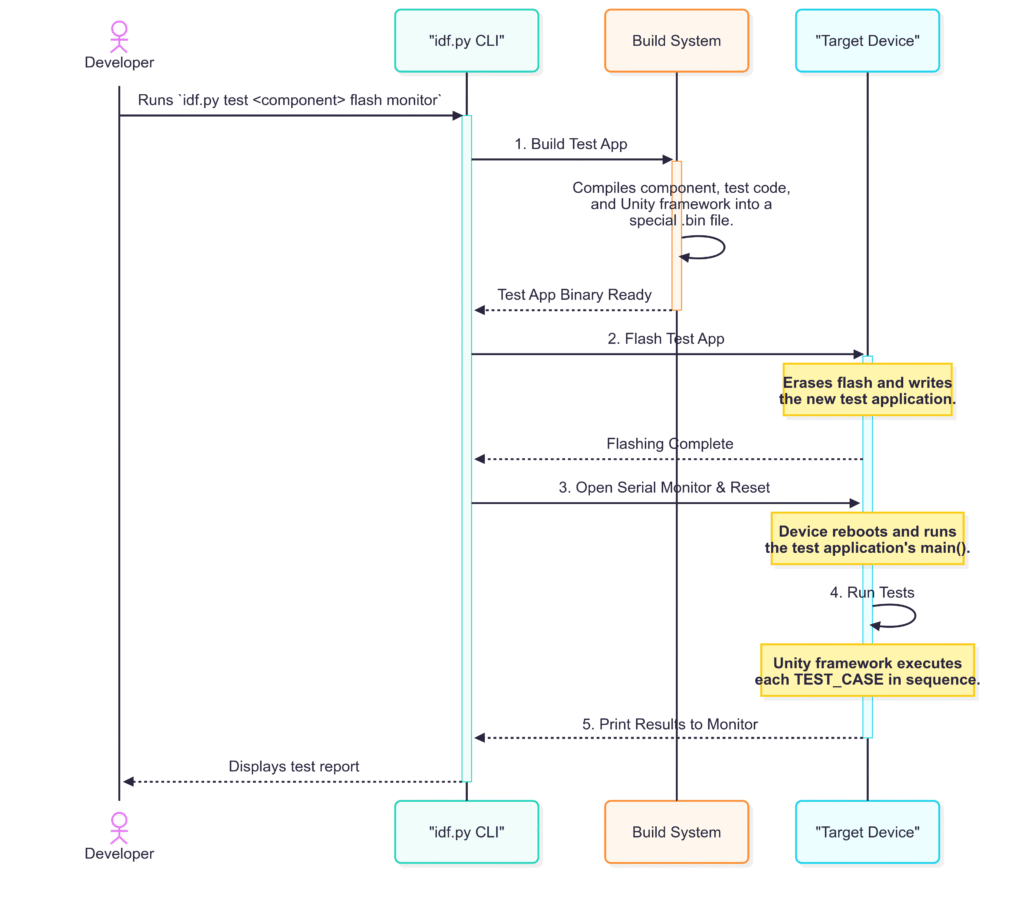
When you initiate a test build, the ESP-IDF creates a special, temporary application. This “test app” includes your component, the Unity framework, and the specific test code. It does not include the main function from your main project. Instead, it has its own main that acts as a test runner. This test app is then flashed to the ESP32, runs the tests, and prints the results to the serial monitor.

Practical Examples
Let’s create a simple component and then write a unit test for it.
%%{init: {'theme': 'base', 'themeVariables': { 'fontFamily': '"Open Sans", sans-serif'}}}%%
graph TD
    A(Start: Identify a function<br>or feature to test) --> B[1- Create test/test_*.c file<br>inside the component directory];
    B --> C[2- Write a TEST_CASE<br> - Give it a description and tag<br> - Call the function to be tested];
    C --> D[3- Add TEST_ASSERT... macros<br>to validate the results];
    D --> E{Does the test<br>allocate memory?};
    E -- Yes --> F["Add free() or use<br> tearDown() to prevent leaks"];
    E -- No --> G;
    F --> G[4- Register the test source file<br>in the component's CMakeLists.txt];
    G --> H[5- Run idf.py test command<br>to build, flash, and monitor];
    H --> I{Test Passed?};
    I -- No --> J[Debug the component code<br>or the test logic];
    J --> C;
    I -- Yes --> K(End: Test successful);

    %% Styling
    classDef start-node fill:#EDE9FE,stroke:#5B21B6,stroke-width:2px,color:#5B21B6;
    classDef process-node fill:#DBEAFE,stroke:#2563EB,stroke-width:1px,color:#1E40AF;
    classDef decision-node fill:#FEF3C7,stroke:#D97706,stroke-width:1px,color:#92400E;
    classDef check-node fill:#FEE2E2,stroke:#DC2626,stroke-width:1px,color:#991B1B;
    classDef endo-node fill:#D1FAE5,stroke:#059669,stroke-width:2px,color:#065F46;

    class A,K start-node;
    class B,C,D,F,G,H process-node;
    class E,I decision-node;
    class J check-node;
1. Create a Custom Component
First, we’ll create a component named string_utils with a function that duplicates a string.
- Inside your project, create the directory
components/string_utils/include. - Create the header file
components/string_utils/include/string_utils.h:
#pragma once
#include <stddef.h>

/**
 * @brief Duplicates a string using heap memory.
 * * @param str_in The input string to duplicate.
 * @return A pointer to the newly allocated string, or NULL on failure.
 * The caller is responsible for freeing this memory.
 */
char* string_utils_duplicate(const char* str_in);
- Create the source file
components/string_utils/string_utils.c:
#include <string.h>
#include <stdlib.h>
#include "string_utils.h"

char* string_utils_duplicate(const char* str_in)
{
    if (str_in == NULL) {
        return NULL;
    }
    size_t len = strlen(str_in) + 1; // +1 for null terminator
    char* str_out = malloc(len);
    if (str_out == NULL) {
        return NULL;
    }
    memcpy(str_out, str_in, len);
    return str_out;
}- Create the component’s build file
components/string_utils/CMakeLists.txt:idf_component_register(SRCS "string_utils.c" INCLUDE_DIRS "include")
2. Create the Test Case
Now, let’s add the test code.
- Create the test subdirectory:
components/string_utils/test. - Create the test source file
components/string_utils/test/test_string_utils.c:
#include <string.h>
#include "unity.h"
#include "string_utils.h" // The header for the code we are testing

TEST_CASE("duplicate a valid string", "[string_utils]")
{
    const char* source = "Hello, Unity!";
    char* duplicated_str = string_utils_duplicate(source);

    // Check that the duplication was successful
    TEST_ASSERT_NOT_NULL(duplicated_str);

    // Check that the content is identical
    TEST_ASSERT_EQUAL_STRING(source, duplicated_str);

    // Check that it's a new memory location
    TEST_ASSERT_NOT_EQUAL(source, duplicated_str);

    // IMPORTANT: Clean up allocated memory
    free(duplicated_str);
}

TEST_CASE("duplicate a NULL string", "[string_utils]")
{
    // The function should gracefully handle NULL input and return NULL
    char* duplicated_str = string_utils_duplicate(NULL);
    TEST_ASSERT_NULL(duplicated_str);
}
Tip: Always free any memory your test case allocates. A memory leak in a test is still a memory leak!
3. Register the Test with CMake
We need to tell the build system about our new test file.
- Open
components/string_utils/CMakeLists.txtand modify it:
idf_component_register(SRCS "string_utils.c"
                       INCLUDE_DIRS "include")

# --- Add this part for testing ---
# List all your test source files here.
set(TEST_SRCS test/test_string_utils.c)

# Register the test with the build system.
# The first argument is the component being tested.
idf_component_add_unit_test(string_utils "${TEST_SRCS}")
4. Build, Flash, and Run the Test
Now for the final step. We will use the idf.py command line.
- Open a new terminal in VS Code (
Terminal -> New Terminal). - Run the test command. Replace
(PORT)with your device’s serial port (e.g.,COM3or/dev/ttyUSB0).idf.py -p (PORT) test string_utils flash monitorLet’s break down this command:idf.py test: The main command to initiate a test build.string_utils: The specific component we want to test.flash: Instructs the tool to flash the resulting test app to the target.monitor: Opens the serial monitor to view the results.
After flashing, the test app will run, and you will see the Unity test report in the monitor:
...
Running test_string_utils...
I (314) test_string_utils: (1) "duplicate a valid string"
I (324) test_string_utils: (2) "duplicate a NULL string"
2 Tests 0 Failures 0 Ignored
OK
Variant Notes
The ESP-IDF Component Testing Framework itself is identical across all ESP32 variants (ESP32, S2, S3, C3, C6, H2). The idf.py test ... command works the same way for all of them.
The crucial difference lies in the behavior of the code being tested, especially when it interacts with hardware peripherals.
- A GPIO test written for an ESP32 may not work on an ESP32-C3 without modification, as the valid GPIO numbers differ.
- A TWAI (CAN) peripheral test will only run on variants that have that peripheral, like the ESP32. It will fail to build or run on an ESP32-C3.
- Timing-sensitive tests might behave differently due to the core architecture (Xtensa vs. RISC-V) or different clock speeds.
Best Practice: When writing tests for hardware-interacting components, use the test tags to specify the intended hardware. For example: TEST_CASE("Test TWAI feature", "[twai][esp32]"). This allows you to selectively run tests relevant to the connected chip.
Common Mistakes & Troubleshooting Tips
| Mistake / Issue | Symptom(s) | Troubleshooting / Solution |
|---|---|---|
| Forgetting to Register Test in CMake | The build completes, but the test command reports: No tests for component ‘my_component’ found. | Solution: Ensure the component’s CMakeLists.txt contains the idf_component_add_unit_test() function call pointing to your test source file(s). |
| Test Case Always Passes | A test runs and is marked “OK” even when the underlying function is clearly broken or returns a wrong value. | Solution: The TEST_CASE function is missing an assertion. Every test case must contain at least one TEST_ASSERT…() macro to actually check a condition. |
| Test Causes a Reboot (WDT) | The device suddenly reboots in the middle of a test run, and the log shows a “Watchdog timer expired” error. | Solution: The code being tested has a long-running loop or has crashed. Insert a vTaskDelay(1) inside long loops to yield to the scheduler and reset the watchdog. Debug to find potential crashes. |
| “Flaky” or Inconsistent Tests | A test passes on one run but fails on the next without any code changes. Often related to external factors. | Solution: Make tests self-contained. Do not rely on a Wi-Fi connection or an external sensor being present unless you explicitly configure it in a setUp() function and clean it up in a tearDown() function. |
Exercises
- Test for Failure: Add a new function to
string_utilscalledchar* string_utils_copy_safe(const char* src, char* dst, size_t dst_size). This function should copy a string but returnNULLif the destination buffer is too small. Write a new test case that asserts the function correctly returnsNULLwhen it’s supposed to fail. - Group with Tags: Create a new component called
calculatorwithaddandsubtractfunctions. Write four test cases:test_add,test_subtract,test_add_negative,test_subtract_negative. Tag the addition tests with[add]and the subtraction tests with[subtract]. Run only the[add]tests using the commandidf.py -p (PORT) test calculator -T "[add]" flash monitor. - Refactor with Setup/Teardown: In the
string_utilstest, notice that you might allocate and free memory in multiple tests. Refactor the tests to usesetUp()to allocate a resource before each test andtearDown()to free it afterward, reducing code duplication.
Summary
- Automated testing is vital for creating reliable and maintainable firmware.
- ESP-IDF uses the Unity framework for on-target unit testing.
- Tests are organized in a
testsub-directory within each component. - Test cases are C functions that use assertion macros (
TEST_ASSERT...) to validate code behavior. - Tests are registered in the component’s
CMakeLists.txtusingidf_component_add_unit_test. - The
idf.py testcommand builds and runs a dedicated test application on the target hardware, providing results over serial. - While the framework is variant-agnostic, the tests you write must account for hardware differences.
Further Reading
- ESP-IDF Unit Testing Documentation: https://docs.espressif.com/projects/esp-idf/en/v5.2.1/api-guides/unit-tests.html
- Unity Test Framework Documentation: http://www.throwtheswitch.org/unity
- CMake CTest Documentation (for advanced test orchestration): https://cmake.org/cmake/help/latest/manual/ctest.1.html
