
Chapter 296: Secure Data Collection Architectures
Chapter Objectives
By the end of this chapter, you will be able to:
- Understand the principle of “defense in depth” as it applies to IoT data security.
- Describe the three primary domains of a secure data pipeline: security at the source, in transit, and at the destination.
- Implement a secure, mutually authenticated TLS connection for MQTT communication.
- Leverage core ESP32 security features like Secure Boot and Flash Encryption to build a hardware root of trust.
- Explain how to protect sensitive data stored on the device (at rest) using NVS encryption.
- Recognize how advanced security features on newer ESP32 variants enhance the overall security posture.
Introduction
We have learned how to collect data, manage devices, and deploy updates. But all this effort is meaningless if the data pipeline is not secure. In an era where data breaches are common, a single vulnerability in an IoT system can have catastrophic consequences, leading to data theft, service disruption, or even physical safety hazards. An insecure medical device, smart lock, or industrial controller is not just a flawed product; it’s a dangerous liability.
Securing an IoT system is not about applying a single solution. It requires a holistic, multi-layered approach known as defense in depth. We must build security into every single stage of the data’s journey, from the moment it is read by a sensor on the ESP32 to the moment it is stored and processed in the cloud.
This chapter synthesizes many of the security concepts we’ve touched upon previously into a single, cohesive architecture. We will explore how to protect data at its source, secure it in transit, and ensure its integrity at its destination, creating a truly end-to-end secure data collection pipeline.
Theory
A secure data architecture is a chain of trust. If any link in the chain is weak, the entire system is compromised. We must therefore secure three distinct domains: the device itself (source), the communication channel (transit), and the cloud platform (destination).
graph TD
    subgraph A["At the Source (ESP32)"]
        direction LR
        SB(Secure Boot)
        FE(Flash Encryption)
        NVS(Encrypted NVS)
        DS(Secure Identity <br> <b>X.509 Certificate</b>)
    end

    subgraph B["In Transit (Network)"]
        TLS(Encrypted TLS Tunnel <br> <b>Mutual Authentication</b>)
    end

    subgraph C["At the Destination (Cloud)"]
        direction LR
        FW(Firewall)
        IAM(IAM Policies <br> <b>Least Privilege</b>)
        DB(Encrypted Database)
    end

    A -- mTLS --> B
    B -- Secure Connection --> C

    classDef source fill:#DBEAFE,stroke:#2563EB,stroke-width:2px,color:#1E40AF
    classDef transit fill:#EDE9FE,stroke:#5B21B6,stroke-width:2px,color:#5B21B6
    classDef dest fill:#D1FAE5,stroke:#059669,stroke-width:2px,color:#065F46

    class A,SB,FE,NVS,DS source
    class B,TLS transit
    class C,FW,IAM,DB dest
1. Security at the Source (On the Device)
The foundation of all security is trusting the device itself. If the device’s integrity can be compromised, no amount of network security can save it. This is where the ESP32’s hardware-based security features are paramount.
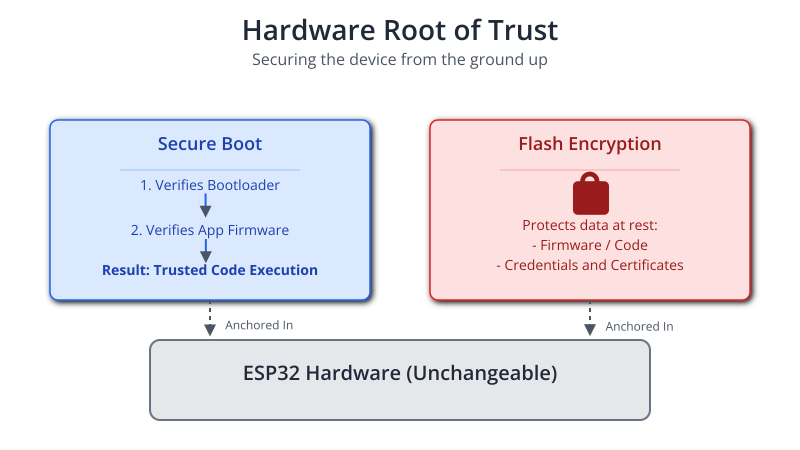
- Hardware Root of Trust: This is an anchor of trust that is physically embedded in the chip’s hardware and cannot be altered.
- Secure Boot: As discussed in Chapter 235, Secure Boot ensures that the device will only execute software that has been digitally signed by a trusted entity (you). It cryptographically verifies the bootloader and application firmware on every startup. This prevents an attacker from flashing malicious firmware onto the device.
- Flash Encryption: This feature, covered in Chapter 234, encrypts the entire contents of the external flash memory. Even if an attacker physically removes the flash chip, the firmware, Wi-Fi credentials, and device certificates stored on it will be unreadable ciphertext.
- Secure Storage (Data at Rest): Sensitive data stored on the device must be protected. The NVS (Non-Volatile Storage) library supports encryption. When enabled (
CONFIG_NVS_ENCRYPTION), all NVS data is encrypted using keys derived from the flash encryption hardware, ensuring that credentials, tokens, and user data are never stored in plaintext. - Secure Identity: The device must have a unique, unforgeable identity. This is achieved with an X.509 client certificate and a corresponding private key. The private key is the device’s most critical secret and must be protected at all costs. On newer ESP32 variants, the Digital Signature (DS) peripheral can be used to store the private key in protected hardware, making it impossible to extract from software.
2. Security in Transit (Device to Cloud)
Once data leaves the device, it must be protected as it travels over public networks like the internet.
- Transport Layer Security (TLS): This is the standard cryptographic protocol for securing network communication. It provides three guarantees:
- Confidentiality: The connection is encrypted, preventing eavesdroppers from reading the data.
- Integrity: The data is protected by a message authentication code (MAC), preventing it from being altered in transit.
- Authentication: The parties can verify each other’s identities.
- Mutual Authentication (mTLS): For IoT, standard TLS is not enough. In a typical HTTPS connection to your bank, your browser verifies the bank’s certificate, but the bank doesn’t verify you at the TLS level (it uses a password instead). In a secure IoT system, we need mutual authentication.
- Server Authentication: The ESP32 client verifies the cloud server’s identity. It does this by checking if the server’s certificate was signed by a trusted Certificate Authority (CA). The ESP32 must be provisioned with a list of trusted root CA certificates.
- Client Authentication: The cloud server verifies the ESP32’s identity. The server challenges the device to prove it possesses the private key corresponding to its client certificate. The device uses its private key to sign a piece of data, which the server then verifies.
sequenceDiagram
    participant ESP32 as ESP32 Client
    participant Broker as MQTT Broker (Server)

    ESP32->>Broker: ClientHello (TLS 1.2, Cipher Suites)
    activate Broker
    Broker-->>ESP32: ServerHello (Chosen Cipher Suite)
    Broker-->>ESP32: Certificate (Server's Certificate)
    Broker-->>ESP32: ServerKeyExchange
    Broker-->>ESP32: CertificateRequest (Asks for Client's Cert)
    Broker-->>ESP32: ServerHelloDone
    deactivate Broker

    Note over ESP32: Verify Server Certificate against its stored CA.pem
    activate ESP32
    ESP32-->>Broker: Certificate (Client's Certificate)
    ESP32-->>Broker: ClientKeyExchange
    Note over ESP32: Sign handshake data with its private key
    ESP32-->>Broker: CertificateVerify (Proof of Private Key)
    ESP32-->>Broker: ChangeCipherSpec
    ESP32-->>Broker: Finished (Encrypted Handshake Messages)
    deactivate ESP32

    Note over Broker: Verify Client Certificate against its trusted CA list
    Note over Broker: Verify signature from CertificateVerify message
    activate Broker
    Broker-->>ESP32: ChangeCipherSpec
    Broker-->>ESP32: Finished (Encrypted Handshake Messages)
    deactivate Broker

    rect rgb(209, 250, 229)
        Note over ESP32, Broker: Secure mTLS Tunnel Established!
        ESP32->>Broker: PUBLISH(topic, payload)
        activate Broker
        Broker->>ESP32: SUBACK
        deactivate Broker
    end
This mTLS handshake proves that your authentic device is talking to your authentic server, and no one else.
3. Security at the Destination (In the Cloud)
Once the data arrives securely at the cloud endpoint, it must be handled and stored securely. While a deep dive into cloud security is beyond the scope of this course, the key principles are:
- Principle of Least Privilege: The IoT broker (e.g., AWS IoT Core, Azure IoT Hub) should have strict authorization policies. Each device’s identity should only grant it permission to publish and subscribe to its own designated topics (e.g.,
devices/esp32-abc-123/#). It should not be able to see data from any other device. - Data Encryption in the Cloud: Data should be encrypted at rest in the cloud, whether in databases, object storage, or log files.
- Secure APIs: Any internal or external APIs that access the collected data must have their own robust authentication and authorization mechanisms.
Practical Example: Secure MQTT with Mutual TLS (mTLS)
Let’s configure the ESP-MQTT client to connect to a broker using a secure, mutually authenticated TLS connection. This is the standard for production IoT systems.
1. Obtaining Certificates
For a real product, you would use a trusted CA. For this example, you can generate self-signed certificates using OpenSSL or use the tools provided by your cloud platform (like AWS IoT). You will need three files:
ca.pem: The root CA certificate of the server. This tells your device to trust the server.device.crt.pem: The unique client certificate for your ESP32 device.device.key.pem: The private key corresponding to the device certificate.
2. Embedding Certificates in Firmware
The easiest way to include these files is using the component manager’s EMBED_FILES feature in your CMakeLists.txt.
In your main/CMakeLists.txt:
idf_component_register(SRCS "main.c"
                    INCLUDE_DIRS "."
                    EMBED_FILES "certs/ca.pem" "certs/device.crt.pem" "certs/device.key.pem")
This will make the contents of these files available as symbols in your C code. Create a certs subdirectory inside your main directory and place the files there.
3. The Code
This example shows how to configure the esp_mqtt_client_config_t structure for mTLS.
#include "esp_log.h"
#include "esp_wifi.h"
#include "nvs_flash.h"
#include "esp_event.h"
#include "esp_mqtt_client.h"

static const char *TAG = "SECURE_ARCH";

// --- Accessing Embedded Certificate Data ---
// These symbols are generated by the build system from the EMBED_FILES command.
extern const uint8_t ca_pem_start[] asm("_binary_ca_pem_start");
extern const uint8_t ca_pem_end[]   asm("_binary_ca_pem_end");
extern const uint8_t device_crt_pem_start[] asm("_binary_device_crt_pem_start");
extern const uint8_t device_crt_pem_end[]   asm("_binary_device_crt_pem_end");
extern const uint8_t device_key_pem_start[] asm("_binary_device_key_pem_start");
extern const uint8_t device_key_pem_end[]   asm("_binary_device_key_pem_end");

static void mqtt_event_handler(void *handler_args, esp_event_base_t base, int32_t event_id, void *event_data) {
    esp_mqtt_event_handle_t event = event_data;
    switch ((esp_mqtt_event_id_t)event_id) {
        case MQTT_EVENT_CONNECTED:
            ESP_LOGI(TAG, "MQTT_EVENT_CONNECTED: Secure connection established!");
            // You can now publish/subscribe securely
            break;
        case MQTT_EVENT_DISCONNECTED:
            ESP_LOGW(TAG, "MQTT_EVENT_DISCONNECTED");
            break;
        case MQTT_EVENT_ERROR:
            ESP_LOGE(TAG, "MQTT_EVENT_ERROR");
            if (event->error_handle->error_type == MQTT_ERROR_TYPE_TCP_TRANSPORT) {
                 ESP_LOGE(TAG, "TLS Error, error code: 0x%x", event->error_handle->esp_tls_last_esp_err);
            }
            break;
        default:
            ESP_LOGI(TAG, "Other event id:%d", event->event_id);
            break;
    }
}

void start_secure_mqtt(void) {
    ESP_LOGI(TAG, "Configuring secure MQTT client...");

    const esp_mqtt_client_config_t mqtt_cfg = {
        .broker.address.uri = "mqtts://your-mqtt-broker-endpoint:8883",
        // --- Certificate Configuration ---
        .broker.verification.certificate = (const char *)ca_pem_start,
        .credentials = {
            .authentication = {
                .certificate = (const char *)device_crt_pem_start,
                .key = (const char *)device_key_pem_start,
            },
        }
    };

    esp_mqtt_client_handle_t client = esp_mqtt_client_init(&mqtt_cfg);
    esp_mqtt_client_register_event(client, ESP_EVENT_ANY_ID, mqtt_event_handler, NULL);
    esp_mqtt_client_start(client);
}

// In app_main(), after connecting to Wi-Fi:
// start_secure_mqtt();
4. Build and Run
- Place your three certificate files in
main/certs/. - Update the
CMakeLists.txtfile as shown above. - Update the broker URI in
mqtt_cfgto point to your secure MQTT broker. - Build, flash, and monitor the device.
- Observe: The device will connect to the broker. If the certificates are correct and the broker is configured for mTLS, you will see the “Secure connection established!” message. If there is a problem with the TLS handshake (e.g., the device doesn’t trust the server’s CA, or the server doesn’t trust the device’s certificate), you will see an
MQTT_EVENT_ERRORwith a TLS error code, and the connection will fail.
Variant Notes
- Core Logic is Universal: The architecture of using mTLS for secure communication is a software standard and is the same across all ESP32 variants. The example code will work on any of them.
- Performance and Power (Hardware Crypto): The TLS handshake is computationally expensive. The hardware cryptographic accelerators on newer variants (ESP32-S2, S3, C3, C6, H2) significantly speed up these operations. This results in a faster connection time and, more importantly for battery-powered devices, lower energy consumption each time the device connects.
- Private Key Protection (Digital Signature Peripheral): The example shows embedding the private key in the firmware. With Flash Encryption enabled, this is reasonably secure. However, the most secure method is to use the Digital Signature (DS) peripheral, available on ESP32-S2 and later. This allows the private key to be stored in secure internal memory (eFuses), completely inaccessible to software. The MQTT client can be configured to use the DS peripheral for the TLS handshake, meaning the private key is used but never seen or exposed in RAM. This provides the highest level of device identity security.
- Secure Boot v2: On ESP32-C3/S3/C6, Secure Boot v2 provides a much stronger guarantee of software integrity than the v1 on the original ESP32. This solidifies the “Security at the Source” pillar.
Common Mistakes & Troubleshooting Tips
| Mistake / Issue | Symptom(s) | Troubleshooting / Solution |
|---|---|---|
| Committing Private Keys to Git | No runtime error, but a massive security vulnerability. Secrets are exposed in the repository history. |
Fix: Use a .gitignore file to ignore all *.pem, *.key, and *.crt files.
Best Practice: Provision secrets during manufacturing/provisioning, not at compile time. Remove keys from Git history if already committed. |
| TLS Handshake Failure |
MQTT_EVENT_ERROR with error_type of MQTT_ERROR_TYPE_TCP_TRANSPORT.
Log shows “esp_tls_handshake: … failed”. |
1. Check Device Clock: Certificates are date-sensitive. Ensure SNTP is initialized to get correct time.
2. Check Server CA: Is the ca.pem file correct for your broker’s endpoint? 3. Check Client Certificate: Is the device certificate registered and authorized in your cloud IoT policy? |
| Using Insecure Transport | Connection immediately rejected or times out. The client tries to connect via plaintext to a port expecting TLS. |
Ensure the broker URI scheme is mqtts:// not mqtt://.
The standard secure port is 8883. |
| Forgetting Flash/Boot Security | A physically compromised device can be read out or reflashed with malicious firmware. |
Fix: For production devices, always enable Secure Boot and Flash Encryption.
In menuconfig, disable JTAG to prevent physical debugging access. |
| Incorrect Certificate Formatting | TLS error during handshake. Log might show a certificate parsing error. | Certificates embedded via EMBED_FILES must be in correct PEM format, including the —–BEGIN…—– and —–END…—– lines with no extra characters. |
Exercises
- Sign Application Data: Go beyond just securing the channel. Before publishing a JSON payload over your secure MQTT connection, use the
esp_digital_signatureAPI to sign the payload. Add the signature to the JSON object (e.g.,{"data":{...}, "signature":"..."}). The cloud can then verify this signature to ensure the data itself was generated by an authentic device and not injected by a compromised one. - Encrypted NVS: Create a project where you enable NVS encryption in
menuconfig. Write a program that stores a “secret” Wi-Fi password in NVS. Then use thenvs_dumputility to inspect thenvspartition. Confirm that the data is stored as ciphertext and not plaintext. - Security Feature Comparison: Research and create a table comparing the security features of the original ESP32, the ESP32-C3, and the ESP32-S3. The table should include rows for Secure Boot version, Flash Encryption scheme, the presence of a Digital Signature peripheral, and hardware crypto acceleration.
| Feature | ESP32 (Original) | ESP32-C3 | ESP32-S3 |
|---|---|---|---|
| Secure Boot Version | v1 | v2 (RSA-based) | v2 (RSA-based) |
| Flash Encryption Scheme | AES-256-XTS | AES-128-XTS | AES-256-XTS |
| Digital Signature (DS) Peripheral | No | Yes (For hardware-protected key) | Yes (For hardware-protected key) |
| Hardware Crypto Acceleration | AES, SHA, RSA, ECC | AES, SHA, RSA, HMAC | AES, SHA, RSA, HMAC, ECC |
| Primary CPU Core | Dual-core Tensilica LX6 | Single-core RISC-V | Dual-core Tensilica LX7 |
| Key Benefit | Proven, wide support | Cost-effective, RISC-V, strong security for its class | High performance, AI features, extensive I/O, strong security |
Summary
- A secure data architecture requires defense in depth, protecting data at the source, in transit, and at the destination.
- Security at the source is established by a Hardware Root of Trust, using features like Secure Boot and Flash Encryption to ensure device integrity.
- Security in transit is achieved using TLS, specifically Mutual TLS (mTLS), where both the device and the server authenticate each other using X.509 certificates.
- The ESP-MQTT client can be easily configured for mTLS by providing a server CA, a device certificate, and a device private key.
- Data stored on the device (at rest) should be protected using NVS Encryption.
- Newer ESP32 variants offer superior security through features like Secure Boot v2 and the Digital Signature peripheral for hardware-protected private keys.
Further Reading
- ESP-IDF TLS Transport: https://docs.espressif.com/projects/esp-idf/en/v5.2.1/esp32/api-reference/protocols/esp_tls.html
- ESP-IDF Secure Boot V2: https://docs.espressif.com/projects/esp-idf/en/v5.2.1/esp32s3/security/secure-boot-v2.html
- ESP-IDF Flash Encryption: https://docs.espressif.com/projects/esp-idf/en/v5.2.1/esp32/security/flash-encryption.html
- ESP-IDF Digital Signature (DS) Peripheral: https://docs.espressif.com/projects/esp-idf/en/v5.2.1/esp32s2/api-reference/peripherals/ds.html
