
Chapter 290: OTA Update Security for ESP32
Chapter Objectives
By the end of this chapter, you will be able to:
- Understand the critical importance of securing the Over-the-Air (OTA) update process.
- Grasp the concepts of digital signatures, Secure Boot, and Flash Encryption.
- Implement application signing to ensure firmware authenticity and integrity.
- Securely deliver firmware updates over HTTPS to prevent interception.
- Enable and understand the purpose of anti-rollback protection.
- Configure a complete, secure OTA update pipeline for a production environment.
Introduction
The ability to update firmware Over-the-Air (OTA) is one of the most powerful features in the IoT world. It allows you to fix bugs, add new features, and patch security vulnerabilities on devices already deployed in the field. However, with great power comes great responsibility. An unsecured OTA mechanism is not a feature; it is a critical vulnerability. It acts as an open door, inviting attackers to load malicious code onto your devices, potentially taking control of a single device or an entire fleet.
Securing the update process is non-negotiable for any professional product. This chapter will guide you through the security features provided by ESP-IDF to lock down your OTA pipeline. We will build a chain of trust from the hardware up, ensuring that your devices only ever run authentic, untampered firmware that comes directly from you.
Theory
The OTA Threat Model
Before we build our defenses, we must understand the threats. An attacker might try to:
- Inject Malicious Firmware: Intercept the update process and replace your legitimate firmware with their own. This could turn your smart lightbulb into part of a botnet.
- Downgrade Firmware: Force a device to “update” to an older, known-vulnerable version of your firmware, which the attacker then exploits. This is a “rollback” attack.
- Steal Intellectual Property: If your firmware is not encrypted, an attacker with physical access could read the binary directly from the flash chip, reverse-engineer it, and steal your proprietary algorithms or security credentials.
%%{ init: { 'theme': 'base', 'themeVariables': { 'fontFamily': 'Open Sans' } } }%%
sequenceDiagram
    participant Device
    participant Attacker
    participant Server

    rect rgb(254, 226, 226)
        Note over Device, Server: Without HTTPS (Plain HTTP)
        Device->>Attacker: Request firmware.bin
        Attacker->>Server: Forward request for firmware.bin
        Server-->>Attacker: Legitimate firmware.bin
        Attacker->>Device: Send MALICIOUS firmware.bin
        Note over Device: Device receives malicious code!<br>Signature check will still fail,<br>but the attack was attempted.
    end

    rect rgb(209, 250, 229)
        Note over Device, Server: With HTTPS
        Device->>Server: Initiate TLS Handshake
        Note over Server: Server sends its certificate
        Server-->>Device: Certificate(Signed by CA)
        Note over Device: Device verifies certificate<br>using its trusted Root CA.
        Device->>Server: Encrypted Request for firmware.bin
        Server-->>Device: Encrypted legitimate firmware.bin
        Note over Attacker: Attacker cannot intercept or<br>modify the encrypted traffic.
    end
The Pillars of OTA Security
To counter these threats, we build our defense on several pillars, creating a robust “chain of trust.”
%%{ init: { 'theme': 'base', 'themeVariables': { 'fontFamily': 'Open Sans' } } }%%
graph TD
    subgraph "1- Signing Process (Developer)"
        A[Firmware.bin] --> B(SHA-256);
        B --> C{"<b>Hash</b><br>a1b2c3d4..."};
        D["<b>Private Key 🔑</b><br>(Secret Signet Ring)"] --> E{Encrypt};
        C --> E;
        E --> F{"<b>Signature</b><br>sig: e5f6..."};
        A --> G[Append Signature];
        F --> G;
        G --> H([Signed Firmware]);
    end

    subgraph "2- Verification Process (ESP32)"
        H --> I{Split Firmware & Signature};
        I -- Firmware --> J(SHA-256);
        J --> K{"<b>Calculated Hash</b><br>a1b2c3d4..."};

        I -- Signature --> L{Decrypt};
        M["<b>Public Key</b><br>(Stored on Device)"] --> L;
        L --> N{"<b>Original Hash</b><br>a1b2c3d4..."};

        K --> O{"Compare<br>Hashes"};
        N --> O;
        O --> P["<b>✅ VERIFIED</b><br>Hashes Match"];
    end

    %% Styling
    classDef processNode fill:#DBEAFE,stroke:#2563EB,stroke-width:1px,color:#1E40AF;
    classDef decisionNode fill:#FEF3C7,stroke:#D97706,stroke-width:1px,color:#92400E;
    classDef keyNode fill:#EDE9FE,stroke:#5B21B6,stroke-width:2px,color:#5B21B6;
    classDef privateKeyNode fill:#FEE2E2,stroke:#DC2626,stroke-width:1px,color:#991B1B;
    classDef publicKeyNode fill:#D1FAE5,stroke:#059669,stroke-width:1px,color:#065F46;
    classDef passNode fill:#D1FAE5,stroke:#059669,stroke-width:2px,color:#065F46;

    class A,B,E,G,H,I,J,L processNode;
    class C,K,N,O decisionNode;
    class F keyNode;
    class D privateKeyNode;
    class M publicKeyNode;
    class P passNode;
1. Authenticity & Integrity (Digital Signatures)
This is the cornerstone of OTA security. We need to be certain that the firmware update came from us (authenticity) and that it wasn’t altered in transit (integrity). Both are achieved using digital signatures, a concept from public-key cryptography.
Analogy: The Corporate Seal
Imagine you are a medieval king sending a decree. To prove it’s authentic, you press your unique signet ring (the private key) into hot wax on the document, creating a seal. Anyone can see the design of your seal (the public key), but only you possess the ring to create it. If the seal is unbroken and matches your known design, the recipient knows the decree is authentic and hasn’t been opened.
The digital process is similar:
- Signing (Developer side):
- You generate a public/private key pair. The private key (
private_key.pem) is kept absolutely secret. - When you build your firmware, the build system calculates a unique fingerprint (a cryptographic hash, like SHA-256) of the firmware binary.
- It then uses your private key to encrypt this hash. The result is the digital signature.
- This signature is appended to the firmware binary.
- You generate a public/private key pair. The private key (
- Verification (ESP32 side):
- The ESP32 device has your public key stored in its firmware.
- When it receives an OTA update, it performs two steps:a. It independently calculates the hash of the received firmware (excluding the signature).b. It uses the public key to decrypt the signature, revealing the original hash calculated by the developer.
- It compares the two hashes. If they match, the firmware is verified. If they don’t, the firmware is rejected as it is either not from you or was tampered with.
2. Hardware Root of Trust (Secure Boot)
A signed application is great, but what if an attacker with physical access flashes their own bootloader that bypasses the signature check? This is where Secure Boot comes in.
Secure Boot creates a root of trust in the hardware itself. When enabled for the first time, it generates a secret key which is permanently burned into the ESP32’s eFuses (one-time programmable memory). From that moment on, the chip’s hardware ROM bootloader will refuse to execute any software bootloader that hasn’t been signed with this secret key. Since only Espressif’s bootloader is signed this way, it ensures that the first piece of software to run is always legitimate. This legitimate software bootloader then takes over the responsibility of verifying the signature of your main application.
3. Confidentiality (Flash Encryption)
To prevent intellectual property theft, ESP-IDF provides Flash Encryption. When enabled, the ESP32 generates an encryption key, also burned into its eFuses. All content written to the external flash memory (including your firmware, NVS data, and partition tables) is encrypted. The hardware transparently decrypts this data as it’s read into the CPU. If an attacker physically desolders the flash chip and reads its contents, they will only see meaningless, encrypted data.
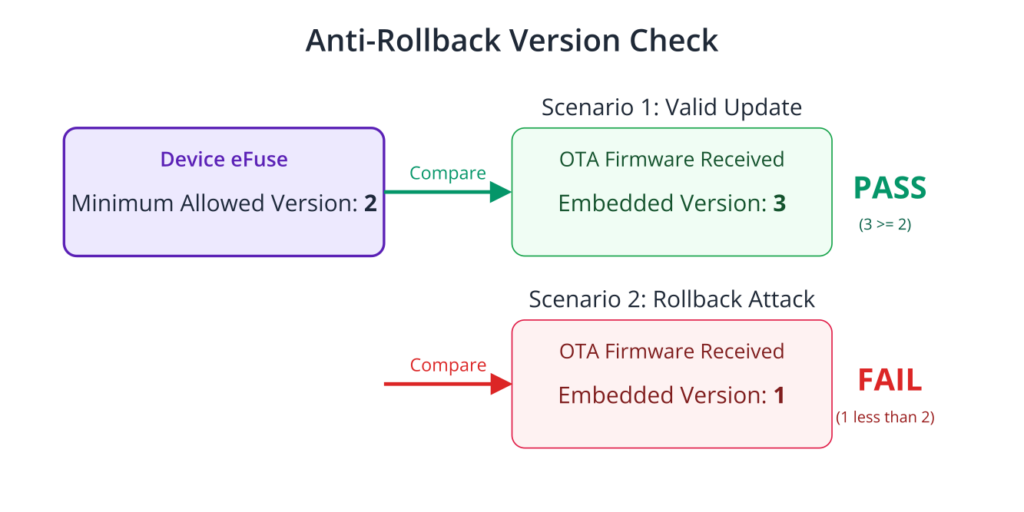
4. Anti-Rollback Protection
To prevent a downgrade attack, the bootloader can enforce version control. When anti-rollback is enabled, the bootloader keeps track of the version number of the currently running application. It will refuse to boot an application that has a lower version number than the one recorded. This is also managed via eFuses.
Practical Examples
Let’s secure a basic OTA application. We assume you have a project that can perform a simple OTA update over HTTP, as this is a prerequisite.
Warning: Enabling Secure Boot and Flash Encryption are PERMANENT operations for a given ESP32 chip. They burn eFuses and cannot be undone. Always experiment on a development board you are willing to dedicate to this purpose.
Step 1: Generate a Signing Key
First, you need the “signet ring”—your private key.
- Open a terminal with the ESP-IDF environment activated.
- Run the following command in your project’s root directory:
esp_secure_cert gensecuresignkey private_key.pem - This creates
private_key.pem. Guard this file with your life. Back it up securely and do not commit it to public version control.
Step 2: Enable Secure Boot and Signed Apps
- Run
idf.py menuconfig. - Navigate to
Security features—>. - Select
[*] Enable hardware Secure Boot. - In the sub-menu, for
Secure bootloader mode, chooseOne-time flash. This is the simplest and most secure option. - Go back one level and select
[*] Require signed app images. - In the
Signature verification key fileoption, enter the path to your key:private_key.pem.
Step 3: Enable Flash Encryption
- While still in
menuconfigunderSecurity features, select[*] Enable flash encryption on boot. - For
Flash encryption mode, chooseRelease. This is the most secure mode and disables debugging.
Step 4: First-Time Secure Flash
This is the most critical step. You are about to permanently alter the chip.
- Clean your project:
idf.py clean. - Build everything:
idf.py build. The build system will automatically sign your application binary using the private key you provided. - Flash: Run
idf.py flash. - The tool will show several warnings, asking you to confirm that you want to burn the eFuses. Read them carefully and type
Yto proceed. The device will be flashed, and on its first boot, it will encrypt the entire flash and burn the secure boot eFuses. This boot will take longer than usual. - Subsequent flashes of new application code can be done normally with
idf.py flash. The bootloader will now verify the signature of any new application before running it.
Step 5: Secure the Transport Layer (HTTPS)
Serving updates over HTTP allows a man-in-the-middle to see the (encrypted) firmware. While they can’t tamper with it (thanks to the signature), it’s best practice to use HTTPS.
%%{ init: { 'theme': 'base', 'themeVariables': { 'fontFamily': 'Open Sans' } } }%%
graph TD
    A[Start OTA Process] --> B{"Establish HTTPS Connection<br>to Server"};
    B --> C{"Server Presents its<br>TLS Certificate"};
    C --> D{Device Validates Server Cert<br>against its stored Root CA};
    D -->|Valid| F[Download Signed Firmware];
    D -->|"Invalid<br>(MITM Attack?)"| E["Abort! Connection Untrusted"];
    F --> G{Verify Firmware Signature<br>using Public Key};
    G -->|Valid| I[Check Firmware Version<br>for Anti-Rollback];
    G -->|Invalid| H[Abort! Firmware Tampered];
    I -->|Newer Version| K[Write to OTA Partition];
    I -->|Older/Same Version| J[Abort! Rollback Attack];
    K --> L[Reboot and Boot New Firmware];

    %% Styling
    classDef startNode fill:#EDE9FE,stroke:#5B21B6,stroke-width:2px,color:#5B21B6;
    classDef processNode fill:#DBEAFE,stroke:#2563EB,stroke-width:1px,color:#1E40AF;
    classDef decisionNode fill:#FEF3C7,stroke:#D97706,stroke-width:1px,color:#92400E;
    classDef failNode fill:#FEE2E2,stroke:#DC2626,stroke-width:1px,color:#991B1B;
    classDef passNode fill:#D1FAE5,stroke:#059669,stroke-width:2px,color:#065F46;

    class A startNode;
    class B,C,F,K,L processNode;
    class D,G,I decisionNode;
    class E,H,J failNode;
    class L passNode;
- In your OTA code, when configuring the
esp_http_client_config_t, you need to provide the server’s root CA certificate. - First, get the certificate for your HTTPS server. For
https.github.com, you can use your browser to download the root CA certificate (e.g., “DigiCert Global Root CA”). Save it asca_cert.pemin yourmaindirectory. - Embed the certificate into your firmware:
- In your main
CMakeLists.txt, add this line:target_embed_txt(ca_cert.pem "server_cert.pem" TEXT)
- In your main
- Update your
esp_http_client_config_tin your C code:
main/main.c (snippet)
// At the top of your file
extern const uint8_t server_cert_pem_start[] asm("_binary_server_cert_pem_start");
extern const uint8_t server_cert_pem_end[]   asm("_binary_server_cert_pem_end");

// ... inside your OTA function ...
esp_http_client_config_t config = {
    .url = "https://your-server.com/firmware.bin",
    .cert_pem = (const char *)server_cert_pem_start, // <-- Add this line
    .event_handler = _http_event_handler,
    .keep_alive_enable = true,
};
esp_https_ota_config_t ota_config = {
    .http_config = &config,
};

esp_err_t ret = esp_https_ota(&ota_config);
// ... handle result ...
Now, when your device performs an OTA update, it will first verify the identity of the server using the CA certificate before downloading the firmware, preventing MITM attacks.
Variant Notes
The security features are a core part of the ESP32 platform, but there are some implementation differences across variants.
| Feature | ESP32 (Original) | ESP32-S2, S3, C3, C6, H2 | Security Implication |
|---|---|---|---|
| Secure Boot | Secure Boot V1 (HMAC-based) | Secure Boot V2 (RSA-based) | V2 is more robust and flexible. ESP-IDF abstracts the differences, so user configuration is similar. |
| Flash Encryption | AES-256-XTS | AES-256-XTS | Provides strong confidentiality of firmware and data at rest across all modern variants. |
| Digital Signature (DS) Peripheral | Not Available | Available (e.g., ESP32-C6, H2) | Allows private key to be stored in hardware, preventing software exposure. A major security enhancement. |
| Anti-Rollback | eFuse-based version counter | eFuse-based version counter | Core functionality is consistent, preventing firmware downgrade attacks across all variants. |
- Secure Boot V1 vs. V2: The original ESP32 uses Secure Boot V1, which is based on an HMAC digest scheme. All newer chips (ESP32-S2, S3, C3, C6, H2) use Secure Boot V2, which is based on RSA digital signatures. V2 is generally considered more robust and flexible. Fortunately, ESP-IDF abstracts this; the configuration steps in
menuconfigare nearly identical. - Flash Encryption Algorithm: All variants that support flash encryption use the AES-XTS algorithm, which is designed for block-based storage devices like flash memory. The specific hardware implementation of the AES accelerator may differ, but the security guarantee is the same.
- Physical Security: Newer variants like the ESP32-C6 and H2 often include additional security peripherals like a Digital Signature (DS) peripheral, which can securely store the private key in hardware, preventing it from ever being exposed in software. This is a significant step up from storing the key on the build server.
Common Mistakes & Troubleshooting Tips
| Mistake / Issue | Symptom(s) | Troubleshooting / Solution |
|---|---|---|
| Losing the Private Signing Key | You can no longer sign new firmware. All devices in the field become un-updateable (“bricked” from an update perspective). | This is the worst-case scenario. Back up your private_key.pem in multiple, secure, offline locations (e.g., encrypted USB drives in a safe). |
| eFuse Write Errors During Flash | The idf.py flash command fails with errors about eFuse bits already being set. | eFuses are One-Time-Programmable. You cannot change a bit from 1 to 0. This error means you are trying to re-burn a fuse. Use a fresh device for new security experiments. |
| Forgetting to Increment App Version | OTA update fails. The device monitor shows the bootloader rejecting the update due to “anti-rollback version check fail”. | If anti-rollback is on, you must increment the version number in menuconfig before building every new firmware release intended for OTA. |
| HTTPS Certificate Expiration | Devices in the field suddenly fail OTA with TLS handshake errors. The server is reachable, but the device won’t connect. | The root CA certificate embedded in your firmware has expired. You must have a strategy for this, often involving an intermediate OTA update with a new CA cert before the old one expires. |
| Committing Private Key to Git | Your secret key is now public. Anyone can sign malicious firmware that your devices will accept as authentic. | Immediately revoke the key. If possible, push an OTA update signed with a new key before an attacker does. Add *.pem to your .gitignore file immediately. |
Exercises
- Key Compromise Simulation: Take a working, secured OTA project. Rename your
private_key.pemtoprivate_key_old.pem. Generate a new key with the same name (private_key.pem). Build a new version of the firmware with this new key. Try to perform an OTA update. Observe as the device correctly rejects the firmware because it was signed with an unknown key. - Anti-Rollback Test: Enable anti-rollback in
menuconfig(Security features->Enable hardware Secure Boot anti-rollback). Set your app version to2.0. Build and flash. Now, change the version to1.0, build, and host this older version for OTA. Trigger the update and watch the bootloader logs in the monitor as it prevents the downgrade. - Investigate the Signed Binary: Use a command-line tool like
xxdorhexdumpto view the contents of a signed.binfile. Compare it to an unsigned one. You will find an appended block of data at the end of the signed file containing a magic number, the signature, and other metadata. - Firmware Encryption Deep Dive: Enable flash encryption and flash a device. Then, use
esptool.pyto read the flash contents back to your computer (esptool.py ... read_flash 0x10000 0x100000 app.encrypted.bin). Openapp.encrypted.binin a hex editor. Compare it to the originalapp.binfrom your build directory. Observe that they are completely different, demonstrating the effect of encryption.
Summary
- A secure OTA process is built on a chain of trust, starting from the hardware.
- Secure Boot creates a hardware root of trust, ensuring the bootloader is authentic.
- Flash Encryption protects your firmware and data from being read by physical attackers.
- Digital Signatures (created with a secret private key) prove that a firmware update is authentic (from you) and has integrity (hasn’t been altered).
- Updates must be delivered over a secure channel like HTTPS to prevent man-in-the-middle attacks.
- Anti-Rollback protection prevents attackers from downgrading devices to older, vulnerable firmware versions.
- Your private signing key is your most critical security asset. Protect it accordingly.
Further Reading
- ESP-IDF Security Documentation (Main Page): https://docs.espressif.com/projects/esp-idf/en/v5.2.1/esp32/security.html
- Secure Boot V2 Guide: https://docs.espressif.com/projects/esp-idf/en/v5.2.1/esp32s3/security/secure-boot-v2.html
- Flash Encryption Guide: https://docs.espressif.com/projects/esp-idf/en/v5.2.1/esp32/security/flash-encryption.html
esp_https_otaAPI Reference: https://docs.espressif.com/projects/esp-idf/en/v5.2.1/esp32/api-reference/system/esp_https_ota.html
