
Chapter 3: Your First Git Repository
Chapter Objectives
By the end of this chapter, you will be able to:
- Initialize a new Git repository using
git init. - Understand the purpose and basic contents of the
.gitdirectory. - Clearly distinguish between the three states of a file in Git: modified, staged, and committed.
- Stage changes for a commit using
git add. - Commit staged changes to the repository’s history using
git commit. - Write clear, concise, and conventional commit messages.
- Check the status of your working directory and staging area using
git status. - View differences between various states of your project files using
git diff,git diff --staged, andgit diff HEAD.
Introduction
In Chapter 1, we introduced the fundamental concepts of version control, and in Chapter 2, you successfully installed Git and performed the initial configuration. Now, it’s time to put that knowledge into practice by creating your very first Git repository. This is where the journey of tracking your project’s history truly begins.
This chapter will walk you through the essential commands for starting a new project with Git (or integrating Git into an existing one). We’ll create a repository, make changes to files, and learn how to tell Git precisely which changes to save. You’ll become familiar with the core workflow of modifying files, staging them, and then committing them as a snapshot in your project’s history. Understanding these basic operations is fundamental to using Git effectively.
Theory
Initializing a Repository: git init
The first step in using Git for a new or existing project is to initialize a Git repository in the project’s main directory. This is done using the git init command.
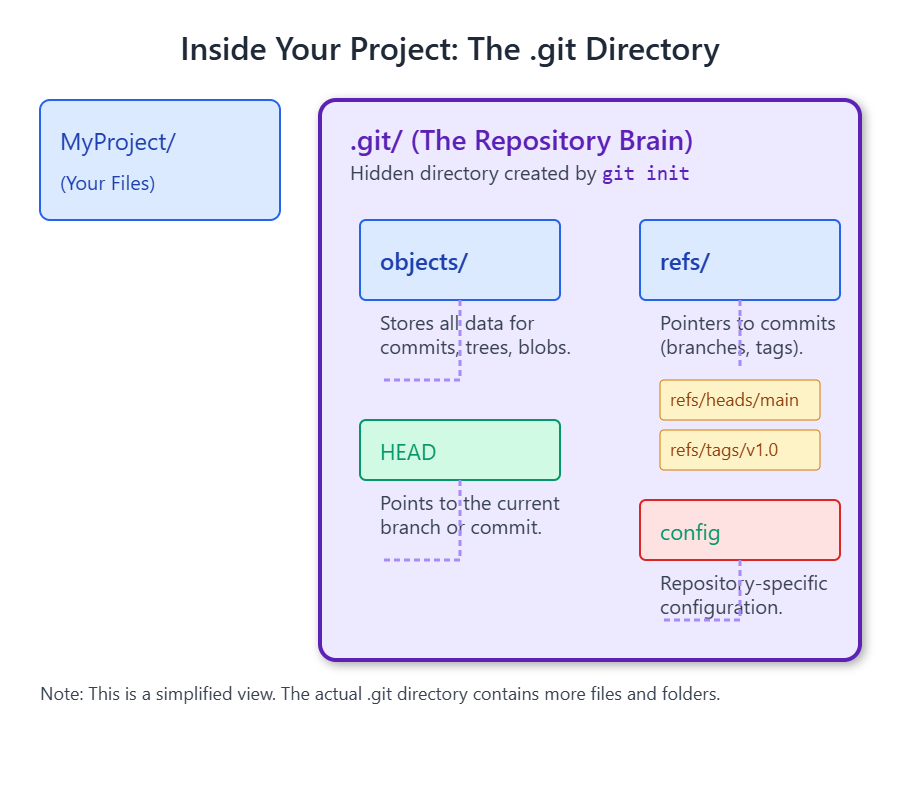
When you run git init, Git creates a new subdirectory named .git. This hidden directory contains all the necessary files and objects for your repository – it’s the “brain” of your Git project. It includes subdirectories for objects (your stored data), refs (pointers to commits like branches and tags), and template files. You generally won’t need to touch the files inside .git directly, as Git commands manage them for you. However, it’s important to know that this directory is what makes an ordinary folder a Git repository.
Once initialized, Git starts tracking the current directory and its subdirectories. However, it doesn’t automatically track any files until you explicitly tell it to.
The Three States Revisited
As briefly mentioned in Chapter 1, Git thinks about your files in three main states, and understanding this is key to understanding Git:
- Modified: A file is modified if you’ve changed it in your working directory but haven’t yet told Git to prepare it for a commit.
- Staged: A file is staged if you’ve marked a modified file in its current version to go into your next commit. This happens by adding the file’s snapshot to the staging area (also known as the “index”).
- Committed: A file is committed if the version of the file in the staging area has been safely stored as a snapshot in your local Git repository (the
.gitdirectory).
%%{
  init: {
    "theme": "base",
    "themeVariables": {
      "primaryColor": "#DBEAFE",     /* Default for process nodes if not overridden */
      "primaryTextColor": "#1E40AF",
      "primaryBorderColor": "#2563EB",
      "lineColor": "#5B21B6",         /* Purple for arrows */
      "textColor": "#1F2937",
      "fontSize": "14px",
      "fontFamily": "Open Sans",

      "workingDirFill": "#DBEAFE",    /* Light Blue for Working Directory */
      "workingDirStroke": "#2563EB",
      "workingDirColor": "#1E40AF",

      "stagingAreaFill": "#FEF3C7",  /* Light Amber for Staging Area */
      "stagingAreaStroke": "#D97706",
      "stagingAreaColor": "#92400E",

      "repoFill": "#EDE9FE",          /* Light Purple for Repository */
      "repoStroke": "#5B21B6",
      "repoColor": "#5B21B6",

      "successFill": "#D1FAE5",       /* Light Green for final state/output */
      "successStroke": "#059669",
      "successColor": "#065F46"
    },
    "flowchart": {
      "htmlLabels": true,
      "nodeSpacing": 60,
      "rankSpacing": 90,
      "curve": "basis"
    }
  }
}%%
graph BT;
    WD["<div style='padding:10px; text-align:center;'><b>Working Directory</b><br><br>💻<br>Files you are currently<br>modifying on your filesystem.<br><br><i>(Files can be modified)</i></div>"];
    SA["<div style='padding:10px; text-align:center;'><b>Staging Area (Index)</b><br><br>📋<br>A snapshot of changes<br>marked for the next commit.<br><br><i>(Files are staged)</i></div>"];
    REPO["<div style='padding:10px; text-align:center;'><b>Repository (.git)</b><br><br>💾<br>Permanent history of<br>committed snapshots.<br><br><i>(Files are committed)</i></div>"];

    WD -- "1- Make changes" --> WD;
    WD -- "2- <code style='font-family:monospace; background:#E0E7FF; padding:3px 5px; border-radius:4px; color:#3730A3; font-weight:600;'>git add <file></code><br>(Select changes to save)" --> SA;
    SA -- "3- <code style='font-family:monospace; background:#E0E7FF; padding:3px 5px; border-radius:4px; color:#3730A3; font-weight:600;'>git commit</code><br>(Record snapshot to history)" --> REPO;
    REPO -- "<code style='font-family:monospace; background:#E0E7FF; padding:3px 5px; border-radius:4px; color:#3730A3;'>git checkout <branch/commit></code><br>(Update Working Directory<br>from history)" --> WD;

    style WD fill:#DBEAFE,stroke:#2563EB,stroke-width:2px,color:#1E40AF;
    style SA fill:#FEF3C7,stroke:#D97706,stroke-width:2px,color:#92400E;
    style REPO fill:#EDE9FE,stroke:#5B21B6,stroke-width:2px,color:#5B21B6;

    classDef default fill:#transparent,stroke:#1F2937,stroke-width:1px,color:#1F2937,font-family:'Open Sans';
This three-state architecture allows you to precisely control what gets included in each historical snapshot (commit). You can make many changes in your working directory, but then selectively stage only related changes for a single, focused commit.
Staging Changes: git add
The git add command is used to move changes from your working directory to the staging area. You’re telling Git, “I want to include the current state of this file (or these files) in my next commit.”
You can git add specific files, or use patterns to add multiple files. If you modify a file after you’ve added it to the staging area, you’ll need to run git add again to stage the latest version of that file if you want those newest changes included in the next commit.
Committing Changes: git commit
The git commit command takes all the changes that have been added to the staging area and records them as a new permanent snapshot in the repository’s history. Each commit is a point in time that you can revert to or inspect later.
Commit Messages: The Why and How
Every commit requires a commit message. This message is crucial for understanding why a change was made. Good commit messages are essential for collaboration and for your future self when you’re trying to remember the context of past changes.
A standard convention for commit messages is:
- A short summary line (imperative mood, ~50 characters):
- Describe what the commit does, as if you’re giving an order. E.g., “Fix bug in login form,” “Add user authentication feature.”
- Capitalize the first letter.
- Do not end with a period.
- (Optional) A blank line.
- (Optional) A more detailed explanation:
- Explain the why and how of the changes if the summary isn’t sufficient.
- Wrap lines at around 72 characters.
You can provide a short commit message directly on the command line using the -m option (e.g., git commit -m "Initial commit"). If you run git commit without -m, Git will open the text editor you configured in Chapter 2 (or the system default) for you to write a more detailed message.
Warning: Once a commit is made, it’s recorded in the repository’s history. While Git offers tools to alter history (which we’ll cover in advanced topics), it’s generally best to assume commits are permanent, especially if you’ve shared them with others.
Checking Status: git status
The git status command is your go-to command for seeing the current state of your working directory and staging area. It tells you:
- Which branch you’re currently on.
- If there are any changes staged for the next commit (“Changes to be committed”).
- If there are any modified files in your working directory that haven’t been staged yet (“Changes not staged for commit”).
- If there are any new files in your working directory that Git doesn’t yet track (“Untracked files”).
It’s a good habit to run git status frequently to stay aware of what Git is tracking and what the state of your project is.
Viewing Differences: git diff
The git diff command is used to see the actual changes (the “diffs” or “patches”) between different states of your files.
git diff(with no arguments): Shows the differences between your working directory and the staging area. It displays changes you’ve made but not yet staged.git diff --staged(orgit diff --cached): Shows the differences between the staging area and your last commit (what’s inHEAD). It displays changes you’ve staged and are ready to be committed.git diff HEAD: Shows all uncommitted changes in your working directory relative to the last commit (HEAD). This effectively combines the output ofgit diffandgit diff --stagedfor tracked files.git diff <commit-hash>: Shows changes between the working directory and a specific commit.git diff <commit-hash1> <commit-hash2>: Shows changes between two specific commits.
Understanding the output of git diff is crucial for reviewing your changes before committing them.
Practical Examples
Let’s create our first repository and practice the workflow.
Setup:
Ensure you are in a directory where you want to create a new project. For this example, let’s create a new directory.
# Create a directory for our project
mkdir my-git-cookbook
cd my-git-cookbook
1. Initializing the Repository
git init
Expected Output:
Initialized empty Git repository in /path/to/your/my-git-cookbook/.git/
(The path will reflect your actual directory structure. If you configured init.defaultBranch to main in Chapter 2, it might say “Initialized empty Git repository in … using ‘main’ as the name for the initial branch” or similar.)
Explanation of Output:
Git has created the .git subdirectory. Your my-git-cookbook directory is now a Git repository.
2. Checking the Initial Status
git status
Expected Output (if default branch is main):
On branch main

No commits yet

nothing to commit (create/copy files and use "git add" to track)
Or, if your default branch is still master:
On branch master

No commits yet

nothing to commit (create/copy files and use "git add" to track)
Explanation of Output:
On branch main(ormaster): Tells you the current active branch.No commits yet: Confirms no snapshots have been saved.nothing to commit...: Your working directory is clean relative to the staging area, and the staging area is empty.
3. Creating and Staging a File
Let’s create a README.md file.
- Create the file with some content. You can use a text editor or the command line:
# On Linux/macOS echo "# My Git Cookbook" > README.md echo "A collection of delicious Git recipes." >> README.md # On Windows PowerShell Set-Content README.md -Value "# My Git Cookbook`nA collection of delicious Git recipes." # Or simply create and edit README.md with Notepad or another editor. - Check the status:
git status
Expected Output:
On branch main # or master

No commits yet

Untracked files:
  (use "git add <file>..." to include in what will be committed)
        README.md

nothing added to commit but untracked files present (use "git add" to track)
Explanation of Output:
Git sees README.md but lists it as “Untracked” because it’s not part of any previous snapshot and hasn’t been staged yet.
- Stage the
README.mdfile:git add README.md(No output is shown if successful) - Check the status again:
git status
Expected Output:
On branch main # or master

No commits yet

Changes to be committed:
  (use "git rm --cached <file>..." to unstage)
        new file:   README.md
Explanation of Output:
README.md is now listed under “Changes to be committed.” This means it’s in the staging area, ready for the next commit.
4. Making the First Commit
Let’s commit the staged file.
- Commit with a message using the
-mflag:git commit -m "Initial commit: Add README file"
Expected Output (will vary slightly based on Git version and configuration):
[main (root-commit) abc1234] Initial commit: Add README file
 1 file changed, 2 insertions(+)
 create mode 100644 README.md
(The abc1234 is the beginning of the commit hash, which will be unique.)
Explanation of Output:
[main (root-commit) abc1234]: Indicates the commit was made on themainbranch, it’s the first commit (root-commit), and shows the short commit hash.Initial commit: Add README file: Your commit message.1 file changed, 2 insertions(+): A summary of what was changed in this commit.create mode 100644 README.md: Indicates thatREADME.mdwas newly created in this commit.100644is a Git internal mode representing a regular non-executable file.
- Check the status one more time:
git status
Expected Output:
On branch main
nothing to commit, working tree clean
Explanation of Output:
The working directory is “clean” – there are no changes in the working directory or staging area that differ from the last commit.
5. Modifying a File and Viewing Diffs
Let’s modify README.md and see how git diff works.
- Add a new line to
README.md:# On Linux/macOS echo "Chapter 3: Our First Repository" >> README.md # On Windows PowerShell Add-Content README.md -Value "Chapter 3: Our First Repository" - Check the status:
git status
Expected Output:
On branch main
Changes not staged for commit:
  (use "git add <file>..." to update what will be committed)
  (use "git restore <file>..." to discard changes in working directory)
        modified:   README.md

no changes added to commit (use "git add" and/or "git commit -a")
Explanation of Output:
Git detected that README.md has been modified in the working directory but these changes are not yet staged.
- View changes not yet staged (
git diff):git diff
Expected Output (will show the added line):
diff --git a/README.md b/README.md
index <hash1>..<hash2> 100644
--- a/README.md
+++ b/README.md
@@ -1,2 +1,3 @@
 # My Git Cookbook
 A collection of delicious Git recipes.
+Chapter 3: Our First Repository
(The <hash1> and <hash2> are internal blob hashes and will vary.)
Explanation of Output:
--- a/README.md: Represents the file before changes (from the staging area/last commit).+++ b/README.md: Represents the file after changes (from the working directory).@@ -1,2 +1,3 @@: Context information about line numbers. It means “show 2 lines from file ‘a’ starting at line 1, and 3 lines from file ‘b’ starting at line 1”.- Lines starting with
+are additions. Lines starting with-would be deletions.
- Stage the changes:
git add README.md - Now, run
git diffagain:git diffExpected Output: (No output, because there are no differences between the working directory and the staging area for tracked files). - View changes that are staged but not yet committed (
git diff --staged):git diff --staged
Expected Output (same diff as before, as these changes are now staged):
diff --git a/README.md b/README.md
index <hash1>..<hash2> 100644
--- a/README.md
+++ b/README.md
@@ -1,2 +1,3 @@
 # My Git Cookbook
 A collection of delicious Git recipes.
+Chapter 3: Our First Repository
6. Committing with the Default Editor
Let’s commit these staged changes, this time letting Git open your configured text editor.
- Run
git commitwithout-m:git commit - Your configured text editor will open with a template like this:
# Please enter the commit message for your changes. Lines starting # with '#' will be ignored, and an empty message aborts the commit. # # On branch main # Changes to be committed: # modified: README.md # - Type your commit message at the top. For example:
Add chapter information to README Detailed explanation about this important update to the README file, explaining the context and purpose of this change.Follow the commit message conventions: a short summary line, a blank line, then a more detailed explanation if needed. - Save the file and close the editor.
Expected Output (after closing the editor):
[main def4567] Add chapter information to README
 1 file changed, 1 insertion(+)
(The commit hash def4567 will be unique.)
Tip: If you run git commit and your editor opens, but you decide not to commit, you can usually abort the commit by deleting all text in the commit message (including commented lines, though just ensuring no non-commented lines exist is often enough) and saving/closing, or by closing the editor without saving if it prompts and offers an abort option.
7. Adding All Changes and Using git commit -a
Let’s create another file and modify README.md again.
- Create
ingredients.txt:echo "Flour" > ingredients.txt echo "Sugar" >> ingredients.txt - Modify
README.mdagain:echo "More details coming soon." >> README.md - Check status:
git status
Expected Output:
On branch main
Changes not staged for commit:
  (use "git add <file>..." to update what will be committed)
  (use "git restore <file>..." to discard changes in working directory)
        modified:   README.md

Untracked files:
  (use "git add <file>..." to include in what will be committed)
        ingredients.txt

no changes added to commit (use "git add" and/or "git commit -a")
- To stage all modified and new files in the current directory and its subdirectories, you can use
git add .(dot means current directory):git add .Or, more explicitly for all changes known to Git (modified/deleted) and new files in paths already known to Git:git add -Aorgit add --all. For new files and modifications in the current directory:git add .is common. - Check status:
git status
Expected Output:
On branch main
Changes to be committed:
  (use "git restore --staged <file>..." to unstage)
        modified:   README.md
        new file:   ingredients.txt
Now, instead of git commit -m "...", if you want to commit all tracked files that have been modified, you can use git commit -a -m "Your message". The -a flag automatically stages all modified tracked files before committing.
Warning: git commit -a will not add new, untracked files. You must use git add for untracked files first. This is why the previous git add . was still necessary for ingredients.txt. If ingredients.txt was already tracked and modified, then git commit -a would stage and commit its changes.
Let’s commit the currently staged changes:
git commit -m "Add ingredients file and update README"
Expected Output:
[main ghi7890] Add ingredients file and update README
 2 files changed, 3 insertions(+)
 create mode 100644 ingredients.txt
| Command | Description | Typical Usage (Chapter 3 Context) |
|---|---|---|
| git init | Initializes a new, empty Git repository or reinitializes an existing one. | Creates the .git subdirectory in your project root, making it a Git repository. |
| git status | Displays the state of the working directory and staging area. | Shows which files are modified, staged, untracked, or committed. Helps understand what Git is tracking. |
| git add <file> | Adds file contents to the staging area (index). | To stage specific new or modified files that you want to include in the next commit. |
| git add . | Adds all new and modified files in the current directory and its subdirectories to the staging area. | To stage all current changes in the project. (Use with caution, review changes first). |
| git commit -m “message” | Records changes from the staging area to the repository with an inline commit message. | To save a snapshot of staged changes with a brief summary message. |
| git commit | Records changes from the staging area to the repository, opening the configured text editor for a commit message. | To save a snapshot of staged changes, allowing for a more detailed, multi-line commit message. |
| git diff | Shows differences between files in the working directory and the staging area. | To review changes you’ve made but not yet staged. |
| git diff –staged (or git diff –cached) |
Shows differences between files in the staging area and the last commit (HEAD). | To review changes you’ve staged and are about to commit. |
| git diff HEAD | Shows all uncommitted changes in your working directory relative to the last commit (HEAD). (For tracked files) | To see all modifications (staged or unstaged) since the last commit. |
OS-Specific Notes
.gitDirectory: The creation and structure of the.gitdirectory are identical across Windows, macOS, and Linux.- File Paths in Commands: When specifying file paths in commands like
git add my/file.txt:- Linux/macOS: Use forward slashes:
path/to/file.txt. - Windows: Git Bash understands forward slashes (
path/to/file.txt). In Command Prompt or PowerShell, you can often use backslashes (path\to\file.txt), but forward slashes are generally more portable and recommended even on Windows when interacting with Git.
- Linux/macOS: Use forward slashes:
- Line Endings in Diffs: As mentioned in Chapter 1, differences in line endings (CRLF for Windows, LF for macOS/Linux) can sometimes make
git diffshow entire files as modified ifcore.autocrlfis not set up correctly. Chapter 2 discussed configuring this. If you see unexpected widespread diffs, line endings are a common culprit. - Default Editor Invocation: How Git calls your configured
core.editormight have slight OS-specific nuances, especially regarding paths with spaces or special characters. The examples in Chapter 2 for settingcore.editoraim to address these.
Common Mistakes & Troubleshooting Tips
| Git Issue / Error | Symptom(s) | Troubleshooting / Solution |
|---|---|---|
| Forgetting git add before git commit | Commit is empty or doesn’t include recent changes. git status still shows “Changes not staged for commit”. | Solution: Always run git add <file> or git add . to stage changes. Verify with git status before committing. |
| Committing unrelated changes together | A single commit contains multiple distinct features or fixes. Commit message is vague (e.g., “Updates”). | Solution: Aim for atomic commits. Use git add <specific-file> to stage related changes for one commit, then repeat for other logical changes. |
| Poor commit messages | Messages like “fix,” “stuff,” or no explanation of ‘why’. Project history is hard to read. | Solution: Follow conventions: imperative summary (e.g., “Fix login bug”), blank line, then detailed explanation if needed. See Chris Beams’ guide. |
| Accidentally committing large/unwanted files | Repository size bloats; sensitive data exposed. .DS_Store, node_modules/, compiled files, etc., in repo. | Solution: Use a .gitignore file (covered next chapter). Review with git diff –staged before commit. For past mistakes, see history rewriting (advanced). |
| Confusion about git diff outputs | Misinterpreting what changes are being shown by different git diff commands. | Solution: Remember:
|
| git commit -a doesn’t add new files | New files are created, git commit -a -m “message” is run, but new files are not in the commit. | Solution: git commit -a only stages modified/deleted *tracked* files. New (untracked) files always require an explicit git add <new-file> or git add . first. |
| Aborting a commit in editor | Opened editor with git commit, but decided not to commit. Unsure how to cancel. | Solution: Delete all text in the commit message (including commented lines, or ensure no non-commented lines exist), then save and close the editor. Some editors might offer an “abort” option on close if no changes are saved. |
Exercises
- Project Initialization and First Commit:
- Create a new directory named
my-novel. - Navigate into
my-novel. - Initialize a Git repository.
- Create a file named
chapter1.txt. Add the sentence “It was a dark and stormy night.” to it. - Check the status. What does Git say about
chapter1.txt? - Stage
chapter1.txt. - Check the status again. How has it changed?
- Commit the staged file with the message “Start Chapter 1”.
- Create a new directory named
- Modifying, Staging, and Diffing:
- In
my-novel, add a new sentence tochapter1.txt: “Suddenly, a shot rang out!” - Create a new file named
characters.txt. Add “Detective Miles” to it. - Check the status.
- View the differences for
chapter1.txtthat are not yet staged. - Stage only the changes to
chapter1.txt. - Check the status. What is staged? What is not?
- View the differences that are staged.
- View the differences for
characters.txt(which should still be unstaged). - Commit the staged changes to
chapter1.txtwith the message “Develop plot in Chapter 1”. - Stage
characters.txt. - Commit
characters.txtwith the message “Introduce main character”.
- In
- Exploring Commit Messages:
- Modify
characters.txtby adding “Villainous Victor” on a new line. - Stage the change.
- Initiate a commit using just
git commit(without-m). - In the editor that opens, write a commit message following good conventions:
- Summary line: “Add antagonist character”
- Blank line
- Detailed description: “Introduced Villainous Victor to create conflict for Detective Miles. This character will be central to the main plot.”
- Save and close the editor to finalize the commit.
- (Self-reflection) How does this commit message compare to ones made with just
-m?
- Modify
Summary
In this chapter, you’ve taken your first practical steps with Git, learning the core workflow for versioning a project:
- Initialize a repository:
git initcreates a new.gitsubdirectory, turning a regular directory into a Git repository. - The
.gitdirectory is the heart of your repository, storing all history and metadata. - File States: Files can be modified (in working directory), staged (in staging area), or committed (in repository).
- Staging Files:
git add <file>orgit add .moves changes from the working directory to the staging area. - Committing Changes:
git commitrecords snapshots of the staging area into the repository history.- Use
git commit -m "Message"for short messages. - Use
git committo open an editor for more detailed messages.
- Use
- Good Commit Messages are crucial: use imperative mood for the summary, keep it short, and explain the why/what in the body if needed.
- Checking Status:
git statusshows the current state of your working directory and staging area. - Viewing Differences:
git diff: Shows unstaged changes (working directory vs. staging area).git diff --staged(or--cached): Shows staged changes (staging area vs. last commit).git diff HEAD: Shows all uncommitted changes (working directory vs. last commit).
Mastering these commands forms the bedrock of your Git skills. In the next chapter, we’ll explore how to ignore unwanted files and delve deeper into Git’s object model.
Further Reading
- Pro Git Book:
- Chapter 2.1 Git Basics – Getting a Git Repository: https://git-scm.com/book/en/v2/Git-Basics-Getting-a-Git-Repository
- Chapter 2.2 Git Basics – Recording Changes to the Repository: https://git-scm.com/book/en/v2/Git-Basics-Recording-Changes-to-the-Repository
- Official Git Documentation:
git init: https://git-scm.com/docs/git-initgit add: https://git-scm.com/docs/git-addgit commit: https://git-scm.com/docs/git-commitgit status: https://git-scm.com/docs/git-statusgit diff: https://git-scm.com/docs/git-diff
- How to Write a Git Commit Message (Chris Beams): https://chris.beams.io/posts/git-commit/ (A widely cited guide on commit message conventions).
