
Chapter 4: Your First ESP32 Project: Hello World
Chapter Objectives
By the end of this chapter, you will be able to:
- Create a new ESP-IDF project from an example template using VS Code.
- Understand the basic C code structure of the “Hello World” example.
- Configure the project for your specific ESP32 target device.
- Select the correct serial port for communication with your ESP32 board.
- Build (compile) the “Hello World” project into a runnable firmware.
- Flash (upload) the compiled firmware to your ESP32 board.
- Monitor the serial output from the ESP32 to see the “Hello World” message.
- Make a small modification to the application code, then rebuild, re-flash, and observe the changes.
Introduction
Welcome to one of the most exciting milestones in your embedded systems journey: running your first program on actual hardware! In the previous chapters, we explored the ESP32 ecosystem, set up your development environment, and gained an understanding of the ESP-IDF architecture. Now, it’s time to bring your ESP32 to life by making it say “Hello World.”
This traditional first program is more than just a rite of passage; it verifies that your entire toolchain—from code editor to compiler to the physical hardware—is working correctly. Successfully completing this chapter will give you the confidence and foundational skills needed to tackle more complex projects. We’ll use VS Code and the ESP-IDF extension to create, build, flash, and monitor this simple application, step by step.
Theory
Before we jump into the practical steps, let’s briefly review some key concepts that come into play when running your first “Hello World” project on an ESP32.
app_main(): The Starting Point
As discussed in Chapter 3, the void app_main(void) function in your C code (typically in a file like main/your_app_main.c) is the entry point for your application’s logic. After the ESP32 boots up and ESP-IDF completes its initial system setup (including starting FreeRTOS), app_main() is called.
Serial Output with printf()
To “see” what our ESP32 is doing, we often send messages from the ESP32 back to our computer. The most common way to do this for simple text output is using the standard C library function printf(). In an ESP-IDF project, printf() is configured by default to send its output over the USB-to-UART serial connection that you use for flashing. We can then use a serial monitor tool to view these messages.
To use printf(), you typically need to include the standard input/output header file:
#include <stdio.h>
Essential Includes for a Basic ESP-IDF Application
A minimal app_main.c file will often include a few key headers:
stdio.h: For standard I/O functions likeprintf.freertos/FreeRTOS.handfreertos/task.h: For FreeRTOS functionalities. Even ifapp_mainis simple, ESP-IDF runs on FreeRTOS, andapp_mainitself is executed as a task. These headers provide definitions for FreeRTOS types and APIs, such asvTaskDelayfor pausing a task.
The Journey from Code to Execution
- Writing Code: You write your C code (e.g.,
hello_world_main.c). - Building (Compilation & Linking):
- Compilation: The C source code files are compiled by the Xtensa or RISC-V C compiler (depending on your ESP32 variant) into object files (
.o). - Linking: The linker takes these object files, along with pre-compiled libraries from ESP-IDF components (like FreeRTOS, Wi-Fi drivers, HAL), and combines them into a single executable binary firmware image (
.binfile). The linker also resolves symbol references between different files and libraries.
- Compilation: The C source code files are compiled by the Xtensa or RISC-V C compiler (depending on your ESP32 variant) into object files (
- Flashing: The generated firmware image (
.binfile) is transferred from your computer to the ESP32’s flash memory via the USB serial connection. Theesptool.pyutility, integrated into ESP-IDF, handles this process. The ESP32 needs to be in a special “bootloader mode” to accept new firmware. Most development boards handle this automatically using the DTR and RTS control lines of the USB-to-UART chip to reset the ESP32 in the correct mode. - Running & Monitoring: Once flashed, the ESP32 resets and starts executing the new firmware, beginning with the bootloaders and then your
app_main(). You can use a serial monitor tool (also integrated into VS Code via the ESP-IDF extension) to view any output your application sends viaprintf().
%%{ init: { 'theme': 'base', 'themeVariables': { 'fontFamily': 'Open Sans' } } }%%
graph TD
    A["Source Code <br> (e.g., hello_world_main.c)"] --> B(C Compiler <br> Xtensa/RISC-V);
    B --> C["Object Files (.o)"];
    C --> D(Linker);
    subgraph ESP-IDF Components
        Lib1[FreeRTOS Lib]
        Lib2[HAL Lib]
        Lib3[Driver Libs]
    end
    Lib1 --> D;
    Lib2 --> D;
    Lib3 --> D;
    D --> E["Firmware Image (.bin)"];
    E --> F{"Flashing Utility <br> (esptool.py via USB)"};
    F --> G[ESP32 Flash Memory];
    G --> H(ESP32 Execution <br> Bootloader -> app_main);
    H --> I["Serial Output <br> (via printf)"];
    I --> J{"Serial Monitor on PC <br> (VS Code / Terminal)"};

    classDef startStyle fill:#DBEAFE,stroke:#2563EB,stroke-width:2px,color:#1E40AF;
    classDef processStyle fill:#EDE9FE,stroke:#5B21B6,stroke-width:1px,color:#5B21B6;
    classDef hardwareStyle fill:#D1FAE5,stroke:#059669,stroke-width:2px,color:#065F46;
    classDef decisionStyle fill:#FEF3C7,stroke:#D97706,stroke-width:1px,color:#92400E;

    class A,J startStyle;
    class B,C,D,Lib1,Lib2,Lib3 processStyle;
    class E,G,H,I hardwareStyle;
    class F decisionStyle;

    style ESP-IDF Components fill:#F3E8FF,stroke:#5B21B6,stroke-width:1px,color:#5B21B6
Practical Examples: Your “Hello World” Project
Let’s get our hands dirty and make your ESP32 say hello!
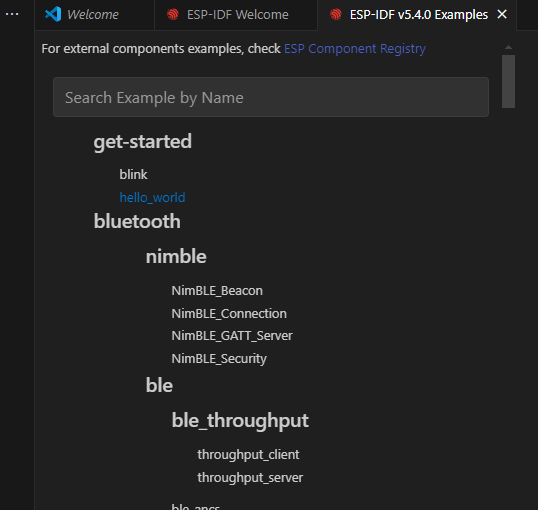
1. Creating a New Project from an Example
The easiest way to start a new project is by using one of the many examples provided with ESP-IDF. We’ll use the hello_world example.
Open VS Code.
Open the Command Palette: Press Ctrl+Shift+P (Windows/Linux) or Cmd+Shift+P (macOS).
Show Examples: Type ESP-IDF: Show Examples Projects and select it from the list.

Select ESP-IDF Version: You’ll be prompted to choose whether to use your current ESP-IDF version or a different one. Select “Use current ESP-IDF version” (which should be the v5.x you set up in Chapter 2).
Choose an Example: A list of examples will appear. Navigate to get-started and select hello_world.
Create Project: Click the “Create project using example hello_world” button.
Choose Project Location: You’ll be prompted to select a directory where your new project will be created.
Important: Do NOT create your project inside the ESP-IDF installation directory itself (e.g., inside C:\esp\esp-idf).
Create a dedicated folder for your ESP32 projects, for example, C:\Users\YourUser\Documents\ESP32_Projects or ~/esp32_projects.
Navigate into this projects folder and then click “Select folder” (or similar, depending on your OS and VS Code version; you are selecting the parent folder where the hello_world project folder will be created). VS Code will then create a new folder named hello_world (or you might be asked to name it) inside your chosen location and copy the example files into it.
VS Code might ask if you trust the authors of the files in this new folder. Since it’s from Espressif, you can click “Yes, I trust the authors.”
The new hello_world project will open in VS Code.
You now have a local copy of the hello_world project, ready for configuration and building.
2. Understanding the “Hello World” Code
Let’s look at the heart of this project:
- In the VS Code Explorer panel (usually on the left), expand the
hello_worldproject folder. - Navigate to the
mainsubfolder and open thehello_world_main.cfile.
You should see code similar to this:
/*
 * SPDX-FileCopyrightText: 2010-2022 Espressif Systems (Shanghai) CO LTD
 *
 * SPDX-License-Identifier: CC0-1.0
 */

#include <stdio.h>
#include <inttypes.h> // For PRId64 macro
#include "sdkconfig.h"
#include "freertos/FreeRTOS.h"
#include "freertos/task.h"
#include "esp_chip_info.h"
#include "esp_flash.h"

void app_main(void)
{
    printf("Hello world!\n");

    /* Print chip information */
    esp_chip_info_t chip_info;
    esp_chip_info(&chip_info);
    printf("This is %s chip with %d CPU core(s), WiFi%s%s%s, ",
           CONFIG_IDF_TARGET,
           chip_info.cores,
           (chip_info.features & CHIP_FEATURE_BT) ? "/BT" : "",
           (chip_info.features & CHIP_FEATURE_BLE) ? "/BLE" : "",
           (chip_info.features & CHIP_FEATURE_IEEE802154) ? "/802.15.4" : ""); // Added for C6/H2

    unsigned major_rev = chip_info.revision / 100;
    unsigned minor_rev = chip_info.revision % 100;
    printf("silicon revision v%d.%d, ", major_rev, minor_rev);

    uint32_t flash_size;
    if (esp_flash_get_size(NULL, &flash_size) != ESP_OK) {
        printf("Get flash size failed");
        return;
    }
    printf("%" PRIu32 "MB %s flash\n", flash_size / (1024 * 1024),
           (chip_info.features & CHIP_FEATURE_EMB_FLASH) ? "embedded" : "external");

    printf("Minimum free heap size: %" PRIu32 " bytes\n", esp_get_minimum_free_heap_size());

    for (int i = 10; i >= 0; i--) {
        printf("Restarting in %d seconds...\n", i);
        vTaskDelay(1000 / portTICK_PERIOD_MS);
    }
    printf("Restarting now.\n");
    fflush(stdout); // Ensure all printf output is sent before restart
    esp_restart();
}
Code Breakdown:
| Code Snippet / Concept | Purpose | Key Headers / Functions |
|---|---|---|
| Includes | Bring in necessary declarations for standard functions and ESP-IDF specific APIs. |
<stdio.h> (for printf)<inttypes.h> (for PRIu32 etc.)"sdkconfig.h" (project configuration macros)"freertos/FreeRTOS.h", "freertos/task.h" (FreeRTOS API)"esp_chip_info.h" (chip details)"esp_flash.h" (flash memory access)
|
void app_main(void) |
The main entry point for user application code after ESP-IDF initialization and FreeRTOS startup. | N/A (Function definition) |
printf("Hello world!\\n"); |
Prints the “Hello world!” message to the serial console. | printf() from <stdio.h> |
| Chip Information Display | Retrieves and prints details about the ESP32 chip (model, cores, features, revision, flash size). |
esp_chip_info_t, esp_chip_info()CONFIG_IDF_TARGET (from sdkconfig.h)esp_flash_get_size()
|
| Minimum Free Heap | Prints the smallest amount of free heap memory recorded since boot, useful for memory monitoring. | esp_get_minimum_free_heap_size() |
| Countdown Loop | A simple loop that counts down from 10 to 0, printing each second. | for loop, printf() |
vTaskDelay(1000 / portTICK_PERIOD_MS); |
Pauses the current FreeRTOS task (app_main in this case) for 1000 milliseconds (1 second). This is a non-blocking delay that allows other tasks to run. |
vTaskDelay(), portTICK_PERIOD_MS (from FreeRTOS headers) |
fflush(stdout); |
Ensures that any buffered output from printf is immediately sent to the serial port before the chip restarts. |
fflush() from <stdio.h> |
esp_restart(); |
Triggers a software reset of the ESP32 chip. | esp_restart() (from esp_system.h, often included transitively) |
- Includes:
stdio.h: Forprintf.inttypes.h: ForPRIu32andPRId64macros, used for platform-independent printing of fixed-width integers.sdkconfig.h: This header is automatically generated during the build process and contains preprocessor definitions based on your project configuration (frommenuconfig).CONFIG_IDF_TARGETis defined here.freertos/FreeRTOS.h,freertos/task.h: For FreeRTOS features likevTaskDelayand task management.esp_chip_info.h: For theesp_chip_info()function to get details about the ESP32 chip.esp_flash.h: For functions related to the flash memory, likeesp_flash_get_size().
app_main(void)function:printf("Hello world!\n");: Prints the classic message.esp_chip_info_t chip_info; esp_chip_info(&chip_info);: Declares a structure to hold chip information and calls the function to populate it.- The subsequent
printfstatements display details about the chip:CONFIG_IDF_TARGET: A macro fromsdkconfig.hthat expands to the name of the target chip (e.g., “esp32”, “esp32s3”).- Number of CPU cores.
- Presence of Bluetooth (BT), Bluetooth Low Energy (BLE), and IEEE 802.15.4 (for ESP32-C6/H2).
- Silicon revision.
- Flash memory size and type (embedded or external).
printf("Minimum free heap size: %" PRIu32 " bytes\n", esp_get_minimum_free_heap_size());: Prints the smallest amount of free heap memory recorded since boot. This is useful for debugging memory issues.- Countdown Loop:
for (int i = 10; i >= 0; i--) { ... }: A loop that counts down from 10.printf("Restarting in %d seconds...\n", i);: Prints the countdown message.vTaskDelay(1000 / portTICK_PERIOD_MS);: This is a FreeRTOS function that pauses the current task (app_mainin this case) for a specified number of “ticks”.1000 / portTICK_PERIOD_MSconverts 1000 milliseconds (1 second) into the equivalent number of FreeRTOS ticks.
printf("Restarting now.\n"); fflush(stdout);: Prints a final message andfflush(stdout)ensures that all bufferedprintfoutput is actually sent out through the serial port before the restart. This is important becauseesp_restart()happens immediately.esp_restart();: This function reboots the ESP32.
3. Configuring the Project
Before building, you need to tell ESP-IDF which specific ESP32 variant you’re using and which serial port your board is connected to.
- Connect your ESP32 board to your computer with a USB data cable.
- VS Code Status Bar: Look at the status bar at the bottom of the VS Code window. You should see several icons and text fields related to ESP-IDF.
- Set ESP32 Target:
- Click on the current target name in the status bar (it might say
esp32by default, or the last one you used). - Alternatively, open the Command Palette (
Ctrl+Shift+PorCmd+Shift+P) and typeESP-IDF: Set Espressif device target. - A list of supported targets will appear (e.g.,
esp32,esp32s2,esp32s3,esp32c3,esp32c6,esp32h2). - Select the exact ESP32 variant that matches your development board. This is crucial. If you’re unsure, check the markings on the chip (as discussed in Chapter 1) or the documentation for your board.
- After selecting, VS Code will configure the project for this target.
- Click on the current target name in the status bar (it might say
- Select Serial Port (COM Port):
- Click on the COM port section in the status bar (it might say “Select Port” or show a previously used port).
- Alternatively, open the Command Palette and type
ESP-IDF: Select Port to Use. - A list of available serial ports will appear. Choose the one corresponding to your ESP32 board (which you identified in Chapter 2, Step 7).
- Windows: e.g.,
COM3,COM4 - macOS: e.g.,
/dev/cu.usbserial-XXXXor/dev/cu.SLAB_USBtoUART - Linux: e.g.,
/dev/ttyUSB0or/dev/ttyACM0
- Windows: e.g.,
- (Optional) Project Configuration with menuconfig:For this basic project, the default settings are usually fine. However, for more complex projects, you’ll use menuconfig to customize various aspects of ESP-IDF and its components.
- You can access it by clicking the “gear” icon (SDK Configuration editor) in the status bar or by opening an ESP-IDF terminal (Command Palette:
ESP-IDF: Open ESP-IDF Terminal) and typingidf.py menuconfig. - We will explore
menuconfigin detail in Chapter 6. For now, you can just exitmenuconfigif you opened it.
- You can access it by clicking the “gear” icon (SDK Configuration editor) in the status bar or by opening an ESP-IDF terminal (Command Palette:

4. Building the Project
Now, let’s compile your C code and link it with ESP-IDF libraries to create the firmware.
- Click the “Build” icon (looks like a hammer or a cylinder with “Build” text) in the VS Code status bar.
- Alternatively, open the Command Palette and type
ESP-IDF: Build your project.
- Alternatively, open the Command Palette and type
- The Terminal panel in VS Code will open (if not already open) and show the build progress. You’ll see CMake configuring the project, then Ninja (the build tool) compiling various C files and linking them.
- This process might take a minute or two, especially for the first build, as it needs to compile all necessary ESP-IDF components. Subsequent builds are usually faster because only changed files are recompiled.
- If the build is successful, you’ll see messages indicating that binary files (
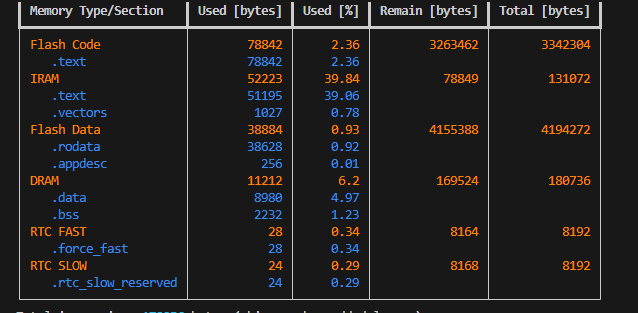
.bin) have been generated, typically in thebuildsubfolder of your project. For example:Project build complete. To flash, run this command: .../python .../esp-idf/components/esptool_py/esptool/esptool.py -p (PORT) -b 460800 --before default_reset --after hard_reset --chip esp32 write_flash --flash_mode dio --flash_size 2MB --flash_freq 40m 0x1000 build/bootloader/bootloader.bin 0x8000 build/partition_table/partition-table.bin 0x10000 build/hello_world.bin or run 'idf.py -p (PORT) flash'
Warning: If the build fails, carefully read the error messages in the terminal. Common issues include syntax errors in your code (though unlikely with the unmodified example), incorrect target selection, or problems with the ESP-IDF toolchain installation (which should have been addressed in Chapter 2).
5. Flashing the Project to Your ESP32
With the firmware built, it’s time to upload it to your ESP32’s flash memory.
- Ensure your ESP32 board is still connected to your computer and the correct COM port is selected in VS Code.
- Click the “Flash” icon (looks like a lightning bolt) in the VS Code status bar. This usually performs a build then flashes.
- Alternatively, open the Command Palette and select
ESP-IDF: Flash your project. If you want to flash without rebuilding (assuming a successful build already happened), you can useESP-IDF: Flash (UART) Your Device.
- Alternatively, open the Command Palette and select
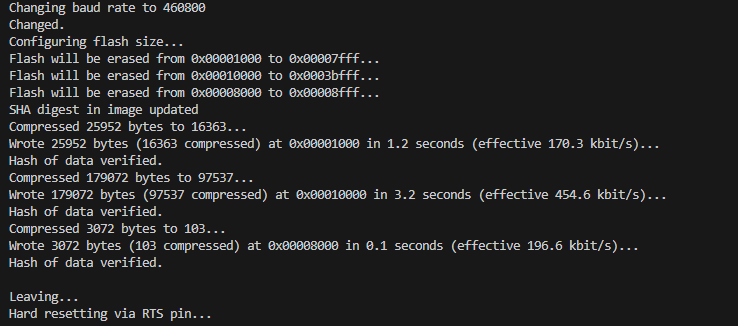
- The terminal will show esptool.py connecting to your ESP32, erasing the necessary flash sectors, and writing the bootloader, partition table, and your application firmware (hello_world.bin).
- Most ESP32 development boards will automatically enter bootloader mode for flashing. If
esptool.pyhas trouble connecting:- Some older boards might require you to manually put the ESP32 into bootloader mode. This usually involves holding down a “BOOT” or “FLASH” button, pressing and releasing the “RESET” (or “EN”) button, and then releasing the “BOOT” button. Check your board’s documentation.
- Try a different USB cable or USB port.
- Once flashing is complete,
esptool.pywill typically reset the ESP32, and your new firmware will start running.
6. Monitoring the Serial Output
Let’s see if our ESP32 is saying hello!
- Click the “Monitor” icon (looks like a plug or screen) in the VS Code status bar.
- Alternatively, open the Command Palette and select
ESP-IDF: Monitor your device.
- Alternatively, open the Command Palette and select
- A new terminal tab for the “ESP-IDF Monitor” will open. It will connect to your ESP32’s serial port at the configured baud rate (usually 115200 for ESP-IDF projects).
- You should see output similar to this:
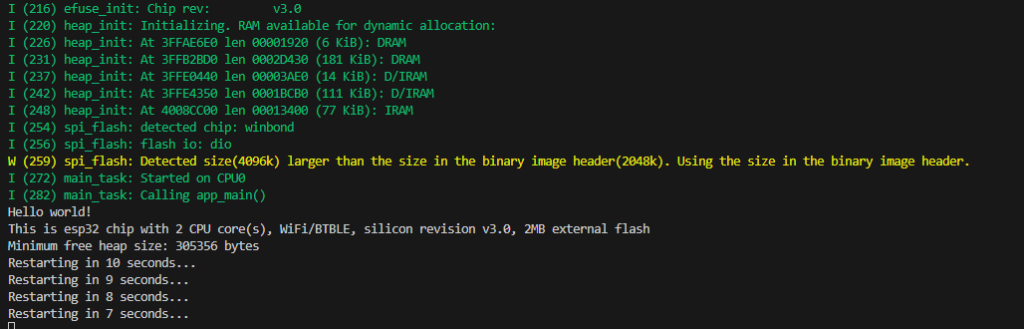
... (bootloader messages) ... I (31) main_task: App version: v5.x.x-dirty I (31) main_task: Compile time: ... I (35) main_task: ELF file SHA256: ... I (41) main_task: ESP-IDF: v5.x.x-dirty I (46) cpu_start: Starting scheduler on PRO CPU. I (0) cpu_start: Starting scheduler on APP CPU. Hello world! This is esp32 chip with 2 CPU core(s), WiFi/BT/BLE, silicon revision v3.0, 4MB external flash Minimum free heap size: 299512 bytes Restarting in 10 seconds... Restarting in 9 seconds... ... Restarting in 0 seconds... Restarting now. ... (restarts and prints again) ...Congratulations! Your ESP32 is running your first program! - To stop the serial monitor:
- Click in the monitor terminal window.
- Press the keyboard shortcut
Ctrl+](Control key and the right square bracket key). - You can also close the terminal tab.
7. Making a Simple Modification
Let’s change the code slightly to see the development cycle in action.
- Go back to the
main/hello_world_main.cfile in VS Code. - Modify the first
printfstatement. For example:printf("Greetings from my ESP32!\n"); - Save the file (
Ctrl+SorCmd+S). - Rebuild: Click the “Build” icon again. It should be much faster this time as only
hello_world_main.cneeds to be recompiled. - Re-flash: Click the “Flash” icon again.
- Re-monitor: Click the “Monitor” icon again.
You should now see your modified message:
… Greetings from my ESP32! This is esp32 chip with 2 CPU core(s), WiFi/BT/BLE, silicon revision v3.0, 4MB external flash …
This iterative process of Edit -> Build -> Flash -> Monitor is fundamental to embedded systems development.
Variant Notes
The process described above for creating, building, flashing, and monitoring the “Hello World” project is identical for all ESP32 variants (ESP32, ESP32-S2, ESP32-S3, ESP32-C3, ESP32-C6, ESP32-H2) when using the ESP-IDF extension in VS Code.
The crucial step that ensures compatibility is Step 3: Configuring the Project, specifically Setting the ESP32 Target. When you select your specific chip (e.g., esp32s3), the ESP-IDF build system automatically:
- Uses the correct Xtensa or RISC-V toolchain.
- Links against the appropriate Hardware Abstraction Layer (HAL) and drivers for that variant.
- Includes chip-specific configurations.
The hello_world_main.c code itself uses CONFIG_IDF_TARGET (from sdkconfig.h) to print the name of the chip it’s running on, demonstrating this target-awareness.
Common Mistakes & Troubleshooting Tips
- Mistake: Incorrect COM/Serial port selected in VS Code.
- Fix: Double-check the COM port in your OS’s Device Manager (Windows) or via
ls /dev/cu.*(macOS) orls /dev/ttyUSB*(Linux). Ensure the correct one is selected in the VS Code status bar.
- Fix: Double-check the COM port in your OS’s Device Manager (Windows) or via
- Mistake: Board not entering bootloader mode during flash (flashing fails with connection errors like “Failed to connect to ESP32: Timed out waiting for packet header”).
- Fix:
- Ensure you’re using a USB data cable, not a power-only charge cable.
- Try a different USB port.
- If your board has “BOOT” and “RESET” (or “EN”) buttons: Hold “BOOT”, press and release “RESET”, then release “BOOT” just before initiating the flash.
- Check if the USB-to-UART drivers (CP210x, CH340) are correctly installed (Chapter 2).
- Fix:
- Mistake: Build errors after modifying code.
- Fix: Carefully read the error messages in the VS Code terminal. They usually point to the file and line number with a C syntax error (e.g., missing semicolon, mismatched parentheses).
- Mistake: Serial monitor shows garbage characters or nothing at all.
- Fix:
- Ensure the baud rate in the monitor matches what the ESP32 is using (ESP-IDF defaults to 115200, and the VS Code monitor tool should use this by default). The
ESP-IDF: Monitor your devicecommand usually handles this correctly. - Verify the correct COM port is selected for monitoring.
- Sometimes, pressing the RESET button on the ESP32 board after starting the monitor can help synchronize the output.
- Ensure the baud rate in the monitor matches what the ESP32 is using (ESP-IDF defaults to 115200, and the VS Code monitor tool should use this by default). The
- Fix:
- Mistake (Linux): “Permission denied” when trying to access the serial port (
/dev/ttyUSB0).- Fix: Your user needs to be a member of the
dialoutgroup (or sometimesuucporserial). Runsudo usermod -a -G dialout $USER. You’ll need to log out and log back in for the change to take effect. You might also need to adjust udev rules for persistent permissions.
- Fix: Your user needs to be a member of the
Exercises
- Personalized Greeting:
- Modify the
hello_world_main.ccode to print your name or a custom greeting message. - Build, flash, and monitor to see your personalized message.
- Modify the
- Chip Revision:
- The current code prints the major and minor silicon revision numbers. Modify the code to print only the full revision number as stored in
chip_info.revisiondirectly as an integer. - Hint: Use the correct
printfformat specifier for anuint16_torint(you might need to cast or check the type ofchip_info.revision).
- The current code prints the major and minor silicon revision numbers. Modify the code to print only the full revision number as stored in
- Slower Countdown:
- Change the
vTaskDelay()duration in the countdown loop to make the ESP32 count down every 2 seconds instead of every 1 second. - Build, flash, and monitor.
- Change the
- Infinite Hello:
- Remove the countdown loop and the
esp_restart()call. - Instead, create an infinite loop (
while(1)) withinapp_main. - Inside the loop, print “Hello from ESP32!” and then add a delay of 500 milliseconds using
vTaskDelay(). - Build, flash, and monitor. What happens? How does this differ from the original example’s behavior?
- Remove the countdown loop and the
Summary
- The “Hello World” project is a fundamental step to verify your ESP32 development setup.
- The typical workflow involves:
- Creating a project (often from an example).
- Writing/modifying C code in
app_main.c(and other files). - Configuring the target ESP32 variant and serial port in VS Code.
- Building the project to compile code and link it into a firmware binary.
- Flashing the firmware to the ESP32’s flash memory.
- Monitoring the serial output to observe the application’s behavior.
printf()is used for serial output, andvTaskDelay()for pausing execution in a FreeRTOS-friendly way.- The ESP-IDF extension in VS Code provides convenient tools for these steps.
- This process is consistent across different ESP32 variants, provided the correct target is selected.
Further Reading
- ESP-IDF
get-started/hello_worldExample README:- Usually found within the example directory itself (
esp-idf/examples/get-started/hello_world/README.md).
- Usually found within the example directory itself (
- ESP-IDF
idf.pyCommand-Line Tool:- https://docs.espressif.com/projects/esp-idf/en/v5.x/esp32/api-guides/tools/idf-py.html
- (While VS Code abstracts these, understanding the underlying commands can be useful.)
- Standard C
printfdocumentation:- Any good C programming reference will cover
printfformat specifiers.
- Any good C programming reference will cover
- FreeRTOS
vTaskDelay()API Reference:
You’ve successfully run your first application! This opens the door to exploring the vast capabilities of the ESP32. In the next chapter, we’ll look more closely at the build and flashing process, comparing command-line tools with the VS Code interface.
