
Chapter 3: Understanding ESP-IDF Framework Architecture
Chapter Objectives
By the end of this chapter, you will be able to:
- Understand the high-level architecture of the ESP-IDF.
- Identify and describe the key directories and their roles within an ESP-IDF installation.
- Explain the concept of “components” in ESP-IDF and how they promote modularity.
- Understand the role of the build system, including CMake and Kconfig (
menuconfig). - Recognize the typical structure of an ESP-IDF project.
- Understand the boot process overview, including the role of bootloaders.
- Identify the main application entry point (
app_main). - Appreciate the integration of FreeRTOS for task management.
- Understand the purpose of the Hardware Abstraction Layer (HAL).
Introduction
In the previous chapter, you successfully set up your ESP32 development environment with ESP-IDF v5.x and VS Code. Now that your digital workbench is ready, it’s time to understand the blueprint of the tools and libraries you’ll be using. The ESP-IDF is more than just a collection of files; it’s a well-organized framework designed to simplify complex embedded systems development.
This chapter will take you on a tour of the ESP-IDF architecture. We’ll explore its directory structure, dissect the concept of components, understand how projects are built, and get a glimpse into how your code interacts with the underlying hardware and the FreeRTOS real-time operating system. A solid grasp of this architecture will empower you to navigate the framework confidently, customize projects, and efficiently troubleshoot issues as you develop more sophisticated applications.
Theory
The ESP-IDF (Espressif IoT Development Framework) is a comprehensive SDK designed to facilitate the development of applications for ESP32-series SoCs. Its architecture is layered and modular, promoting code reusability and simplifying the management of complex projects.
%%{ init: { 'theme': 'base', 'themeVariables': { 'fontFamily': 'Open Sans', 'primaryTextColor': '#333', 'primaryBorderColor': '#5B21B6', 'lineColor': '#333', 'secondaryColor': '#DBEAFE', 'tertiaryColor': '#D1FAE5' } } }%%
classDiagram
    %% Hardware Layer
    class ESP32SoC {
        +ESP32/ESP32-S2/S3/C3/C6/H2
    }

    %% HAL Layer
    class HAL {
        +Register definitions
        +Low-level APIs
        +abstractHardware()
    }

    %% FreeRTOS Layer
    class FreeRTOS {
        +Scheduler
        +Tasks
        +Semaphores
        +Queues
        +createTask()
        +deleteSemaphore()
        +sendToQueue()
    }

    %% Drivers Layer
    class Drivers {
        +GPIO
        +SPI
        +I2C
        +UART
        +ADC
        +DAC
        +configureGPIO()
        +readADC()
        +transmitSPI()
    }

    %% Middleware Layer
    class Middleware {
        +Wi-Fi
        +TCP/IP
        +BLE/BT
        +Filesystems
        +Security
        +connectWifi()
        +sendTCPPacket()
        +initBLE()
        +mountFilesystem()
        +encryptData()
    }

    %% Application Layer
    class UserApplication {
        +app_main()
        +Custom components
        +Application logic
        +initializeSystem()
        +processData()
        +handleEvents()
    }

    %% Define relationships
    UserApplication --> Middleware : uses
    UserApplication --> Drivers : uses
    UserApplication --> FreeRTOS : uses
    Middleware --> Drivers : uses
    Middleware --> FreeRTOS : uses
    Middleware --> HAL : uses
    Drivers --> HAL : uses
    FreeRTOS --> HAL : uses
    HAL --> ESP32SoC : abstracts

    %% Apply styling
    classDef appStyle fill:#DBEAFE,stroke:#2563EB,stroke-width:2px,color:#1E40AF
    classDef idfStyle fill:#EDE9FE,stroke:#5B21B6,stroke-width:2px,color:#5B21B6
    classDef hwStyle fill:#D1FAE5,stroke:#059669,stroke-width:2px,color:#065F46
Let’s break down the key aspects of its architecture:
1. ESP-IDF Directory Structure
When you installed ESP-IDF (typically in a directory like ~/esp/esp-idf or C:\esp\esp-idf), a specific directory structure was created. Understanding this structure is key to finding resources, examples, and core framework code. Here are some of the most important top-level directories:
components: This is one of the most critical directories. It contains various software modules (components) that provide specific functionalities, such as Wi-Fi drivers, TCP/IP stack, FreeRTOS kernel, peripheral drivers, and various utility libraries. We’ll discuss components in more detail shortly.docs: Contains the official ESP-IDF documentation in reStructuredText format. You can build this locally or access the latest version online.examples: A rich collection of example projects demonstrating how to use various features and peripherals of the ESP32. These are invaluable learning resources and starting points for your own projects.tools: Contains various host-side tools and scripts used by ESP-IDF, including the IDF Python tools (idf.py), Kconfig frontends, and partition table utilities.Kconfig: Contains Kconfig fragment files used by the configuration system.linker: Contains linker script fragments and related files used to control how the application is linked.make: Contains legacy Make build system files (ESP-IDF v4.x and earlier primarily used Make; v5.x uses CMake, but some Make support might exist for compatibility or specific tools).
| Directory | Description | Importance / Key Contents |
|---|---|---|
components |
Contains software modules (components) providing specific functionalities. | Critical for modular design. Includes drivers, FreeRTOS, networking stacks, HAL, etc. |
docs |
Official ESP-IDF documentation in reStructuredText format. | Source for documentation; can be built locally. |
examples |
A rich collection of example projects. | Invaluable for learning and as starting points for new projects. |
tools |
Host-side tools and scripts used by ESP-IDF. | Includes idf.py, Kconfig frontends, partition utilities. |
Kconfig |
Contains Kconfig fragment files used by the configuration system. | Defines configuration options for components and the framework. |
linker |
Contains linker script fragments and related files. | Controls how the application is linked and memory is laid out. |
make |
Legacy Make build system files (primarily for older versions or specific tools). | ESP-IDF v5.x uses CMake; Make files are for compatibility/specific cases. |
2. Components: The Building Blocks of ESP-IDF
ESP-IDF is built around the concept of components. A component is a self-contained piece of code that provides a specific functionality. It typically includes source files (.c, .cpp, .S), header files (.h), and a CMakeLists.txt file that tells the build system how to compile it. Components can also include a Kconfig file for configuration options.
| Component Type | Description | Typical Location | Examples |
|---|---|---|---|
| Core ESP-IDF Components | Fundamental libraries and drivers provided by Espressif as part of ESP-IDF. | esp-idf/components |
freertos, lwip, esp_wifi, driver, esp_hw_support, nvs_flash |
| Project Components | Custom components specific to your application, developed by you or your team. | your_project_root/components/ |
my_custom_sensor_driver, application_logic_module, ui_handler |
| Third-Party Components | Components developed by others, integrated into your project. Can be sourced from registries like the ESP-IDF Component Registry or GitHub. | Managed by build system (e.g., in your_project_root/managed_components/) or placed in your_project_root/components/ |
aws_iot, azure_iot_hub, various utility libraries (e.g., for specific sensors, protocols) |
Benefits of a Component-Based Architecture:
- Modularity: Code is organized into logical units, making it easier to understand, maintain, and test.
- Reusability: Components can be easily reused across different projects.
- Configurability: Many components offer configuration options (via Kconfig) that allow you to enable/disable features or adjust parameters, tailoring the component to your specific needs and optimizing resource usage.
- Extensibility: You can create your own custom components for your application-specific logic.
Types of Components:
- Core ESP-IDF Components: Found in the
esp-idf/componentsdirectory. These provide fundamental functionalities:- System-level:
freertos(FreeRTOS kernel and ESP32 port),esp_hw_support(Hardware Abstraction Layer, clock control, interrupt allocation),heap(memory management),log(logging library),nvs_flash(Non-Volatile Storage). - Peripheral Drivers:
driver(GPIO, I2C, SPI, UART, ADC, DAC, etc.),esp_adc(newer ADC driver). - Networking:
lwip(Lightweight IP TCP/IP stack),esp_wifi(Wi-Fi driver),esp_eth(Ethernet driver),mbedtls(TLS/SSL library). - Bluetooth:
bt(Bluetooth controller and host stack – Classic & BLE). - Utilities:
json,protobuf-c, etc.
- System-level:
- Project Components: Specific to your project, usually placed in a
componentsdirectory within your project’s root folder. This is where you’d put your custom drivers or libraries. - Third-Party Components: You can also integrate components from other sources.
%%{ init: { 'theme': 'base', 'themeVariables': { 'fontFamily': 'Open Sans' } } }%%
graph TD
    subgraph Final_Application_Firmware
        direction LR
        AppLogic["My_App_Logic (Custom Component)"]
        WiFiDriver["WiFi_Driver (IDF Component)"]
        FreeRTOSKernel["FreeRTOS (IDF Component)"]
        HALComponent["HAL (IDF Component)"]
        BluetoothDriver["Bluetooth_Driver (IDF Component)"]
        FileSystem["FileSystem (IDF Component)"]
    end

    AppLogic --> FinalFirmware((Firmware Image: .bin))
    WiFiDriver --> FinalFirmware
    FreeRTOSKernel --> FinalFirmware
    HALComponent --> FinalFirmware
    BluetoothDriver --> FinalFirmware
    FileSystem --> FinalFirmware

    classDef appComponentStyle fill:#DBEAFE,stroke:#2563EB,stroke-width:2px,color:#1E40AF;
    classDef idfComponentStyle fill:#EDE9FE,stroke:#5B21B6,stroke-width:1px,color:#5B21B6;
    classDef firmwareStyle fill:#D1FAE5,stroke:#059669,stroke-width:2px,color:#065F46;

    class AppLogic appComponentStyle;
    class WiFiDriver,FreeRTOSKernel,HALComponent,BluetoothDriver,FileSystem idfComponentStyle;
    class FinalFirmware firmwareStyle;

    style Final_Application_Firmware fill:#F0F0F0,stroke:#333,stroke-width:1px
Each component is compiled into a static library (.a file) and then linked together with other components and your application code to create the final firmware image.
[Insert diagram: Illustrating the concept of components. Show a box for the final application firmware, composed of several smaller boxes representing different components like “My_App_Logic”, “WiFi_Driver”, “FreeRTOS”, “HAL”.]
3. Build System: CMake and Kconfig
ESP-IDF uses CMake as its primary build system. CMake is an open-source, cross-platform family of tools designed to build, test, and package software. It uses configuration files named CMakeLists.txt.
- Project
CMakeLists.txt: Located in the root of your project. It defines project-wide build settings, specifies the ESP-IDF path, and lists the components required by your application. - Component
CMakeLists.txt: Located in each component’s directory. It specifies how that particular component should be built (source files, include directories, dependencies on other components).
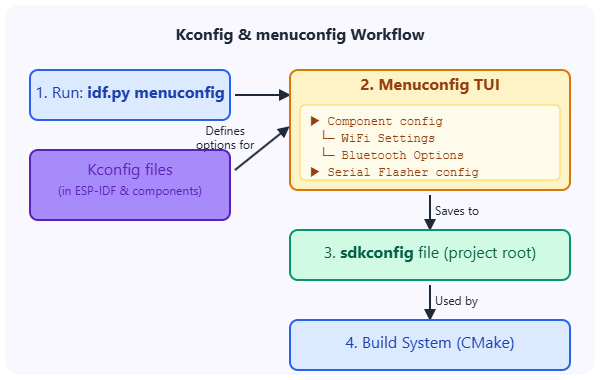
Kconfig (menuconfig) for Configuration:
ESP-IDF uses the Kconfig system (borrowed from the Linux kernel) to manage project configuration. This system allows you to customize a vast array of parameters for ESP-IDF components and the project itself.
sdkconfigfile: This file, located in your project’s root directory, stores your project’s specific configuration settings. It’s automatically generated and updated when you usemenuconfig.idf.py menuconfig: This command (run in the project directory) launches a text-based user interface (TUI) that allows you to browse and modify configuration options. These options are defined inKconfigfiles within components.[Insert screenshot: Themenuconfiginterface showing various configuration options for ESP-IDF.]
Usage of sdkconfig Settings |
Explanation | Example Kconfig Option (Illustrative) |
|---|---|---|
| Conditional Compilation | Enables or disables blocks of code using preprocessor directives (#ifdef, #if). This tailors the firmware to include only necessary features, optimizing size and performance. |
CONFIG_BT_ENABLED, CONFIG_SOME_FEATURE_MODE |
| Define Preprocessor Macros | Sets values for constants or macros used throughout the ESP-IDF framework and application code. | CONFIG_LOG_DEFAULT_LEVEL, CONFIG_FREERTOS_HZ |
| Influence Component Linking | Determines which components or parts of components are included in the final firmware image based on selected features. | If Wi-Fi is disabled, Wi-Fi related components might not be linked. |
| Configure Hardware Parameters | Sets default parameters for hardware peripherals, like baud rates, pin assignments (though often overridden in code), or clock speeds. | CONFIG_ESP_CONSOLE_UART_BAUDRATE |
| Set Resource Sizes | Defines sizes for buffers, stacks, or other resources. For example, task stack sizes, buffer sizes for networking. | CONFIG_MAIN_TASK_STACK_SIZE, CONFIG_LWIP_TCP_MSS |
When you build your project, the settings in sdkconfig are used to:
- Conditionally compile code (e.g., enable/disable features).
- Define preprocessor macros.
- Influence how components are linked.
Tip: It’s crucial to version control your sdkconfig file along with your project source code, as it defines how your application is built and configured. However, do not manually edit sdkconfig directly; always use menuconfig.
4. Project Structure
A typical ESP-IDF project has a standard directory structure:
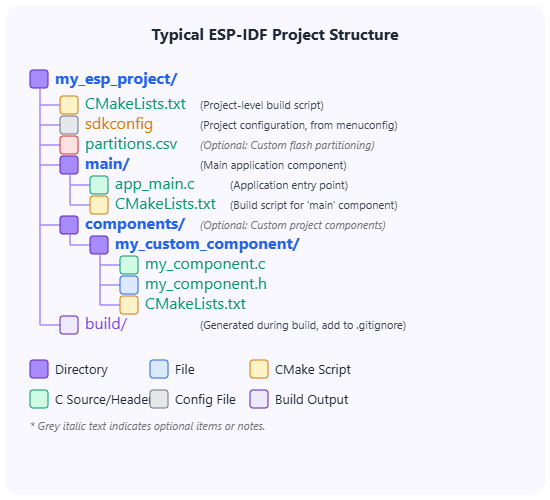
main/: This directory contains the main part of your application code.app_main.c(or.cpp): This file usually contains theapp_main()function, which is the entry point for your application logic after the system has initialized.CMakeLists.txt: A componentCMakeLists.txtfile for themaincomponent. It registers the source files in themaindirectory to be compiled as part of themaincomponent.
components/(optional): If your project has custom components, you place them here, each in its own subdirectory.CMakeLists.txt: The project-levelCMakeLists.txtfile. It typically includes a line likecmake_minimum_required(VERSION 3.16)andinclude($ENV{IDF_PATH}/tools/cmake/project.cmake). It also defines the project name usingproject(my_project_name).sdkconfig: Stores the project’s configuration settings, managed bymenuconfig.partitions.csv(optional): Defines how the flash memory is partitioned (e.g., for bootloader, application, NVS, OTA data). If not present, a default partition table is used.build/: This directory is created during the build process. It contains intermediate build files, compiled object files, libraries, and the final firmware binaries (.binfiles). This directory should typically be added to your.gitignorefile.
5. Boot Process Overview
When an ESP32 powers up or resets, it goes through a multi-stage boot process:
- First-Stage Bootloader (ROM Bootloader): This is a small piece of code embedded in the ESP32’s ROM (Read-Only Memory) by Espressif. Its primary job is to initialize basic hardware and check for a valid second-stage bootloader in the flash memory at a specific offset (usually
0x1000). If found, it loads and executes it. It also provides mechanisms for serial flashing if no valid second-stage bootloader is found or if specific strapping pins are set. - Second-Stage Bootloader (
bootloader.bin): This bootloader is part of ESP-IDF and resides in flash memory. It’s compiled along with your project (or more accurately, ESP-IDF provides a default one that can be customized). Its responsibilities include:- Initializing more hardware (like SPI flash, memory mapping).
- Reading the partition table to find the location of the application firmware.
- Performing integrity checks on the application firmware.
- If Over-The-Air (OTA) updates are enabled, it selects which application partition to boot (e.g., factory app or an OTA updated app).
- Finally, it loads the application firmware into RAM and jumps to its entry point.
- Application Firmware (
your_project_name.bin): This is your compiled code along with ESP-IDF components.- The application first performs system-level initializations (e.g., setting up FreeRTOS, initializing drivers specified by
sdkconfig). - Then, it calls the
app_main()function.
- The application first performs system-level initializations (e.g., setting up FreeRTOS, initializing drivers specified by
%%{ init: { 'theme': 'base', 'themeVariables': { 'fontFamily': 'Open Sans' } } }%%
graph TD
    A[Power On / Reset] --> B{"ROM Bootloader (in Chip ROM)"};
    B -- Loads & Executes --> C["Second-Stage Bootloader <br> (bootloader.bin from Flash @ 0x1000)"];
    C -- Initializes Hardware, Reads Partition Table --> D{Finds Application Partition};
    D -- Performs Integrity Check --> E{"Selects App <br> (Factory/OTA)"};
    E -- Loads App to RAM & Jumps --> F["Application Firmware <br> (your_project.bin from Flash)"];
    F -- System Init (FreeRTOS, Drivers) --> G["app_main() <br> (User Code Entry Point)"];

    classDef startStyle fill:#EDE9FE,stroke:#5B21B6,stroke-width:2px,color:#5B21B6;
    classDef processStyle fill:#DBEAFE,stroke:#2563EB,stroke-width:1px,color:#1E40AF;
    classDef decisionStyle fill:#FEF3C7,stroke:#D97706,stroke-width:1px,color:#92400E;
    classDef endStyle fill:#D1FAE5,stroke:#059669,stroke-width:2px,color:#065F46;

    class A startStyle;
    class B,C,F processStyle;
    class D,E decisionStyle;
    class G endStyle;
6. app_main(): The Application Entry Point
After the second-stage bootloader loads your application and the ESP-IDF system initialization (including starting FreeRTOS and the main task) is complete, the function void app_main(void) is called. This is the primary entry point for your custom application logic.
// Example structure of app_main.c
#include <stdio.h>
#include "freertos/FreeRTOS.h"
#include "freertos/task.h"
#include "esp_system.h"

void app_main(void)
{
    printf("Hello from app_main!\n");

    // Your application initialization code here
    // e.g., initialize peripherals, Wi-Fi, create tasks

    // Example: Print chip information
    esp_chip_info_t chip_info;
    esp_chip_info(&chip_info);
    printf("This is %s chip with %d CPU core(s), WiFi%s%s, ",
            CONFIG_IDF_TARGET, // Gets the target name, e.g., "esp32", "esp32s3"
            chip_info.cores,
            (chip_info.features & CHIP_FEATURE_BT) ? "/BT" : "",
            (chip_info.features & CHIP_FEATURE_BLE) ? "/BLE" : "");
    printf("silicon revision %d, ", chip_info.revision);
    printf("%uMB %s flash\n", spi_flash_get_chip_size() / (1024 * 1024),
            (chip_info.features & CHIP_FEATURE_EMB_FLASH) ? "embedded" : "external");

    // Typically, app_main might create other FreeRTOS tasks and then might
    // delete itself or enter a loop if it's the only task doing certain work.
    // For simple examples, it might just run to completion.
    // For long-running applications, app_main usually sets up tasks and might then suspend or delete itself.
    // For example, if app_main is running as the 'main' task created by FreeRTOS startup.
}
Within app_main, you’ll typically initialize peripherals, set up networking, create FreeRTOS tasks for concurrent operations, and start the core logic of your device.
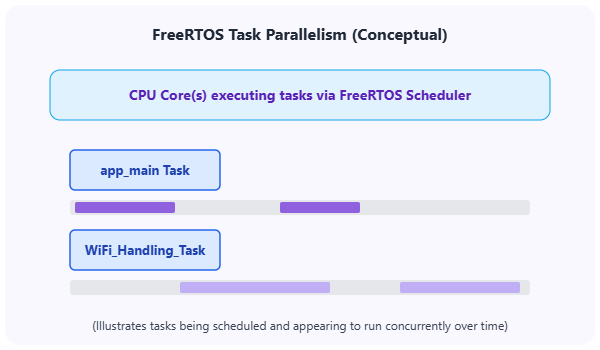
7. FreeRTOS Integration
ESP-IDF uses FreeRTOS as its real-time operating system. FreeRTOS allows you to write concurrent applications by managing multiple tasks. Each task is a semi-independent thread of execution. Key FreeRTOS features used in ESP-IDF include:
- Task creation and management
- Task scheduling (priority-based, preemptive)
- Inter-task communication (queues, semaphores, mutexes, event groups)
- Software timers
- Memory management
| FreeRTOS Feature | Description in ESP-IDF Context |
|---|---|
| Task Creation & Management | Allows creation of multiple independent threads of execution (tasks) for concurrent operations. app_main itself runs as a task. Functions like xTaskCreatePinnedToCore are used. |
| Task Scheduling | Priority-based, preemptive scheduler manages which task runs at any given time. Higher priority tasks can interrupt lower priority ones. |
| Inter-Task Communication | Mechanisms for tasks to exchange data and synchronize:
|
| Software Timers | Allows functions to be executed at specific future times or periodically without requiring a dedicated task. |
| Memory Management | FreeRTOS provides heap management schemes (e.g., heap_caps.h in ESP-IDF for capabilities-aware allocation like DMA-capable memory). |
| Critical Sections & Interrupt Management | Mechanisms to protect sections of code from concurrent access or preemption, and to handle hardware interrupts safely within the RTOS context. |
We will dedicate several chapters later in this volume to understanding and using FreeRTOS effectively on the ESP32. For now, it’s important to know that app_main itself runs as a FreeRTOS task, and many ESP-IDF functionalities (especially networking and Bluetooth) rely heavily on FreeRTOS.
8. Hardware Abstraction Layer (HAL)
The Hardware Abstraction Layer (HAL) provides a consistent API to access the low-level hardware peripherals of different ESP32 variants. It abstracts away the direct register-level details, making it easier to write portable code across the ESP32 family. The HAL is located within the esp_hw_support component and other low-level driver components. While you might not interact with the HAL directly for common peripherals (as higher-level drivers are preferred), it’s a crucial underlying layer.

Practical Examples
While this chapter is primarily theoretical, let’s explore the ESP-IDF structure practically.
1. Exploring Your ESP-IDF Installation Directory:
- Locate ESP-IDF: Open your file explorer and navigate to the directory where you installed ESP-IDF in Chapter 2 (e.g.,
C:\esp\esp-idfor~/esp/esp-idf). - Browse
componentsdirectory:- Open the
componentssub-directory. - Notice the numerous sub-directories, each representing a component (e.g.,
freertos,lwip,esp_wifi,driver). - Open one of these component directories, for instance,
driver. Inside, you’ll find source files (.c), include directories with header files (.h), and aCMakeLists.txtfile. ThisCMakeLists.txttells the build system how to compile thisdrivercomponent.
- Open the
- Browse
examplesdirectory:- Go back to the root ESP-IDF directory and open the
examplessub-directory. - You’ll see categories of examples (e.g.,
get-started,wifi,bluetooth,peripherals). - Navigate into
get-started/hello_world. This is a minimal ESP-IDF project.
- Go back to the root ESP-IDF directory and open the
2. Understanding a Simple Project Structure (e.g., hello_world):
- Navigate to
hello_world: In your file explorer or using the VS Code “File > Open Folder…” menu, open theget-started/hello_worldexample project from your ESP-IDF installation (e.g.,C:\esp\esp-idf\examples\get-started\hello_world). - Examine the project files:
main/directory:hello_world_main.c: This is where theapp_main()function for this project is defined. Open it and look at its simple structure.CMakeLists.txt: This file registershello_world_main.cto be compiled as part of themaincomponent. It might look like this:idf_component_register(SRCS "hello_world_main.c" INCLUDE_DIRS ".")
CMakeLists.txt(in the project root): This is the main project CMake file. It will contain lines like:cmake_minimum_required(VERSION 3.16) include($ENV{IDF_PATH}/tools/cmake/project.cmake) project(hello_world)Theproject(hello_world)line sets the project name. Theincludeline pulls in the core ESP-IDF build logic.sdkconfig.defaults(optional): Some examples provide a default configuration. The actual configuration used during a build is insdkconfig(which might be generated from these defaults ifsdkconfigdoesn’t exist).- (After build)
build/directory: If you were to build this project (which we’ll do in Chapter 4), abuilddirectory would appear, containing all the compiled files and the final firmware. - (After configuration)
sdkconfigfile: After runningidf.py menuconfigat least once, this file will appear in the project root. It stores all your specific configuration choices.
This exploration should give you a tangible feel for how ESP-IDF is organized and how a basic project is laid out.
Variant Notes
The core architecture of ESP-IDF, including its component-based structure, build system (CMake and Kconfig), and the general boot process, is consistent across all ESP32 variants (ESP32, ESP32-S2, ESP32-S3, ESP32-C3, ESP32-C6, ESP32-H2).
The main differences lie in:
- Available Components: Some components might only be relevant or available for certain variants (e.g., a component related to Bluetooth Classic would not be used for an ESP32-S3 project). The build system handles including the correct components based on the selected target.
- HAL and Low-Level Drivers: The Hardware Abstraction Layer and specific driver implementations will differ internally to support the unique hardware of each variant. However, the API provided by the drivers to the application developer aims to be as consistent as possible.
- Toolchains: As mentioned in Chapter 2, different CPU architectures (Xtensa vs. RISC-V) require different underlying toolchains (compilers, linkers). ESP-IDF manages this transparently.
When you select a target (e.g., esp32s3, esp32c3) using idf.py set-target <target_name> or via the VS Code extension, ESP-IDF’s build system automatically uses the correct SDK configurations, HAL, drivers, and toolchain for that specific variant.
| Aspect that Varies by ESP32 Variant | How ESP-IDF Handles It | Impact on Developer |
|---|---|---|
| Available Peripherals & Features | The build system, guided by Kconfig and the selected target (e.g., ESP32-S3, ESP32-C3), conditionally compiles and links relevant components and drivers. | Some driver APIs or features might only be available/functional for specific targets. Documentation and Kconfig options usually clarify this. Code may need #ifdef CONFIG_IDF_TARGET_XXX for fine-grained control. |
| Hardware Abstraction Layer (HAL) & Low-Level Drivers | Internal implementations of HAL functions and low-level drivers differ significantly to match the specific hardware registers and capabilities of each variant. | Largely transparent. The goal is to provide a consistent high-level driver API. Direct HAL use is less common for typical applications. |
| CPU Architecture (Xtensa LX6/LX7, RISC-V) | ESP-IDF automatically selects and uses the correct cross-compiler toolchain (e.g., Xtensa toolchain, RISC-V toolchain) based on the chosen target. | Mostly transparent. Core dumps and assembly-level debugging will differ. Some very low-level optimizations or inline assembly might be architecture-specific. |
| Memory (RAM, Flash) Sizes & Layout | Default linker scripts and Kconfig options adapt to the memory characteristics of the target. Partition tables might differ. | Available memory for application and heap will vary. Memory-intensive applications need to be mindful of target limitations. |
| Specific Kconfig Options | Menuconfig will show options relevant to the selected target. Some options are generic, others are target-specific. | Configuration options (e.g., for specific peripherals, clock settings) will reflect the capabilities of the chosen chip. |
| Bootloader & Partitioning | The second-stage bootloader and default partition schemes are adapted for each chip series. | Generally transparent, but custom partition tables must be compatible with the target’s flash layout and bootloader requirements. |
Key Takeaway: ESP-IDF aims to provide a consistent development experience. Setting the correct target (e.g., via idf.py set-target esp32s3) is crucial for ESP-IDF to automatically configure the build for the specific hardware.
Common Mistakes & Troubleshooting Tips
- Mistake: Manually modifying files within the core ESP-IDF directory (
esp-idf/components).- Fix: Avoid this. ESP-IDF updates can overwrite your changes. If you need to customize a core component’s behavior, try to do it via
menuconfigoptions. For more significant changes, consider copying the component into your project’scomponentsdirectory and renaming it or using theEXTRA_COMPONENT_DIRSvariable in your project’sCMakeLists.txtto point to an alternative location for components. The preferred method for overriding is using component overrides (see ESP-IDF documentation).
- Fix: Avoid this. ESP-IDF updates can overwrite your changes. If you need to customize a core component’s behavior, try to do it via
- Mistake: Forgetting that
app_main()runs within a FreeRTOS task context.- Fix: Understand that
app_mainis not like a traditionalmain()in a bare-metal system running in an infinite loop. It has a stack size, priority, and can be preempted. For long-running operations or blocking calls, it’s often better to spawn new tasks fromapp_mainrather than doing everything inapp_mainitself, unlessapp_mainis intended to be the sole application task.
- Fix: Understand that
- Mistake: Not understanding the scope of
CMakeLists.txtfiles (project vs. component).- Fix: Remember the project root
CMakeLists.txtis for overall project definition and including ESP-IDF’s build system. Each component (includingmain) has its ownCMakeLists.txtto define how that specific component is built (its sources, include directories, dependencies).
- Fix: Remember the project root
- Mistake: Manually editing the
sdkconfigfile.- Fix: Always use
idf.py menuconfig(or the VS Code extension’s interface for it) to change project configurations. Manual edits can be overwritten or lead to an inconsistent state.
- Fix: Always use
- Mistake: Placing all application code directly into
app_main.cfor larger projects.- Fix: For better organization in larger projects, create custom components in your project’s
componentsdirectory to encapsulate different functionalities or modules of your application. This keepsmaincleaner and promotes modularity.
- Fix: For better organization in larger projects, create custom components in your project’s
Exercises
- Component Deep Dive:
- Navigate to your ESP-IDF installation directory (e.g.,
~/esp/esp-idforC:\esp\esp-idf). - Go into the
componentsdirectory. - Choose two of the following components:
esp_wifi,nvs_flash,esp_http_client. - For each chosen component:
- Look at its
CMakeLists.txtfile. Try to identify if it registers source files or depends on other components (look foridf_component_registerandREQUIRESorPRIV_REQUIRES). - Look for a
Kconfigfile. If it exists, open it and see what kind of configuration options it defines. - Briefly describe the apparent purpose of the component based on its name and the files you see.
- Look at its
- Navigate to your ESP-IDF installation directory (e.g.,
- Project File Analysis (Hello World):
- Open the
hello_worldexample project (examples/get-started/hello_world) in VS Code or your text editor. - Open the project’s root
CMakeLists.txt. What is the project name defined here? - Open
main/CMakeLists.txt. What source file(s) does it register for themaincomponent? - If you have already built this project or run
menuconfigfor it, open thesdkconfigfile. Search for a configuration related to the ESP32 target (e.g.,CONFIG_IDF_TARGET). What is its value? (If you haven’t configured/built it, you can look atsdkconfig.defaultsif present, or try runningidf.py menuconfigthen saving to generatesdkconfig).
- Open the
Summary
- ESP-IDF has a layered, component-based architecture that promotes modularity and reusability.
- Key directories include
components(core libraries),examples, andtools. - Components are self-contained modules with their own source code and
CMakeLists.txt. - The build system uses CMake for building projects and Kconfig (via
idf.py menuconfig) for project configuration, stored in thesdkconfigfile. - A typical project includes a
maindirectory (withapp_main.c), a rootCMakeLists.txt, and ansdkconfigfile. Custom components can be added in a project-levelcomponentsdirectory. - The ESP32 boot process involves a ROM bootloader and an ESP-IDF second-stage bootloader before the application firmware runs.
app_main()is the entry point for your application code, running as a FreeRTOS task.- FreeRTOS is integral to ESP-IDF, providing multitasking and real-time capabilities.
- The HAL provides a consistent interface to underlying hardware across ESP32 variants.
- The core ESP-IDF architecture is consistent across different ESP32 chip variants.
Further Reading
- ESP-IDF Project and Component Build System:
- Application Level Tracing Library (for understanding program flow and tasks):
- ESP-IDF Project Structure:
- ESP-IDF Bootloader:
- FreeRTOS (Official Documentation – useful for general FreeRTOS concepts):
- https://www.freertos.org/Documentation/RTOS_book.html (The “Mastering the FreeRTOS Real Time Kernel” book)
Understanding this architecture is fundamental. In the next chapter, we will finally get to write, build, and run our first “Hello World” application, putting this knowledge into practice.
