
Chapter 99: The Linux Kernel: High-Level Architecture Overview
Chapter Objectives
Upon completing this chapter, you will be able to:
- Understand the fundamental role and responsibilities of an operating system kernel in an embedded system.
- Compare and contrast the monolithic and microkernel architectural designs, articulating their respective trade-offs in performance, security, and complexity.
- Explain the core architectural principles of the Linux kernel, recognizing it as a monolithic yet modular system.
- Identify and describe the key subsystems within the Linux kernel, including process management, memory management, the virtual file system, device drivers, and the networking stack.
- Implement practical examples on a Raspberry Pi 5 to inspect kernel state, load custom modules, and trace system calls.
- Debug common issues related to kernel module compilation and the user space/kernel space boundary.
Introduction
In our journey through the landscape of embedded Linux, we have assembled toolchains and configured build systems, treating the Linux kernel as a crucial but somewhat opaque component—a pre-compiled binary (zImage or uImage) to be placed on our storage media. This chapter pulls back the curtain on that binary, transitioning our perspective from a user of the kernel to a student of its architecture. Understanding the kernel’s internal structure is not merely an academic exercise; it is fundamental to building efficient, stable, and secure embedded devices. When a system performs poorly, when a peripheral fails to respond, or when a critical task misses its deadline, the root cause often lies within the kernel’s domain.
This chapter explores the very heart of our embedded operating system: its architectural design. We will begin by examining a foundational debate in operating system theory—the choice between a monolithic kernel and a microkernel. This decision has profound implications for everything from raw performance to system robustness. We will situate Linux within this context, discovering how its monolithic design provides exceptional performance, while its ingenious use of loadable modules offers the flexibility typically associated with other architectures. By dissecting the kernel’s primary responsibilities—managing processes, memory, files, and hardware—you will gain a holistic view of how a single, complex piece of software orchestrates every action on your Raspberry Pi 5. This foundational knowledge is the key to unlocking advanced capabilities, effective debugging, and true system-level mastery.
Technical Background
At the center of any modern operating system lies the kernel, a master control program that has privileged access to the system’s hardware. It serves as the primary interface between hardware and software, providing a safe, abstract, and consistent way for applications to use resources like the CPU, memory, and peripherals. Without the kernel, every application would need to be a miniature operating system, containing its own drivers for every possible piece of hardware—an impossibly complex and unstable scenario. The kernel’s design philosophy, or architecture, is therefore one of the most critical decisions in the entire system, dictating how these core services are structured and how they interact.
The Great Architectural Debate: Monolithic vs. Microkernel
Historically, two dominant philosophies have emerged for structuring an operating system kernel: the monolithic design and the microkernel design. This is not just a technical footnote; the choice between them represents a fundamental trade-off between performance, simplicity, modularity, and robustness.
A monolithic kernel is an architecture where the entire operating system—all of the core services like process scheduling, memory management, file systems, device drivers, and network protocol stacks—runs in a single, large binary in a single address space, known as kernel space. When an application in user space (the memory area for user processes) needs a service, it makes a special request called a system call. This call triggers a context switch, trapping execution from the unprivileged user mode to the highly privileged kernel mode. Because all the kernel subsystems reside in the same address space, communication between them is extremely fast; it is as simple and efficient as a direct function call within the same program. The Linux kernel, from its inception by Linus Torvalds, has been a prime example of a monolithic design. This choice was pragmatic, prioritizing performance and leveraging the well-understood design patterns of commercial UNIX systems of its era.

The primary advantage of this all-in-one approach is performance. When the networking stack needs to allocate memory for an incoming packet, it can directly call the memory manager’s functions. When a file system driver needs to schedule a block I/O operation, it invokes the process scheduler’s functions directly. There is no overhead from inter-process communication (IPC) or message passing between kernel components, as they are all part of the same tightly integrated program. However, this tight integration is also its main drawback. A bug in a single component, such as a faulty device driver, can corrupt memory used by another, unrelated subsystem, potentially bringing down the entire system in a “kernel panic.” Furthermore, modifying a monolithic kernel can be complex; to update a core component, one often needs to recompile and reboot the entire kernel.
In stark contrast, a microkernel adopts a minimalist philosophy. Its core principle is to include the absolute minimum amount of functionality possible within the privileged kernel space. Typically, this is limited to fundamental services like basic process management (address spaces), low-level memory management, and an inter-process communication (IPC) mechanism. All other traditional OS services—device drivers, file systems, networking stacks—are implemented as separate processes, called servers, that run in the unprivileged user space, just like regular applications.

When an application needs to read a file in a microkernel-based system, it sends an IPC message to the file system server. The microkernel’s role is simply to facilitate the delivery of this message. The file system server, upon receiving the message, might then need to communicate with a specific disk driver server, again via an IPC message brokered by the microkernel. This design offers compelling advantages. Its modularity is superb; a component can be updated, restarted, or replaced without rebooting the system. It is also more robust; a crash in a user-space device driver server will only terminate that server, not the entire operating system. The system can often recover by simply restarting the failed server process. This makes microkernels highly attractive for mission-critical systems where high availability is paramount, such as in telecommunications or avionics. However, this robustness comes at a performance cost. Every interaction between servers requires at least two context switches (user -> kernel -> user) and the overhead of message passing, which is significantly slower than a direct function call in a monolithic kernel.
The Linux Approach: Monolithic but Modular
While Linux is fundamentally monolithic, it incorporates one of the most powerful features of modular design: Loadable Kernel Modules (LKMs). This hybrid approach gives developers much of the flexibility of a microkernel without sacrificing the performance of a monolithic design. An LKM is a piece of object code that can be dynamically loaded into and unloaded from the running kernel at any time. The vast majority of device drivers, file systems, and networking protocols in a typical Linux system are implemented as LKMs.
When your Raspberry Pi 5 boots, a minimal core kernel is loaded. Then, as hardware is detected, the system loads the necessary modules—for the USB controller, the Ethernet port, the SD card reader, and the GPU. If you later plug in a USB Wi-Fi dongle, the kernel can load the appropriate driver module on-the-fly without a reboot. This modularity is what makes a single Linux kernel binary capable of supporting an immense variety of hardware. While these modules are loaded dynamically, it is crucial to remember that once loaded, they run in kernel space with the full privileges of the core kernel. A buggy LKM can crash the system just as effectively as a bug in the core scheduler. Thus, Linux achieves flexibility and extensibility while remaining firmly in the monolithic camp, a pragmatic compromise that has proven incredibly successful.
graph TD
    A[User Space Applications] --> B[System Call Interface]

    subgraph "Linux Kernel Space - Hybrid Architecture"
        B --> C[Virtual File System VFS]
        B --> D[Process Management]
        B --> E[Memory Management]
        B --> F[Network Stack]

        subgraph "Monolithic Core"
            C --> G[File Systems<br/>ext4, xfs, btrfs]
            D --> H[Scheduler<br/>Process Control]
            E --> I[Virtual Memory<br/>Page Management]
            F --> J[TCP/IP Stack<br/>Socket Layer]

            G --> K[Block Layer]
            H --> L[Inter-Process Communication]
            I --> M[Memory Allocators]
            J --> N[Network Protocols]
        end

        subgraph "Loadable Kernel Modules (Microkernel-like)"
            O[Device Drivers]
            P[File System Modules]
            Q[Network Drivers]
            R[Crypto Modules]
            S[Security Modules]
        end

        K --> O
        G --> P
        N --> Q
        C --> R
        D --> S
    end

    O --> T[Hardware Layer<br/>CPU, Memory, Storage, Network]
    Q --> T


    style A fill:#e1f5fe
    style B fill:#f3e5f5
    style T fill:#fff3e0


    classDef monolithic fill:#ffcdd2
    classDef microkernel fill:#c8e6c9

    class C,D,E,F,G,H,I,J,K,L,M,N monolithic
    class O,P,Q,R,S microkernel
Key Responsibilities of the Kernel
To orchestrate the complex hardware of a device like the Raspberry Pi 5, the Linux kernel is divided into several major, interconnected subsystems. Each has a distinct and vital responsibility.
1. Process Management
The essence of an operating system is to run multiple programs concurrently. The kernel’s process manager is responsible for creating, managing, and terminating processes. A process is more than just an executing program; it is an abstraction that includes the program’s code, its current state (e.g., CPU register values), and its memory. On Linux, creating a new process is typically done via the fork() system call, which creates an almost identical copy of the calling process. This is often followed by an exec() system call, which replaces the new process’s memory image with that of a new program.
graph TD
    subgraph "Parent Process (e.g., /bin/bash)"
        A[Start]:::primary
    end

    subgraph "Kernel Action"
        B{"fork() System Call"}:::decision
    end

    subgraph "Child Process (PID: new)"
        C["Child process created<br><i>Exact copy of parent's<br>memory and state</i>"]:::process
        D{"exec() System Call<br>e.g., exec('/bin/ls')"}:::decision
        E["Address space is replaced<br>with the new program's code<br>(e.g., 'ls')"]:::process
        F[New Program Runs]:::system
    end

    G[Parent continues execution]:::system

    A --> B
    B -- "Returns 0 to child" --> C
    B -- "Returns child's PID to parent" --> G
    C --> D
    D --> E
    E --> F

    classDef primary fill:#1e3a8a,stroke:#1e3a8a,stroke-width:2px,color:#ffffff;
    classDef decision fill:#f59e0b,stroke:#f59e0b,stroke-width:1px,color:#ffffff;
    classDef process fill:#0d9488,stroke:#0d9488,stroke-width:1px,color:#ffffff;
    classDef system fill:#8b5cf6,stroke:#8b5cf6,stroke-width:1px,color:#ffffff;
Central to process management is the scheduler. Since there are usually more processes than CPU cores, the scheduler’s job is to decide which process gets to use a CPU core at any given moment, and for how long. It uses sophisticated algorithms to create the illusion of simultaneous execution, rapidly switching the CPU between different processes. The goal is to balance competing needs: interactive processes (like a user shell) need a fast response time, while batch processes (like a data compiler) need high throughput. In an embedded system, the scheduler is also critical for real-time tasks, which must be executed within a strict deadline. The Linux kernel includes several schedulers, such as the Completely Fair Scheduler (CFS) for general-purpose tasks and real-time schedulers (FIFO, Round Robin) for time-critical operations.
2. Memory Management
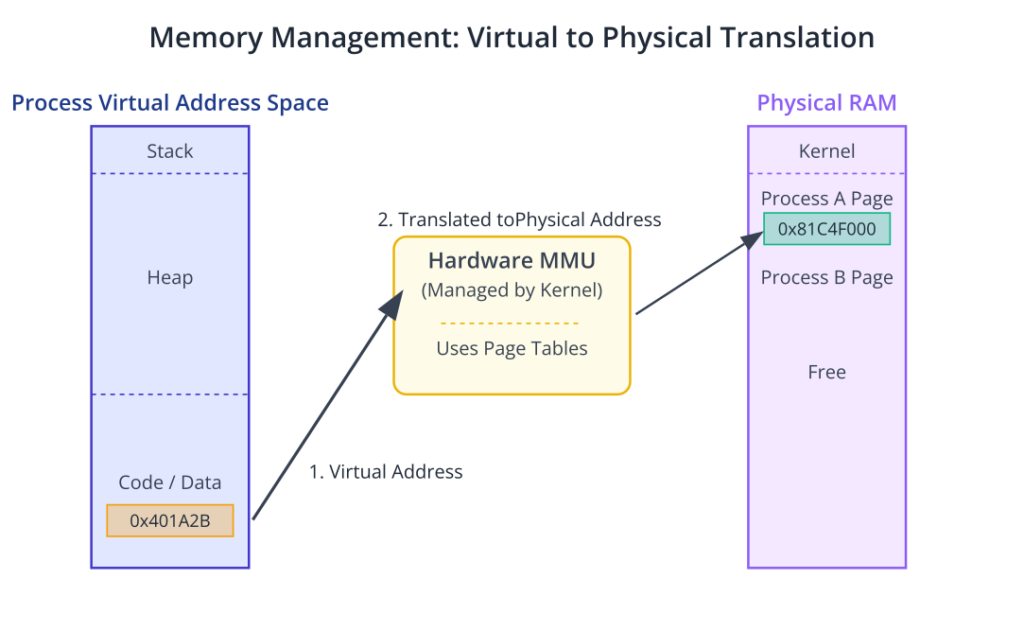
The Memory Management Unit (MMU) of the kernel is tasked with managing the system’s RAM. On a modern system like the Raspberry Pi 5, this is a highly complex task. The kernel provides each process with its own private virtual address space. This means that from a process’s perspective, it has exclusive access to the entire range of memory addresses. This is a powerful abstraction that prevents a buggy application from corrupting the memory of another application or, critically, the kernel itself.
The hardware MMU, under the kernel’s direction, translates these virtual addresses into physical addresses in the actual RAM chips. This translation is done through page tables. Memory is divided into fixed-size blocks called pages (typically 4KB on ARM architectures). The kernel maintains a page table for each process, mapping its virtual pages to physical pages. This mechanism also enables clever features. For instance, if memory runs low, the kernel can take a page that has not been used recently and save it to a storage device (a process called swapping or paging), freeing up physical RAM. When the process needs that page again, the kernel intercepts the access (a “page fault”), reloads the page from storage back into RAM, and allows the process to continue, completely unaware of what happened.
3. The Virtual File System (VFS)
Embedded systems need to interact with a wide variety of storage devices, from SD cards and USB drives formatted with FAT32 or EXT4 to flash memory with specialized file systems like JFFS2 or UBIFS. To provide a consistent interface for applications, the kernel uses a brilliant abstraction layer called the Virtual File System (VFS), sometimes referred to as the Virtual Filesystem Switch.
The VFS defines a universal interface for file operations. When an application makes a system call like open(), read(), or write(), it interacts with the VFS. The VFS then determines the underlying file system of the target file and routes the request to the specific file system driver responsible for it. This architecture allows a program like cp (copy) to work identically on any file system without needing any internal logic to handle the differences between them. This is a powerful example of abstraction; the VFS provides a clean, common API for the messy, diverse world of storage formats.
graph TD
    A["User Application<br>(e.g., 'cat file.txt')"]:::primary
    B["<b>System Call</b><br>write(fd, buf, count)"]:::system
    C["VFS (Virtual File System Layer)"]:::system
    D{"Check file descriptor.<br>Which filesystem is it on?"}:::decision
    E["EXT4 Driver"]:::process
    F["JFFS2 Driver"]:::process
    G["FAT32 Driver"]:::process
    H["Hardware<br>(SD Card, Flash, USB Drive)"]:::primary

    A --> B
    B --> C
    C --> D
    D -- "/mnt/sdcard" --> E
    D -- "/mnt/flash" --> F
    D -- "/mnt/usb" --> G
    E --> H
    F --> H
    G --> H

    classDef primary fill:#1e3a8a,stroke:#1e3a8a,stroke-width:2px,color:#ffffff;
    classDef decision fill:#f59e0b,stroke:#f59e0b,stroke-width:1px,color:#ffffff;
    classDef process fill:#0d9488,stroke:#0d9488,stroke-width:1px,color:#ffffff;
    classDef system fill:#8b5cf6,stroke:#8b5cf6,stroke-width:1px,color:#ffffff;
4. Device Drivers and the Device Model
Perhaps the largest and most dynamic part of the kernel is the subsystem responsible for device drivers. A device driver is a piece of software that understands the specific language of a hardware peripheral. It acts as a translator, converting the standardized requests from the kernel into the low-level register writes and interrupt handling routines that the hardware requires.
In Linux, most devices are represented as files in a special directory, /dev. This “everything is a file” philosophy is a cornerstone of the UNIX design. To read from a serial port, you can simply open /dev/ttyS0 and read from it like a file. To send data to a speaker, you might write to /dev/dsp. This is managed by the kernel’s device model, which organizes devices into buses (like USB, I2C, SPI) and classes (like input devices, network interfaces). When you load a device driver module, it registers itself with the kernel, declaring which devices it can control. The kernel can then associate the driver with the appropriate hardware and create the corresponding /dev file, making the hardware available to user-space applications.
5. The Networking Stack
Finally, the kernel contains a comprehensive networking stack, responsible for all network communication. This stack is a layered implementation of networking protocols, most famously the TCP/IP suite. When an application wants to send data over the network, it uses the socket API, another abstraction that presents a network connection as a file-like object.
The data travels down the layers of the stack. At the transport layer, TCP or UDP adds its headers to manage connections or provide connectionless datagrams. At the network layer, the IP protocol adds its headers for routing the packet across networks. Finally, at the link layer, the network device driver (for Ethernet or Wi-Fi) creates a frame and sends it to the hardware for transmission. The process is reversed for incoming packets. This layered model is highly modular; the same application code can work over Wi-Fi, Ethernet, or a cellular modem without any changes, because the higher levels of the stack are agnostic to the physical hardware used at the bottom.

Practical Examples
The theoretical architecture of the kernel becomes much clearer when we explore it on a running system. The following examples will use a Raspberry Pi 5 running a standard Raspberry Pi OS or a similar embedded Linux distribution. You will need SSH access or a direct terminal connection to your device.
Example 1: Exploring Kernel Abstractions with procfs and sysfs
The Linux kernel exposes a vast amount of information about its internal state and the hardware it manages through two special pseudo-filesystems: /proc and /sys. They are “pseudo” because they do not exist on any storage device; they are created in memory by the kernel at boot time. Reading a file in /proc is actually a request to the kernel to provide data on demand.
Inspecting System Information
1. View CPU Information: The /proc/cpuinfo file provides details about the processor. This information is gathered by the kernel during early boot.
cat /proc/cpuinfo
2. Check Memory Usage: The /proc/meminfo file gives a real-time snapshot of the system’s memory usage, directly from the memory manager subsystem.
cat /proc/meminfoMemTotal, MemFree, Buffers, and Cached. This is the same source of information used by tools like free and top.
3. List Loaded Modules: You can see which LKMs are currently loaded into the kernel, demonstrating its modular nature.
lsmod
# or the equivalent, which reads from /proc/modules
cat /proc/modulesbcmgenet), USB controller, and graphics driver.
Interacting with Hardware via sysfs
While /proc is for process and system status information, /sys is structured to represent the kernel’s device model. It provides a way to view and even control hardware devices.
1. Control the On-board LED: The Raspberry Pi’s green activity LED is controllable via sysfs. First, find the LED device.
ls /sys/class/leds/led0 or ACT. Let’s assume it’s led0.
2. Examine its Properties: You can see the properties of this LED device. The trigger file shows what kernel event currently controls the LED.
cat /sys/class/leds/led0/trigger[mmc0], indicating it flashes on SD card activity. The brackets show the active trigger.
3. Take Manual Control: We can change the trigger to none to take manual control, then write to the brightness file to turn the LED on or off. This is a direct interaction with the device driver through a file abstraction.Warning: You will need root privileges for the following commands. Use sudo sh -c '...' or switch to the root user with sudo su.
# Take manual control
echo none | sudo tee /sys/class/leds/led0/trigger

# Turn the LED on (brightness value > 0)
echo 1 | sudo tee /sys/class/leds/led0/brightness

# Wait a few seconds
sleep 3

# Turn the LED off
echo 0 | sudo tee /sys/class/leds/led0/brightness

# Return control to the kernel's SD card driver
echo mmc0 | sudo tee /sys/class/leds/led0/trig
Example 2: Building and Loading a “Hello World” Kernel Module
This example demonstrates the modularity of the Linux kernel by having you compile and load a simple LKM. This requires a cross-compilation environment and the kernel headers corresponding to the kernel running on your Raspberry Pi 5. We will assume these were set up in a previous chapter.
The Module Source Code
Create a file named hello_lkm.c with the following content. This is a minimal kernel module that prints messages when it is loaded and unloaded.
#include <linux/init.h>
#include <linux/module.h>
#include <linux/kernel.h>

// Meta Information
MODULE_LICENSE("GPL");
MODULE_AUTHOR("Embedded Systems Student");
MODULE_DESCRIPTION("A simple Hello World LKM for RPi5");

/**
 * @brief This function is called when the module is loaded into the kernel.
 */
static int __init hello_init(void) {
    // prink is the kernel's equivalent of printf
    printk(KERN_INFO "Hello, Kernel! I am now loaded.\n");
    return 0; // A non-zero return prevents the module from loading
}

/**
 * @brief This function is called when the module is removed from the kernel.
 */
static void __exit hello_exit(void) {
    printk(KERN_INFO "Goodbye, Kernel! I am being unloaded.\n");
}

// Register the init and exit functions
module_init(hello_init);
module_exit(hello_exit);
- Headers: We include standard headers for module creation and kernel functions.
MODULE_*Macros: These provide metadata about the module, visible with tools likemodinfo.hello_init: The entry point function, marked with__init, which tells the kernel this code is only needed during initialization and its memory can be reclaimed afterward.hello_exit: The exit point function, called upon module removal.module_init/module_exit: These macros register our functions as the official entry and exit points for this module.
The Makefile
To build this module, we need a special Makefile. It leverages the kernel’s own build system to correctly compile the module with the right flags and headers. Create a file named Makefile in the same directory:
# The object file we are building
obj-m += hello_lkm.o

# Path to the pre-compiled kernel source/headers
# This must match the target Raspberry Pi's kernel version
KDIR := /path/to/rpi-linux-headers

# Architecture and cross-compiler prefix
ARCH := arm64
CROSS_COMPILE := aarch64-none-linux-gnu-

all:
	make -C $(KDIR) M=$(PWD) ARCH=$(ARCH) CROSS_COMPILE=$(CROSS_COMPILE) modules

clean:
	make -C $(KDIR) M=$(PWD) clean
Tip: You must replace
/path/to/rpi-linux-headerswith the actual path to the kernel headers for your target system. TheCROSS_COMPILEprefix should also match your toolchain.
Build, Deploy, and Load
1. Cross-Compile: From your development machine, run make.
makehello_lkm.ko. The .ko stands for Kernel Object, which is our loadable module.
2. Deploy to Target: Copy the module to your Raspberry Pi 5.
scp hello_lkm.ko pi@<rpi_ip_address>:~3. Load the Module: On the Raspberry Pi 5, use the insmod command to load the module into the running kernel. You’ll need root privileges.
sudo insmod hello_lkm.ko4. Check the Kernel Log: The printk messages do not go to the standard console; they go to the kernel’s ring buffer. You can view this with the dmesg command.
dmesg | tail -n 1[timestamp] Hello, Kernel! I am now loaded.
5. Verify Module is Loaded: Use lsmod to confirm.
lsmod | grep hello_lkm6. Unload the Module: Use rmmod to remove the module.
sudo rmmod hello_lkm7. Check the Kernel Log Again:
dmesg | tail -n 1[timestamp] Goodbye, Kernel! I am being unloaded. This simple exercise powerfully illustrates how the monolithic kernel can be extended dynamically at runtime.
Example 3: Observing the User/Kernel Boundary with strace
The strace utility is a powerful debugging tool that intercepts and records the system calls made by a process and the signals it receives. It allows us to see exactly how a user-space application requests services from the kernel.
1. Install strace: If it’s not already installed on your Raspberry Pi 5:
sudo apt update
sudo apt install strace
2. Trace a Simple Command: Let’s trace the echo command.
strace echo "hello"3. Analyze the Output: You will see a large amount of output. The first part is the setup of the process, loading libraries. The most important line is near the end:
...
write(1, "hello\n", 6)                   = 6
...
exit_group(0) = ?echo program making a write() system call. The arguments are: file descriptor 1 (which is stdout), the string "hello\n", and the number of bytes to write (6). The kernel handles this request, directing the data to the appropriate output device (our terminal), and returns 6, indicating success. The exit_group(0) call then terminates the process. We are directly observing the bridge between user space and kernel space.
4. Trace File I/O: Now let’s see the system calls for reading a file.
# Create a test file
echo "test data" > testfile.txt

# Trace the 'cat' command on our file
strace cat testfile.txt
openat(AT_FDCWD, "testfile.txt", O_RDONLY): The cat program asks the kernel to open the file. The kernel performs permission checks and, if successful, returns a file descriptor (an integer, e.g., 3).
read(3, "test data\n", 65536): cat asks the kernel to read from file descriptor 3. The kernel’s VFS directs this to the appropriate file system driver, which reads the data from the SD card and places it in the process’s buffer.
write(1, "test data\n", 10): cat then immediately asks the kernel to write that data to file descriptor 1 (stdout).
close(3): Finally, cat tells the kernel it is finished with the file.
This hands-on tracing makes the abstract concepts of system calls, file descriptors, and the user/kernel boundary concrete and observable.
Common Mistakes & Troubleshooting
Navigating the boundary between user space and kernel space introduces new categories of errors. Understanding these common pitfalls can save hours of frustrating debugging.
Exercises
- Intermediate: Exploring Device Configuration in
sysfs- Objective: Use
sysfsto find and modify a CPU performance parameter. - Steps:
- Navigate to the directory for the first CPU core’s policy:
cd /sys/devices/system/cpu/cpu0/cpufreq/. - Use
catto view the available CPU frequency governors in thescaling_available_governorsfile. - Use
catto see the currently active governor inscaling_governor. - As root, use
echoto change the governor toperformance(which locks the CPU at its highest frequency). - Verify the change by reading the
scaling_governorfile again. - Observe the current CPU speed in
scaling_cur_freq. - Change the governor back to its original setting (e.g.,
ondemandorschedutil).
- Navigate to the directory for the first CPU core’s policy:
- Verification: You should be able to successfully read and write to the
scaling_governorfile and see the system’s behavior change.
- Objective: Use
- Intermediate: Parameterizing a Kernel Module
- Objective: Modify the “Hello World” LKM to accept a parameter when loaded.
- Steps:
- In
hello_lkm.c, include the<linux/moduleparam.h>header. - Below the metadata macros, declare a variable to hold the parameter and use the module_param macro to expose it. For example, to accept a name string:static char *name = “world”;module_param(name, charp, 0644);MODULE_PARM_DESC(name, “The name to display in the greeting message”);
- Modify the hello_init function’s printk call to use this variable:printk(KERN_INFO “Hello, %s! I am now loaded.\n”, name);
- Recompile and deploy the module.
- Load the module on the Raspberry Pi 5, passing the parameter at load time:sudo insmod ./hello_lkm.ko name=”Universe”
- In
- Verification:
dmesgshould show the message “Hello, Universe! I am now loaded.” instead of the default.
- Basic: Comparing System Call Footprints
- Objective: Use
straceto compare the system calls made by a shell built-in command versus an external program. - Steps:
- The
cdcommand is typically a shell built-in. Runstrace cd /tmp. Note the output is minimal because the shell performs the action internally without executing a new program. - The
lscommand is an external program located at/bin/ls. Runstrace ls /tmp. - Observe the output of the
lstrace. You will see anexecve("/bin/ls", ...)system call, which is the shell asking the kernel to execute a new program. This is followed by manyopenat(),mmap(), andclose()calls as the dynamic linker loads required libraries beforelscan even run.
- The
- Verification: The key difference to find is the presence of the
execvesystem call in thelstrace and its absence in thecdtrace. This highlights the difference between actions handled within a process versus actions requiring the kernel to start a new process.
- Objective: Use
Summary
This chapter provided a high-level architectural overview of the Linux kernel, a critical component for any embedded system developer. We moved beyond treating the kernel as a black box to understanding its internal design and core functions.
- Architectural Models: We contrasted the monolithic kernel design, which integrates all OS services into a single address space for performance, with the microkernel design, which separates services into user-space servers for robustness and modularity.
- The Linux Approach: The Linux kernel is fundamentally monolithic, offering high performance, but it achieves excellent flexibility through Loadable Kernel Modules (LKMs), which allow drivers and features to be added or removed from the running kernel.
- Core Subsystems: We identified the kernel’s key responsibilities:
- Process Management: Creating, scheduling, and managing concurrent processes.
- Memory Management: Providing protected, virtual address spaces for each process.
- Virtual File System (VFS): An abstraction layer providing a uniform interface to diverse storage devices.
- Device Drivers: Code that translates generic kernel requests into hardware-specific commands.
- Networking Stack: A layered implementation of network protocols like TCP/IP.
- Practical Exploration: Through hands-on examples on the Raspberry Pi 5, we learned how to use
procfsandsysfsto inspect kernel state, build and load a simple LKM, and usestraceto observe the critical system call interface between user space and kernel space.
Understanding this architecture is the foundation for effective debugging, performance tuning, and custom hardware integration in embedded Linux. In subsequent chapters, we will dive deeper into building custom kernels and writing more complex device drivers.
Further Reading
- Linux Kernel Documentation: The official, authoritative source for all kernel subsystems. The documentation on the kernel’s device model is particularly relevant. https://www.kernel.org/doc/html/latest/
"Linux Kernel Development"by Robert Love: An excellent and highly readable book that provides a clear tour of the kernel’s major subsystems, design rationales, and core data structures."Understanding the Linux Kernel"by Daniel P. Bovet & Marco Cesati: A more in-depth and code-level exploration of the kernel’s implementation. It is a dense but invaluable reference for deep architectural understanding.- The Eudyptula Challenge: An archived, hands-on series of programming exercises that teach you how to work with the Linux kernel, starting with simple modules and progressing to more complex tasks. A great way to learn by doing. http://eudyptula-challenge.org/
- LWN.net: A premier online publication for news and in-depth articles about the Linux kernel development community. Reading LWN provides context on why certain architectural decisions are made and how the kernel is evolving. https://lwn.net/
- Raspberry Pi Kernel Source Tree: Browsing the actual source code for the Raspberry Pi’s version of the Linux kernel can be highly instructive. https://github.com/raspberrypi/linux
"Operating Systems: Three Easy Pieces"by Remzi H. Arpaci-Dusseau and Andrea C. Arpaci-Dusseau: A freely available and highly regarded textbook covering fundamental OS concepts, including the architectural trade-offs discussed in this chapter.
