
Chapter 12: Setting Up Raspberry Pi 5: OS Installation (Raspberry Pi OS)
Chapter Objectives
Upon completing this chapter, you will be able to:
- Understand the fundamental role of an operating system in an embedded device like the Raspberry Pi 5.
- Download and install the Raspberry Pi Imager on your host computer (Windows, macOS, or Linux).
- Write the Raspberry Pi OS to a microSD card using the Imager, including advanced pre-configuration options.
- Successfully assemble the necessary hardware and perform the first boot of the Raspberry Pi 5.
- Verify the system’s operation and establish a connection for further development, either directly or remotely.
- Diagnose and resolve common issues encountered during the initial setup and boot process.
Introduction
Welcome to the foundational step of your embedded Linux journey. In previous chapters, we explored the hardware architecture of the Raspberry Pi 5, examining its powerful SoC, memory, and extensive I/O capabilities. However, without software, this sophisticated hardware is merely a dormant piece of silicon and plastic. The operating system (OS) is the lifeblood of the system; it is the bridge between your commands and the physical actions of the hardware. It manages resources, provides essential services, and creates the environment where all our future applications will run.
This chapter marks a pivotal transition from theory to practice. You will take a blank microSD card and transform it into a bootable, functional Linux system tailored for the Raspberry Pi 5. We will use Raspberry Pi OS, the official and recommended operating system, which is finely tuned to leverage every feature of the hardware. The process we will follow—writing an OS image to storage—is a universal concept in embedded systems development, applicable to countless devices beyond the Raspberry Pi. By the end of this chapter, you will have experienced the rewarding moment of the “first boot,” where the device comes to life, ready to become the centerpiece of your embedded projects. This is the true starting line for development.
Technical Background
To fully appreciate the practical steps we are about to take, it is essential to understand the key technologies and processes working behind the scenes. The act of “installing an OS” on an embedded device is fundamentally different from the setup process on a typical desktop or laptop. It involves writing a complete, pre-built system snapshot, known as a disk image, directly onto a storage medium.
The Role of an Operating System in an Embedded Context
At its core, an operating system is a master control program that manages a computer’s hardware resources and provides a stable, consistent environment for applications to run. In an embedded system, the OS plays a particularly critical role. Imagine trying to manually control every single electrical signal for the CPU, memory, USB ports, and GPIO pins simultaneously. This would be an impossibly complex task, known as bare-metal programming.
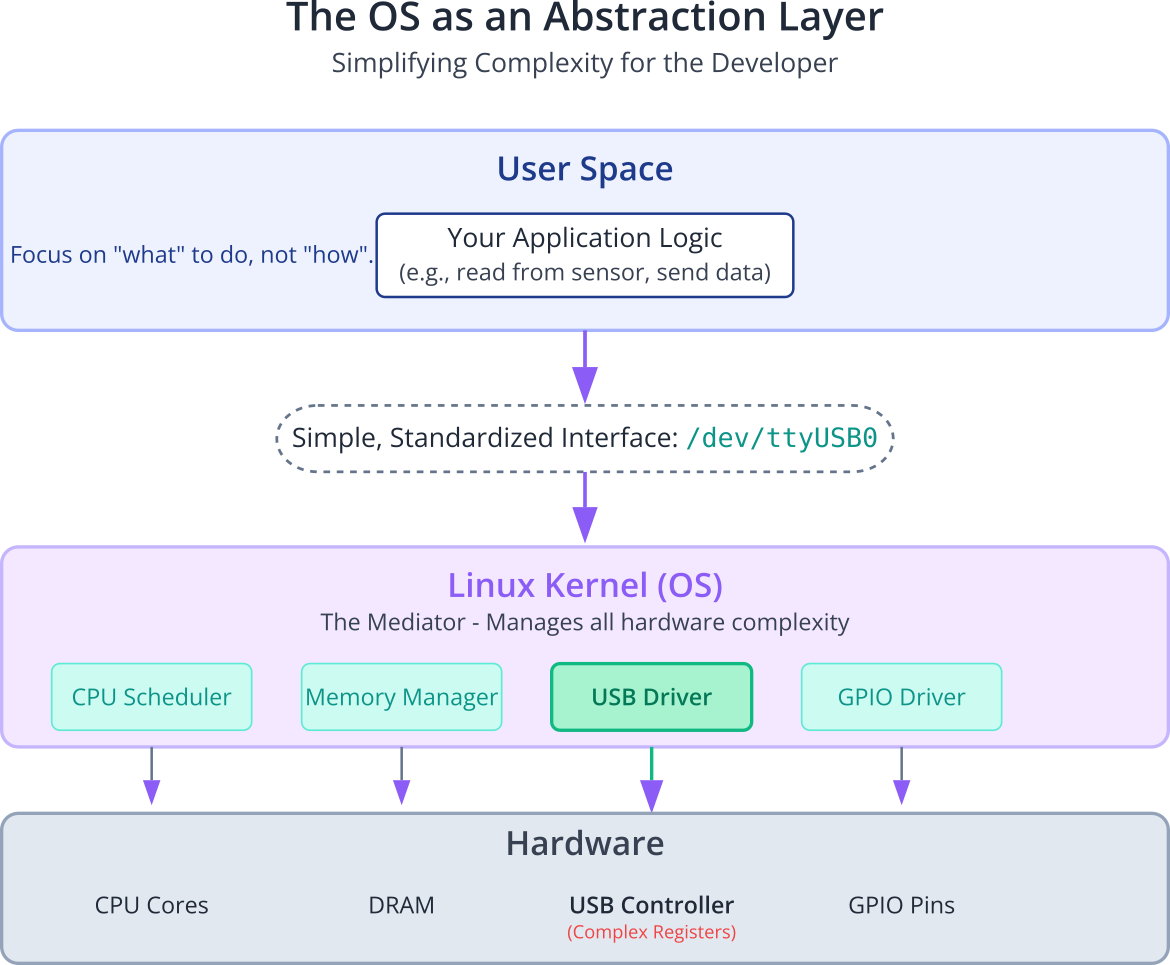
An OS like Linux provides layers of abstraction. It presents the complex hardware to the developer in a simplified, standardized way. For example, instead of knowing the specific memory addresses of a USB controller’s registers, you can simply interact with a file in the /dev directory. This abstraction handles the low-level complexity, freeing you to focus on your application’s logic. The Linux kernel is the heart of this operation, acting as the ultimate mediator for resources. It schedules which processes get to use the CPU, allocates memory, manages data flow to and from peripherals, and enforces security boundaries. This managed environment is what makes it possible to run complex applications, like a web server or a machine learning model, on a small device like the Raspberry Pi 5.
Understanding Disk Images
A disk image is a single file that contains the complete structure and contents of a storage device. Think of it as a perfect, byte-for-byte clone of a fully configured and installed system, frozen in time. When we write the Raspberry Pi OS image to our microSD card, we are not just copying files; we are replicating a partition table, boot sectors, a bootloader, the Linux kernel, a root filesystem, and a full suite of pre-installed software and libraries.
This image-based approach is standard in the embedded world because it ensures consistency and reliability. Every device flashed with the same image will behave identically, which is crucial for manufacturing and deploying products at scale. The Raspberry Pi OS image contains two primary partitions:
- The
/bootPartition: This is a small partition formatted with the FAT32 filesystem. The choice of FAT32 is deliberate; it is universally readable by almost any computer (Windows, macOS, Linux), making it easy to modify boot configuration files from a host machine if needed. This partition contains the critical components needed to start the system, including the bootloader firmware, the Linux kernel (kernel_2712.img), and the Device Tree Blob (DTB). - The Root Filesystem (
/) Partition: This is a much larger partition formatted with the ext4 filesystem, a standard for Linux. It contains the entire directory structure of the operating system—from system libraries and user applications to configuration files. This is where the OS “lives.”

The Raspberry Pi 5 Boot Process: A Step-by-Step Narrative
The journey from applying power to seeing a login prompt is a rapid but complex sequence of events. Understanding this sequence is invaluable for troubleshooting.
- Power-On and Boot ROM: When you connect the USB-C power supply, the first code to execute is not on the microSD card. It resides in a Boot ROM permanently etched into the BCM2712 SoC itself. This immutable, factory-programmed code has one primary job: to locate and execute the next stage of the bootloader.
- The EEPROM Bootloader: The Raspberry Pi 5 features a significant upgrade over its predecessors: a programmable bootloader stored in an on-board EEPROM chip. This second-stage bootloader is more sophisticated. It initializes the DRAM (the main system memory) and then searches for a bootable partition on various storage devices in a configurable order (e.g., microSD, NVMe, USB). It looks for the
/bootpartition we discussed earlier. - Loading the Kernel: Once the bootloader finds the
/bootpartition, it loads several files into memory, most notably the Linux kernel itself and a crucial file called the Device Tree Blob (DTB). The Device Tree is a data structure that describes the hardware of the specific board to the kernel. Instead of hard-coding the hardware layout into the kernel, the bootloader passes it this “map” of the system. This allows the same generic kernel to be used on different hardware revisions, simply by providing a different DTB. - Kernel Initialization: The bootloader hands over control to the Linux kernel. The kernel “wakes up” and begins one of the most complex phases of the boot process. It uses the information from the Device Tree to initialize drivers for all the hardware components: the CPU cores, memory management unit, GPIO, USB, Ethernet, etc. You see this process as a rapid scroll of text messages on the connected display. During this phase, the kernel mounts the root filesystem (the large ext4 partition) so it can access the rest of the operating system files.
- Starting the
initProcess: After the kernel has initialized the hardware and mounted the root filesystem, its final job is to start the very first user-space program, known as theinitprocess. In modern Linux distributions like Raspberry Pi OS,initis almost alwayssystemd. - Userspace Initialization:
systemdtakes over and becomes the parent of all other processes. It reads its configuration files and begins starting all the essential background services (daemons) that make up a functional OS: networking services, logging daemons, the graphical user interface (GUI) server, and finally, the login prompt that allows you to interact with the system.
flowchart TD
    subgraph "Hardware & Firmware"
        A[Power On: 5V/5A Supply] --> B{BCM2712 Boot ROM};
        B --> C[On-board EEPROM<br>Bootloader];
    end

    subgraph "Boot Partition (microSD)"
        D[Finds /boot Partition];
        E["Loads Kernel (kernel_2712.img)<br>& Device Tree (DTB)"];
    end

    subgraph "Linux Kernel Initialization"
        F[Kernel Takes Control];
        G[Initializes CPU & Memory];
        H{Reads Device Tree<br>to understand hardware};
        I["Loads All Device Drivers<br>(USB, GPIO, etc.)"];
        J["Mounts Root Filesystem (/)"];
    end

    subgraph "Userspace Initialization"
        K["Starts <i>systemd</i> (init process)"];
        L["Launches System Services<br>(Networking, Logging, etc.)"];
        M[Starts GUI / Login Prompt];
    end

    subgraph "System Ready"
        N[User Access Granted]
    end

    %% Styling
    classDef primary fill:#1e3a8a,stroke:#1e3a8a,stroke-width:2px,color:#ffffff;
    classDef success fill:#10b981,stroke:#10b981,stroke-width:2px,color:#ffffff;
    classDef process fill:#0d9488,stroke:#0d9488,stroke-width:1px,color:#ffffff;
    classDef kernel fill:#8b5cf6,stroke:#8b5cf6,stroke-width:1px,color:#ffffff;
    classDef check fill:#ef4444,stroke:#ef4444,stroke-width:1px,color:#ffffff;

    class A,B,C primary;
    class D,E process;
    class F,G,H,I,J kernel;
    class K,L,M process;
    class N success;

    %% Connections
    C --> D;
    D --> E;
    E --> F;
    F --> G;
    G --> H;
    H --> I;
    I --> J;
    J --> K;
    K --> L;
    L --> M;
    M --> N;
This entire sequence, from power-on to a usable system, typically takes less than 30 seconds, but it represents a beautifully orchestrated interplay between hardware, firmware, and the operating system kernel.
The Raspberry Pi Imager: More Than a Writing Tool
To make this process accessible, the Raspberry Pi Foundation provides the Raspberry Pi Imager. While its primary function is to write a disk image to a microSD card, it performs several other critical tasks that streamline the setup. It can download the latest version of the chosen OS for you, ensuring you don’t have to hunt for it online. Crucially, it includes an “Advanced Options” menu that allows for pre-configuration of the system before the first boot. You can set the hostname, create a user account, enable SSH for remote access, and provide Wi-Fi credentials. The Imager injects these settings into a special file within the /boot partition. On the very first boot, a service reads this file, applies all the configurations, and then deletes it. This “headless” setup capability is a massive advantage for embedded development, as it often isn’t practical to connect a monitor and keyboard to a device deployed in the field.
Practical Examples
Now, let’s translate this technical background into a practical, step-by-step process. For this exercise, you will need your Raspberry Pi 5, a quality USB-C power supply (5V/5A), a microSD card (32GB or larger, Class 10/U1 or faster is recommended), and a host computer.
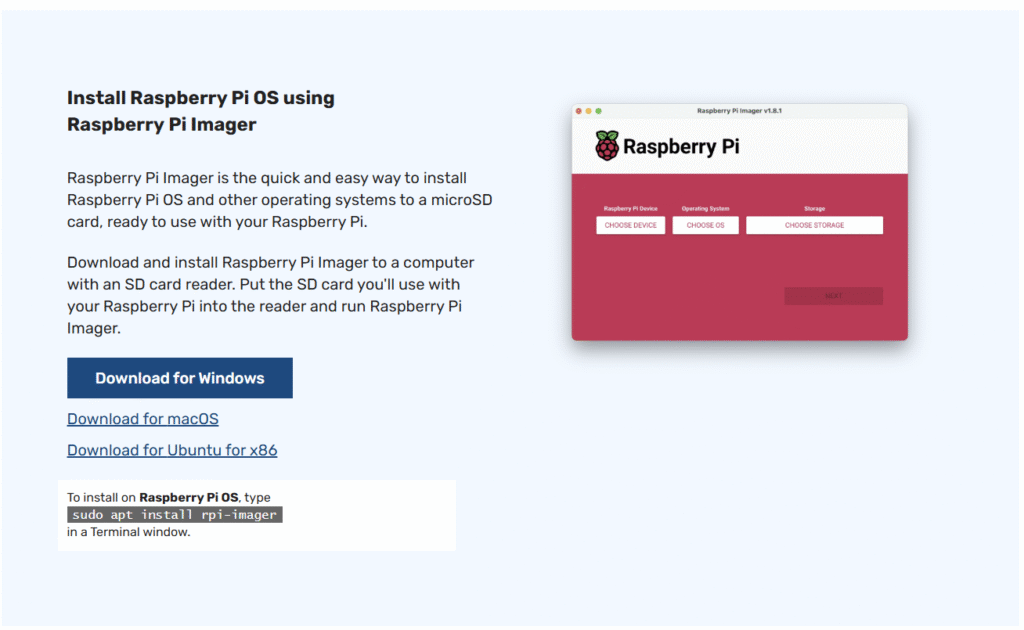
Step 1: Download and Install Raspberry Pi Imager
The first step is to acquire the tool for the job. The Raspberry Pi Imager is available for Windows, macOS, and Ubuntu Linux.
- Open a web browser on your host computer and navigate to the official Raspberry Pi software page:
https://www.raspberrypi.com/software/. - Download the appropriate version for your operating system.
- On Windows: Run the downloaded
.exefile and follow the installation wizard prompts. - On macOS: Open the downloaded
.dmgfile and drag the Raspberry Pi Imager application into your Applications folder. - On Linux (Debian/Ubuntu): You can install it directly from the terminal:
sudo apt update sudo apt install rpi-imager
Step 2: Writing the OS to the microSD Card
With the Imager installed, we can now prepare our microSD card. Insert the card into a card reader connected to your host computer.
Warning: This process will permanently erase all data on the selected microSD card. Double-check that you have selected the correct drive in the Imager and that you have backed up any important data from the card.
flowchart TD
    A[Start: Launch<br>Raspberry Pi Imager] --> B["Click <b>CHOOSE DEVICE</b>"];
    B --> C["Select <b>Raspberry Pi 5</b>"];
    C --> D["Click <b>CHOOSE OS</b>"];
    D --> E["Select <b>Raspberry Pi OS (64-bit)</b>"];
    E --> F{Pre-configure OS?};
    F -- Yes --> G["Click <b>EDIT SETTINGS</b>"];
    F -- No --> H["Click <b>CHOOSE STORAGE</b>"];

    subgraph "Advanced Options"
        G1[Set Hostname & User/Pass];
        G2[Configure Wi-Fi];
        G3[Enable SSH Service];
        G4[Set Locale/Keyboard];
    end

    G --> G1 --> G2 --> G3 --> G4 --> H;

    H --> I{Select correct<br>microSD Card Drive};
    I -- Drive Correct --> J[Click <b>WRITE</b>];
    I -- Drive Incorrect --> K[STOP!<br>Re-select Drive];

    J --> L[Imager Downloads,<br>Writes & Verifies Image];
    L --> M[Eject Card &<br>Insert into Pi];

    %% Styling
    classDef primary fill:#1e3a8a,stroke:#1e3a8a,stroke-width:2px,color:#ffffff;
    classDef success fill:#10b981,stroke:#10b981,stroke-width:2px,color:#ffffff;
    classDef decision fill:#f59e0b,stroke:#f59e0b,stroke-width:1px,color:#ffffff;
    classDef process fill:#0d9488,stroke:#0d9488,stroke-width:1px,color:#ffffff;
    classDef check fill:#ef4444,stroke:#ef4444,stroke-width:1px,color:#ffffff;
    classDef caution fill:#eab308,stroke:#eab308,stroke-width:1px,color:#1f2937;

    class A primary;
    class B,C,D,E,G,H,J,L process;
    class G1,G2,G3,G4 process;
    class F,I decision;
    class K check;
    class M success;
- Launch the Raspberry Pi Imager application. You will be greeted with a simple, three-step interface.
- Choose Device: Click the “CHOOSE DEVICE” button and select “Raspberry Pi 5” from the list. This helps the Imager filter for compatible operating systems.
- Choose OS: Click “CHOOSE OS”. For our purposes, select “Raspberry Pi OS (64-bit)”. This is the recommended version that is fully optimized for the Raspberry Pi 5’s 64-bit ARM architecture. You will notice other options like “Lite” (no graphical desktop) and “Full” (with more pre-installed software), but the standard 64-bit version is the perfect starting point.
- Pre-configure the OS: Before choosing the storage, click the “Next” button which will reveal a dialog asking if you want to use OS customisation. Click “EDIT SETTINGS“. This is the most critical step for a smooth setup.Let’s go through these options:
- Set hostname: Check this box. The default is
raspberrypi. You can leave it or change it to something more descriptive, likemy-pi5. Appending.local(e.g.,my-pi5.local) allows for easy network access using mDNS. - Set username and password: This is not optional. Modern security practices require a unique user. Avoid simple usernames and passwords. This will be your
sudouser, with administrative privileges. - Configure wireless LAN: Check this box and enter the SSID (network name) and password for your Wi-Fi network. This allows the Pi to connect to the internet automatically on its first boot.
- Set locale settings: Adjust the Time zone and Keyboard layout to match your location and hardware. This prevents frustration with incorrect characters when typing.
- Services Tab: Click on the “Services” tab. Ensure “Enable SSH” is checked. This is essential for “headless” access, allowing you to control the Pi over the network from another computer’s terminal. Keep “Password authentication” selected for now.
- Set hostname: Check this box. The default is
- Click SAVE after configuring the options.
- Choose Storage: Now, click the “CHOOSE STORAGE” button. A list of removable drives will appear. Carefully select your microSD card reader. The Imager is good at hiding system drives, but always verify the drive name and size to avoid catastrophic mistakes.
- Write: Click the “WRITE” button. The system will ask for your administrator password to get permission to write to the drive. The Imager will then download the OS image (if it hasn’t already), write it to the card, and then perform a verification pass to ensure the data was written correctly. This process can take 10-20 minutes depending on your internet speed and microSD card performance.
Step 3: Hardware Assembly and First Boot
Once the Imager confirms the write was successful, you can eject the microSD card from your computer.
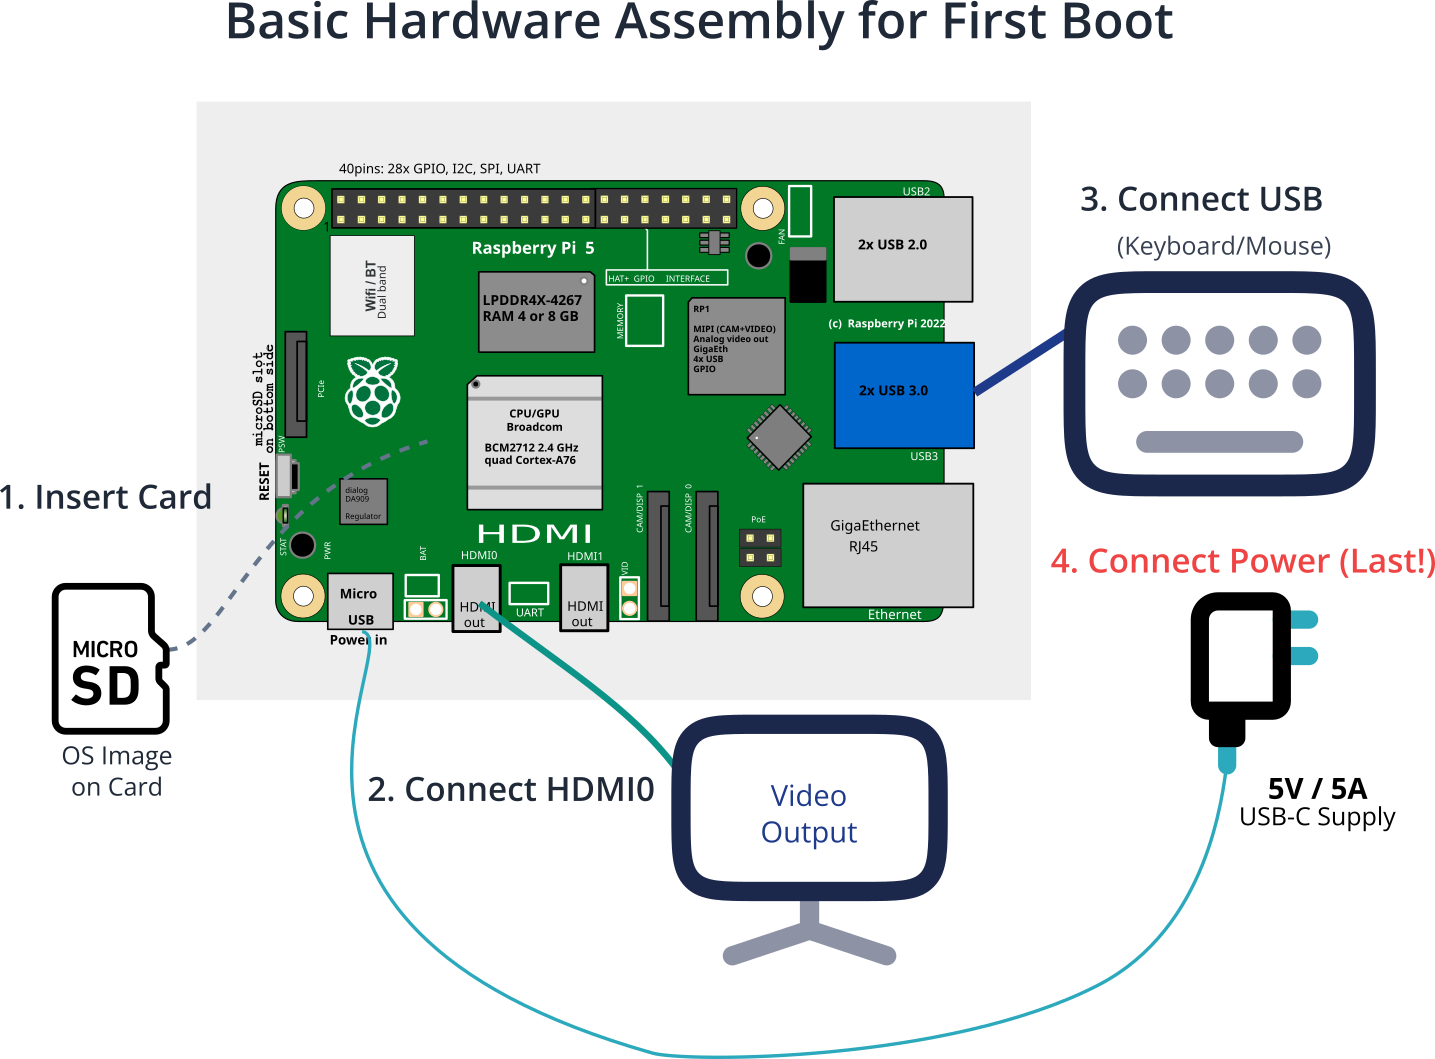
- Insert microSD Card: Carefully slide the microSD card into the spring-loaded slot on the underside of the Raspberry Pi 5.
- Connect Peripherals (for Desktop Mode): If you plan to use the graphical desktop directly, connect a keyboard and mouse to the USB ports. Connect a monitor to the
HDMI0port (the one closer to the USB-C power port) using a micro-HDMI to standard HDMI cable. - Connect Power: The final step. Connect the 5V/5A USB-C power supply to the power port. The device will begin to boot immediately.
Step 4: Monitoring and Verification
You should see the red power LED light up and remain steady. The green activity LED will flicker as it reads from the microSD card. On your monitor, you will see the Raspberry Pi boot sequence:
- A rainbow splash screen.
- A series of Linux kernel boot messages scrolling rapidly.
- Finally, the Raspberry Pi OS graphical desktop will appear.
The system may automatically reboot once during the first boot as it resizes the filesystem to fill the entire microSD card.
First Boot Verification (Desktop):
Once at the desktop, open a terminal window (click the > icon in the top menu bar) and run these commands to verify the system:
- Check the kernel and hardware architecture:
aarch64, confirming you are running a 64-bit kernel.
uname -a- Check the OS version:
lsb_release -a- Check the network connection:
wlan0interface. You should see aninetaddress, which is the IP address your Pi received from the Wi-Fi router. Note this address down.
ip aFirst Boot Verification (Headless SSH):
If you are running headless, wait about 2-3 minutes for the Pi to boot and connect to Wi-Fi. From another computer on the same network, open a terminal (or PuTTY on Windows) and connect via SSH:
ssh yo***********@******me.local
For example: ssh em**************@****i5.local.
You will be prompted for the password you created in the Imager. If the connection is successful, you will be greeted with the command line prompt of your new Raspberry Pi 5. You have successfully booted and accessed your system!
Tip: The first thing you should always do on a new system is update the package lists and upgrade all installed software to ensure you have the latest security patches and features.
Bashsudo apt update sudo apt upgrade -y
Common Mistakes & Troubleshooting
Even with a streamlined process, issues can arise. Here are some of the most common pitfalls and how to resolve them.
Exercises
These exercises are designed to reinforce the concepts from this chapter and build your confidence in setting up the Raspberry Pi 5.
- The Basic Setup: Follow the chapter’s main tutorial exactly as written. Install the 64-bit Raspberry Pi OS Desktop version, configure it with your user details and Wi-Fi, and boot to the desktop. Use the terminal to verify your kernel version and IP address. The objective is to successfully replicate the core task of the chapter.
- The Headless Challenge: Re-image your microSD card. This time, do not connect a monitor, keyboard, or mouse. Use the Raspberry Pi Imager’s advanced options to configure a user, enable SSH, and set up Wi-Fi. Power on the Pi and find its IP address from your router’s admin page or by using a network scanning tool. Successfully SSH into the device from your host computer. This exercise simulates a common real-world embedded setup.
- Going Lite: For many embedded applications, a graphical desktop is unnecessary overhead. Re-image your microSD card again, but this time select “Raspberry Pi OS Lite (64-bit)”. This version boots directly to a command-line interface. Repeat the headless setup from Exercise 2. Once you SSH in, notice the difference in memory usage by running the
free -hcommand. Compare this to the memory usage on the full desktop version. - Exploring the Boot Partition: After imaging a card, don’t eject it immediately. Use your host computer’s file explorer to open the
/bootpartition. Find and open theconfig.txtfile in a text editor. This file contains many hardware configuration parameters. Find the linedtparam=audio=onand change it todtparam=audio=offto disable the on-board audio. Boot the Pi and verify that the audio device is no longer present. This exercise demonstrates how to make low-level hardware changes before booting. - EEPROM Bootloader Investigation: Boot your Raspberry Pi 5 normally. Open a terminal and use the
rpi-eeprom-configutility to inspect the bootloader configuration. Run the commandsudo rpi-eeprom-config. Examine the output. Note theBOOT_ORDERsetting, which dictates the sequence in which the Pi searches for a bootable device. This exercise introduces you to the powerful, configurable nature of the Pi 5’s bootloader.
Summary
- The operating system is the essential software layer that manages hardware resources and provides a stable platform for applications.
- Embedded OS installation typically involves writing a disk image, a complete snapshot of a pre-configured system, to a storage medium.
- The Raspberry Pi 5 boot process is a multi-stage sequence, starting from the on-chip Boot ROM, proceeding to the EEPROM bootloader, which then loads the Linux kernel from the microSD card.
- The Raspberry Pi Imager is the recommended tool for downloading, pre-configuring, and writing Raspberry Pi OS to a microSD card.
- Pre-configuration via the Imager’s advanced options (setting a user, SSH, Wi-Fi) is critical for an efficient headless setup.
- A stable 5V/5A power supply is non-negotiable for the Raspberry Pi 5 to ensure reliable operation.
- Verification after the first boot should include checking the kernel version, OS release, and network connectivity.
Having successfully booted your Raspberry Pi 5, you now have a powerful and versatile embedded Linux development platform at your command. In the next chapter, we will begin exploring the Linux command line and file system, the primary tools you will use to interact with and control your device.
Further Reading
- Raspberry Pi Documentation – Getting Started: The official, canonical source for setting up your Raspberry Pi.
- Raspberry Pi Documentation – Raspberry Pi OS: Detailed information about the official operating system.
- The Debian Administrator’s Handbook: Since Raspberry Pi OS is based on Debian, this is an excellent, in-depth resource for understanding the underlying system.
- Raspberry Pi 5 Product Brief: The official hardware brief from the Raspberry Pi Foundation.
systemdfor Administrators, Part I-XX: A detailed series for understanding thesystemdinit system.
