
Chapter 2: Setting Up ESP-IDF v5 with VS Code
Chapter Objectives
By the end of this chapter, you will be able to:
- Understand the components of the ESP32 development environment.
- Install Visual Studio Code (VS Code) on your operating system (Windows, macOS, or Linux).
- Install Python and Git, which are prerequisites for ESP-IDF.
- Install the Espressif IDF extension for VS Code.
- Use the Espressif IDF extension to download and install ESP-IDF v5.x and its associated toolchains.
- Install necessary USB-to-UART bridge drivers for your ESP32 development board.
- Verify that your development environment is correctly set up and ready for ESP32 development.
- Identify your ESP32 board’s serial COM port.
Introduction
In Chapter 1, we explored the exciting ESP32 ecosystem and its diverse variants. Now, it’s time to roll up our sleeves and prepare the workshop for our embedded development journey. A correctly configured development environment is paramount for a smooth and efficient workflow. It allows you to write, compile, flash (upload), and debug your code with ease.
This chapter will guide you step-by-step through setting up the Espressif IoT Development Framework (ESP-IDF) version 5.x using Visual Studio Code (VS Code) and the official Espressif IDF extension. VS Code, a popular and powerful source code editor, combined with this extension, provides an integrated and user-friendly environment that simplifies many of the complexities traditionally associated with embedded toolchain setup. By the end of this chapter, you’ll have a fully functional ESP32 development environment, ready to compile your first “Hello World” application in Chapter 4.
Theory
Before diving into the installation steps, let’s understand the key components that constitute our development environment:
| Component | Role in ESP32 Development | Key Info / Version |
|---|---|---|
| Visual Studio Code (VS Code) | Source code editor with integrated development features. | Free, cross-platform (Windows, macOS, Linux). |
| Python | Used for build processes, configuration tools (menuconfig), and utility scripts within ESP-IDF. | Version 3.8 or later required for ESP-IDF v5.x. |
| Git | Version control system for downloading and managing ESP-IDF and its components from GitHub. | Required for fetching ESP-IDF. |
| Espressif IDF Extension for VS Code | Integrates ESP-IDF into VS Code, manages installations, and provides UI for build/flash/monitor/debug. | Official Espressif extension. |
| ESP-IDF (Espressif IoT Development Framework) | Official SDK with libraries, examples, and tools for ESP32 application development. | Using v5.x (FreeRTOS based). |
| Toolchains |
Set of programming tools:
|
Installed by ESP-IDF extension based on selected ESP-IDF version and target chip. |
| USB-to-UART Bridge Drivers | Enable communication between the computer and ESP32 board via USB by creating a virtual serial port. | Specific to chips like CP210x, CH340/CH341. OS needs correct drivers. |
- Visual Studio Code (VS Code):
- A free, lightweight, yet powerful source code editor developed by Microsoft.
- Supports a vast array of programming languages and features through extensions.
- Offers features like syntax highlighting, code completion (IntelliSense), debugging capabilities, and an integrated terminal.
- Its cross-platform nature (Windows, macOS, Linux) makes it a versatile choice.
- Python:
- A high-level, interpreted programming language.
- ESP-IDF uses Python scripts for various build processes, configuration tools (like
menuconfig), and utility scripts. - ESP-IDF v5.x requires Python 3.8 or later.
- Git:
- A distributed version control system.
- ESP-IDF is hosted on GitHub and uses Git for version management and downloading the framework itself and its various components.
- Espressif IDF Extension for VS Code:
- An official extension provided by Espressif Systems.Integrates ESP-IDF seamlessly into VS Code.Manages the installation of ESP-IDF, the required toolchains (compilers, debuggers, etc.), and Python virtual environments.Provides convenient UI elements and commands for building, flashing, monitoring, and debugging ESP32 applications.Simplifies project configuration and SDK management.
%%{ init: { 'theme': 'base', 'themeVariables': { 'fontFamily': 'Open Sans, sans-serif' } } }%%
graph TD
    subgraph Computer Environment
        VSCODE[("Visual Studio Code<br>(Editor)")]
        style VSCODE fill:#DBEAFE,stroke:#2563EB,stroke-width:1px,color:#1E40AF

        EXT[("Espressif IDF Extension<br>(Management & UI)")]
        style EXT fill:#DBEAFE,stroke:#2563EB,stroke-width:1px,color:#1E40AF

        PYGIT[("Python & Git<br>(Build & Version Control Tools)")]
        style PYGIT fill:#FEF3C7,stroke:#D97706,stroke-width:1px,color:#92400E

        IDF_FRAMEWORK[("ESP-IDF<br>(Libraries, Examples, Core Tools)")]
        style IDF_FRAMEWORK fill:#EDE9FE,stroke:#5B21B6,stroke-width:2px,color:#5B21B6

        TOOLCHAIN[("Toolchains<br>(Compilers, Debugger, Build Systems like CMake/Ninja)")]
        style TOOLCHAIN fill:#EDE9FE,stroke:#5B21B6,stroke-width:2px,color:#5B21B6
    end

    subgraph Physical Hardware
        ESP32_BOARD[("ESP32 Development Board<br>(Target Hardware)")]
        style ESP32_BOARD fill:#D1FAE5,stroke:#059669,stroke-width:2px,color:#065F46
    end

    VSCODE -- Manages/Uses --> EXT
    EXT -- Installs & Manages --> IDF_FRAMEWORK
    EXT -- Installs & Manages --> TOOLCHAIN
    EXT -- Uses --> PYGIT
    IDF_FRAMEWORK -- Requires --> PYGIT
    IDF_FRAMEWORK -- Uses --> TOOLCHAIN

    TOOLCHAIN -- Compiles/Builds for --> ESP32_BOARD
    EXT -- Flash/Monitor/Debug --> ESP32_BOARD

    %% Styling for specific node types (already applied inline for clarity)
    %% classDef primaryNode fill:#EDE9FE,stroke:#5B21B6,stroke-width:2px,color:#5B21B6
    %% classDef processNode fill:#DBEAFE,stroke:#2563EB,stroke-width:1px,color:#1E40AF
    %% classDef decisionNode fill:#FEF3C7,stroke:#D97706,stroke-width:1px,color:#92400E
    %% classDef successNode fill:#D1FAE5,stroke:#059669,stroke-width:2px,color:#065F46
    %% class IDF_FRAMEWORK,TOOLCHAIN primaryNode;
    %% class VSCODE,EXT processNode;
    %% class PYGIT decisionNode;
    %% class ESP32_BOARD successNode;
- ESP-IDF (Espressif IoT Development Framework):
- As introduced in Chapter 1, this is Espressif’s official software development kit.
- Contains libraries, source code examples, and build tools necessary to develop applications for ESP32 series SoCs.
- We will be using ESP-IDF v5.x, which is based on FreeRTOS.
- Toolchains:
- These are sets of programming tools used to create software. For ESP32 development, this includes:
- Compilers: Xtensa C/C++ compiler (for LX6/LX7 based ESP32s) and RISC-V C/C++ compiler (for RISC-V based ESP32s like C3, C6, H2).
- Debugger: Tools like OpenOCD and GDB for debugging applications directly on the hardware.
- Build tools: CMake and Ninja, which manage the compilation and linking process.
- The Espressif IDF extension will help install the correct toolchain for your selected ESP-IDF version.
- These are sets of programming tools used to create software. For ESP32 development, this includes:
| ESP32 Series/Architecture | Primary Toolchain Compiler | Key Development Tools |
|---|---|---|
| ESP32 (Original), ESP32-S2, ESP32-S3 (Xtensa LX6/LX7 Microprocessor) |
Xtensa C/C++ Compiler (e.g., xtensa-esp32-elf-gcc, xtensa-esp32s2-elf-gcc, xtensa-esp32s3-elf-gcc) |
|
| ESP32-C2, ESP32-C3, ESP32-C6, ESP32-H2 (RISC-V Microprocessor) |
RISC-V C/C++ Compiler (e.g., riscv32-esp-elf-gcc) |
|
Note: The Espressif IDF Extension for VS Code, when configured with a specific ESP-IDF version (e.g., v5.x) and target chip, automatically downloads and manages the correct toolchain components. Developers typically interact with these tools via the extension’s UI or the idf.py command-line utility. |
||
- USB-to-UART Bridge Drivers:
- Most ESP32 development boards use a USB-to-UART (Universal Asynchronous Receiver/Transmitter) bridge chip to communicate with a computer over USB. This chip allows your computer to see the ESP32 as a virtual serial port (COM port on Windows,
/dev/ttyUSBxor/dev/ttyACMxon Linux,/dev/cu.usbserial-XXXXor/dev/cu.SLAB_USBtoUARTon macOS). - Common bridge chips include CP210x (from Silicon Labs) and CH340/CH341 (from WCH).
- Your operating system needs the correct drivers for these chips to recognize and communicate with the ESP32 board.
- Most ESP32 development boards use a USB-to-UART (Universal Asynchronous Receiver/Transmitter) bridge chip to communicate with a computer over USB. This chip allows your computer to see the ESP32 as a virtual serial port (COM port on Windows,
Setting up these components manually can be a complex and error-prone process. Fortunately, the Espressif IDF extension for VS Code automates much of this, making it significantly easier to get started.
Practical Examples: Step-by-Step Setup Guide
Follow these steps carefully to set up your ESP32 development environment. Ensure you have a stable internet connection, as several components will be downloaded.
Step 1: Install Visual Studio Code
- Go to the official VS Code website: https://code.visualstudio.com/
- Download the installer appropriate for your operating system (Windows, macOS, or Linux).
- Run the installer and follow the on-screen instructions. Accept the default settings unless you have specific reasons to change them.
- Windows Tip: During installation, ensure that “Add to PATH” (or similar wording) is checked. This makes it easier to launch VS Code from the command line.
Step 2: Install Python
ESP-IDF v5.x requires Python 3.8 or newer.
- Go to the official Python website: https://www.python.org/downloads/
- Download an installer for Python 3.8 or a later version.
- Run the installer.
- Windows Tip: Crucially, on the first page of the Python installer, check the box that says “Add Python X.Y to PATH” (where X.Y is the version number). This is very important. Also, consider selecting “Install Now” for the default recommended installation.
- macOS/Linux: Python might already be installed. You can check by opening a terminal and typing
python3 --version. If it’s not installed or the version is too old, use your system’s package manager (e.g.,aptfor Debian/Ubuntu,brewfor macOS) or download from the Python website.
Step 3: Install Git
- Go to the official Git website: https://git-scm.com/downloads
- Download the installer for your operating system.
- Run the installer and follow the on-screen instructions. For most users, the default settings are fine.
- Windows Tip: Ensure Git is added to your system PATH. The installer usually offers this option (e.g., “Git from the command line and also from 3rd-party software”).
Step 4: Install the Espressif IDF Extension in VS Code
%%{ init: { 'theme': 'base', 'themeVariables': { 'fontFamily': 'Open Sans, sans-serif' } } }%%
graph TD
    A["Start: Open VS Code Command Palette<br>Type "ESP-IDF: Configure ESP-IDF extension""] --> B{Setup Mode Selection};
    style A fill:#EDE9FE,stroke:#5B21B6,stroke-width:2px,color:#5B21B6

    B -- "EXPRESS (Recommended)" --> C1["Select ESP32 Target<br>(e.g., ESP32, ESP32-S3)"];
    C1 --> D1["Choose Download Server<br>(Espressif / GitHub)"];
    D1 --> E1["Specify ESP-IDF Install Directory<br>(e.g., C:\esp, ~/esp)"];
    E1 --> F1["Review: ESP-IDF Version & Tools Path"];
    F1 --> G{"Click "Install""};
    style B fill:#FEF3C7,stroke:#D97706,stroke-width:1px,color:#92400E
    style C1 fill:#DBEAFE,stroke:#2563EB,stroke-width:1px,color:#1E40AF
    style D1 fill:#DBEAFE,stroke:#2563EB,stroke-width:1px,color:#1E40AF
    style E1 fill:#DBEAFE,stroke:#2563EB,stroke-width:1px,color:#1E40AF
    style F1 fill:#FEE2E2,stroke:#DC2626,stroke-width:1px,color:#991B1B
    style G fill:#D1FAE5,stroke:#059669,stroke-width:2px,color:#065F46

    B -- "ADVANCED (Custom)" --> C2["Select ESP-IDF Version/Path<br>(Download new / Use existing)"];
    C2 --> D2["Specify ESP-IDF Install Directory<br>(Container Directory)"];
    D2 --> E2["Specify ESP-IDF Tools Path<br>(e.g., ~/.espressif)"];
    E2 --> F2["Python Packages Installation<br>(Global / Virtual Env - Recommended)"];
    F2 --> G;
    style C2 fill:#DBEAFE,stroke:#2563EB,stroke-width:1px,color:#1E40AF
    style D2 fill:#DBEAFE,stroke:#2563EB,stroke-width:1px,color:#1E40AF
    style E2 fill:#DBEAFE,stroke:#2563EB,stroke-width:1px,color:#1E40AF
    style F2 fill:#DBEAFE,stroke:#2563EB,stroke-width:1px,color:#1E40AF

    G --> H["Download & Installation Process:<br>- ESP-IDF from GitHub<br>- Toolchains (Compilers, etc.)<br>- Python Virtual Env & Packages"];
    H --> I[Setup Complete!];
    style H fill:#DBEAFE,stroke:#2563EB,stroke-width:1px,color:#1E40AF
    style I fill:#D1FAE5,stroke:#059669,stroke-width:2px,color:#065F46
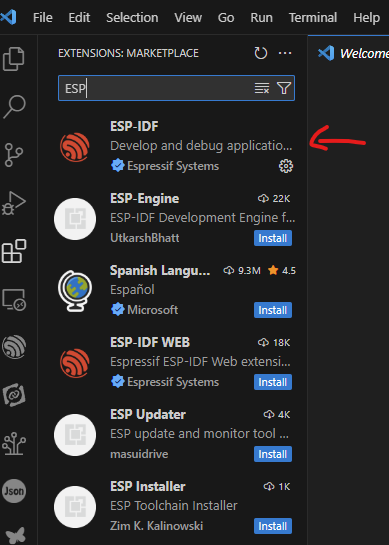
- Open Visual Studio Code.
- Click on the Extensions icon in the Activity Bar on the side of the window (it looks like four squares, with one detaching), or press
Ctrl+Shift+X(Windows/Linux) orCmd+Shift+X(macOS). - In the search bar, type
Espressif IDF. - Locate the extension named “ESP-IDF” provided by Espressif Systems.
- Click the Install button. The installation might take a few moments.
Step 5: Configure the ESP-IDF Extension (Initial Setup Wizard)
Once the extension is installed, it will typically open a welcome page or prompt you to configure it. If not, you can manually trigger the setup:
%%{ init: { 'theme': 'base', 'themeVariables': { 'fontFamily': 'Open Sans, sans-serif' } } }%%
sequenceDiagram
    participant User
    participant VSCodeExt as "VS Code ESP-IDF Ext."
    participant GitHub
    participant EspressifServer as "Espressif Download Server"
    participant LocalSystem as "User's Computer"

    User->>VSCodeExt: Initiates ESP-IDF Setup (Express/Advanced)
    activate VSCodeExt

    VSCodeExt->>GitHub: Request ESP-IDF Repository (selected version)
    activate GitHub
    GitHub-->>VSCodeExt: ESP-IDF Source Code
    deactivate GitHub
    VSCodeExt->>LocalSystem: Clone/Download ESP-IDF to specified path
    activate LocalSystem
    Note over VSCodeExt,LocalSystem: ESP-IDF core framework downloaded

    VSCodeExt->>EspressifServer: Request Toolchain Binaries<br>(Compiler, Debugger, etc.)
    activate EspressifServer
    EspressifServer-->>VSCodeExt: Toolchain Packages
    deactivate EspressifServer
    VSCodeExt->>LocalSystem: Install Toolchains to tools path
    Note over VSCodeExt,LocalSystem: Xtensa/RISC-V tools installed

    VSCodeExt->>LocalSystem: Create Python Virtual Environment
    VSCodeExt->>LocalSystem: Install Python dependencies (from requirements.txt)
    Note over VSCodeExt,LocalSystem: Python environment configured

    deactivate LocalSystem
    VSCodeExt-->>User: Setup Complete / Success Message
    deactivate VSCodeExt

%% Styling
%% Default styles are applied via mermaid theme.
%% Specific node styling can be done if needed, but sequence diagrams rely less on node fills
%% and more on actor/participant representation.
%% Using default colors which are generally clear.
%% Colors for participants are usually handled by the theme or can be customized if really needed
%% but for sequence, clarity of flow is key.
- Open the VS Code Command Palette:
Ctrl+Shift+P(Windows/Linux) orCmd+Shift+P(macOS). - Type
ESP-IDF: Configure ESP-IDF extensionand select it. - This will launch the setup wizard, which guides you through the installation of ESP-IDF and its tools. You’ll be presented with a few setup modes. “EXPRESS” is recommended for most users as it installs the latest stable ESP-IDF version and corresponding tools with sensible defaults. “ADVANCED” allows more customization (e.g., selecting a specific ESP-IDF version, existing ESP-IDF path, or custom tool paths).Let’s proceed with EXPRESS for simplicity (or follow ADVANCED if you have specific needs):
- If choosing EXPRESS:
- Select your ESP32 target (e.g., ESP32, ESP32-S3). You can change this later per project. For now, selecting any common ESP32 variant is fine.
- Choose a download server (Espressif or GitHub). Espressif is usually faster.
- Specify the ESP-IDF Install Directory. This is where ESP-IDF and its tools will be downloaded. Choose a path without spaces or special characters (e.g.,
C:\espor~/espon Linux/macOS). Avoid very long paths on Windows. - The wizard will then show you the ESP-IDF version to be installed (e.g., a recent v5.x release) and the path for the required tools.
- Click “Install”.
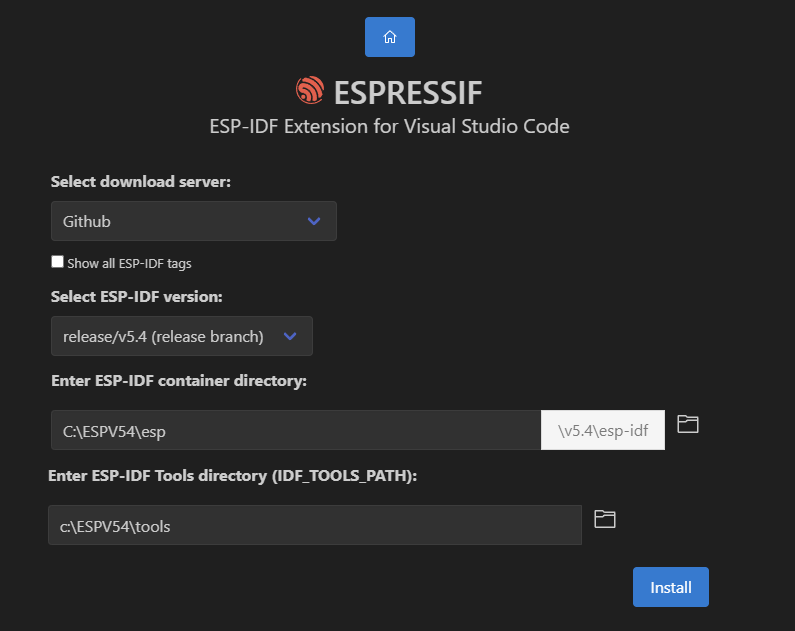
- If choosing ADVANCED (for more control):
- Select ESP-IDF: You can choose to download a specific version from GitHub (e.g., v5.1.2, v5.2) or use an existing ESP-IDF copy on your system. For this course, we aim for v5.x.
- ESP-IDF Install Directory (Container Directory): Specify the parent directory where ESP-IDF and its tools will be stored. For example,
C:\espor~/esp. - ESP-IDF Tools Path: Specify the directory where the ESP-IDF toolchains will be installed. The default is usually
IDF_TOOLS_PATHinside your user directory (e.g.,.espressifin your home folder). - Python Packages from requirements.txt: Choose whether to install into a global Python environment or a Python virtual environment (recommended). The extension usually defaults to creating a virtual environment.
- Click “Install”.
- If choosing EXPRESS:
- Download and Installation Process:
- The extension will now download ESP-IDF from GitHub, download the necessary toolchains (compilers, OpenOCD, CMake, Ninja, etc.), and set up a Python virtual environment with required packages.This process can take a significant amount of time (15 minutes to over an hour) and download several gigabytes of data, depending on your internet speed and the selected components.You can monitor the progress in the VS Code terminal output.Important: Do not interrupt this process. Ensure your computer does not go to sleep.
- Once the installation is complete, you should see a success message.
Step 6: Install USB-to-UART Bridge Drivers
Your computer needs drivers to communicate with your ESP32 board.
- Identify your board’s USB-to-UART chip:
- Look at the chip near the USB connector on your ESP32 development board. Common chips are:
- CP210x: Often a square chip with “SILABS CP210…” markings.
- CH340/CH341: Often a rectangular chip with “CH340…” markings.
- Some newer boards (especially ESP32-S2, ESP32-S3 with native USB) might not need a separate bridge chip or use a different one. For these, drivers are often built into the OS or provided by Espressif.
- Look at the chip near the USB connector on your ESP32 development board. Common chips are:
- Download and install the drivers:
- CP210x Drivers: Go to the Silicon Labs website: https://www.silabs.com/interface/usb-to-uart-bridge/device.cp2102n (or search for “CP210x drivers”). Download and install the VCP (Virtual COM Port) driver for your OS.
- CH340/CH341 Drivers: Search for “CH340 driver” or “CH341 driver” for your OS. These are commonly found on sites like SparkFun or from the chip manufacturer WCH.
- Windows: Download and run the installer.
- macOS: May require disabling System Integrity Protection (SIP) temporarily for some older CH340 drivers, though newer ones might be signed. Follow instructions carefully.
- Linux: Drivers are usually built into the kernel, but you might need to ensure your user is part of the
dialoutgroup (sudo usermod -a -G dialout $USERthen log out/in).
- Restart your computer after installing drivers if prompted or if the board is not detected.
| Chip Family | Manufacturer | Typical Markings | Driver Source & Notes |
|---|---|---|---|
| CP210x (e.g., CP2102, CP2102N, CP2104) | Silicon Labs | “SILABS CP210…” |
Download VCP (Virtual COM Port) drivers from Silicon Labs website.
|
| CH340 / CH341 | WCH (Jiangsu Qinheng Co., Ltd.) | “CH340G”, “CH340C”, “CH341A” |
Search for “CH340 driver” or “CH341 driver” for your OS. Often available from:
|
| FTDI FT232R / FT231X etc. | FTDI (Future Technology Devices International) | “FTDI”, “FT232RL” |
Drivers (VCP) usually available from FTDI website.
|
| Native USB (ESP32-S2, S3, C3 etc.) | Espressif Systems | N/A (Integrated into ESP32 SoC) |
For boards using native USB for programming/serial:
|
Step 7: Connect Your ESP32 Board and Verify COM Port
- Connect your ESP32 development board to your computer using a known-good USB data cable (some USB cables are power-only).
- Your operating system should detect the board and assign it a COM port (Windows) or a device file (macOS/Linux).
- Windows: Open Device Manager (search for it in the Start Menu). Look under “Ports (COM & LPT)”. You should see an entry like “Silicon Labs CP210x USB to UART Bridge (COM_X_)” or “USB-SERIAL CH340 (COM_Y_)”. Note the COM port number (e.g., COM3, COM4).[Insert screenshot of Windows Device Manager showing an ESP32 COM port.]
- macOS: Open a terminal and type
ls /dev/cu.*. You should see entries like/dev/cu.usbserial-XXXXXXor/dev/cu.SLAB_USBtoUART. - Linux: Open a terminal and type
ls /dev/ttyUSB*orls /dev/ttyACM*. You should see entries like/dev/ttyUSB0.
Tip: If the board is not detected, try a different USB cable, a different USB port, or reinstall the drivers.
How to Find Your ESP32’s COM Port
Finding COM Port on Windows:
- Connect your ESP32 board to your computer.
- Open Device Manager:
- Press
Win + Xand select “Device Manager”. - Or, search for “Device Manager” in the Start Menu.
- Press
- Look under the “Ports (COM & LPT)” section.
- You should see an entry like:
Silicon Labs CP210x USB to UART Bridge (COM_X_)USB-SERIAL CH340 (COM_Y_)- Or similar, depending on your board’s USB-to-UART chip.
- The
COM_X_orCOM_Y_is your COM port (e.g., COM3, COM4). Note this down.
Finding Serial Port on macOS:
- Connect your ESP32 board to your Mac.
- Open Terminal (you can find it in Applications > Utilities, or search via Spotlight).
- Type the following command and press Enter:
ls /dev/cu.* - Look for entries that typically look like:
/dev/cu.usbserial-XXXXXXXX(often for FTDI-like chips or generic serial)/dev/cu.SLAB_USBtoUART(for Silicon Labs CP210x chips)/dev/cu.wchusbserialXXXXX(for CH340 chips)
- This is your serial port device file. Note it down.
Finding Serial Port on Linux:
- Connect your ESP32 board to your Linux machine.
- Open a Terminal.
- Type one of the following commands and press Enter:
ls /dev/ttyUSB*(common for many USB-to-serial converters like CP210x, CH340, FTDI)ls /dev/ttyACM*(sometimes used, e.g., for boards with native USB CDC)
- You should see an entry like
/dev/ttyUSB0or/dev/ttyUSB1. This is your serial port device file. - You can also use
dmesg | grep ttyright after plugging in the board to see kernel messages about the newly connected device.
dialout group (or uucp on some older systems): sudo usermod -a -G dialout $USER You’ll need to log out and log back in for this change to take effect.
Step 8: Verify ESP-IDF Extension Configuration in VS Code
The ESP-IDF extension should now be mostly configured. You can check and fine-tune settings:

- Open VS Code.
- The status bar at the bottom of VS Code should show information related to ESP-IDF, such as the current ESP-IDF version, the target chip, the COM port, and icons for build, flash, and monitor.
- Select COM Port: If the COM port is not automatically detected or is incorrect, click on the COM port section in the status bar (or use the command
ESP-IDF: Select Port to Use (COM, /dev/tty*, etc.)) and choose the correct one you identified in Step 7. - Select Target Chip: Click on the chip name in the status bar (e.g.,
esp32s3) or use the commandESP-IDF: Set Espressif device targetto select the specific ESP32 variant you are using for your project (e.g.,esp32,esp32s2,esp32s3,esp32c3,esp32c6,esp32h2). This is crucial for compiling code correctly. - Check Doctor Command: Open the Command Palette (
Ctrl+Shift+PorCmd+Shift+P) and runESP-IDF: Doctor command. This tool checks your ESP-IDF and toolchain setup for common issues and provides a report. Address any errors it reports.
If all steps were successful, your ESP32 development environment is now ready!
Variant Notes
The setup process described above using the VS Code Espressif IDF extension is largely identical for all ESP32 variants (ESP32, ESP32-S2, ESP32-S3, ESP32-C3, ESP32-C6, ESP32-H2). The extension handles the installation of the appropriate toolchains (Xtensa or RISC-V) based on the ESP-IDF version and the target chip you select.
The main difference you’ll encounter related to variants during setup is selecting the correct target chip within the VS Code extension (as described in Step 8.4). This ensures that ESP-IDF compiles the code using the correct architecture and for the specific features of your chosen chip. Also, the USB-to-UART driver might vary depending on the chip used on your particular development board, not strictly the ESP32 variant itself, though newer ESP32-S2/S3 boards might use the native USB capability for programming, which could have different driver requirements or work driverlessly.
Common Mistakes & Troubleshooting Tips
- Mistake: Python or Git not added to the system PATH during their installation.
- Fix: Reinstall Python/Git, ensuring the “Add to PATH” option is checked. Alternatively, manually add their installation directories (specifically the
Scriptsfolder for Python) to the system’s PATH environment variable and restart VS Code or your computer.
- Fix: Reinstall Python/Git, ensuring the “Add to PATH” option is checked. Alternatively, manually add their installation directories (specifically the
- Mistake: Antivirus or firewall software blocking the download or execution of ESP-IDF tools.
- Fix: Temporarily disable your antivirus/firewall during the ESP-IDF setup process, or add exceptions for the VS Code executable, Python, Git, and the ESP-IDF installation directories. Remember to re-enable it afterward.
- Mistake: Incorrect COM port selected, or USB drivers not installed/working correctly.
- Fix: Double-check Device Manager (Windows) or
ls /dev/...(macOS/Linux) to find the correct COM port. Ensure you’ve installed the correct drivers for your board’s USB-to-UART chip (CP210x, CH340, etc.). Try a different USB cable or port. Restarting your computer can sometimes help.
- Fix: Double-check Device Manager (Windows) or
- Mistake: ESP-IDF installation path is too long or contains spaces/special characters (especially on Windows).
- Fix: Choose a short, simple path for ESP-IDF installation, like
C:\esporD:\esp-idf. Avoid user directories with spaces in their names if possible, or paths deep within many nested folders. You might need to uninstall/reconfigure the ESP-IDF extension with the new path.
- Fix: Choose a short, simple path for ESP-IDF installation, like
- Mistake: ESP-IDF download or toolchain installation fails midway.
- Fix: This can be due to network issues or server overload. Try running the
ESP-IDF: Configure ESP-IDF extensionwizard again. Ensure you have a stable internet connection. Sometimes, choosing a different download server (GitHub vs. Espressif) in the ADVANCED setup can help. Check the output logs in the VS Code terminal for specific error messages, which can provide clues.
- Fix: This can be due to network issues or server overload. Try running the
Exercises
- Verify Prerequisites:
- Open a command prompt (Windows) or terminal (macOS/Linux).
- Type
python --version(orpython3 --version) and press Enter. Verify that a version 3.8 or newer is displayed. - Type
git --versionand press Enter. Verify that Git is installed and its version is displayed. - What versions do you have installed?
- Identify Your Board’s COM Port:
- Connect your ESP32 development board to your computer.
- Follow the instructions in “Step 7: Connect Your ESP32 Board and Verify COM Port” to find the COM port (e.g., COM3, /dev/ttyUSB0) assigned to your board.
- What is the COM port for your board? Which USB-to-UART chip does your board use (if you can identify it)?
- Explore ESP-IDF Extension Settings:
- In VS Code, go to File > Preferences > Settings (or Code > Settings > Settings on macOS).
- In the search bar, type
esp-idf. - Browse through the available settings for the Espressif IDF extension. Note down at least three settings you think might be useful to customize later (e.g., ESP-IDF Path, Custom extra paths, Flash Baud Rate).
- Locate Your ESP-IDF Installation:
- Find the directory on your computer where ESP-IDF was installed during “Step 5: Configure the ESP-IDF Extension”.
- Navigate into this directory using your file explorer. What are some of the main sub-folders you see (e.g.,
components,examples,tools)?
- Check Python Environment for ESP-IDF:
- The ESP-IDF extension typically creates a Python virtual environment for its tools. This is often located in
IDF_TOOLS_PATH/python_envor similar (e.g.,~/.espressif/python_env/...orC:\Users\YourUser\.espressif\python_env\...). - Try to locate this directory.
- Alternatively, in VS Code, open the Command Palette and run
ESP-IDF: Open ESP-IDF Terminal. Once the terminal is open, typepython --version. This shows the Python version used within the ESP-IDF environment. Is it the same as your system’s global Python version you checked in Exercise 1? Why might it be different?
- The ESP-IDF extension typically creates a Python virtual environment for its tools. This is often located in
Summary
- A proper development environment setup is crucial for efficient ESP32 programming.
- Key components include VS Code, Python, Git, the Espressif IDF extension, ESP-IDF itself, and associated toolchains.
- The Espressif IDF extension for VS Code greatly simplifies the installation and management of ESP-IDF and its tools.
- Installing the correct USB-to-UART drivers (e.g., CP210x, CH340) is necessary for communication with the ESP32 board.
- The setup process involves installing VS Code, Python, Git, the ESP-IDF extension, then using the extension to install ESP-IDF and toolchains.
- Verifying the COM port and selected target chip in VS Code is essential after setup.
- The setup procedure is generally consistent across all ESP32 variants, with the main difference being the target selection.
Further Reading
- Espressif ESP-IDF Get Started Guide (Official Documentation):
- https://docs.espressif.com/projects/esp-idf/en/v5.x/esp32/get-started/index.html
- While the VS Code extension automates much of this, understanding the underlying manual steps can be beneficial.
- Visual Studio Code Documentation:
- Espressif IDF VS Code Extension Documentation:
- Usually accessible from the extension’s details page within VS Code Marketplace or its GitHub repository.
- https://github.com/espressif/vscode-esp-idf-extension/blob/master/docs/tutorial/install.md
With your development environment now configured, you are well-prepared to move on to Chapter 3, where we will delve into the architecture of the ESP-IDF framework itself, followed by writing and flashing your first ESP32 application in Chapter 4.
