
Chapter 32: Python Refresher: Functions, Modules, and Packages
Chapter Objectives
By the end of this chapter, you will be able to:
- Understand the fundamental principles of procedural and modular programming in Python.
- Implement custom functions to create reusable, organized, and efficient code blocks.
- Organize related functions and data into separate modules and structured packages.
- Configure the Python environment on a Raspberry Pi 5 to use custom and third-party packages.
- Debug common issues related to imports, scope, and package management in an embedded context.
- Apply these concepts to build a practical hardware control application on the Raspberry Pi 5.
Introduction
As we venture deeper into the world of embedded Linux, our programs will inevitably grow in complexity. A single, monolithic script that was once sufficient for blinking an LED becomes unwieldy when tasked with managing sensors, network communication, and user interfaces simultaneously. The key to managing this complexity is not just writing code that works, but writing code that is organized, readable, and maintainable. This is where Python’s powerful organizational structures—functions, modules, and packages—become indispensable tools for the embedded developer.
This chapter serves as a crucial refresher on structuring Python code effectively. We will move beyond simple scripts and explore how to encapsulate logic within functions, the fundamental building blocks of reusable code. We will then learn how to group related functions and variables into modules (single files) and, for larger projects, how to organize these modules into hierarchical packages (directories). Mastering these concepts is essential for building robust, scalable embedded applications. Poorly organized code is difficult to debug, harder to extend, and nearly impossible for a team to collaborate on. By embracing modularity, you create a clean separation of concerns, making your projects more resilient and your development process more efficient. In this chapter, you will apply these principles directly to the Raspberry Pi 5, learning how to structure a hardware control application in a professional, maintainable way.
Technical Background
The Essence of Abstraction: Functions
At the heart of any non-trivial program lies the concept of abstraction. In programming, abstraction means simplifying complex reality by modeling classes appropriate to the problem, and working at the most appropriate level of detail for a given task. The most fundamental unit of abstraction in Python is the function. A function is a self-contained, organized, and reusable block of code that performs a single, specific action. Instead of writing the same sequence of instructions multiple times, you can define it once within a function and then call that function whenever you need to perform that task.
This principle, known as Don’t Repeat Yourself (DRY), is a cornerstone of good software engineering. Consider the task of initializing a GPIO pin on the Raspberry Pi 5. This often involves several steps: selecting the pin number, setting its mode (input or output), and perhaps configuring an initial state (high or low). Repeating this setup code for every pin you use would be tedious and error-prone. If you needed to change the initialization logic—for instance, to add logging—you would have to find and modify every instance of that code. By placing the initialization logic inside a function, say initialize_gpio(pin_number, mode), you create a single, authoritative source for that operation. The complex details are hidden, or encapsulated, within the function, and you can interact with it through a simple, well-defined interface.
A function in Python is defined using the def keyword, followed by the function name, a set of parentheses () for parameters, and a colon :. The indented code block that follows constitutes the function’s body.
def greet_developer(name):
    """A simple function that prints a greeting."""
    message = "Hello, " + name + "! Welcome to Embedded Python."
    print(message)
The parameters listed in the parentheses, like name in the example above, are the inputs to the function. When you call the function, you provide arguments, which are the actual values passed to these parameters. For example, greet_developer("Ada") calls the function and passes the string "Ada" as the argument for the name parameter.
Scope and Lifetime of Variables
A critical concept associated with functions is scope. The scope of a variable determines where in a program it can be accessed. Variables defined inside a function are said to have local scope; they exist only within that function. Once the function finishes executing, its local variables are destroyed, and their memory is reclaimed. This is a vital feature for preventing unintended side effects. If two different functions used a variable named i for a loop, their local scope ensures they don’t interfere with each other.
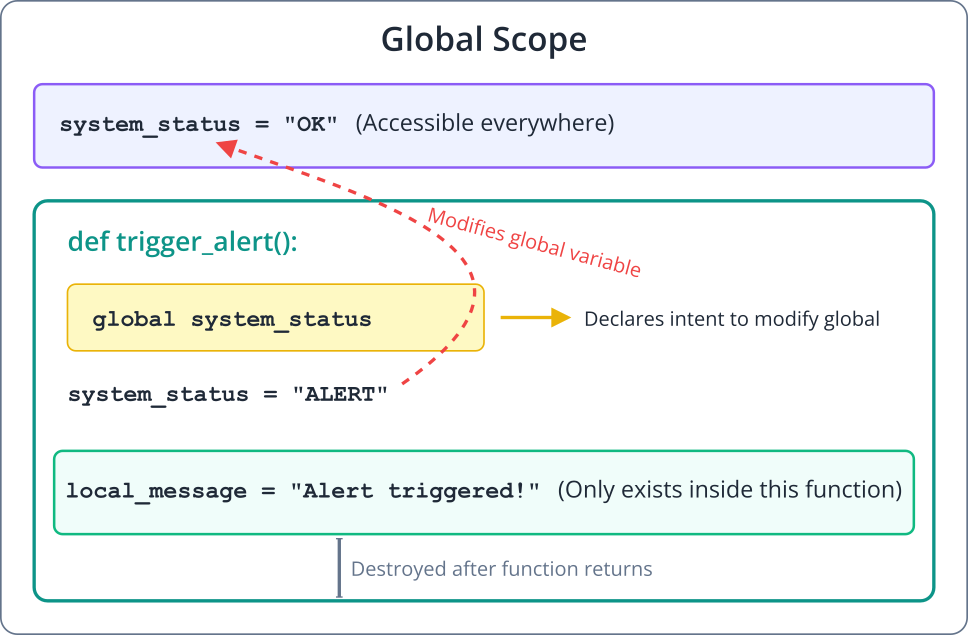
Conversely, variables defined outside of any function, at the top level of a script, have global scope. They can be accessed from anywhere in the file, including from within functions. While global variables can be useful for storing configuration constants or state that must be shared across the entire application, their overuse is a common source of bugs. Modifying a global variable from within a function can lead to confusing behavior that is difficult to trace, as the state of the program is no longer self-contained within its functions. To modify a global variable from within a function, you must explicitly declare your intent with the global keyword.
# A global variable
system_status = "OK"

def check_system():
    # Accessing the global variable (reading is fine)
    print(f"System status is currently: {system_status}")

def trigger_alert():
    # Modifying the global variable requires the 'global' keyword
    global system_status
    system_status = "ALERT"
    print(f"System status changed to: {system_status}")
Tip: Prefer passing data into functions as arguments and returning data with
returnstatements. This makes your functions more predictable and self-contained, a practice known as creating pure functions when possible.
Returning Values
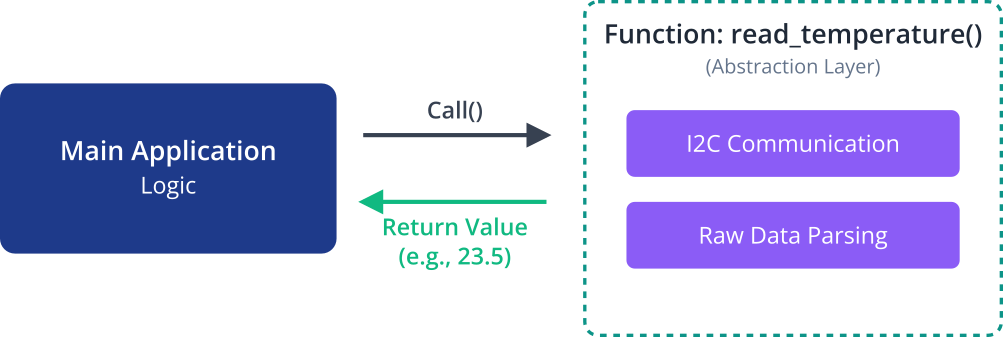
Functions are not just for performing actions; they are also for computing values. The return statement is used to exit a function and pass a value back to the part of the code that called it. A function can return any type of Python object: a number, a string, a list, a dictionary, or even another function. If a function reaches its end without a return statement, it implicitly returns None.
In an embedded context, a function might read a sensor and return the measured value. For example, a function read_temperature() could handle the low-level communication with a temperature sensor over an I2C bus and simply return a floating-point number representing the temperature in Celsius. This abstracts away the complexity of the I2C protocol, allowing the main part of your application to simply call current_temp = read_temperature() and work with the result.
Scaling Up: From Scripts to Modules
As your project grows, placing all your functions into a single file becomes just as unmanageable as having no functions at all. The next logical step in organization is the module. In Python, a module is simply a file with a .py extension that contains Python definitions and statements. If you have a file named gpio_utils.py containing various functions for controlling GPIO pins, that file is a module named gpio_utils.
Modules allow you to logically group related code. You might have one module for sensor interactions, another for network communications, and a third for display management. This practice, known as separation of concerns, makes your codebase vastly easier to navigate, understand, and maintain.
To use the functions or variables from one module in another file, you use the import statement. Python provides a few ways to do this.
- Importing the entire module: import gpio_utilsWhen you use this form, you must prefix the function names with the module name. This is generally the preferred method as it makes it explicitly clear where the function is coming from, avoiding naming conflicts.gpio_utils.initialize_gpio(17, “out”)
- Importing specific names: from gpio_utils import initialize_gpio, set_pin_highThis brings the specified functions directly into the current file’s namespace. You can then call them without the module prefix. This can be more concise but can also lead to confusion if you import functions with the same name from different modules.initialize_gpio(17, “out”)
- Importing with an alias: import gpio_utils as gpioThis is a useful compromise, allowing you to use a shorter or more convenient name for the module. It maintains clarity while reducing verbosity.gpio.initialize_gpio(17, “out”)
The first time a module is imported, Python executes the code in the module file from top to bottom and caches the resulting module object in a dictionary called sys.modules. Subsequent imports of the same module in the same program run will simply retrieve the cached object, avoiding the cost of re-executing the module’s code.
The __name__ == "__main__" Guard
You will often see a peculiar block of code at the end of a Python module:
if __name__ == "__main__":
    # Code to execute when the script is run directly
    print("This module is being run as the main program.")
    # Example: run a self-test of the module's functions
    initialize_gpio(4, "out")
    set_pin_high(4)
Python sets a special variable, __name__, for every module. When you run a Python file directly from the command line (e.g., python gpio_utils.py), Python sets that file’s __name__ variable to the string "__main__". However, when the file is imported by another module, its __name__ is set to its own filename (e.g., "gpio_utils").
graph TD
    subgraph Execution Context
        direction LR
        A[Start: `python my_module.py`]
    end

    B{Check value of __name__}

    A --> B;

    C["__name__ is set to __main__ "]
    D["__name__ is set to my_module"]

    B --"Run Directly"--> C;
    B --"Imported by another script<br><i>(e.g., import my_module)</i>"--> D;

    E{if __name__ == __main__}

    C --> E;
    D --> E;

    F["<b>True</b><br>Execute code inside the if block<br><i>(e.g., run self-tests, demos)</i>"]
    G["<b>False</b><br>Skip code inside the if block"]

    E --"True"--> F;
    E --"False"--> G;

    H["Continue executing rest of module<br>(e.g., function and class definitions)"]

    F --> H;
    G --> H;

    I[Module is now loaded and ready for use]
    H --> I

    %% Styling
    classDef startNode fill:#1e3a8a,stroke:#1e3a8a,stroke-width:2px,color:#ffffff
    classDef decisionNode fill:#f59e0b,stroke:#f59e0b,stroke-width:1px,color:#ffffff
    classDef processNode fill:#0d9488,stroke:#0d9488,stroke-width:1px,color:#ffffff
    classDef endNode fill:#10b981,stroke:#10b981,stroke-width:2px,color:#ffffff
    classDef checkNode fill:#ef4444,stroke:#ef4444,stroke-width:1px,color:#ffffff

    class A startNode
    class B,E decisionNode
    class C,D,F,G,H processNode
    class I endNode
This if block acts as a guard, allowing a module to have code that only executes when it is the main program being run. This is incredibly useful for providing tests, demonstrations, or examples of how to use the module’s functionality. For an embedded module like gpio_utils.py, the code inside this block might perform a simple self-test, like blinking an LED, to confirm the functions are working correctly without requiring another script to import it.
Professional Organization: Packages
When a project becomes so large that even modules are not enough to keep it organized, Python offers a final level of hierarchy: the package. A package is a way of structuring Python’s module namespace by using “dotted module names”. In simple terms, a package is a directory that contains a special file called __init__.py and other modules or sub-packages.
Imagine you are building a complex weather station on your Raspberry Pi 5. You might have sensors for temperature, humidity, and pressure, as well as a display and a web server to show the data. A package structure could look like this:

In this structure, sensors, display, and network are all sub-packages of the main weather_station application. To use the function read_bme280_temp() from the temperature.py module, your main.py script would use a dotted import path:
from sensors.temperature import read_bme280_temp
Or, using a full import:
import sensors.temperaturecurrent_temp = sensors.temperature.read_bme280_temp()
The __init__.py file is what tells Python to treat a directory as a package. This file can be empty, but it can also be used to execute package initialization code or to set the __all__ variable, which defines the public API of the package. For instance, the sensors/__init__.py file could import key functions from its modules to make them more accessible.
If sensors/__init__.py contains:from .temperature import read_bme280_tempfrom .humidity import read_bme280_humidity
Then main.py can use a more convenient import:from sensors import read_bme280_temp, read_bme280_humidity
This structure provides a robust, scalable, and highly organized framework for complex applications, which is the standard in professional software development.
The Python Standard Library and pip
No discussion of Python modules and packages is complete without mentioning the vast ecosystem that makes Python so powerful. Python comes with a rich Standard Library, a collection of modules included with every Python installation. For embedded systems, modules like os (for interacting with the operating system), sys (for system-specific parameters), time (for delays and timekeeping), socket (for networking), and subprocess (for running external commands) are invaluable. You should always check the standard library first before writing your own solution or seeking a third-party one.
Beyond the standard library lies a massive repository of third-party packages known as the Python Package Index (PyPI). This is where you can find libraries for almost any task imaginable, from controlling specific hardware (like the RPi.GPIO or gpiozero libraries for Raspberry Pi) to advanced data analysis (numpy, pandas) and web frameworks (Flask, Django).
The tool used to install and manage these packages is pip (Pip Installs Packages). With a simple command like pip install rpi-lgpio, you can download and install a package from PyPI onto your Raspberry Pi 5, making its modules available for you to import into your projects. pip handles dependencies automatically; if a package you want to install requires another package, pip will install it as well. This dramatically accelerates development, as you can build upon the work of thousands of other developers instead of reinventing the wheel. For embedded development, pip is the primary mechanism for adding hardware drivers and other essential tools to your Python environment on the device.
Practical Examples
In this section, we will apply the theoretical concepts to a practical project on the Raspberry Pi 5. Our goal is to build a simple, modular application that reads the state of a push button and controls an LED accordingly. We will start with a single script and refactor it into functions, then a module, and finally a structured package.
Hardware Requirements:
- Raspberry Pi 5 running Raspberry Pi OS
- 1 x LED (any color)
- 1 x 330Ω resistor
- 1 x Tactile push button
- Breadboard and jumper wires
Hardware Setup:
- LED Connection:
- Connect the long leg (anode) of the LED to GPIO 17 on the Raspberry Pi 5.
- Connect the short leg (cathode) of the LED to one end of the 330Ω resistor.
- Connect the other end of the resistor to a GND (Ground) pin on the Raspberry Pi 5.
- Button Connection:
- Connect one leg of the push button to GPIO 27.
- Connect the diagonally opposite leg of the button to a 3.3V pin on the Raspberry Pi 5.

Warning: Always double-check your wiring before powering on the Raspberry Pi. Incorrect connections to the GPIO pins can damage the board. Ensure the resistor is in series with the LED to limit current.
We will use the lgpio library, which is the modern, recommended way to control GPIO on recent Raspberry Pi models and Raspberry Pi OS versions. It provides robust control via the Linux character device interface.
Installation:
First, ensure lgpio is installed. It is typically included in recent Raspberry Pi OS images, but you can install it manually. Open a terminal on your Raspberry Pi and run:
sudo apt update
sudo apt install python3-lgpio
Example 1: The Monolithic Script
Let’s start with a single script that accomplishes our goal. This represents the initial, less-organized approach.
File: button_led_simple.py
import lgpio
import time
import sys

# --- Configuration ---
LED_PIN = 17  # GPIO 17
BUTTON_PIN = 27 # GPIO 27

# --- Main Execution ---
try:
    # Open the GPIO chip
    h = lgpio.gpiochip_open(0)

    # Configure LED pin as output
    lgpio.gpio_claim_output(h, LED_PIN)

    # Configure button pin as input with a pull-down resistor
    # The pull-down ensures the pin reads LOW when the button is not pressed.
    flags = lgpio.SET_PULL_DOWN
    lgpio.gpio_claim_input(h, BUTTON_PIN, flags)

    print("Application started. Press the button to light up the LED. Press Ctrl+C to exit.")

    while True:
        # Read the button state
        button_state = lgpio.gpio_read(h, BUTTON_PIN)

        # If button is pressed (state is HIGH), turn on LED
        if button_state == 1:
            lgpio.gpio_write(h, LED_PIN, 1) # Turn LED ON
        else:
            lgpio.gpio_write(h, LED_PIN, 0) # Turn LED OFF

        time.sleep(0.1) # Small delay to prevent high CPU usage

except (KeyboardInterrupt, SystemExit):
    print("\nExiting application.")
finally:
    # Clean up GPIO resources
    if 'h' in locals() and h >= 0:
        lgpio.gpio_write(h, LED_PIN, 0) # Ensure LED is off
        lgpio.gpiochip_close(h)
    print("GPIO cleanup complete.")
To Run:
Save the code as button_led_simple.py on your Raspberry Pi and execute it from the terminal:
python3 button_led_simple.py
Expected Output:
The program will print the “Application started” message. When you press and hold the button, the LED should light up. When you release it, the LED should turn off. Pressing Ctrl+C will stop the program and run the cleanup code. This script works, but all the logic is mixed together.
Example 2: Refactoring into Functions and a Module
Now, let’s improve the organization by creating functions and saving them in a dedicated module.
File Structure:
gpio_project/
├── hardware_control.py
└── main.py
Step 1: Create the hardware control module.
This module will contain all the low-level functions for interacting with the GPIO pins.
File: gpio_project/hardware_control.py
import lgpio

# This handle will be shared by functions in this module.
# It's a module-level global variable.
_h = None

def setup_gpio():
    """
    Opens the GPIO chip and returns the handle.
    This must be called before any other GPIO functions.
    """
    global _h
    if _h is None:
        try:
            _h = lgpio.gpiochip_open(0)
            print("GPIO chip opened successfully.")
        except lgpio.error as e:
            print(f"Failed to open GPIO chip: {e}")
            _h = None
    return _h

def configure_led(pin):
    """Configures a specific GPIO pin as an output for an LED."""
    if _h is None:
        raise RuntimeError("GPIO not set up. Call setup_gpio() first.")
    try:
        lgpio.gpio_claim_output(_h, pin)
    except lgpio.error as e:
        print(f"Failed to claim pin {pin} as output: {e}")

def configure_button(pin):
    """Configures a specific GPIO pin as an input for a button with a pull-down."""
    if _h is None:
        raise RuntimeError("GPIO not set up. Call setup_gpio() first.")
    try:
        flags = lgpio.SET_PULL_DOWN
        lgpio.gpio_claim_input(_h, pin, flags)
    except lgpio.error as e:
        print(f"Failed to claim pin {pin} as input: {e}")

def set_led_state(pin, state):
    """Sets the state of an LED pin (1 for ON, 0 for OFF)."""
    if _h is None: return
    lgpio.gpio_write(_h, pin, state)

def read_button_state(pin):
    """Reads the state of a button pin (1 for pressed, 0 for not pressed)."""
    if _h is None: return 0
    return lgpio.gpio_read(_h, pin)

def cleanup_gpio():
    """Closes the GPIO chip handle, releasing resources."""
    global _h
    if _h is not None:
        lgpio.gpiochip_close(_h)
        _h = None
        print("GPIO cleanup complete.")

# Self-test block
if __name__ == "__main__":
    print("--- Running hardware_control.py self-test ---")
    LED_PIN_TEST = 17
    BUTTON_PIN_TEST = 27

    handle = setup_gpio()
    if handle:
        configure_led(LED_PIN_TEST)
        configure_button(BUTTON_PIN_TEST)

        print("Testing LED for 2 seconds...")
        set_led_state(LED_PIN_TEST, 1)
        import time
        time.sleep(2)
        set_led_state(LED_PIN_TEST, 0)

        print("Please press the button to test input...")
        start_time = time.time()
        while time.time() - start_time < 5: # Test for 5 seconds
            if read_button_state(BUTTON_PIN_TEST) == 1:
                print("Button press detected!")
                break
            time.sleep(0.1)
        else:
            print("No button press detected in 5 seconds.")

        cleanup_gpio()
    print("--- Self-test finished ---")
Step 2: Create the main application script.
This script will import our new module and contain the high-level application logic.
File: gpio_project/main.py
import time
import hardware_control as hw

# --- Configuration ---
LED_PIN = 17
BUTTON_PIN = 27

def main():
    """Main application logic."""
    print("Application starting...")

    # Setup hardware
    handle = hw.setup_gpio()
    if not handle:
        print("Could not initialize hardware. Exiting.")
        return # Exit if GPIO setup fails

    hw.configure_led(LED_PIN)
    hw.configure_button(BUTTON_PIN)

    print("Application started. Press the button to light up the LED. Press Ctrl+C to exit.")

    try:
        while True:
            button_state = hw.read_button_state(BUTTON_PIN)
            hw.set_led_state(LED_PIN, button_state)
            time.sleep(0.1)
    except (KeyboardInterrupt, SystemExit):
        print("\nExiting application.")
    finally:
        # Always ensure cleanup is called
        hw.set_led_state(LED_PIN, 0) # Turn off LED before closing
        hw.cleanup_gpio()

if __name__ == "__main__":
    main()
To Run:
Navigate into the gpio_project directory and run the main.py script.
cd gpio_project
python3 main.py
The behavior will be identical to the first example, but the code is now much cleaner. The main.py file describes what the application does (reads a button, sets an LED), while hardware_control.py handles how it’s done (the low-level lgpio calls). You can also run python3 hardware_control.py to run its self-test.
Example 3: Structuring as a Package
For a final evolution, let’s organize our code into a proper package. This is overkill for our simple example, but it’s the correct approach for a large, real-world application.
File Structure:
smart_switch_app/
├── main.py
└── smartswitch/
    ├── __init__.py
    └── devices/
        ├── __init__.py
        ├── led.py
        └── button.py
Step 1: Create the package directories and __init__.py files.
The __init__.py files can be empty. Their presence is what defines the directories as Python packages.
mkdir -p smart_switch_app/smartswitch/devices
touch smart_switch_app/smartswitch/__init__.py
touch smart_switch_app/smartswitch/devices/__init__.py
Step 2: Create device-specific modules.
We will separate the LED and Button logic into their own modules.
File: smart_switch_app/smartswitch/devices/led.py
import lgpio

def configure(handle, pin):
    """Configures a pin as an output for an LED."""
    lgpio.gpio_claim_output(handle, pin)

def set_state(handle, pin, state):
    """Sets the state of an LED pin (1=ON, 0=OFF)."""
    lgpio.gpio_write(handle, pin, state)
File: smart_switch_app/smartswitch/devices/button.py
import lgpio

def configure(handle, pin):
    """Configures a pin as an input for a button."""
    flags = lgpio.SET_PULL_DOWN
    lgpio.gpio_claim_input(handle, pin, flags)

def read_state(handle, pin):
    """Reads the state of a button pin."""
    return lgpio.gpio_read(handle, pin)
Step 3: Create a higher-level __init__.py to manage the GPIO handle.
We can use the package’s __init__.py to manage the shared lgpio handle.
File: smart_switch_app/smartswitch/__init__.py
import lgpio
from .devices import led, button

# Package-level handle
_handle = None

def init():
    """Initializes the GPIO system for the package."""
    global _handle
    if _handle is None:
        _handle = lgpio.gpiochip_open(0)
    return _handle

def cleanup():
    """Cleans up GPIO resources used by the package."""
    global _handle
    if _handle is not None:
        lgpio.gpiochip_close(_handle)
        _handle = None

# You can expose a simplified API here if desired
# For now, we will keep it simple.
Step 4: Update the main application script.
The main.py now sits outside the package and uses it.
File: smart_switch_app/main.py
import time
import sys
# To make the 'smartswitch' package findable, we add the current directory to Python's path
# This is often needed when running a script that uses a sibling package.
sys.path.append('.')

import smartswitch
from smartswitch.devices import led, button

# --- Configuration ---
LED_PIN = 17
BUTTON_PIN = 27

def main():
    """Main application logic using the smartswitch package."""
    print("Application starting...")

    try:
        # Initialize the package, which gives us the GPIO handle
        gpio_handle = smartswitch.init()
        if not gpio_handle:
            print("Failed to initialize GPIO. Exiting.")
            return

        # Configure devices using their respective modules
        led.configure(gpio_handle, LED_PIN)
        button.configure(gpio_handle, BUTTON_PIN)

        print("Application running. Press Ctrl+C to exit.")
        while True:
            state = button.read_state(gpio_handle, BUTTON_PIN)
            led.set_state(gpio_handle, LED_PIN, state)
            time.sleep(0.1)

    except (KeyboardInterrupt, SystemExit):
        print("\nExiting application.")
    finally:
        # Ensure the LED is off before cleaning up
        if 'gpio_handle' in locals() and gpio_handle:
            led.set_state(gpio_handle, LED_PIN, 0)
        smartswitch.cleanup()
        print("Cleanup complete.")

if __name__ == "__main__":
    main()
To Run:
Navigate to the smart_switch_app directory and run main.py.
cd smart_switch_app
python3 main.py
The application functions as before, but now we have a highly organized, scalable, and reusable package structure. Each component has a clearly defined role and location.
Common Mistakes & Troubleshooting
As you begin to structure your code, you may encounter several common issues. Understanding them ahead of time can save hours of debugging.
Exercises
- Refactor to a Function.
- Objective: Practice creating and using a function for a specific, reusable task.
- Task: Take the first monolithic script (
button_led_simple.py). Create a new function calledcheck_button_and_update_led(handle, button_pin, led_pin). This function should contain the logic from inside thewhileloop: read the button state and write the corresponding state to the LED. Modify thewhileloop to call this new function. - Verification: The program’s behavior should be identical to the original.
- Create a Sensor Module.
- Objective: Build a new, self-contained module for a different hardware type.
- Task: Imagine you have a DHT11 temperature and humidity sensor connected to your Raspberry Pi. Create a new module named
dht11_sensor.py. Inside, create a placeholder functionread_temp_humidity(pin)that simulates reading from the sensor. It should return a tuple of two random numbers, e.g.,(25.5, 45.8). Add a__name__ == "__main__"block that calls this function and prints the simulated data to test the module. - Verification: Running
python3 dht11_sensor.pyshould print the simulated temperature and humidity.
- Build a Multi-Module Package.
- Objective: Practice organizing multiple modules into a cohesive package.
- Task: Create a new package called
robot_control. Inside this package, create two modules:motors.pyandsensors.py.- In
motors.py, create functions likemove_forward(),turn_left(), etc. These can just containprint()statements for now (e.g.,print("Motor: Moving forward")). - In
sensors.py, create functions likeread_distance()andread_light_level(), which also just print messages. - Create a
main.pyoutside the package that imports these functions and calls them in a sequence to simulate a robot’s behavior (e.g., move forward, read distance, turn left).
- In
- Verification: Running
main.pyshould print the sequence of actions from your motor and sensor modules.
- Install and Use a Third-Party Package.
- Objective: Learn to find, install, and use a package from PyPI.
- Task: The
psutillibrary is a cross-platform package for retrieving information on running processes and system utilization (CPU, memory, etc.).- Install it on your Raspberry Pi using
pip:pip install psutil. - Write a Python script
system_monitor.pythat importspsutil. - Use
psutil.cpu_percent(interval=1)to get the CPU utilization. - Use
psutil.virtual_memory().percentto get the memory usage percentage. - Print these values to the console in a loop every 2 seconds.
- Install it on your Raspberry Pi using
- Verification: The script should output the current CPU and memory usage of your Raspberry Pi, updating every two seconds.
Summary
- Functions are the primary tool for creating reusable code, improving readability, and abstracting complexity. They operate on local variables, receiving data through parameters and returning results with
return. - Modules are single
.pyfiles that allow you to group related functions and data, promoting a clean separation of concerns. Theimportstatement is used to access code from other modules. - The
if __name__ == "__main__"construct allows a module to double as a runnable script for testing or demonstration purposes. - Packages are directories containing an
__init__.pyfile, which allows for a hierarchical organization of modules. This is the standard for structuring large, complex applications. - pip is the essential tool for installing and managing third-party packages from the Python Package Index (PyPI), giving you access to a vast ecosystem of pre-built libraries.
- Effective code organization is not an academic exercise; it is a critical practice for writing maintainable, scalable, and debuggable embedded systems.
Further Reading
- The Python Tutorial – Modules: The official Python documentation is the authoritative source. This section provides a detailed look at the module system. https://docs.python.org/3/tutorial/modules.html
- Python Packaging User Guide: The official guide to creating and distributing Python packages. Essential reading for professional development. https://packaging.python.org/en/latest/
- Raspberry Pi GPIO Python Libraries: A comparison of the different Python libraries for GPIO control on the Raspberry Pi.
https://projects.raspberrypi.org/en/projects/physical-computing/1 - Real Python: An excellent source for high-quality tutorials on a wide range of Python topics, including project structure and packaging. https://realpython.com/
- The
lgpioLibrary Documentation: The official documentation for thelgpiolibrary, providing details on all available functions. https://abyz.me.uk/lg/py_lgpio.html - Hitchhiker’s Guide to Python – Structuring Your Project: A well-regarded, opinionated guide on best practices for Python application structure. https://docs.python-guide.org/writing/structure/
psutilDocumentation: The official documentation for thepsutillibrary used in the exercise. https://psutil.readthedocs.io/en/latest/
