
Chapter 6: Overview of Common Linux Distributions for Embedded Systems
Chapter Objectives
Upon completing this chapter, you will be able to:
- Understand the fundamental differences between embedded Linux distributions and desktop Linux distributions.
- Analyze the core philosophies, architectures, and trade-offs of major embedded Linux build systems and distributions, including Debian, the Yocto Project, Buildroot, OpenWrt, and Android.
- Select the most appropriate distribution or build system for a given embedded project based on technical requirements, development resources, and product lifecycle.
- Perform a basic system configuration and build using Buildroot to generate a custom Linux image for the Raspberry Pi 5.
- Deploy a custom-built image to a Raspberry Pi 5 and verify its functionality via a serial console.
- Debug common issues related to build configuration, package selection, and system deployment in an embedded Linux environment.
Introduction
In the world of desktop computing, the choice of a Linux distribution—such as Ubuntu, Fedora, or Arch Linux—is often a matter of personal preference, user interface aesthetics, or pre-installed software packages. The underlying hardware is typically powerful and standardized, with ample storage and memory. The embedded world, however, operates under a completely different set of constraints and priorities. An embedded system, whether it’s a smart thermostat, an industrial controller, or an automotive infotainment system, demands an operating system that is meticulously tailored to its specific purpose. This is where the concept of an embedded Linux distribution becomes critically important.
Unlike their desktop counterparts, embedded Linux distributions are not one-size-fits-all solutions. They are better understood as frameworks, toolkits, or highly specialized operating systems designed to be lean, reliable, and efficient. The choice is not merely about preference but is a foundational engineering decision with far-reaching consequences for the product’s performance, security, cost, and time-to-market. A mismatch between the project’s needs and the distribution’s capabilities can lead to bloated systems, security vulnerabilities, and significant development overhead.
This chapter will serve as your guide to the landscape of common embedded Linux options. We will move beyond the familiar territory of pre-built distributions like Raspberry Pi OS (a derivative of Debian) and delve into the powerful world of build systems like the Yocto Project and Buildroot, which empower you to create a truly custom Linux from the ground up. We will also explore specialized distributions like OpenWrt for networking devices and the complex ecosystem of Android for consumer electronics. By understanding the “why” and “how” behind each of these systems, you will gain the critical ability to architect an embedded Linux system that is not just functional, but optimal.
Technical Background
The journey into embedded Linux distributions begins with a fundamental shift in perspective. Instead of receiving a pre-compiled, monolithic operating system, an embedded developer often starts with the tools to create one. This distinction separates general-purpose distributions from the highly adaptable systems required for embedded products. The core challenge is to build a system that includes everything it needs and nothing it doesn’t, perfectly matching the hardware capabilities and application requirements.
From Pre-built Binaries to Source: The Core Trade-off
At one end of the spectrum, we have distributions like Debian, which provide a vast repository of pre-compiled binary packages. This approach offers convenience and rapid prototyping, making it an excellent choice for development platforms like the Raspberry Pi. When you install a package using apt-get, you are pulling in a ready-to-run binary that has been compiled and tested by the Debian community. This is analogous to buying a pre-fabricated component from a hardware store; it’s reliable and easy to integrate, but you have little control over its internal construction. For a final product, this can lead to a larger-than-necessary footprint, as the generic packages may contain features and dependencies that your specific application does not require. The Raspberry Pi OS, which is based on Debian, exemplifies this trade-off: it provides a rich, desktop-like experience out of the box, but a production device running a single application would be burdened by the thousands of unnecessary packages and services.
This is where build systems like Buildroot and the Yocto Project enter the picture. They are not distributions in the traditional sense but are more accurately described as “distribution builders” or “meta-build systems.” They provide the recipes, tools, and automation to create a completely custom Linux system from source code.
Buildroot: The Philosophy of Simplicity
Buildroot is guided by a philosophy of simplicity and minimalism. It is essentially a collection of Makefiles that automates the process of downloading source code, configuring a cross-compilation toolchain, building the Linux kernel, compiling a root filesystem with selected applications, and generating a final bootable image. The entire configuration is managed through a kernel-style menuconfig interface, allowing a developer to precisely select the target architecture, the C library (e.g., glibc, uClibc-ng), and the specific software packages to include. The result is a small, static system image. Buildroot is not designed to have a package manager on the target device; if a change is needed, the developer reconfigures and rebuilds the entire system image. This makes it exceptionally well-suited for single-purpose, deeply embedded devices where the software stack is fixed and updates are performed by replacing the entire firmware. Think of a smart coffee machine or a simple sensor node; its functionality is defined at the factory and is unlikely to change.
flowchart TD
    A[menuconfig] --> B[Download Sources]
    B --> C[Kernel Sources]
    B --> D[BusyBox Sources]
    B --> E[Package Sources]

    C --> F[Build Cross-Compilation Toolchain]
    D --> F
    E --> F

    F --> G[Build Kernel]
    F --> H[Build Bootloader]
    F --> I[Build Root Filesystem]

    G --> J[Final System Image<br/>sdcard.img]
    H --> J
    I --> J

    style A fill:#e1f5fe
    style B fill:#f3e5f5
    style F fill:#fff3e0
    style J fill:#e8f5e8
The Yocto Project: A Framework for Scalability
The Yocto Project, in contrast, is built for complexity and scalability. It is not a build system itself but a collaborative open-source project that provides templates, tools, and methods to create custom Linux-based systems. The actual build engine it uses is called Poky, which leverages a task executor named BitBake. Instead of Makefiles, the Yocto Project uses “recipes” (.bb files) to specify how to fetch, configure, compile, and deploy individual pieces of software. These recipes are organized into “layers,” which allow for modularity and collaboration. A hardware vendor (like Texas Instruments or NXP) can provide a Board Support Package (BSP) layer for their specific hardware, a software team can provide a layer for their graphical stack, and another team can provide a layer for the core application.
This layered architecture makes the Yocto Project incredibly powerful for large-scale, long-lifecycle products developed by multiple teams, such as automotive infotainment systems, complex industrial machinery, or carrier-grade networking equipment. It can generate not only a final system image but also a full software development kit (SDK) for application developers and even a package feed, allowing for on-target package management (similar to apt-get) if desired. The learning curve for the Yocto Project is considerably steeper than for Buildroot. Mastering the recipe syntax, understanding layer dependencies, and debugging complex build failures requires a significant investment of time. However, for products that demand customization, scalability, and maintainability over many years, the Yocto Project is often the industry standard.
%%{ init: { 'theme': 'base', 'themeVariables': { 'fontFamily': 'Open Sans' } } }%%
graph TD
    subgraph Yocto Project Build
        direction TB
        subgraph "Input Layers"
            App[<b>Meta-MyWebApp</b><br><i>Application Layer</i>]
            GUI[<b>Meta-Qt5</b><br><i>GUI Layer</i>]
            BSP[<b>Meta-RaspberryPi</b><br><i>BSP Layer</i>]
            Base["<b>Poky</b><br><i>(BitBake, OpenEmbedded-Core)</i>"]
        end

        App --> Build
        GUI --> Build
        BSP --> Build
        Base --> Build

        subgraph "Build Engine"
            Build{<b>BitBake</b><br>Parses Recipes<br>Executes Tasks}
        end

        subgraph "Outputs"
            direction LR
            Image["System Image<br><i>(core-image-minimal.wic)</i>"]
            SDK["SDK Toolchain<br><i>(For App Developers)</i>"]
            Feed["Package Feeds<br><i>(For on-target updates)</i>"]
        end

        Build --> Image
        Build --> SDK
        Build --> Feed
    end

    %% Styling
    classDef primary fill:#1e3a8a,stroke:#1e3a8a,stroke-width:2px,color:#ffffff;
    classDef success fill:#10b981,stroke:#10b981,stroke-width:2px,color:#ffffff;
    classDef decision fill:#f59e0b,stroke:#f59e0b,stroke-width:1px,color:#ffffff;
    classDef process fill:#0d9488,stroke:#0d9488,stroke-width:1px,color:#ffffff;
    classDef system fill:#8b5cf6,stroke:#8b5cf6,stroke-width:1px,color:#ffffff;

    class Base,BSP,GUI,App system;
    class Build decision;
    class Image,SDK,Feed success;
Specialized Distributions: OpenWrt for Networking
Venturing into more specialized domains, we encounter distributions like OpenWrt. Originally created to replace the proprietary firmware on home routers, OpenWrt has evolved into a highly flexible and powerful embedded Linux distribution for networking applications. Its primary strength lies in its extensive networking support and its package management system, opkg. Unlike Buildroot, OpenWrt is designed for on-device modification. Its root filesystem is typically a writable overlay (using JFFS2 or OverlayFS) on top of a read-only SquashFS partition. This clever design allows users to install and uninstall packages on a live system without risking corruption of the core OS. A factory reset simply involves wiping the overlay partition, instantly reverting the device to its original state. The configuration is centralized in the /etc/config directory, using a unified configuration interface (UCI) that simplifies the management of complex network settings for firewalls, wireless interfaces, VLANs, and VPNs. For any product whose primary function is to route, filter, or manage network traffic—such as custom routers, firewalls, IoT gateways, or mesh network nodes—OpenWrt is an unparalleled choice.
The Android Ecosystem: A Linux Distribution for Consumer Devices

Finally, we must consider Android. While many think of it as just a mobile operating system, it is, at its core, a heavily modified Linux distribution. The Android Open Source Project (AOSP) provides the source code for a complete software stack, including a Linux kernel with custom patches (for power management, for example), a set of native libraries, the Android Runtime (ART), and a comprehensive application framework. Building a custom Android system is a complex undertaking, similar in scale to using the Yocto Project, but focused on a very specific architecture designed for user-facing applications with rich graphical interfaces. Android introduces its own abstractions and services, such as Binders for inter-process communication and Hardware Abstraction Layers (HALs) that standardize the interface between the Android framework and underlying hardware drivers. This makes it an excellent, albeit heavyweight, choice for consumer electronics like smart TVs, digital signage, and in-vehicle infotainment systems, where a familiar user experience and access to a vast ecosystem of apps are key requirements. However, for most traditional “deeply embedded” systems, the resource overhead and complexity of the Android stack would be prohibitive.
Choosing the right path depends entirely on the project’s destination. For a quick proof-of-concept on a Raspberry Pi, Debian is the fastest way to get started. For a resource-constrained, fixed-function device, Buildroot offers simplicity and minimal footprint. For a complex, collaborative, long-term project, the Yocto Project provides the necessary structure and scalability. For a networking-centric device, OpenWrt delivers unparalleled specialization. And for a consumer-facing product demanding a rich UI, Android provides a complete, albeit complex, ecosystem.
Practical Examples
Theory provides the map, but practical application is the journey itself. In this section, we will walk through the process of creating a minimal custom Linux image for the Raspberry Pi 5 using Buildroot. This hands-on example will solidify the concepts of cross-compilation, system configuration, and image generation, demonstrating the power of building a system from source.
Build and Configuration Steps
Our goal is to create a bootable microSD card image containing only the Linux kernel and a basic shell provided by BusyBox. This is the “Hello, World!” of embedded Linux systems.
Warning: The build process will download several hundred megabytes of source code and compile it. This can take anywhere from 30 minutes to several hours depending on your host machine’s performance. Ensure you have at least 10-15 GB of free disk space.
1. Setting up the Host Environment
First, you need a Linux host machine (a VM or native installation of Ubuntu 22.04 LTS is recommended). Install the essential packages required by Buildroot:
sudo apt update
sudo apt install -y build-essential libncurses-dev git rsync wget unzip bc
2. Downloading and Configuring Buildroot
Next, we will clone the Buildroot repository and check out a stable version.
# Clone the official Buildroot repository
git clone https://git.buildroot.net/buildroot

# Navigate into the directory
cd buildroot

# It's good practice to use a stable release. Let's list the tags.
git tag

# Let's check out the latest stable release (e.g., 2024.02.x)
# Replace with the latest stable version you see from the tag list.
git checkout 2024.02.3
Buildroot comes with default configurations for many popular boards, including the Raspberry Pi series. We will use the configuration for the Raspberry Pi 5 as our starting point.
# List available configurations for Raspberry Pi
find . -name "raspberrypi*defconfig"

# Load the default configuration for the Raspberry Pi 5 (64-bit)
make raspberrypi5_defconfig
This command populates a .config file in the root of the buildroot directory with a known-good configuration for the Pi 5. Now, we’ll enter the configuration menu to inspect and customize it.
make menuconfig
This command launches a text-based user interface. Navigate using the arrow keys, press Enter to enter a submenu, and use the spacebar to select or deselect options.
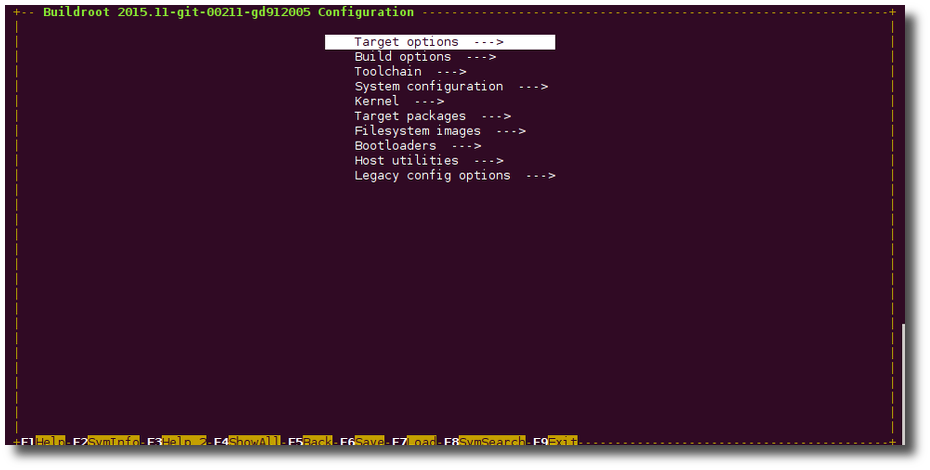
For our minimal build, the default configuration is mostly sufficient. Let’s explore a few key areas:
- Target options: Here you can verify the
Target Architectureis set toAArch64 (ARM 64-bit). - Toolchain: This section defines the cross-compiler. By default, Buildroot will build its own cross-compilation toolchain, which is the most reliable method.
- Kernel: Ensure the Linux Kernel is selected (
[*]). You can enter this submenu to see the specific kernel version being used. - Target packages: This is where you select the user-space applications for your root filesystem. For our minimal build, we will ensure that very little is selected. Navigate into
Target packages->Shell and utilities. Notice thatBusyBoxis already selected and cannot be deselected, as it’s fundamental to a minimal system.
For now, we will not change anything. Simply navigate to < Exit > and select < Yes > when asked to save the new configuration.
3. Building the Image
With the configuration saved, initiating the build is as simple as running a single command:
make
Buildroot will now execute the entire process automatically:
- Download all source code (toolchain, kernel, BusyBox, etc.).
- Build the cross-compiler.
- Build the Linux kernel for the AArch64 architecture.
- Build BusyBox and create the root filesystem structure.
- Combine the bootloader, kernel, and root filesystem into a bootable
sdcard.imgfile.
File Structure Examples
Once the build completes successfully, the output files will be located in the output/images directory.
ls -l output/images/
You should see a file structure similar to this:
-rw-r--r-- 1 user user   4194304 Jul  7 15:30 bcm2712-rpi-5-b.dtb
-rw-r--r-- 1 user user      4096 Jul  7 15:30 boot.vfat
-rw-r--r-- 1 user user  25485312 Jul  7 15:30 Image
-rw-r--r-- 1 user user  62914560 Jul  7 15:30 rootfs.ext4
-rw-r--r-- 1 user user      4898 Jul  7 15:30 rpi-firmware/
-rw-r--r-- 1 user user 104857600 Jul  7 15:31 sdcard.img
bcm2712-rpi-5-b.dtb: The Device Tree Blob for the Raspberry Pi 5.Image: The compiled Linux kernel.rootfs.ext4: The root filesystem image, formatted as ext4.rpi-firmware/: Contains the proprietary bootloader files required by the Raspberry Pi.sdcard.img: The final, complete image file that we will flash to our microSD card. It’s a single file containing the boot partition (VFAT) and the root partition (ext4).
Hardware Integration
To test our image, we need a physical Raspberry Pi 5, a microSD card (8GB or larger), and a USB-to-TTL serial adapter to view the boot messages.
Wiring for Serial Console:
You need to connect the USB-to-TTL adapter to the Raspberry Pi 5’s UART pins. The Pi 5 exposes its primary UART on pins 8 (TXD) and 10 (RXD).
- GND (Adapter) -> GND (Pi Pin 6)
- RXD (Adapter) -> TXD (Pi Pin 8)
- TXD (Adapter) -> RXD (Pi Pin 10)
Warning: Never connect the VCC pin from the USB-to-TTL adapter to the Raspberry Pi’s 5V or 3.3V pins, as this can damage the board. The Pi should be powered separately via its USB-C port.

Build, Flash, and Boot Procedures
1. Flashing the Image
Insert your microSD card into your host machine. Identify its device name carefully. You can use lsblk or dmesg. Be absolutely certain you have the correct device name (e.g., /dev/sdc), as writing to the wrong device will destroy its data.
Tip: A safe way to flash the image is using the
ddcommand.
# Unmount the SD card partitions if they were auto-mounted
sudo umount /dev/sdX*

# Write the image to the card. Replace /dev/sdX with your card's device name.
sudo dd if=output/images/sdcard.img of=/dev/sdX bs=4M conv=fsync
2. Monitoring the Boot Process
With the image flashed, safely eject the microSD card from your host and insert it into the Raspberry Pi 5. Connect your USB-to-TTL serial adapter to your computer. Use a serial terminal program like minicom or screen to connect.
# Install minicom if you don't have it
sudo apt install minicom

# Connect to the serial port (usually /dev/ttyUSB0) with a baud rate of 115200
sudo minicom -b 115200 -o -D /dev/ttyUSB0
Now, power on your Raspberry Pi 5. You should see a stream of boot messages from the kernel in your terminal window.
Expected Output:
After a few seconds, the boot process will complete, and you will be presented with a login prompt.
[    0.000000] Booting Linux on physical CPU 0x0000000000 [0x410fd0af]
...
[    2.123456] Kernel panic - not syncing: VFS: Unable to mount root fs on unknown-block(179,2)
...
[ OK ] Started BusyBox httpd.
[ OK ] Started telnetd.

Welcome to Buildroot
buildroot login:
At the login prompt, type root and press Enter. There is no password by default. You are now in a shell on your custom-built Linux system!
buildroot login: root
#
# whoami
root
# uname -a
Linux buildroot 6.6.20 #1 SMP PREEMPT_DYNAMIC aarch64 GNU/Linux
# ls -l /
total 20
drwxr-xr-x    2 root     root          1024 Jul  7 15:28 bin
drwxr-xr-x    2 root     root          1024 Jul  7 15:28 dev
drwxr-xr-x    4 root     root          1024 Jul  7 15:28 etc
drwxr-xr-x    2 root     root          1024 Jul  7 15:28 lib
lrwxrwxrwx    1 root     root             3 Jul  7 15:28 lib64 -> lib
dr-xr-xr-x  101 root     root             0 Jan  1 00:00 proc
drwxr-xr-x    2 root     root          1024 Jul  7 15:28 sbin
dr-xr-xr-x   12 root     root             0 Jan  1 00:00 sys
drwxr-xr-x    2 root     root          1024 Jul  7 15:28 usr
#
You have successfully built, deployed, and booted a minimal embedded Linux system from scratch. The final image is tiny, boots quickly, and contains only the components you explicitly selected. This is the essence and power of embedded Linux development.
Common Mistakes & Troubleshooting
The path to a working embedded Linux system is often paved with cryptic error messages. Understanding common pitfalls can save hours of frustration. Here are some frequent issues encountered when working with build systems.
Exercises
These exercises are designed to reinforce the concepts presented in this chapter and encourage exploration of the build systems.
1. Analysis: Deconstructing Raspberry Pi OS
- Objective: To understand the composition and size of a general-purpose distribution compared to a minimal embedded system.
- Task:
- Boot a standard Raspberry Pi OS (64-bit) image on your Raspberry Pi 5.
- Open a terminal and use the command
dpkg --get-selections | wc -lto count the number of installed packages. - Use the
df -hcommand to check the disk usage of the root partition. - Use the
free -hcommand to check the memory usage immediately after booting to the command line (before starting the graphical desktop). - Write a short paragraph comparing these numbers to the system you built with Buildroot. Discuss why these differences exist and the implications for a production embedded device.
2. Intermediate: Adding a Package in Buildroot
- Objective: To learn how to modify a Buildroot configuration to add new functionality.
- Task:
- Starting from the
raspberrypi5_defconfigconfiguration you used earlier, runmake menuconfig. - Navigate to
Target packages->Networking applications. - Select the
opensshpackage by pressing the spacebar ([*]). - Exit the configuration menu and save your changes.
- Run
maketo rebuild the system. Buildroot is intelligent and will only rebuild what’s necessary. - Flash the new
sdcard.imgto your microSD card and boot the Raspberry Pi 5. - From your host machine, attempt to SSH into the Pi:
ssh root@<pi_ip_address>. You will need to find the Pi’s IP address from the serial console using theip acommand.
- Starting from the
- Verification: You should be able to successfully log in via SSH without a password.
3. Advanced: Exploring the Yocto Project for Raspberry Pi
- Objective: To gain exposure to the Yocto Project’s structure and build process. This is a more involved exercise.
- Task:
- Follow the official
meta-raspberrypilayer’s README file or a reputable online guide to set up a Yocto Project build environment for the Raspberry Pi 5. This will involve cloning Poky (the Yocto reference build system) and themeta-raspberrypilayer. - Configure your build by editing the
conf/local.conffile to setMACHINE ?= "raspberrypi5-64". - Attempt to build the minimal console image using the command
bitbake core-image-minimal. - This build will take a very long time. The primary goal is not necessarily to complete it, but to experience the setup process, observe the BitBake task execution, and understand the directory structure (
conf,layers,build/tmp).
- Follow the official
- Verification: Observe the build output. Note how BitBake reports the status of different tasks (parsing recipes, fetching, compiling, packaging). If the build succeeds, you can find the final image in
tmp/deploy/images/raspberrypi5-64/.
Summary
- Embedded vs. Desktop Distributions: Embedded Linux systems prioritize minimalism, reliability, and customization over the rich feature sets and user-friendliness of desktop distributions.
- General-Purpose Distributions (Debian): Offer convenience and vast pre-compiled package repositories. They are excellent for rapid prototyping but can result in bloated systems with large footprints and unnecessary services for production devices.
- Build Systems (Buildroot & Yocto): Provide the tools to create a custom Linux system from source code, offering ultimate control over the final image.
- Buildroot: A simple, Makefile-based system ideal for creating small, static firmware images for resource-constrained or single-purpose devices. It is easy to learn but less flexible for on-target updates.
- The Yocto Project: A powerful, layer-based meta-build system designed for complex, scalable, and long-lifecycle products. It has a steep learning curve but offers unparalleled modularity and maintainability for large teams and projects.
- Specialized Distributions (OpenWrt & Android): OpenWrt is highly optimized for networking devices, offering robust configuration and on-device package management. Android provides a complete application framework for consumer electronics with rich user interfaces.
- The Right Tool for the Job: The selection of a distribution or build system is a critical design decision that must be based on the project’s specific technical requirements, hardware constraints, development team size, and product lifecycle.
%%{ init: { 'theme': 'base', 'themeVariables': { 'fontFamily': 'Open Sans' } } }%%
graph TD
    A[<b>Start:</b><br>Define Project Goal] --> B{What is the main priority?};

    B --> C{Rapid Prototyping /<br>Learning on RPi?};
    C -- Yes --> D["Use a pre-built GPP OS<br><i>(e.g., Debian/Raspberry Pi OS)</i>"];
    C -- No --> E{Is the device's primary<br>function networking?};

    E -- Yes --> F[Use a specialized distro<br><b>OpenWrt</b>];
    E -- No --> G{Is it a consumer device<br>with a rich UI/app ecosystem?};

    G -- Yes --> H["Use a full software stack<br><b>AOSP (Android)</b>"];
    G -- No --> I{Building a fixed-function,<br>resource-constrained device?};

    I -- Yes --> J[Use a simple build system<br><b>Buildroot</b>];
    I -- No --> K{Building a complex, scalable product<br>with multiple teams / long lifecycle?};

    K -- Yes --> L[Use a meta-build system<br><b>The Yocto Project</b>];
    K -- No --> M[Re-evaluate Project Scope];

    D --> Z[<b>Success:</b><br>Fastest Path to a<br>Working System];
    F --> Z;
    H --> Z;
    J --> Z;
    L --> Z;

    %% Styling
    classDef primary fill:#1e3a8a,stroke:#1e3a8a,stroke-width:2px,color:#ffffff;
    classDef success fill:#10b981,stroke:#10b981,stroke-width:2px,color:#ffffff;
    classDef decision fill:#f59e0b,stroke:#f59e0b,stroke-width:1px,color:#ffffff;
    classDef process fill:#0d9488,stroke:#0d9488,stroke-width:1px,color:#ffffff;
    classDef check fill:#ef4444,stroke:#ef4444,stroke-width:1px,color:#ffffff;
    classDef system fill:#8b5cf6,stroke:#8b5cf6,stroke-width:1px,color:#ffffff;
    classDef warning fill:#eab308,stroke:#eab308,stroke-width:1px,color:#1f2937;

    class A primary;
    class Z success;
    class B,C,E,G,I,K decision;
    class D,F,H,J,L system;
    class M warning;
Further Reading
- Buildroot Official Documentation: The primary source for all Buildroot configuration and usage. The user manual is comprehensive and well-maintained. https://buildroot.org/docs.html
- Yocto Project Official Documentation: The definitive guide to the Yocto Project, including concepts and reference manuals. It is essential reading for anyone serious about using Yocto. https://docs.yoctoproject.org/
- Embedded Linux Primer: A Practical Real-World Approach by Christopher Hallinan: A classic textbook that provides a solid foundation in the principles of embedded Linux development.
- Mastering Embedded Linux Programming by Chris Simmonds: An excellent, up-to-date book that covers modern tools and practices, including deep dives into both Buildroot and the Yocto Project.
- The meta-raspberrypi Layer README: The official source for using the Yocto Project with Raspberry Pi boards. It contains the most current instructions and configuration details. https://github.com/agherzan/meta-raspberrypi
- OpenWrt Official Documentation: The best resource for understanding the architecture, configuration, and usage of OpenWrt for custom networking devices. https://openwrt.org/docs/start
- Android Open Source Project (AOSP) Documentation: The entry point for understanding the Android platform’s architecture and how to build it from source. https://source.android.com/
