
Chapter 5: Linux Kernel vs. Userspace in an Embedded Context
Chapter Objectives
By the end of this chapter, you will be able to:
- Understand the fundamental roles of the Linux kernel and userspace and the critical boundary that separates them.
- Explain the system call interface and how userspace applications request services from the kernel.
- Analyze the mechanisms for kernel-userspace communication, including virtual filesystems like
procfsandsysfs. - Implement C and Python applications on a Raspberry Pi 5 that interact with kernel subsystems to control hardware.
- Debug common issues related to permissions, system calls, and driver interactions in an embedded context.
- Configure kernel parameters from userspace to modify system behavior at runtime.
Introduction
In any modern operating system, a fundamental architectural division exists that ensures stability, security, and performance. This is the separation between the kernel and userspace. In the world of embedded Linux, this concept is not merely an academic detail; it is the bedrock upon which reliable and robust devices are built. From industrial controllers managing factory floors to smart home hubs coordinating household devices, the integrity of this separation is paramount. An error in a single userspace application, such as a media player or a web interface, should not be able to crash the entire system or compromise the core drivers that manage critical hardware.
This chapter delves into this essential division, exploring the “why” and “how” of the kernel-userspace boundary. We will treat the kernel as the trusted, privileged core of the operating system and userspace as the less-privileged domain where all application software resides. You will learn how these two worlds communicate, not as peers, but through a strictly controlled and well-defined interface. By mastering these concepts, you will gain the foundational knowledge required to write efficient, stable, and secure embedded applications on your Raspberry Pi 5, moving beyond simple scripting to professional embedded systems development.
Technical Background
The architecture of the Linux operating system is elegantly partitioned into two primary domains: kernel space and user space. This design is not arbitrary; it is a deliberate and crucial implementation of a security and stability principle known as privilege separation. Understanding this separation is the single most important step toward becoming a proficient embedded Linux developer.
The Principle of Privilege Separation
At the very heart of the system lies the Linux kernel. It is the first major piece of software to run after the bootloader, and it has complete and unrestricted access to all the underlying hardware. Think of the kernel as the central government and chief executive of the system’s resources. In stark contrast to the privileged and powerful kernel is userspace. This is the domain where everything else runs: your shell, your custom applications, system daemons, and graphical interfaces. Programs in userspace operate in a restricted, unprivileged mode. They have no direct access to hardware and can only access their own designated virtual memory space. If a userspace application attempts to perform a privileged operation, such as disabling interrupts or directly accessing a hardware port, the CPU’s protection mechanism will trigger a fault, and the kernel will promptly terminate the offending application. This is not a bug; it is the system working as designed to protect its own integrity.
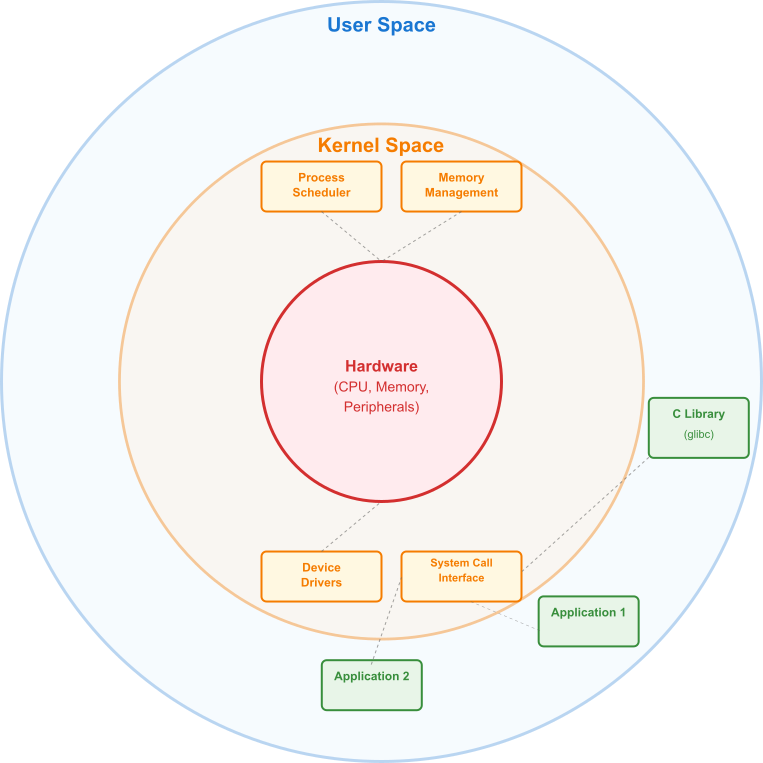
The Kernel’s Domain: The Trusted Core
The kernel’s primary responsibilities are profound and all-encompassing. First, it manages the system’s hardware. It doesn’t matter if it’s the BCM2712 processor on the Raspberry Pi 5, the GPIO pins, the USB controller, or the Ethernet port; the kernel is the sole entity that communicates directly with these components through specialized pieces of code called device drivers. An application program wanting to blink an LED does not directly write to a hardware register; it asks the kernel to do it on its behalf. This abstraction is powerful, as it frees the application developer from needing to know the intricate, low-level details of every piece of hardware.
Second, the kernel is the ultimate arbiter of system memory. It controls the Memory Management Unit (MMU) of the processor to create a virtual memory space for every running application. This is a cornerstone of modern operating systems. Each process is given the illusion that it has the entire system’s memory to itself, preventing it from interfering with the memory of the kernel or any other process. This memory protection is a critical stability feature. Without it, a bug in one application could corrupt the memory of another, leading to unpredictable behavior and system-wide crashes. The kernel carefully maps these virtual addresses to actual physical RAM, handling the complex logistics behind the scenes.
Third, the kernel manages all the processes running on the system. The scheduler is a key component of the kernel that decides which process gets to use the CPU at any given moment. It rapidly switches between processes, giving each a small slice of CPU time, creating the illusion of parallel execution. In an embedded system, this is vital for ensuring that high-priority tasks, like responding to a sensor input, are executed in a timely manner, even while lower-priority tasks, like updating a display, are also running.
The System Call Interface: Bridging the Divide
So, if userspace applications are so restricted, how do they accomplish anything useful? How does a program open a file, send data over the network, or read a GPIO pin? The answer lies in the System Call Interface (SCI). This is the narrow, well-defined bridge between userspace and the kernel. A system call is a formal request from a userspace program to the kernel to perform a privileged task on its behalf.
To make a system call, a program loads specific values into the CPU’s registers—one register to identify the requested system call (e.g., open, read, write) and others to hold the arguments (e.g., a filename, a data buffer, the number of bytes to read). It then executes a special instruction (on ARM architectures, this is the SVC instruction, for “Supervisor Call”). This instruction causes a “trap,” a deliberate switch from the CPU’s unprivileged mode to its privileged mode. Control is immediately transferred to a specific, predefined location in the kernel: the system call handler.
The kernel’s system call handler then takes over. It validates the arguments passed by the application, checks permissions (e.g., does this user have the right to read this file?), and then executes the requested operation. Once the operation is complete, the kernel places the return value (e.g., a file descriptor, the number of bytes read, or an error code) into a register, switches the CPU back to unprivileged mode, and returns control to the userspace program right after the SVC instruction. From the application’s perspective, it looks like a simple function call, but a remarkable context switch has occurred under the hood.
%% Mermaid Flowchart: The System Call Process
%% This diagram illustrates the step-by-step execution path of a system call,
%% from a userspace application requesting a service to the kernel fulfilling it.
%% It highlights the critical context switch between user mode and kernel mode.

flowchart TD
    subgraph "User Space (Unprivileged)"
        A["<b>Application Call</b><br>e.g., printf(Hello)"]
        B["<b>C Library (glibc)</b><br>Wrapper function e.g., write()"]
        C{<b>Prepare System Call</b><br>1. Load syscall number into register<br>2. Load arguments into registers}
        D["Execute <i>SVC</i> instruction<br><i>(Supervisor Call)</i>"]
    end

    subgraph CPU Mode Switch
        E((TRAP))
    end

    subgraph "Kernel Space (Privileged)"
        F[<b>System Call Handler</b><br>Reads syscall number]
        G{<b>Validate & Check Permissions</b><br>Are arguments valid?<br>Does user have access?}
        H[<b>Execute Kernel Function</b><br>e.g., Kernel's internal write logic]
        I[<b>Interact with Device Driver</b><br>e.g., Console/UART driver]
        J{<b>Prepare Return</b><br>1. Place return value/error in register<br>2. Switch CPU back to user mode}
    end

    %% Styling
    style A fill:#0d9488,stroke:#0d9488,stroke-width:1px,color:#ffffff
    style B fill:#0d9488,stroke:#0d9488,stroke-width:1px,color:#ffffff
    style C fill:#0d9488,stroke:#0d9488,stroke-width:1px,color:#ffffff
    style D fill:#1e3a8a,stroke:#1e3a8a,stroke-width:2px,color:#ffffff
    style E fill:#f59e0b,stroke:#f59e0b,stroke-width:1px,color:#ffffff
    style F fill:#8b5cf6,stroke:#8b5cf6,stroke-width:1px,color:#ffffff
    style G fill:#ef4444,stroke:#ef4444,stroke-width:1px,color:#ffffff
    style H fill:#8b5cf6,stroke:#8b5cf6,stroke-width:1px,color:#ffffff
    style I fill:#8b5cf6,stroke:#8b5cf6,stroke-width:1px,color:#ffffff
    style J fill:#10b981,stroke:#10b981,stroke-width:2px,color:#ffffff

    %% Connections
    A --> B
    B --> C
    C --> D
    D --> E
    E -- "Switch to Kernel Mode" --> F
    F --> G
    G -- "Valid" --> H
    G -- "Invalid" --> J
    H --> I
    I --> J
    J -- "Return to Application" --> B
Tip: You rarely make system calls directly. Instead, you use wrapper functions provided by a C library, like the GNU C Library (glibc). When you call
printf()in your C program, the library function handles buffering the data and eventually uses thewrite()system call to ask the kernel to display the text on the console.
Virtual Filesystems: A Window into the Kernel
To facilitate communication and configuration without requiring constant system calls, the Linux kernel exposes a vast amount of information through special virtual filesystems. The two most important are procfs (mounted at /proc) and sysfs (mounted at /sys). These are not real filesystems that exist on a storage device; they are dynamic interfaces to kernel data structures, presented in a familiar file-and-directory hierarchy.
The /proc filesystem, or procfs, is primarily focused on process information. Each running process has a directory named after its process ID (PID) in /proc. By reading files within these directories, you can find out the command that started the process, its memory usage, its current state, and much more. Tools like ps and top get all their information by parsing files in /proc. Procfs also contains files that provide a snapshot of the wider system, such as /proc/meminfo (memory statistics), /proc/cpuinfo (CPU details), and /proc/interrupts (interrupt line usage).
The /sys filesystem, or sysfs, is more modern and structured. Its hierarchy is designed to reflect the actual hardware device tree as the kernel sees it. It provides a way to view and, in many cases, modify the parameters of device drivers while the system is running. For example, you can navigate to /sys/class/gpio to find interfaces for controlling GPIO pins. You can write a value to a file here to export a pin for use, set its direction (input/output), and change its value. This file-based approach to hardware control is a powerful and uniquely Linux-like philosophy. It means you can often control hardware simply by using standard shell commands like echo and cat, which is incredibly useful for scripting, prototyping, and debugging.
This kernel/userspace architecture provides immense benefits for embedded systems. It creates a stable foundation where a failure in a non-critical userspace application won’t bring down the entire device. It enhances security by preventing applications from directly accessing sensitive hardware or the memory of other processes. Finally, it promotes modularity. You can update a userspace application without having to recompile the kernel, and you can use standardized kernel interfaces to interact with hardware, making your application code more portable across different Linux-based devices.
Practical Examples
Theory is essential, but the real understanding comes from hands-on practice. In this section, we will use your Raspberry Pi 5 to explore the kernel-userspace boundary and demonstrate how to control hardware from userspace applications.
Example 1: Exploring Kernel Data with procfs and sysfs
This example requires no extra hardware. We will use standard shell commands to peek into the kernel’s inner workings.
Objective: To read system information from /proc and control an on-board LED through /sys.
Procedure:
1. Boot your Raspberry Pi 5 and open a terminal window or connect via SSH.
2. Explore procfs: Let’s start by looking at CPU information. The cpuinfo file contains details about the processor.
cat /proc/cpuinfoYou will see a detailed output listing the processor model, features, and information for each core. This data is not read from a static file on your SD card; the kernel generates it on-the-fly when you access the file.
3. Explore sysfs for the On-Board LED: The Raspberry Pi 5 has an activity/power LED that is controllable via a kernel driver exposed in sysfs. Let’s find it. The LEDs are typically located under
ls -l /sys/class/leds/led0 or ACT. Let’s assume it’s led0. This directory contains several files that control the LED’s behavior.
4. Check the LED Trigger: The trigger file controls what event causes the LED to light up.
cat /sys/class/leds/led0/trigger[mmc0], indicating it’s tied to SD card activity. You’ll also see a list of other available triggers.
%% Mermaid Flowchart: Sysfs Hardware Control
%% This diagram shows the data flow when a user in userspace uses a simple
%% shell command to control a piece of hardware (an LED) via the sysfs
%% virtual filesystem, demonstrating the abstraction provided by the kernel.

flowchart TD
    subgraph User Space
        A["<b>User Command</b><br>echo 1 | sudo tee brightness"]
        B["<b>Shell (e.g., bash)</b><br>Interprets command & pipes data"]
        C["<b><i>tee</i> Utility</b><br>Reads 1 from stdin"]
    end

    subgraph "System Call Interface (SCI)"
        D{"<b><i>write()</i> System Call</b><br>tee requests kernel to write 1<br>to the file <i>/sys/.../brightness</i>"}
    end

    subgraph Kernel Space
        E["<b>Virtual Filesystem (VFS) Layer</b><br>Receives write request"]
        F[<b>Sysfs Subsystem</b><br>Identifies the target file<br>is a sysfs entry]
        G[<b>LED Class Driver</b><br>Invokes the `brightness_store` function]
        H{"<b>Hardware Abstraction</b><br>Driver translates 1 to a<br>hardware-specific action"}
        I[<b>GPIO Subsystem/Register Access</b><br>Writes value to hardware register]
    end

    subgraph Hardware
        J((<br><b>LED</b><br>Turns ON<br>))
    end

    %% Styling
    style A fill:#1e3a8a,stroke:#1e3a8a,stroke-width:2px,color:#ffffff
    style B fill:#0d9488,stroke:#0d9488,stroke-width:1px,color:#ffffff
    style C fill:#0d9488,stroke:#0d9488,stroke-width:1px,color:#ffffff
    style D fill:#f59e0b,stroke:#f59e0b,stroke-width:1px,color:#ffffff
    style E fill:#8b5cf6,stroke:#8b5cf6,stroke-width:1px,color:#ffffff
    style F fill:#8b5cf6,stroke:#8b5cf6,stroke-width:1px,color:#ffffff
    style G fill:#8b5cf6,stroke:#8b5cf6,stroke-width:1px,color:#ffffff
    style H fill:#8b5cf6,stroke:#8b5cf6,stroke-width:1px,color:#ffffff
    style I fill:#8b5cf6,stroke:#8b5cf6,stroke-width:1px,color:#ffffff
    style J fill:#10b981,stroke:#10b981,stroke-width:2px,color:#ffffff

    %% Connections
    A --> B --> C --> D
    D --> E
    E --> F
    F --> G
    G --> H
    H --> I
    I --> J
5. Take Manual Control of the LED: To control the LED ourselves, we need to change the trigger to none. We do this by writing the string “none” into the file. You will need superuser privileges for this.
echo "none" | sudo tee /sys/class/leds/led0/trigger
Tip: We usesudo teeinstead of a simplesudo echo "none" > ...because the redirection (>) is handled by your user’s shell, which doesn’t have permission to write to the file.teereceives the input and writes it to the file with the elevated privileges granted bysudo.
Turn the LED On and Off: Now that we have manual control, we can control the LED by writing to the brightness file. A value of 1 (or any non-zero number) turns it on, and 0 turns it off.
# Turn the LED ON
echo 1 | sudo tee /sys/class/leds/led0/brightness

# Wait for 2 seconds
sleep 2

# Turn the LED OFF
echo 0 | sudo tee /sys/class/leds/led0/brightness
Restore the Default Behavior: It’s good practice to return the LED to its default state.echo "mmc0" | sudo tee /sys/class/leds/led0/trigger
Example 2: System Calls in Action with C
Here, we will write a C program that explicitly uses system calls to write to the console and then use the strace utility to observe these calls.
Objective: To understand how C library functions map to underlying kernel system calls.
Hardware:
- Raspberry Pi 5
- A separate computer for cross-compilation (optional but good practice).
Code:
Create a file named syscall_test.c.
#include <stdio.h>
#include <unistd.h>
#include <string.h>

int main() {
    // This is a standard C library function.
    // It will buffer the output and eventually use the write() system call.
    printf("Hello from printf! This is buffered output.\n");

    // The write() function is a thin wrapper around the actual system call.
    // We are asking the kernel to write a string to file descriptor 1 (stdout).
    const char *msg = "Hello from write()! This is direct output.\n";
    write(1, msg, strlen(msg));

    return 0;
}
Build and Run:
1. Compilation: If you are building directly on the Pi, you can use gcc.
gcc syscall_test.c -o syscall_testaarch64-linux-gnu-gcc.)
2. Execution: Run the compiled program.
./syscall_test
3. Tracing with strace: Now, let’s run the program with strace. This powerful utility intercepts and records the system calls made by a process.
strace ./syscall_teststrace showing you every system call your program makes, from loading libraries to finally exiting. Look carefully through the output for lines containing write(1, ...):
...
write(1, "Hello from printf! This is buf"..., 42) = 42
write(1, "Hello from write()! This is di"..., 41) = 41
...
exit_group(0) write system calls, requesting that the kernel (which manages the console driver) display the text. strace has allowed you to witness this transaction as it happened.
Example 3: Hardware Control with Python and GPIO
This example demonstrates controlling an external hardware component (an LED) from a high-level Python script. We will use the gpiod library, which is the modern, standard way to interact with the kernel’s GPIO subsystem.
Objective: To control a physical LED connected to the Raspberry Pi 5’s GPIO pins.
Hardware:
- Raspberry Pi 5
- Breadboard
- 1x LED (any color)
- 1x 330Ω resistor
- Jumper wires
Wiring:
Connect the components as follows. GPIO 17 is a safe, general-purpose pin.
- Connect a jumper wire from a GND pin on the Raspberry Pi to one rail of the breadboard (the blue line).
- Connect a jumper wire from GPIO 17 (physical pin 11) to a row on the breadboard.
- Place the 330Ω resistor in the same row, bridging to an adjacent row.
- Place the LED in the breadboard. Connect its longer leg (anode) to the same row as the resistor. Connect its shorter leg (cathode) to the ground rail.

Warning: Always use a current-limiting resistor with LEDs. Connecting an LED directly to a GPIO pin can draw too much current and damage both the LED and the Raspberry Pi.
Software and Code:
1. Install the library: First, install the gpiod library and its command-line tools.
sudo apt update sudo apt install gpiod libgpiod-dev python3-gpiodIdentify the GPIO Chip: Find the name of the GPIO controller for the main pins.
gpiodetectgpiochip0 or similar. This is the kernel’s name for the hardware device.
3. Python Script: Create a file named blink.py.
import gpiod
import time

# Define the GPIO chip and line number we want to use.
# The main Raspberry Pi GPIOs are on "gpiochip4" on the Pi 5.
# Check with `gpiodetect` if you are unsure.
GPIO_CHIP = 'gpiochip4'
LED_LINE = 17 # We are using GPIO 17

print(f"Starting LED blink on {GPIO_CHIP}, line {LED_LINE}")

# The 'with' statement ensures resources are cleaned up automatically.
# We request the line from the kernel's GPIO driver.
try:
    with gpiod.request_lines(
        path=f'/dev/{GPIO_CHIP}',
        consumer='blink.py',
        config={
            LED_LINE: gpiod.LineSettings(
                direction=gpiod.line.Direction.OUTPUT,
                output_value=gpiod.line.Value.INACTIVE
            )
        }
    ) as lines:
        print("LED line acquired. Starting to blink...")
        while True:
            # Set the line value to ACTIVE (1), turning the LED on.
            # This is a request to the kernel to change the hardware state.
            lines.set_value(LED_LINE, gpiod.line.Value.ACTIVE)
            time.sleep(0.5)

            # Set the line value to INACTIVE (0), turning the LED off.
            lines.set_value(LED_LINE, gpiod.line.Value.INACTIVE)
            time.sleep(0.5)

except (OSError, FileNotFoundError) as e:
    print(f"Error: Could not open GPIO chip. Is '{GPIO_CHIP}' correct?")
    print(f"Details: {e}")
except KeyboardInterrupt:
    print("\nExiting program. The LED line will be released automatically.")
Run the Script: Execute the Python script.
python3 blink.pygpiod library. This library, in turn, communicates with the kernel’s GPIO driver through system calls (specifically, ioctl calls on the /dev/gpiochip4 device file). The kernel driver then performs the privileged, low-level operations of writing to the hardware registers to toggle the pin’s voltage. Press Ctrl+C to stop the script. The with statement ensures the GPIO line is properly released back to the system.
Common Mistakes & Troubleshooting
Navigating the kernel-userspace boundary can be tricky, and several common pitfalls can trip up new developers. Understanding these in advance can save hours of frustrating debugging.
Exercises
These exercises are designed to reinforce the concepts presented in this chapter, progressing from simple exploration to active programming.
- System Discovery via
procfs:- Objective: Use
procfsto determine how long your Raspberry Pi has been running (its uptime) and how much memory is currently free. - Guidance: Look for the files
/proc/uptimeand/proc/meminfo. The first value in/proc/uptimeis the total uptime in seconds. In/proc/meminfo, look for theMemFreeorMemAvailablelines. - Verification: Write a short shell script that reads these files and prints a formatted message, e.g., “System uptime: [X] seconds. Available memory: [Y] kB.”
- Objective: Use
- Modifying Kernel Behavior with
sysfs:- Objective: The Linux kernel has a setting that controls its behavior when it runs out of memory, called the Out-of-Memory (OOM) Killer. You can make the kernel more or less aggressive about killing processes. This exercise involves changing this behavior.
- Guidance: The “panic on OOM” setting is controlled by
/proc/sys/vm/panic_on_oom. First, read the current value usingcat. Then, usingsudo, try writing a1to the file to enable panic on OOM, and then a0to disable it. - Warning: Do not leave this setting enabled. A panic will halt the system, requiring a reboot. The goal is simply to practice modifying a kernel parameter from userspace.
- Verification: Verify that your
echocommand successfully changes the value contained in the file by reading it again withcatafter each write.
- GPIO Input and Blocking:
- Objective: Write a Python script that waits for a button press and prints a message only when the button is pressed. This exercise will teach you how to use blocking calls instead of inefficient polling.
- Hardware: In addition to the LED circuit, add a push-button. Connect one terminal to GPIO 22 (physical pin 15) and the other terminal to a ground pin.
- Guidance: Use the
gpiodlibrary. Configure GPIO 22 as an input with an internal pull-up resistor enabled. Use thelines.wait_for_edge()method to block the script until the button is pressed (which will cause a falling edge as the pin is pulled to ground). - Verification: The script should print nothing and consume minimal CPU while waiting. When you press the button, it should print “Button Pressed!” and then exit or wait for the next press.
- Measuring System Call Latency:
- Objective: Write a C program to get a rough estimate of the time it takes to perform a minimal system call.
- Guidance: The
getpid()system call is one of the fastest, as it requires very little work from the kernel. In your C program, use theclock_gettime()function withCLOCK_MONOTONICto record the time just before and just after a call togetpid(). Repeat this in a loop thousands of times and calculate the average time taken. - Code Structure:
#include <stdio.h>
#include <unistd.h>
#include <time.h>

// ... main function ...
// struct timespec start, end;
// long long total_ns = 0;
// int iterations = 100000;
//
// for (int i = 0; i < iterations; i++) {
//     clock_gettime(CLOCK_MONOTONIC, &start);
//     getpid();
//     clock_gettime(CLOCK_MONOTONIC, &end);
//     total_ns += (end.tv_sec - start.tv_sec) * 1000000000LL + (end.tv_nsec - start.tv_nsec);
// }
//
// printf("Average syscall time: %lld ns\n", total_ns / iterations);
- Verification: The program should compile and run, printing an average time that is typically in the hundreds of nanoseconds. This demonstrates the overhead involved in the context switch from userspace to kernel space and back.
Summary
- Privilege Separation: The Linux operating system is fundamentally divided into a privileged kernel space and a restricted user space to ensure stability and security.
- Kernel Responsibilities: The kernel is responsible for all core system functions, including process scheduling, memory management, and direct hardware control via device drivers.
- Userspace Applications: All user-facing applications, shells, and services run in userspace with limited privileges. They cannot directly access hardware or the memory of other processes.
- System Call Interface (SCI): Userspace programs request services from the kernel through the SCI, a well-defined and controlled bridge. This involves a context switch from unprivileged to privileged mode.
- Virtual Filesystems: The kernel exposes runtime data and configuration knobs to userspace through virtual filesystems like
/proc(for process and system information) and/sys(for device driver and hardware control). - Hardware Interaction: The standard, modern way to control hardware like GPIO is to interact with the appropriate kernel driver (e.g., via
/dev/gpiochipN) from a userspace application. This abstracts the low-level details and provides safe, managed access. - Efficient Programming: Using kernel-provided blocking mechanisms (e.g., waiting for an edge event) is vastly more efficient than polling in a tight loop in userspace, saving CPU cycles and power.
Further Reading
- Linux Kernel Documentation: The official and most authoritative source for kernel information. The documentation for
sysfsandgpiodis particularly relevant.- Website: docs.kernel.org
- “Linux Device Drivers, 3rd Edition” by Jonathan Corbet, Alessandro Rubini, and Greg Kroah-Hartman: While focused on driver development, the initial chapters provide one of the best explanations of the kernel architecture and its interaction with userspace.
- Website: LWN.net (Freely available online)
- “The Linux Programming Interface” by Michael Kerrisk: An exhaustive and definitive guide to the Linux system call interface and library functions. An essential reference for any serious Linux C programmer.
- Website: man7.org/tlpi/
- Raspberry Pi Documentation – GPIO: The official documentation from the Raspberry Pi Foundation on using the GPIO pins, including command-line usage.
- Website: raspberrypi.com/documentation/
- LWN.net: An online magazine that provides in-depth technical articles about the Linux kernel. An excellent resource for keeping up with new developments.
- Website: lwn.net
- Buildroot Manual: The official manual for the Buildroot embedded Linux build system, which provides excellent context on how a complete system, including the kernel and userspace filesystem, is put together.
- Website: buildroot.org/docs.html
- Yocto Project Documentation: Similar to Buildroot, the Yocto Project documentation offers deep insight into the construction of custom embedded Linux distributions.
- Website: docs.yoctoproject.org
