
Chapter 16: Linux Commands: Permissions (chmod, chown) and Links (ln)
Chapter Objectives
By the end of this chapter, you will be able to:
- Understand the Linux file permission model, including user, group, and other access rights.
- Analyze and interpret file permissions using the
ls -lcommand. - Implement permission changes using
chmodin both symbolic and octal notation. - Configure file and directory ownership using the
chownandchgrpcommands. - Create and differentiate between symbolic (
soft) and hard links using thelncommand. - Debug common permission-related errors and resolve broken links in an embedded environment.
Introduction
In the intricate world of Embedded Linux, the system’s stability, security, and reliability hinge on a foundational concept: file permissions. While seemingly basic, the mechanisms that control who can read, write, and execute files are the bedrock of the entire operating system. For an embedded engineer, mastering file permissions is not a trivial pursuit; it is a critical skill. Imagine a medical device where a logging process inadvertently gains the ability to modify a core calibration file, or a network appliance where a script accessible by a web server can be altered to execute malicious code. These scenarios, which could lead to catastrophic failure, are prevented by a robust and correctly implemented permission scheme.
This chapter delves into the essential commands that govern file access and organization: chmod, chown, and ln. We will move beyond simple command execution and explore the “why” behind these tools. You will learn how the Linux kernel decides whether to grant or deny access to a resource, a process that happens thousands of times a second on a running system. We will investigate how ownership dictates responsibility and control, a vital concept when managing system services and user-level applications on your Raspberry Pi 5. Furthermore, we will explore how file system links provide the flexibility to organize and share code, libraries, and configuration files without creating redundant, difficult-to-maintain copies. By mastering these commands, you will gain the ability to build more secure, organized, and professional embedded systems.
Technical Background
The Linux Security Model: A Triad of Permissions
At the heart of the Linux operating system lies a simple yet powerful security model built upon three layers of access control for every file and directory. This model is often referred to as the UGO model, which stands for User, Group, and Other. To understand any file’s permissions, you must first understand these three entities and the rights they can be granted.
The User is the owner of the file. By default, the user who creates a file becomes its owner. The owner has the most direct control and is typically the primary person or process responsible for the file’s content and purpose.
The Group is a collection of users who share a common set of permissions for the file. This is an incredibly powerful concept for collaborative projects or for granting specific access to system services. For instance, you might have a group called developers that has write access to all source code files, or a group named www-data that has read access to web server content. A file can only belong to one group at a time, but a user can be a member of multiple groups.
Finally, Other refers to everyone else—any user on the system who is not the file’s owner and does not belong to the file’s group. This category represents the “rest of the world” and is typically granted the most restrictive permissions.
graph TD
    subgraph "File: script.sh"
        direction LR
        UGO --> User
        UGO --> Group
        UGO --> Other
    end

    subgraph Permissions
        direction TB
        User_Perms["<b>User (Owner)</b><br><i>r w x</i>"]
        Group_Perms["<b>Group</b><br><i>r - x</i>"]
        Other_Perms["<b>Other</b><br><i>r - -</i>"]
    end

    User -- "Has Permissions" --> User_Perms
    Group -- "Has Permissions" --> Group_Perms
    Other -- "Has Permissions" --> Other_Perms


    UGO("<b>U G O</b><br>Permission<br>Structure")

    classDef user fill:#8b5cf6,stroke:#8b5cf6,stroke-width:1px,color:#ffffff
    classDef group fill:#0d9488,stroke:#0d9488,stroke-width:1px,color:#ffffff
    classDef other fill:#f59e0b,stroke:#f59e0b,stroke-width:1px,color:#ffffff

    class User,User_Perms user
    class Group,Group_Perms group
    class Other,Other_Perms other
For each of these three entities (User, Group, Other), there are three fundamental permissions that can be granted or denied:
- Read (
r): The ability to view the contents of a file or, for a directory, to list its contents. - Write (
w): The ability to modify or delete a file. For a directory, this permission allows creating, deleting, or renaming files within that directory. - Execute (
x): The ability to run a file as a program or script. For a directory, the execute permission is crucial; it grants the ability tocdinto the directory and access its files and subdirectories. Without execute permission on a directory, even if you have read permission, you cannot access its contents.
When you view a file’s permissions with the ls -l command, you see a 10-character string that represents this entire model.
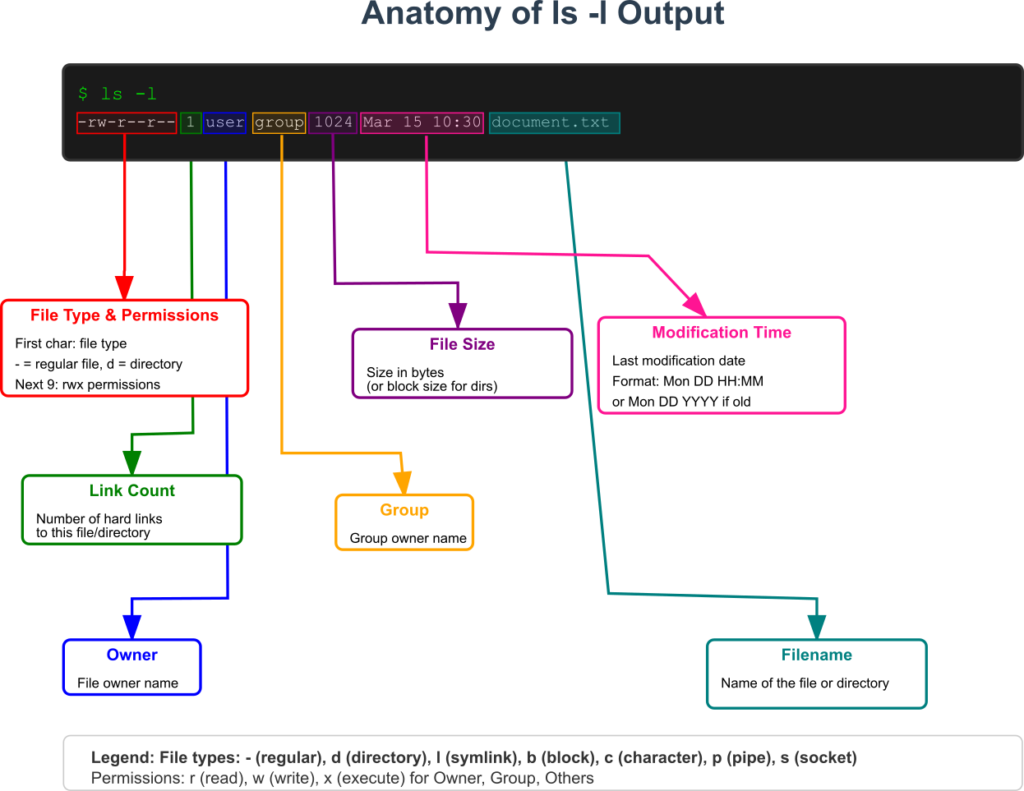
The first character indicates the file type (e.g., - for a regular file, d for a directory, l for a symbolic link). The next nine characters are the core of the permission model, organized into three sets of three: rwx for the User, rwx for the Group, and rwx for the Other. If a permission is not granted, its place is held by a hyphen (-). For example, rwxr-xr-- means the User has read, write, and execute permissions; the Group has read and execute permissions; and Other has only read permission.
Changing Permissions with chmod: The Gatekeeper’s Keys
The chmod (change mode) command is your primary tool for modifying these permissions. It offers two distinct but equally powerful methods for defining access rights: symbolic notation and octal notation.
Symbolic notation is more verbose but arguably more intuitive for making specific, targeted changes. It uses a combination of characters to represent the entities, the operation, and the permissions.
- Entities (Who):
u(user),g(group),o(other),a(all – u, g, and o). - Operation (Action):
+(add permission),-(remove permission),=(set exact permissions). - Permissions (What):
r(read),w(write),x(execute).
Using this syntax, you can construct commands that read like sentences. For example, chmod u+x myfile.sh translates to “for the user, add the execute permission to myfile.sh.” Similarly, chmod go-w config.txt means “for the group and other, remove the write permission from config.txt.” The = operator is useful for setting permissions explicitly, wiping out the existing ones. chmod a=r data.log sets the permissions so that everyone has read-only access, regardless of the previous settings.
Octal (or numeric) notation is a more concise and often faster way to set permissions, especially when you want to define all nine permission bits at once. It is the preferred method for many experienced developers and is commonly seen in scripts and documentation. This method is based on the binary representation of the rwx bits.

Each permission is assigned a numeric value:
r(read) = 4w(write) = 2x(execute) = 1
To determine the octal value for a single entity (User, Group, or Other), you simply add the values of the permissions you want to grant.
---= 0--x= 1-w-= 2-wx= 3 (2 + 1)r--= 4r-x= 5 (4 + 1)rw-= 6 (4 + 2)rwx= 7 (4 + 2 + 1)
A complete chmod command using octal notation uses a three-digit number representing the permissions for User, Group, and Other, in that order. For example, the command chmod 754 script.sh sets the following permissions:
- User: 7 (
rwx) - Group: 5 (
r-x) - Other: 4 (
r--)
This translates to the permission string -rwxr-xr--. Common and useful octal codes include 755 for executable scripts and programs that should be readable by others, and 644 for data files that should be writable only by the owner but readable by everyone. For sensitive files, 600 ensures that only the owner can read and write the file, providing a strong layer of privacy.
Establishing Ownership with chown: The Deed to the File
While chmod controls what can be done with a file, the chown (change owner) command determines who owns it. Ownership is a fundamental aspect of system administration and security. In an embedded context, processes often run as specific, unprivileged users to limit their potential to cause harm if compromised. For example, a web server might run as the user www-data, and it needs to own or have group access to the files it serves.
The chown command’s basic syntax is chown <new_owner> <file>. For instance, chown pi my_app would transfer ownership of the my_app file to the user pi.
A powerful feature of chown is its ability to change both the user and the group owner simultaneously. This is done by specifying the user and group separated by a colon (:). The command chown pi:developers main.c changes the user owner to pi and the group owner to developers. If you only want to change the group, you can use the chgrp command (chgrp developers main.c) or, more concisely, use chown with a leading colon: chown :developers main.c.
graph TD
    A[Start: Check Initial Ownership] --> B{"File: "my_app/config.ini""};
    B -- "ls -l" --> C["Owner: <b>pi</b><br>Group: <b>pi</b>"];

    C --> D["Execute Command:<br><i>sudo chown -R appuser:appgroup my_app/</i>"];

    D --> E{"Decision: Is -R (Recursive) flag used?"};
    E -- Yes --> F[Apply to 'my_app' directory AND<br>all files/subdirectories within it];
    E -- No --> G[Apply to 'my_app' directory ONLY];

    F --> H{Result: Check Final Ownership};
    G --> H;

    H -- "ls -l my_app/config.ini" --> I["Owner: <b>appuser</b><br>Group: <b>appgroup</b>"];
    I --> J[End: Ownership Transferred];

    classDef startNode fill:#1e3a8a,stroke:#1e3a8a,stroke-width:2px,color:#ffffff
    classDef processNode fill:#0d9488,stroke:#0d9488,stroke-width:1px,color:#ffffff
    classDef decisionNode fill:#f59e0b,stroke:#f59e0b,stroke-width:1px,color:#ffffff
    classDef checkNode fill:#ef4444,stroke:#ef4444,stroke-width:1px,color:#ffffff
    classDef endNode fill:#10b981,stroke:#10b981,stroke-width:2px,color:#ffffff

    class A,J startNode;
    class D,F,G processNode;
    class E decisionNode;
    class B,C,H,I checkNode;
The -R (recursive) option is indispensable when working with directories. chown -R pi:pi /opt/my_application will change the ownership of the my_application directory and every file and subdirectory within it to the user pi and group pi. This is a common operation after unpacking an application archive or when setting up a service’s runtime environment.
Warning: Using
chownrequires superuser privileges (sudo) because changing a file’s owner has significant security implications. A regular user cannot simply give away their file to another user, nor can they take ownership of a file that doesn’t belong to them.
Creating Aliases with ln: Pointers in the Filesystem
The Linux filesystem provides a powerful mechanism for creating references, or “links,” to files. This allows a single file to be accessed from multiple locations in the directory tree without creating duplicate copies of the data. This is essential for creating organized filesystem layouts, managing shared libraries, and deploying applications. There are two types of links: hard links and symbolic (or soft) links. Understanding the difference is crucial.
A hard link is essentially a second name for a file. Both the original name and the hard link point to the same inode, which is the data structure on the disk that stores the file’s metadata (permissions, ownership, size, and pointers to the actual data blocks). Because they point to the same inode, a hard link is indistinguishable from the original file. If you delete the original file, the hard link still works because the inode and the data remain on the disk until all links to that inode are removed.
graph TD
    subgraph Filesystem View
        A["/path/to/<b>original_file</b>"]
        B["/path/to/<b>hard_link</b>"]
        C["/path/to/<b>symbolic_link</b>"]
    end

    subgraph Disk Storage
        D{Inode 12345}
        E["Data Blocks <br><i>File Content</i>"]
        F{Inode 56789}
        G["Path Data <br><i>/path/to/original_file</i>"]
    end

    A -- "Points to" --> D
    B -- "Points to" --> D
    D -- "Contains pointer to" --> E

    C -- "Points to" --> F
    F -- "Contains pointer to" --> G
    G -.-> A

    classDef default fill:#f8fafc,stroke:#64748b,stroke-width:2px,color:#1f2937
    classDef inode fill:#8b5cf6,stroke:#8b5cf6,stroke-width:1px,color:#ffffff
    classDef data fill:#0d9488,stroke:#0d9488,stroke-width:1px,color:#ffffff
    classDef path fill:#eab308,stroke:#eab308,stroke-width:1px,color:#1f2937

    class D,F inode
    class E,G data

    style A fill:#1e3a8a,stroke:#1e3a8a,stroke-width:2px,color:#ffffff
    style B fill:#1e3a8a,stroke:#1e3a8a,stroke-width:2px,color:#ffffff
    style C fill:#f59e0b,stroke:#f59e0b,stroke-width:1px,color:#ffffff
However, hard links have two significant limitations:
- They cannot span across different filesystems (partitions). The link and the file must reside on the same disk partition because inodes are unique only within a single filesystem.
- You cannot create a hard link to a directory. This is a design choice to prevent the creation of confusing and potentially infinite directory loops.
A symbolic link (or symlink) is a more flexible and common type of link. Instead of pointing to an inode, a symlink is a special type of file whose content is simply the path to another file or directory. It’s a pointer, or a shortcut.
graph LR
    subgraph Application
        App["Application Binary"]
    end

    subgraph Filesystem Layout in /usr/lib
    direction TB
        A("<b>libcrypto.so</b><br><i>Generic Name</i>")
        B("<b>libcrypto.so.1.1</b><br><i>Versioned Name</i>")
        C("<b>libcrypto-1.1.1k.so</b><br><i>Actual File</i>")
    end

    App -- "Links against" --> A
    A -- "Symlink ->" --> B
    B -- "Symlink ->" --> C

    click A "#" "Generic symlink used by the linker at compile time."
    click B "#" "Major version symlink. Allows multiple minor versions to exist."
    click C "#" "The actual, physical library file."

    classDef default fill:#f8fafc,stroke:#64748b,stroke-width:2px,color:#1f2937
    classDef app fill:#1e3a8a,stroke:#1e3a8a,stroke-width:2px,color:#ffffff
    classDef link fill:#f59e0b,stroke:#f59e0b,stroke-width:1px,color:#ffffff
    classDef file fill:#0d9488,stroke:#0d9488,stroke-width:1px,color:#ffffff

    class App app
    class A,B link
    class C file
When the operating system accesses a symlink, it reads the path stored within it and then follows that path to the destination file. This provides several advantages:
- Symlinks can point to files on different filesystems.
- Symlinks can point to directories.
- It’s always clear which file is the link and which is the original.
The primary drawback of a symlink is its dependency. If the original file is deleted or moved, the symlink becomes “broken” or “dangling.” It still exists, but it points to a location that no longer contains the target file.
The ln command is used to create both types of links. The syntax is ln [options] <target> <link_name>.
- To create a hard link:
ln /path/to/original /path/to/hardlink - To create a symbolic link, you use the
-sflag:ln -s /path/to/original /path/to/symlink
In embedded systems, symlinks are used extensively. The shared library loader (ld.so) uses symlinks to manage library versions (e.g., libc.so.6 might be a symlink to libc-2.35.so). Application launchers in /usr/bin are often symlinks to the actual executables stored elsewhere, such as in /opt/app/bin. This allows for clean updates; you can install a new version of an application in its own directory and then atomically update the symlink in /usr/bin to point to the new executable, minimizing downtime.
Practical Examples
This section provides hands-on, step-by-step examples for managing permissions and links on your Raspberry Pi 5. Open a terminal to follow along.
Example 1: Managing Script Permissions with chmod
Let’s create a simple shell script and manage its permissions. A common task is to make a script executable only by its owner.
1. Create the Script File
First, create a new directory for our work and create a script file inside it.
# Create a directory for our chapter work
mkdir ~/ch16_examples
cd ~/ch16_examples

# Create a simple shell script using the nano editor
nano myscript.sh
Inside nano, type the following lines:
#!/bin/bash
# This is a simple script for our chmod example.
echo "Hello, Embedded Linux World!"
echo "Running as user: $(whoami)"
Press Ctrl+X, then Y, then Enter to save and exit.
2. Examine Initial Permissions
Now, let’s look at the default permissions assigned to the new file.
ls -l myscript.shExpected Output:
-rw-r--r-- 1 pi pi 103 Jul 08 21:45 myscript.shThe output shows that the owner (pi) has read and write permissions (rw-), while the group (pi) and others have only read permission (r--). Crucially, no one has execute (x) permission. If you try to run it, you’ll get an error.
./myscript.shExpected Output:
bash: ./myscript.sh: Permission denied3. Make the Script Executable (Symbolic Method)
Let’s add execute permission for the user (owner) only.
chmod u+x myscript.shNow, check the permissions again:
ls -l myscript.shExpected Output:
-rwxr--r-- 1 pi pi 103 Jul 08 21:45 myscript.shThe x has been added to the user’s permission block. Now the script will run successfully.
./myscript.shExpected Output:
Hello, Embedded Linux World!
Running as user: pi
4. Set Permissions with Octal Notation
A more common permission set for a script that is safe for others to run (but not modify) is 755. This gives the owner full control (rwx), while the group and others can read and execute (r-x).
# Let's first reset permissions to something else
chmod 644 myscript.sh

# Now set them using octal notation
chmod 755 myscript.sh

# Verify the result
ls -l myscript.sh
Expected Output:
-rwxr-xr-x 1 pi pi 103 Jul 08 21:45 myscript.shThis single command precisely sets all nine permission bits to the desired state, demonstrating the efficiency of the octal method.
Example 2: Managing Ownership with chown
Imagine you are deploying an application that will be run by a dedicated service user. For security, the application’s files should be owned by that user.
1. Create a New User and Group
First, we need to create a new user for our application. We’ll call the user appuser. The adduser command will also create a corresponding group.
Tip: You need
sudoto create users and change ownership to other users.
sudo adduser --system --no-create-home appuserThe --system flag creates a system user, which is appropriate for running services. --no-create-home prevents the creation of a home directory, as it’s not needed.
2. Create Application Files
Let’s create a mock application directory and a configuration file.
# As the 'pi' user
mkdir -p my_app/config
touch my_app/config/settings.conf
touch my_app/app.bin

# Check initial ownership
ls -ld my_app
ls -l my_app/config/settings.conf
Expected Output:
You will see that the owner and group for all these files is pi.
drwxr-xr-x 2 pi pi 4096 Jul 08 21:45 my_app
-rw-r--r-- 1 pi pi    0 Jul 08 21:45 my_app/config/settings.conf
3. Change Ownership Recursively
Now, let’s transfer ownership of the entire application directory to our new appuser.
# Use sudo to change ownership to another user
# The -R flag makes the change recursive
sudo chown -R appuser:appuser my_app/

# Verify the new ownership
ls -ld my_app
ls -l my_app/config/settings.conf
ls -l my_app/app.bin
Expected Output:
The owner and group for the directory and all its contents are now appuser.
drwxr-xr-x 2 appuser appuser 4096 Jul 08 21:45 my_app
-rw-r--r-- 1 appuser appuser    0 Jul 08 21:45 my_app/config/settings.conf
-rw-r--r-- 1 appuser appuser    0 Jul 08 21:45 my_app/app.bin
This is a critical step in securing an embedded application. By ensuring files are owned by the correct unprivileged user, you limit the “blast radius” if that application is ever compromised.
Example 3: Using Symbolic and Hard Links with ln
This example will demonstrate the practical differences between hard and symbolic links.
1. Create a Source File
First, create a file that will be the target of our links.
echo "This is the original data." > original_file.txt2. Create a Hard Link
Now, create a hard link to this file.
ln original_file.txt hardlink.txt

# List the files with their inode numbers
ls -li
Expected Output:
Notice that original_file.txt and hardlink.txt have the exact same inode number (the number in the first column). They also have the same permissions, owner, and size. The number 2 in the third column is the link count—it indicates that two directory entries point to this inode.
131252 -rw-r--r-- 2 pi pi 27 Jul 08 21:45 hardlink.txt
131252 -rw-r--r-- 2 pi pi 27 Jul 08 21:45 original_file.txt
3. Create a Symbolic Link
Next, create a symbolic link to the original file.
ln -s original_file.txt symlink.txt

# List the files again
ls -li
Expected Output:
The symbolic link has its own unique inode number. Its file type is l, and its size is small (the number of characters in the path it stores). The link count of the original file remains 2.
131252 -rw-r--r-- 2 pi pi   27 Jul 08 21:45 hardlink.txt
131252 -rw-r--r-- 2 pi pi   27 Jul 08 21:45 original_file.txt
131253 lrwxrwxrwx 1 pi pi   19 Jul 08 21:45 symlink.txt -> original_file.txt
4. Test the Behavior When Deleting the Original
This is where the difference becomes clear. Let’s remove the original file.
rm original_file.txt

# See what's left
ls -li
Expected Output:
- The hard link
hardlink.txtis unaffected. Its link count has dropped to1, but it still points to the original data. You can view its contents withcat hardlink.txt. - The symbolic link
symlink.txtis now broken.lswill often color it red to indicate this. It still points to the nameoriginal_file.txt, but that file no longer exists.
131252 -rw-r--r-- 1 pi pi   27 Jul 08 21:45 hardlink.txt
131253 lrwxrwxrwx 1 pi pi   19 Jul 08 21:45 symlink.txt -> original_file.txt
If you try to cat symlink.txt, you will get a “No such file or directory” error. This experiment clearly illustrates that hard links are direct references to data, while symbolic links are references to a name.
Common Mistakes & Troubleshooting
Even experienced developers can stumble over permission and link issues. Here are some common pitfalls and how to navigate them.
Exercises
- Basic Permissions Practice:
- Objective: Practice using
chmodwith both symbolic and octal notation. - Steps:
- Create a file named
data.txt. - Use
ls -lto view its default permissions. - Using symbolic notation, remove all permissions for the “other” group.
- Using symbolic notation, add write permission for the “group”.
- Using octal notation, set the permissions so the owner can read/write, the group can only read, and others have no permissions (
640).
- Create a file named
- Verification: Use
ls -l data.txtafter each step to confirm the permissions have changed as expected.
- Objective: Practice using
- Securing a Log Directory:
- Objective: Create a directory structure for logs that can only be written to by its owner but can be read by a specific group.
- Steps:
- Create a new group called
auditors(sudo addgroup auditors). - Add your current user (
pi) to this group (sudo usermod -aG auditors pi). You will need to log out and log back in for the group change to take effect. - Create a directory named
log_archive. - Change the ownership of
log_archiveso it is owned by thepiuser and theauditorsgroup. - Set the permissions on the directory so that only the owner can create and delete files within it, but members of the
auditorsgroup can list and read files inside. (Hint: This requires a specific combination ofr,w, andxpermissions on the directory itself).
- Create a new group called
- Verification: Try to create a file in the directory as the
piuser (should succeed). As a different user (if one exists) or by changing the permissions temporarily, verify that non-owners/non-group members cannot access it.
- Shared Library Symlink Management:
- Objective: Simulate the management of shared library versions using symbolic links.
- Steps:
- Create a directory structure:
mkdir -p my_app/lib. - Inside
lib, create two dummy library files:touch libfoo.so.1.0andtouch libfoo.so.1.1. - Create a symbolic link named
libfoo.so.1that points tolibfoo.so.1.0. - Create another symbolic link named
libfoo.sothat points tolibfoo.so.1. This is a common pattern. - Use
ls -lto view the chain of links. - “Upgrade” the library by changing the
libfoo.so.1link to point tolibfoo.so.1.1. (Hint: You may need to remove the old link first, or useln -sfto force the update).
- Create a directory structure:
- Verification: Use
ls -l libandreadlink -f my_app/lib/libfoo.soto verify that the final link now resolves tolibfoo.so.1.1.
- Hard Link Inode Investigation:
- Objective: Deepen understanding of how hard links relate to inodes and data.
- Steps:
- Create a file named
original_data.txtwith some text in it. - Use
ls -lito find its inode number. - Create a hard link to it named
hard_link_copy.txt. - Verify with
ls -lithat both files share the same inode and the link count is 2. - Edit the contents of
hard_link_copy.txt. - Use
catto view the contents oforiginal_data.txt.
- Create a file named
- Verification: Observe that the content of
original_data.txthas also changed. This demonstrates that both names point to the exact same data on the disk.
- Troubleshooting a Broken Link:
- Objective: Learn to identify and fix a broken symbolic link.
- Steps:
- Create a file
config.jsonin a directory namedconf. - In a separate directory named
bin, create a symbolic link namedapp_configthat points to../conf/config.json. - Verify the link works with
ls -l bin/app_config. - Now, rename the
confdirectory tocfg. - Run
ls -l bin/app_configagain.
- Create a file
- Verification: Observe that the link is now broken (often shown in red). Fix the link by removing the old one and creating a new one that points to the correct, new path.
Summary
- Permissions are fundamental to the security and stability of any Linux system, including embedded devices.
- The UGO model (User, Group, Other) combined with Read, Write, Execute permissions (
rwx) forms the core of file access control. - The
ls -lcommand is your essential tool for analyzing file permissions, ownership, and link status. chmodmodifies permissions using either intuitive symbolic notation (u+x) or efficient octal notation (755).chownandchgrpmanage ownership, a critical step for securing applications by assigning files to unprivileged service accounts.- Hard links act as multiple names for the same file inode, cannot cross filesystems, and persist even if the original name is deleted.
- Symbolic links are pointers to a file path, are highly flexible, can cross filesystems and point to directories, but will break if the target is moved or deleted.
- Adhering to the Principle of Least Privilege and using relative paths for links within deployable applications are key best practices.
Further Reading
- The Linux Command Line, 2nd Edition by William Shotts – An excellent, comprehensive guide to the shell, including a detailed chapter on permissions.
- Linux man pages: The official documentation built into your system. Access them with
man chmod,man chown, andman ln. They are the ultimate source of truth. - Raspberry Pi Documentation – The Linux command line: Official tutorials from the Raspberry Pi Foundation.
https://www.raspberrypi.com/documentation/computers/remote-access.html#command-line - GNU Coreutils Manual: The official documentation for the core utilities (
chmod,chown,ln, etc.). (https://www.gnu.org/software/coreutils/manual/coreutils.html) - How To Manage File Permissions in Linux – A well-written tutorial from DigitalOcean covering the basics with clear examples. (https://www.digitalocean.com/community/tutorials/how-to-manage-file-permissions-in-linux)
- Understanding Linux File Permissions – A detailed article from Red Hat that provides a solid overview of the concepts. (https://docs.redhat.com/en/documentation/red_hat_enterprise_linux/4/html/reference_guide/s2-nfs-security-files)
