
Chapter 43: Git: Working with Remote Repositories (GitHub/GitLab)
Chapter Objectives
By the end of this chapter, you will be able to:
- Understand the distributed nature of Git and the role of remote repositories in collaborative development.
- Configure secure access to remote hosting services like GitHub and GitLab from your Raspberry Pi 5 using SSH.
- Utilize
git cloneto create a local, workable copy of a remote project. - Synchronize changes between your local and remote repositories using
git push,git pull, andgit fetch. - Diagnose and resolve common issues related to remote operations, such as push rejections and merge conflicts.
- Implement a standard workflow for contributing to a shared codebase in a team environment.
Introduction
The complexity of projects often requires the coordinated effort of multiple engineers in modern embedded systems development. The days of a single developer managing a project’s source code on their local machine are long gone. Today’s collaborative environment demands a robust system for tracking changes, merging contributions from different team members, and maintaining a coherent history of the project’s evolution. This is where distributed version control systems, and specifically Git, become indispensable. While previous chapters focused on managing a project locally, this chapter introduces the next critical layer: remote repositories.
We will explore how to extend your Git skills to interact with centralized hosting platforms like GitHub and GitLab. These services act as the authoritative “single source of truth” for a project, even though every developer retains a full copy of the repository’s history. This distributed-yet-centralized model is the cornerstone of modern open-source and commercial software development. For an embedded Linux engineer, mastering remote operations is not just a valuable skill—it is a fundamental requirement. Whether you are contributing to a large open-source project like the Linux kernel, collaborating with a team on a proprietary device driver, or simply backing up your own work, understanding how to clone, push, pull, and fetch is essential. This chapter will guide you through connecting your Raspberry Pi 5 development environment to these powerful platforms, transforming it from an isolated workstation into a fully integrated node in a global development ecosystem.
flowchart TD
    A[Start: On Local 'main' Branch] --> B{Is my local copy up-to-date?};
    B --> |Yes| C[Create new branch<br><i>git checkout -b my-feature</i>];
    B --> |No| D["git pull<br><i>(or git fetch + git merge)</i>"];
    D --> C;

    C --> E{Work on code:<br>Add new features, fix bugs};
    E --> F["git add .<br>git commit -m '...'"];
    F --> E;
    E --> G{Ready to share?};

    G --> |Yes| H["git checkout main<br>git pull"];
    H --> I["git checkout my-feature<br>git merge main"];
    I --> J{Resolve any merge conflicts};
    J --> K["git push origin my-feature"];

    K --> L[Open Pull Request on GitHub/GitLab];
    L --> M{Code Review & Automated Checks};
    M --> |Approved| N[Merge PR into remote 'main'];
    M --> |Changes Requested| E;

    N --> Z[End: Changes are in 'main'];

    %% Styling
    style A fill:#1e3a8a,stroke:#1e3a8a,stroke-width:2px,color:#ffffff
    style Z fill:#10b981,stroke:#10b981,stroke-width:2px,color:#ffffff
    style B fill:#f59e0b,stroke:#f59e0b,stroke-width:1px,color:#ffffff
    style E fill:#f59e0b,stroke:#f59e0b,stroke-width:1px,color:#ffffff
    style G fill:#f59e0b,stroke:#f59e0b,stroke-width:1px,color:#ffffff
    style J fill:#f59e0b,stroke:#f59e0b,stroke-width:1px,color:#ffffff
    style M fill:#f59e0b,stroke:#f59e0b,stroke-width:1px,color:#ffffff
    style C fill:#0d9488,stroke:#0d9488,stroke-width:1px,color:#ffffff
    style D fill:#0d9488,stroke:#0d9488,stroke-width:1px,color:#ffffff
    style F fill:#0d9488,stroke:#0d9488,stroke-width:1px,color:#ffffff
    style H fill:#0d9488,stroke:#0d9488,stroke-width:1px,color:#ffffff
    style I fill:#0d9488,stroke:#0d9488,stroke-width:1px,color:#ffffff
    style K fill:#0d9488,stroke:#0d9488,stroke-width:1px,color:#ffffff
    style L fill:#8b5cf6,stroke:#8b5cf6,stroke-width:1px,color:#ffffff
    style N fill:#8b5cf6,stroke:#8b5cf6,stroke-width:1px,color:#ffffff
Technical Background
The Distributed Paradigm: A Shift in Thinking
To truly grasp the mechanics of remote Git operations, one must first understand the fundamental architectural difference between distributed version control systems (DVCS) like Git and their predecessors, the centralized version control systems (CVCS) like Subversion (SVN) or CVS. In a centralized model, a single server contains the master copy of the project’s history. Developers “check out” the latest version of the files, make changes, and then “commit” them directly back to that central server. The developer’s local machine only ever holds a snapshot, a working copy of a specific version, not the entire history. Communication is always between the client and the central server.
Git fundamentally breaks this model. When you work with Git, your local repository is not just a working copy; it is a complete, first-class citizen. Every developer’s machine contains the entire history of the project—every commit, every branch, every tag. When you git clone a repository, you are creating a full-fledged mirror of it. This distributed architecture has profound implications. It means you can commit your work, create branches, view project history, and compare versions entirely offline, without any network access. The “remote” repository is, from Git’s perspective, simply another peer. It is only by social convention that we treat a specific remote, like the one hosted on GitHub, as the authoritative or “blessed” repository for a project.
graph TD
    subgraph "Centralized VCS (e.g., SVN)"
        direction LR
        CentralServer[("Central Server<br><b>Single Source of History</b>")]
        ClientA[("Developer A<br><i>Working Copy</i>")]
        ClientB[("Developer B<br><i>Working Copy</i>")]
        ClientC[("Developer C<br><i>Working Copy</i>")]

        CentralServer --- ClientA
        CentralServer --- ClientB
        CentralServer --- ClientC
    end

    subgraph "Distributed VCS (e.g., Git)"
        direction TB
        DevA[("Developer A<br><b>Full Local Repo</b>")]
        DevB[("Developer B<br><b>Full Local Repo</b>")]
        DevC[("Developer C<br><b>Full Local Repo</b>")]
        RemoteRepo[("Remote Repo<br><i>(e.g., GitHub)</i><br><b>Conventional Authority</b>")]

        DevA <--> DevB
        DevB <--> DevC
        DevC <--> DevA
        DevA <--> RemoteRepo
        DevB <--> RemoteRepo
        DevC <--> RemoteRepo
    end

    style CentralServer fill:#8b5cf6,stroke:#8b5cf6,stroke-width:2px,color:#ffffff
    style ClientA fill:#0d9488,stroke:#0d9488,stroke-width:1px,color:#ffffff
    style ClientB fill:#0d9488,stroke:#0d9488,stroke-width:1px,color:#ffffff
    style ClientC fill:#0d9488,stroke:#0d9488,stroke-width:1px,color:#ffffff

    style DevA fill:#0d9488,stroke:#0d9488,stroke-width:1px,color:#ffffff
    style DevB fill:#0d9488,stroke:#0d9488,stroke-width:1px,color:#ffffff
    style DevC fill:#0d9488,stroke:#0d9488,stroke-width:1px,color:#ffffff
    style RemoteRepo fill:#1e3a8a,stroke:#1e3a8a,stroke-width:2px,color:#ffffff
Anatomy of a Remote Connection
When you clone a repository, Git automatically configures a connection to the original URL under a default name: origin. This is not a magical keyword; it is simply a convenient alias for the remote repository’s location. You can think of it like a bookmark in a web browser. It saves you from having to type the full, cumbersome URL every time you want to interact with the remote. You can view your configured remotes by running git remote -v in your repository, which will show the URLs for both fetching (downloading) and pushing (uploading) data.
This origin remote is the bridge between your local work and the shared, collaborative space. When you push your changes, you are telling Git, “Take the commits from my local branch and send them to the corresponding branch on the remote named origin.” Conversely, when you pull or fetch, you are asking Git to retrieve data from origin and update your local repository.
Remote-Tracking Branches: Your Local Window into the Remote World
A crucial concept for understanding remote interactions is the remote-tracking branch. These are special, read-only pointers in your local repository that reflect the state of the branches in the remote repository the last time you communicated with it. They act as your local cache of the remote’s state. You don’t edit these branches directly; Git updates them for you during fetch operations.
These branches live in a separate namespace, typically prefixed with the remote’s name. For example, if the remote repository origin has a main branch, your local repository will have a remote-tracking branch named origin/main. This allows you to see the progress of the remote project without immediately merging it into your own local branches. You can inspect the history of origin/main (git log origin/main), see the differences between your local main and the remote version (git diff main origin/main), and make informed decisions about when and how to integrate the remote changes into your own work. This separation between your local work (main) and your cached view of the remote’s work (origin/main) is a key safety feature, preventing unexpected changes from being forced into your working directory.
graph TD
    subgraph "Remote Repository (origin)"
        R_C1(fa:fa-code-commit Commit A)
        R_C2(fa:fa-code-commit Commit B)
        R_Main[fa:fa-code-branch main]

        R_C1 --> R_C2
        R_C2 --> R_Main
    end

    subgraph "Local Repository"
        direction LR
        subgraph "Local Branches"
            L_C1(fa:fa-code-commit Commit A)
            L_Main[fa:fa-code-branch main]
            L_C1 --> L_Main
        end

        subgraph "Remote-Tracking 'Cache'"
            RT_C1(fa:fa-code-commit Commit A)
            RT_C2(fa:fa-code-commit Commit B)
            RT_Main["fa:fa-code-branch origin/main<br><i>(read-only)</i>"]
            RT_C1 --> RT_C2 --> RT_Main
        end
    end

    Fetch["<b>git fetch origin</b><br>Downloads new data<br>Updates local cache"]
    Fetch --> |updates| RT_C2
    Fetch --> |updates| RT_Main


    style R_C1 fill:#374151,stroke:#374151,stroke-width:1px,color:#ffffff
    style R_C2 fill:#10b981,stroke:#10b981,stroke-width:1px,color:#ffffff
    style R_Main fill:#1e3a8a,stroke:#1e3a8a,stroke-width:1px,color:#ffffff

    style L_C1 fill:#374151,stroke:#374151,stroke-width:1px,color:#ffffff
    style L_Main fill:#0d9488,stroke:#0d9488,stroke-width:1px,color:#ffffff

    style RT_C1 fill:#374151,stroke:#374151,stroke-width:1px,color:#ffffff,stroke-dasharray: 5 5
    style RT_C2 fill:#10b981,stroke:#10b981,stroke-width:1px,color:#ffffff,stroke-dasharray: 5 5
    style RT_Main fill:#8b5cf6,stroke:#8b5cf6,stroke-width:1px,color:#ffffff

    style Fetch fill:#f59e0b,stroke:#f59e0b,stroke-width:1px,color:#ffffff
The Core Operations: fetch, pull, push, and clone
While they all deal with moving data between repositories, the primary remote commands have distinct and important purposes.
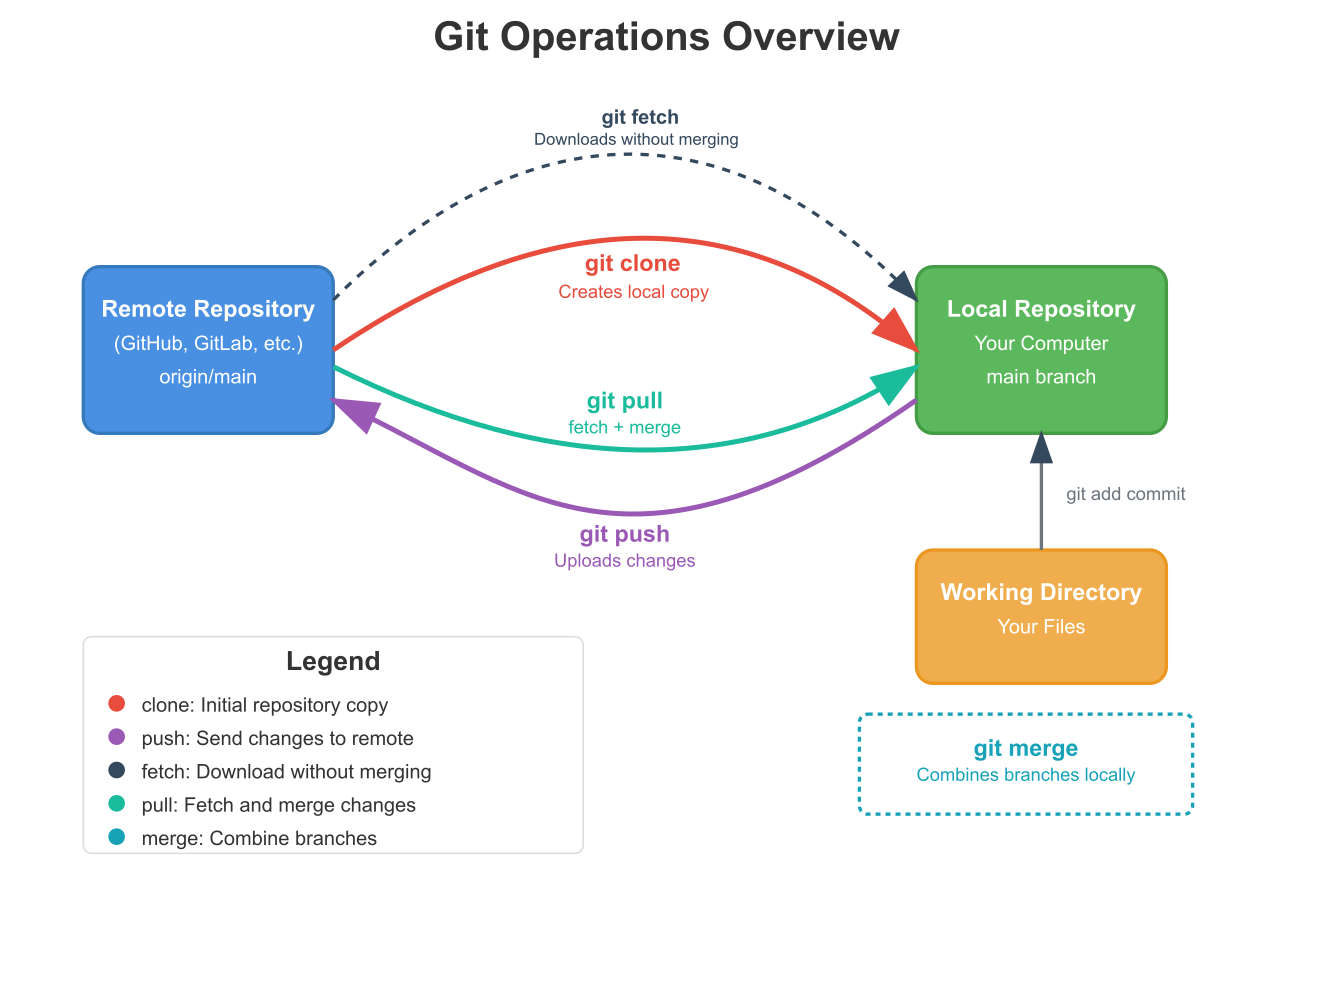
git clone: This is the starting point. git clone <url> performs several actions in one command. First, it creates a new directory on your local machine. Second, it initializes an empty Git repository within it (git init). Third, it adds a remote named origin pointing to the <url> you provided. Fourth, it performs a git fetch to download all data from the remote repository. Finally, it “checks out” the default branch (usually main or master) into your working directory, creating a local branch that tracks the corresponding remote branch (origin/main). After a clone, you have a complete, independent local repository that is ready for work and already linked to its remote source.
git fetch: This is the most “polite” of the download commands. git fetch origin communicates with the origin remote and downloads any new data (commits, branches, tags) that you don’t have in your local repository. Crucially, it does not modify your local working branches. It only updates your remote-tracking branches (like origin/main). This is a safe way to check for upstream changes without having them immediately impact your own work. You can inspect the fetched changes and then decide if you want to merge them.
git pull: This command is essentially a shortcut. git pull origin main is equivalent to running two separate commands: git fetch origin followed by git merge origin/main (while you are on your local main branch). It downloads the new data and immediately tries to merge it into your current working branch. While convenient, this can sometimes be risky if the remote has significant changes you weren’t expecting. An unexpected merge could lead to conflicts that you are not prepared to resolve. Many experienced developers prefer to use fetch and merge as two distinct steps to have more control over the integration process.
Tip: A safer alternative to a standard
git pullis to usegit pull --rebase. This performs a fetch and then rebases your local commits on top of the remote changes, resulting in a cleaner, linear project history. We will explore rebasing in more detail in a later chapter.
git push: This is the command for uploading your local changes to the remote. When you run git push origin main, you are telling Git to take all the commits that are present on your local main branch but are missing from the remote origin/main branch, and upload them. Git will first check if this operation is a “fast-forward.” A fast-forward push is only possible if your local branch is a direct descendant of the remote branch you are pushing to—meaning no one else has pushed new commits in the meantime. If someone else has pushed changes, the remote branch will have diverged, and Git will reject your push to prevent you from overwriting their work. In this scenario, you must first pull (or fetch and merge) the remote changes, integrate them with your local work, and then attempt the push again. This mechanism is a critical safeguard that enforces collaboration and prevents history from being accidentally destroyed.
Practical Examples
This section provides hands-on, step-by-step examples for interacting with a remote repository from your Raspberry Pi 5. We will use GitHub for these examples, but the commands are identical for GitLab or any other standard Git hosting service.
Step 1: Setting up SSH Key-based Authentication
While you can interact with remote repositories using HTTPS and a username/password (or personal access token), using the SSH protocol is far more secure and convenient for frequent use. It allows your Raspberry Pi to authenticate with GitHub without you having to type your credentials every time.
1. Generate an SSH Key Pair: Open a terminal on your Raspberry Pi 5. If you don’t already have an SSH key, generate one using the ssh-keygen command. It’s best practice to use the modern and secure Ed25519 algorithm.
# Press Enter to accept the default file location (~/.ssh/id_ed25519)
# It is highly recommended to enter a secure passphrase when prompted.
ssh-keygen -t ed25519 -C "yo********@*****le.com"~/.ssh directory: id_ed25519 (your private key, keep it secret!) and id_ed25519.pub (your public key, which you can share).
2. Add the Public Key to GitHub:
First, display your public key in the terminal and copy its entire output.
cat ~/.ssh/id_ed25519.pub
- Navigate to your GitHub account in a web browser.
- Go to
Settings>SSH and GPG keys. - Click
New SSH keyorAdd SSH key. - Give your key a descriptive
Title(e.g., “Raspberry Pi 5”). - Paste the copied public key into the
Keyfield. - Click
Add SSH key.
3. Test the Connection: Verify that your Raspberry Pi can now authenticate with GitHub via SSH.
ssh -T gi*@****ub.comyes to continue. If everything is configured correctly, you will see a message like:
Hi <your-username>! You've successfully authenticated, but GitHub does not provide shell access.Step 2: Cloning a Remote Repository
For this example, we will create a new repository on GitHub and then clone it to our Raspberry Pi.
1. Create a Repository on GitHub:
- On the GitHub website, create a new repository. Let’s call it
rpi5-gpio-test. - Make it
Public. - Initialize it with a
READMEfile. This is important as you cannot clone an empty repository. - Click
Create repository.
2. Clone the Repository:
- On the repository’s main page, click the green
<> Codebutton.Make sure theSSHtab is selected, and copy the SSH URL (it should look likegi*@****ub.com:<your-username>/rpi5-gpio-test.git).In your Raspberry Pi terminal, navigate to the directory where you want to store your projects and run thegit clonecommand.
# Navigate to your development directory
cd ~

# Clone the repository using the SSH URL
git clone gi*@****ub.com:<your-username>/rpi5-gpio-test.git
rpi5-gpio-test containing the README.md file.
# Verify the contents
ls rpi5-gpio-test
# Output: README.md

# Navigate into the new repository
cd rpi5-gpio-test

# Check the remote configuration
git remote -v
# Output:
# origin  gi*@****ub.com:<your-username>/rpi5-gpio-test.git (fetch)
# origin  gi*@****ub.com:<your-username>/rpi5-gpio-test.git (push)
Step 3: Making Local Changes and Pushing to the Remote
Now we will simulate a typical development workflow: make a change locally, commit it, and push it to the remote repository. We’ll add a simple Python script to control a GPIO pin.
Warning: Always double-check your wiring before running scripts that interact with GPIO pins. Incorrect connections can damage your Raspberry Pi. For this example, we will just write the code and not connect any hardware.
1. Create and Edit a New File: Create a Python script to (theoretically) blink an LED.
# Create a new file using the nano editor
nano blink_led.py
2. Add Code to the File: Add the following Python code. This uses the modern gpiod library, the standard way to interact with GPIO on a Raspberry Pi 5 and other modern Linux systems.
# Filename: blink_led.py
# A simple script using the modern 'gpiod' library for RPi 5.
# This script is intended to blink an LED connected to GPIO 17.

import gpiod
import time

# Pin Definitions for Raspberry Pi 5
# The main GPIO controller is typically 'gpiochip4' on the RPi 5
CHIP = 'gpiochip4'
LED_LINE = 17

def main():
    """Sets up GPIO and blinks an LED."""
    # The 'with' statement ensures resources are automatically released.
    try:
        with gpiod.Chip(CHIP) as chip:
            line = chip.get_line(LED_LINE)
            line.request(consumer="blink_led.py", type=gpiod.LINE_REQ_DIR_OUT)

            print(f"Blinking LED on GPIO {LED_LINE} for 10 seconds...")
            end_time = time.time() + 10

            while time.time() < end_time:
                line.set_value(1)  # Turn LED on
                time.sleep(0.5)
                line.set_value(0)  # Turn LED off
                time.sleep(0.5)

    except KeyboardInterrupt:
        print("\nProgram interrupted by user.")
    except Exception as e:
        print(f"An error occurred: {e}")
        print("Please ensure 'libgpiod' is installed (`sudo apt install gpiod libgpiod-dev python3-gpiod`)")
    finally:
        # No explicit cleanup needed for the line when using 'with'
        print("Blinking finished.")

if __name__ == '__main__':
    main()
nano (Ctrl+X, then Y, then Enter).
3. Stage and Commit the Changes: Now, add the new script to the staging area and commit it with a descriptive message.
# Check the status of your repository
git status
# Output will show 'blink_led.py' as an untracked file

# Stage the new file
git add blink_led.py

# Commit the staged file
git commit -m "feat: Add initial script for LED blinking"
4. Push the Commit to GitHub: Your commit currently only exists on your Raspberry Pi. To share it, you need to push it to the origin remote.
# Push the changes from your local 'main' branch to the 'origin' remote's 'main' branch
git push origin mainblink_led.py file is now part of the project.
Step 4: Fetching and Pulling Remote Changes
Now, let’s simulate a collaborator making a change. We will use the GitHub web interface to edit the README.md file, and then we will pull that change down to our Raspberry Pi.
1. Edit the File on GitHub:
- On your GitHub repository page, click on the
README.mdfile. - Click the pencil icon to edit the file.
- Add a new line of text, for example:
This project contains a test script for controlling Raspberry Pi 5 GPIO. - Scroll down and commit the changes directly to the
mainbranch.
2. Use git fetch to See the Changes: Back on your Raspberry Pi, your local repository is now out of date. It doesn’t know about the change you just made on GitHub. Let’s use git fetch to learn about it without merging.
# Fetch the latest information from the origin remote
git fetch origin

# Now, check the status
git status
# Output will show:
# On branch main
# Your branch is behind 'origin/main' by 1 commit, and can be fast-forwarded.
#   (use "git pull" to update your local branch)
#
# nothing to commit, working tree cleanmain branch is behind the remote-tracking branch origin/main. It hasn’t changed your files yet, but it knows there’s a new commit available. You can even see what the commit is:
git log main..origin/main
# This will show the commit you made on GitHub for the README update.
3. Use git pull to Update Your Local Branch: Now that you’ve inspected the changes and are ready to integrate them, use git pull.
git pull origin main
README on the remote, and you haven’t touched it locally since), this will be a simple “fast-forward” merge. Git simply moves your local main pointer forward to match origin/main.Now, if you view the README.md file on your Raspberry Pi, you will see the new text.
cat README.md
Common Mistakes & Troubleshooting
Even with a solid understanding of the concepts, every developer encounters issues with remote operations. Here are some common pitfalls and how to resolve them.
Exercises
- Personal Project Setup:
- Objective: Create a new remote repository on GitHub or GitLab and connect it to a local project on your Raspberry Pi.
- Steps:
- Create a new, public repository on GitHub named
rpi5-learning-journal. - Initialize it with a
README.mdfile. - Clone this repository to your Raspberry Pi’s home directory using SSH.
- Create a new file inside the local repository called
chapter43_notes.txt. - Add a few sentences to the file summarizing what you’ve learned.
- Stage, commit, and push this new file to the remote repository.
- Create a new, public repository on GitHub named
- Verification: Check your
rpi5-learning-journalrepository on GitHub. Thechapter43_notes.txtfile should be present with your notes.
- Working with a Collaborator (Simulated):
- Objective: Practice the
fetchandpullworkflow by simulating a change from another source. - Steps:
- Using the GitHub web interface for your
rpi5-learning-journalrepository, edit theREADME.mdfile. Add a “Project Goals” section. - Commit the change directly on GitHub.
- On your Raspberry Pi, use
git fetchto download the new data. - Use
git statusandgit log main..origin/mainto inspect the incoming changes. - Finally, use
git pullto merge the changes into your localmainbranch.
- Using the GitHub web interface for your
- Verification: Run
cat README.mdon your Raspberry Pi. The “Project Goals” section should now be visible.
- Objective: Practice the
- The “Push Rejected” Scenario:
- Objective: Intentionally cause and then resolve a non-fast-forward push rejection.
- Steps:
- On your Raspberry Pi, edit
chapter43_notes.txtand add a new line. Commit this change locally, but do not push it yet. - Go to the GitHub web interface and edit
chapter43_notes.txtagain, adding a different new line. Commit this change on GitHub. - Now, back on your Raspberry Pi, try to
git push. Observe the rejection error. - Resolve the issue by running
git pull. This will likely cause a merge conflict. - Open the file, resolve the conflict by combining both new lines, and save it.
- Follow the instructions from Git:
git addthe file andgit committo complete the merge. - Now,
git pushagain. It should succeed.
- On your Raspberry Pi, edit
- Verification: The final version of
chapter43_notes.txton GitHub should contain the changes from both your local commit and the web interface commit.
- Working with Branches:
- Objective: Practice creating a feature branch, pushing it to the remote, and seeing how it’s tracked.
- Steps:
- In your local
rpi5-learning-journalrepository, create and switch to a new branch calledadd-system-info-script. - Create a shell script named
sys_info.shthat prints the Raspberry Pi’s hostname and kernel version (uname -a). - Stage and commit this new script to the
add-system-info-scriptbranch. - Push this new branch to the remote repository using
git push -u origin add-system-info-script. The-uflag sets up tracking.
- In your local
- Verification: On GitHub, you should see a message indicating a new branch was pushed. You should be able to switch to the
add-system-info-scriptbranch in the web UI and see yoursys_info.shfile.
- Cloning an Existing Open-Source Project:
- Objective: Clone a real-world open-source project to practice working with a larger, more complex repository.
- Steps:
- Find the official repository for a well-known tool used in embedded development, for example, the
raspberrypi/pico-sdkon GitHub. - Use
git clonewith the SSH URL to download a copy of this SDK to your Raspberry Pi. cdinto the new directory and usegit logto explore the project’s commit history.- Use
git branch -rto list all the remote-tracking branches and see the active development lines.
- Find the official repository for a well-known tool used in embedded development, for example, the
- Verification: You have successfully cloned the repository and can navigate its history and branches locally on your Raspberry Pi.
Summary
- Distributed Version Control: Git operates on a distributed model where every developer has a complete copy of the project’s history, enabling offline work and robust collaboration.
- Remote Repositories: Platforms like GitHub and GitLab host what is conventionally treated as the authoritative or
originrepository, acting as a central point for team synchronization. - SSH Authentication: Using SSH keys provides a secure and convenient method for authenticating your Raspberry Pi with remote Git services.
git clone: Creates a full local copy of a remote repository, automatically configuring theoriginremote and checking out the default branch.git fetch: Safely downloads new data from the remote repository and updates your remote-tracking branches (e.g.,origin/main) without modifying your local working branches.git pull: A shortcut that combinesgit fetchandgit merge, automatically downloading and attempting to merge remote changes into your current branch.git push: Uploads your committed local changes to the remote repository. Git prevents non-fast-forward pushes to protect against overwriting collaborators’ work.- Core Workflow: The fundamental cycle of collaboration involves pulling remote changes, integrating them with your local work, and then pushing your contributions back to the remote for others to access.
Further Reading
- Pro Git Book: Scott Chacon and Ben Straub. Specifically, Chapter 3: Git Branching and Chapter 5: Distributed Git. This is the definitive, freely available book on Git. (https://git-scm.com/book/en/v2)
- GitHub Docs: Connecting to GitHub with SSH: The official documentation from GitHub on generating and adding SSH keys. (https://docs.github.com/en/authentication/connecting-to-github-with-ssh)
- GitLab Docs: Git Basics: GitLab’s official tutorials covering cloning, pushing, and other fundamental commands. (https://docs.gitlab.com/tutorials/)
- Atlassian Git Tutorial:
git fetchvsgit pull: A well-regarded tutorial that clearly explains the difference between these two crucial commands. (https://www.atlassian.com/git/tutorials/syncing/git-fetch) - The Git Parable by Tom Preston-Werner: An excellent, non-technical explanation of the philosophy behind Git’s design that helps build a strong mental model. (https://tom.preston-werner.com/2009/05/19/the-git-parable.html)
- Raspberry Pi Documentation: Official hardware and software documentation for the Raspberry Pi, useful for any embedded project. (https://www.raspberrypi.com/documentation/)
- Linux Kernel Documentation: The
gitcommand: For those who want to go to the source, the Linux kernel’s own documentation on using Git is comprehensive, though highly technical. (https://www.kernel.org/doc/html/latest/maintainer/git.html)
