
Chapter 94: Embedded Linux System Components: Toolchain to RootFS
Chapter Objectives
By the end of this chapter, you will be able to:
- Understand the distinct roles of the cross-compilation toolchain, bootloader, kernel, and root filesystem in an embedded system.
- Explain the complete boot sequence of an embedded Linux device, from power-on to the user-space shell.
- Differentiate between the functions of the bootloader (U-Boot) and the Linux kernel, including the handover process.
- Analyze the structure and contents of a minimal root filesystem and justify the inclusion of its key components.
- Implement the basic steps to configure and build each of these major software components for a Raspberry Pi 5 target.
- Debug common integration issues that arise from component mismatches or incorrect configurations.
Introduction
An embedded Linux system is a symphony of precisely engineered software components working in concert. While a desktop Linux distribution appears as a single, monolithic entity, the embedded world demands a deeper understanding of its constituent parts. Think of it like a high-performance vehicle. You have the factory where the engine is built (the toolchain), the ignition system that starts it (the bootloader), the powerful engine itself (the kernel), and finally, the chassis, controls, and cabin that make the vehicle useful (the root filesystem). Each part is distinct, serves a critical purpose, and must be perfectly integrated for the system to function. An engine without a chassis is just a loud machine, and a beautiful chassis with no engine goes nowhere.
In previous chapters, we explored the fundamentals of the Linux command line and system architecture from a user’s perspective. Now, we transition from user to architect. This chapter deconstructs the embedded Linux ecosystem into its four foundational pillars. We will explore the “why” behind each component—why we need a special compiler, what the bootloader really does before the famous penguin logo appears, how the kernel orchestrates hardware, and what files are absolutely essential for a system to be considered “booted.” Using the Raspberry Pi 5 as our practical hardware platform, you will not only learn the theory but also gain the foundational knowledge required to build, configure, and assemble these components into a custom, functioning embedded system from the ground up. This knowledge is the bedrock of professional embedded Linux development.
Technical Background
Venturing into the construction of an embedded Linux system requires a solid grasp of the four primary software elements. These are not merely separate programs but layers of a complete software stack, each enabling the next. We will explore them in the logical order of their use in the development and boot process: the toolchain that builds everything, the bootloader that starts the machine, the kernel that manages it, and the root filesystem that gives it purpose.
The Cross-Compilation Toolchain: The Factory for Your Code
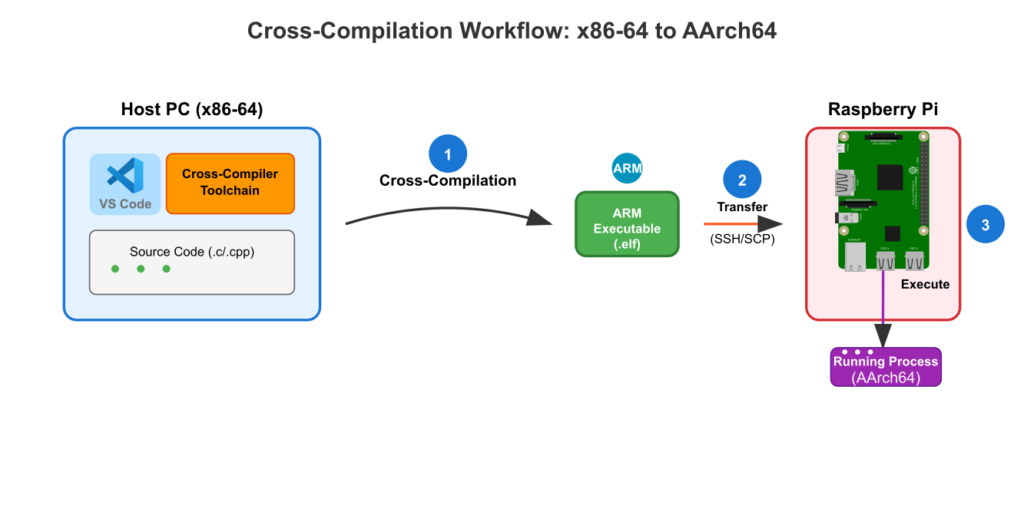
The journey of creating embedded software begins not on the embedded device itself, but on a powerful development workstation. This distinction introduces the fundamental concepts of the host and the target. The host is your desktop or laptop computer, typically running on an x86_64 architecture with ample RAM and processing power. The target is the embedded device, in our case the Raspberry Pi 5, which uses a completely different ARM-based architecture (specifically, the 64-bit Arm Cortex-A76). You cannot run a program compiled for an Intel processor on an Arm processor, and vice-versa. Therefore, we need a special set of tools that run on the host but produce executable code for the target. This suite of tools is the cross-compilation toolchain, or simply toolchain.
Attempting to compile large software projects like the Linux kernel or a complex application directly on the target device is often impractical or impossible. Embedded targets are optimized for their specific application, not for heavy-duty software development; they typically lack the necessary processing power, memory, and storage. The toolchain is the sophisticated factory that runs on your powerful host machine to forge the binaries that will ultimately run on the constrained target.
A modern toolchain is composed of several key components. The most prominent is the GNU Compiler Collection (GCC), which is the compiler that translates C/C++ source code into machine-readable assembly code. Working alongside it are the Binary Utilities (Binutils), a suite of essential tools including the linker (ld), which combines various pieces of object code into a single executable, and the assembler (as), which converts assembly code into machine code.
However, a compiler and linker are not enough. Nearly every program you write relies on a standard library to provide fundamental functions like printing to a console (printf), managing memory (malloc), or handling files (fopen). This is the role of the C library (libc). In the embedded world, you have choices for your C library, each with important trade-offs. The most common is GNU C Library (glibc), which is the standard on most desktop Linux distributions. It is feature-rich, POSIX-compliant, and highly optimized, but it is also relatively large, which can be a concern for resource-constrained devices. An increasingly popular alternative is musl libc, a lightweight, modern implementation designed with static linking and resource efficiency in mind. For deeply embedded systems, older options like uClibc also exist. The choice of C library is a critical architectural decision that influences the final size and performance of your entire user-space environment. The toolchain must be built against a specific C library, bundling the necessary headers and library files for the target architecture.
The Bootloader: The First Spark of Life
Once power is applied to the Raspberry Pi 5’s processor, it doesn’t magically start running Linux. The processor’s first action is to execute a small, immutable piece of code stored in its on-chip Read-Only Memory (ROM). This Boot ROM code is the first link in the boot chain. Its sole purpose is to locate the next-stage bootloader on an external storage medium—such as an SD card, eMMC, or network interface—load it into RAM, and execute it. For most sophisticated embedded Linux systems, this second-stage bootloader is Das U-Boot (The Universal Bootloader).
U-Boot is a powerful, open-source project that has become the de facto standard in the embedded world. It acts as the bridge between the initial hardware power-on state and the fully operational Linux kernel. Its responsibilities are critical and multifaceted. First, it performs low-level hardware initialization. While the Boot ROM may have done some minimal setup, U-Boot is responsible for configuring the most critical systems, such as initializing the DDR RAM controller (without which the kernel cannot be loaded), setting up system clocks, and configuring a serial port to provide console output for debugging. This console is often an embedded developer’s most vital tool, offering a window into the boot process long before the display or network is active.
flowchart TD
    A[Power On] --> B{Boot ROM};
    B --> C[U-Boot SPL/TPL<br><i>Initial HW Setup</i>];
    C --> D[U-Boot<br><i>Full HW Init: RAM, Clocks, Console</i>];
    D --> E{"Interactive Console?<br><i>(boot delay)</i>"};
    E -- Yes --> F[Developer Interaction<br><i>Debug, Load Files</i>];
    E -- No / Timeout --> G[Load Kernel & DTB to RAM<br><i>from SD Card / eMMC / Network</i>];
    F --> G;
    G --> H[Pass Boot Arguments to Kernel];
    H --> I(Jump to Kernel Entry Point);
    I --> J[Kernel Decompression & Initialization];
    J --> K[Mount Root Filesystem];
    K --> L((Start /sbin/init));

    %% Styling
    style A fill:#1e3a8a,stroke:#1e3a8a,stroke-width:2px,color:#ffffff
    style L fill:#10b981,stroke:#10b981,stroke-width:2px,color:#ffffff
    style E fill:#f59e0b,stroke:#f59e0b,stroke-width:1px,color:#ffffff
    style B fill:#0d9488,stroke:#0d9488,stroke-width:1px,color:#ffffff
    style C fill:#0d9488,stroke:#0d9488,stroke-width:1px,color:#ffffff
    style D fill:#0d9488,stroke:#0d9488,stroke-width:1px,color:#ffffff
    style F fill:#eab308,stroke:#eab308,stroke-width:1px,color:#1f2937
    style G fill:#0d9488,stroke:#0d9488,stroke-width:1px,color:#ffffff
    style H fill:#0d9488,stroke:#0d9488,stroke-width:1px,color:#ffffff
    style I fill:#ef4444,stroke:#ef4444,stroke-width:1px,color:#ffffff
    style J fill:#8b5cf6,stroke:#8b5cf6,stroke-width:1px,color:#ffffff
    style K fill:#8b5cf6,stroke:#8b5cf6,stroke-width:1px,color:#ffffff
After initializing the hardware, U-Boot provides an interactive command-line interface over the serial console. This allows a developer to interrupt the boot process and manually inspect memory, modify boot parameters, or load files from different sources like USB or the network (TFTP). This powerful feature is invaluable for board bring-up and debugging.
In its final and most important act, U-Boot loads the Linux kernel image from the storage device into a specific address in RAM. But it doesn’t simply jump to the kernel’s entry point and disappear. It passes a vital data structure to the kernel, often including the Device Tree Blob (DTB), which we will discuss shortly, and a set of boot arguments. These arguments are a simple string of text that tells the kernel crucial information, such as the location of the root filesystem (root=/dev/mmcblk0p2), the device to use as the system console (console=ttyS0,115200), and other kernel-specific parameters. Once this information is in place, U-Boot executes a final command to jump to the kernel’s entry point, handing over control of the system.
The Linux Kernel: The Core of the System
With control passed from U-Boot, the Linux kernel begins its own complex initialization sequence. The kernel is the core of the operating system, the ultimate manager of all hardware and software resources. It operates in a privileged processor mode (kernel space), distinct from the unprivileged mode where user applications run (user space). This separation is a key security and stability feature of modern operating systems. The kernel’s primary function is to serve as an abstraction layer, shielding applications from the raw complexity of the underlying hardware. An application doesn’t need to know how to toggle pins on a specific UART chip to send serial data; it simply makes a generic write() system call to a file descriptor, and the kernel, through its device drivers, handles the rest.

The Linux kernel is considered a monolithic kernel. This means that its core functions—the process scheduler, memory manager, virtual filesystem (VFS), networking stack, and device drivers—are all tightly integrated into a single large executable (Image or zImage). The alternative, a microkernel architecture, implements minimal services in the kernel and runs others as user-space processes. While academically interesting, the monolithic design has proven to be highly efficient in practice, offering superior performance, which is often a key requirement in embedded systems.
A pivotal innovation for embedded Linux on ARM platforms is the Device Tree. In the early days of ARM support in Linux, hardware descriptions for each specific board were hard-coded into the kernel source. This was unsustainable, leading to a massive proliferation of board-specific code. The device tree solves this by separating the description of the hardware from the kernel’s driver code. It is a tree-like data structure, written in a human-readable source format (.dts) and compiled into a compact binary blob (.dtb). This blob is loaded by the bootloader (U-Boot) and passed to the kernel at boot time. The kernel parses this structure to learn what hardware is present—which serial ports are available, how devices are connected to the I2C bus, how many CPUs there are, and so on—and loads the appropriate drivers. This allows a single, generic ARM kernel binary to boot on a wide variety of different hardware platforms simply by being provided with the correct DTB file.
Finally, the kernel’s last major task during its boot sequence is to locate and mount the root filesystem. Following the instructions passed in the boot arguments from U-Boot, the kernel initializes the necessary storage drivers and mounts the specified partition at the root (/) of the filesystem hierarchy. From there, it executes the very first user-space program: /sbin/init. At this moment, the kernel’s job transitions from initialization to its primary role of system management, and the user-space world comes to life.
The Root Filesystem (RootFS): The User’s World
The kernel, for all its power and complexity, is not the complete system. On its own, it cannot provide a shell, run applications, or perform any task a user would find useful. The world of applications, libraries, and utilities that we interact with constitutes the root filesystem (RootFS). When the kernel starts the init process, it cedes control of the system’s higher-level behavior to user space. The init program, which always has Process ID 1, becomes the ancestor of all other user-space processes on the system.
The contents of the RootFS define the system’s entire personality and capability. A RootFS for a commercial product like a smart thermostat might be highly minimalistic, containing only the essential libraries, device nodes, configuration files, and the single application that runs the thermostat’s logic. It would be stored on a read-only filesystem to prevent corruption and may be only a few megabytes in size. In contrast, the RootFS for a development platform like the Raspberry Pi 5 running Raspberry Pi OS is enormous, containing thousands of packages, a graphical user interface, compilers, and extensive libraries to support a wide range of applications.

Regardless of its size, every functional RootFS must contain a few key elements. The init program is the most critical. This can be a complex system manager like systemd (common on desktops), a traditional SysVinit system, or, very commonly in embedded systems, the simple init provided by BusyBox. BusyBox is a remarkable piece of software often called “The Swiss Army Knife of Embedded Linux.” It combines hundreds of common Linux command-line utilities (ls, cp, mount, ifconfig, etc.) and a full-featured shell into a single, small executable. By creating symbolic links (e.g., ls -> /bin/busybox), BusyBox can emulate all these tools, dramatically reducing the storage footprint of the RootFS.
Beyond init and the core utilities, the RootFS must contain the C library (/lib/libc.so.6) and the dynamic linker (/lib/ld-linux.so.3) that all dynamically linked programs will depend on. The /etc directory holds system configuration files, such as /etc/inittab to control the init process or /etc/fstab to define filesystem mounts. The /dev directory must contain essential device nodes, which are special files that represent hardware devices. Finally, shared libraries required by the applications are stored in /lib and /usr/lib. Assembling this collection of files and directories correctly is the final step in creating a bootable embedded Linux system.
Practical Examples
Theory provides the map, but practical application is the journey. In this section, we will walk through the high-level steps for building each of the four key components for the Raspberry Pi 5. We will use industry-standard tools like Crosstool-NG and Buildroot to automate and simplify these complex processes.
Tip: Before starting, ensure you have a Linux host system (a virtual machine is fine) with at least 50GB of free space and essential development packages installed (
build-essential,git,bison,flex, etc.).
Building a Cross-Compilation Toolchain with Crosstool-NG
Crosstool-NG is a powerful meta-build tool that automates the creation of custom cross-compilation toolchains. It handles the downloading, patching, and building of all the necessary components (GCC, Binutils, C library) in the correct order.
Build and Configuration Steps:
1. Clone Crosstool-NG and prepare it:
git clone [https://github.com/crosstool-ng/crosstool-ng.git](https://github.com/crosstool-ng/crosstool-ng.git)
cd crosstool-ng
./bootstrap
./configure --enable-local
make
2. Configure the toolchain for Raspberry Pi 5 (AArch64):We start with a sample configuration and then customize it.
./ct-ng list-samples  # See available samples
./ct-ng aarch64-rpi4-linux-gnu  # The RPi4 config is a great starting point for RPi5
./ct-ng menuconfigmenuconfig, you can navigate to Target options and confirm the architecture is aarch64. Under C-library, you can choose between glibc (default) or musl. For now, we’ll stick with the defaults. Exit and save the configuration.
3. Build the toolchain:This step will take a significant amount of time, as it downloads and compiles all components from scratch.
./ct-ng build4. Install and use the toolchain:The toolchain will be installed in ~/x-tools/aarch64-rpi4-linux-gnu/. To use it, you must add its bin directory to your PATH.
export PATH="${HOME}/x-tools/aarch64-rpi4-linux-gnu/bin:${PATH}"
export CROSS_COMPILE=aarch64-rpi4-linux-gnu-

# Verify the installation
aarch64-rpi4-linux-gnu-gcc --version
This command should now execute your new cross-compiler, not the host’s native GCC.
Compiling U-Boot for the Raspberry Pi 5
With the toolchain ready, we can now compile the bootloader.
Build and Configuration Steps:
1. Clone the U-Boot source code:
git clone [https://github.com/u-boot/u-boot.git](https://github.com/u-boot/u-boot.git)
cd u-boot
2. Configure U-Boot for the Raspberry Pi:U-Boot contains default configurations for thousands of boards. We use the one appropriate for the 64-bit Raspberry Pi models.
make rpi_arm64_defconfig3. Compile U-Boot:The CROSS_COMPILE variable we set earlier tells the U-Boot build system to use our newly built toolchain.
makeu-boot.bin. This binary needs to be copied to the boot partition of the SD card. The Raspberry Pi boot process has specific filename requirements, so you will typically copy u-boot.bin to the SD card as kernel8.img or configure the boot firmware to load a differently named file.
Building the Linux Kernel
Next, we compile the engine of our system. We will use the official Raspberry Pi kernel source, which includes the necessary drivers and device tree files.
Build and Configuration Steps:
1. Clone the kernel source:
git clone --depth=1 [https://github.com/raspberrypi/linux.git](https://github.com/raspberrypi/linux.git)
cd linux
2. Configure the kernel:The kernel build system requires ARCH to be set to arm64. We will use the default configuration for the BCM2712 SoC used in the RPi 5.
KERNEL=kernel8
make ARCH=arm64 CROSS_COMPILE=aarch64-rpi4-linux-gnu- bcm2712_defconfig
3. Build the kernel image, modules, and device trees:
make ARCH=arm64 CROSS_COMPILE=aarch64-rpi4-linux-gnu- Image.gz modules dtbs -j$(nproc)
File Structure Examples:
The build process generates several critical outputs:
arch/arm64/boot/Image.gz: This is the compressed Linux kernel image. You will copy this to the SD card’s boot partition.arch/arm64/boot/dts/broadcom/*.dtb: These are the compiled device tree blobs. You will copy the relevant one for the RPi 5 (bcm2712-rpi-5-b.dtb) to the boot partition.- Kernel modules (
.kofiles): These must be installed into the root filesystem. You can install them into a temporary directory first:
mkdir -p ../rootfs_install/
make ARCH=arm64 CROSS_COMPILE=aarch64-rpi4-linux-gnu- modules_install INSTALL_MOD_PATH=../rootfs_install//lib/modules/ directory inside ../rootfs_install/ which you will later merge with your final root filesystem.
Creating a Minimal Root Filesystem with Buildroot
Buildroot is a fantastic tool that automates the entire process of creating a complete, custom root filesystem. It downloads, configures, and cross-compiles hundreds of open-source packages.
Build and Configuration Steps:
1. Download and configure Buildroot:
wget [https://buildroot.org/downloads/buildroot-2023.11.1.tar.gz](https://buildroot.org/downloads/buildroot-2023.11.1.tar.gz)
tar -xf buildroot-2023.11.1.tar.gz
cd buildroot-2023.11.1/
make raspberrypi5_defconfig
2. Customize the RootFS:Run make menuconfig. This text-based interface is incredibly powerful.
- Under
Toolchain, selectExternal toolchainand point it to the location of the toolchain we built with Crosstool-NG. - Under
Target packages, you can select which software to include. For a minimal system, ensureBusyBoxis enabled. You could also adddropbearfor a lightweight SSH server. - Under
System configuration, you can set the root password and change the hostname.
3. Build the RootFS:
makeFile Structure Examples:
After the build completes, the output/images/ directory will contain the generated RootFS.
rootfs.tar: This is a tarball of the entire root filesystem. You will extract this onto the root partition of your SD card.
Build, Flash, and Boot Procedures
flowchart TD
    subgraph "C. System Boot"
        direction TB
        C1[Insert SD Card & Power On] --> C2((Login Prompt!))
    end


    subgraph "B. Target Flashing"
        direction TB
        B1{"Partition SD Card<br><i>(Boot [FAT32], Root [ext4])</i>"}
        B2[Copy Boot Files<br><i>Firmware, U-Boot, Kernel, DTB</i>]
        B3[Extract RootFS Tarball]
        B4[Copy Kernel Modules to RootFS]
        B1 --> B2 & B3;
        B2 & B3 --> B4
    end

    subgraph "A. Host Development"
        direction TB
        A1["1- Build Toolchain<br><i>(Crosstool-NG)</i>"] --> A2["2- Build Bootloader<br><i>(U-Boot)</i>"]
        A2 --> A3["3- Build Kernel & DTB"]
        A3 --> A4["4- Build RootFS<br><i>(Buildroot)</i>"]
    end


    %% Styling
    style A1 fill:#0d9488,stroke:#0d9488,stroke-width:1px,color:#ffffff
    style A2 fill:#0d9488,stroke:#0d9488,stroke-width:1px,color:#ffffff
    style A3 fill:#0d9488,stroke:#0d9488,stroke-width:1px,color:#ffffff
    style A4 fill:#0d9488,stroke:#0d9488,stroke-width:1px,color:#ffffff
    style B1 fill:#f59e0b,stroke:#f59e0b,stroke-width:1px,color:#ffffff
    style B2 fill:#0d9488,stroke:#0d9488,stroke-width:1px,color:#ffffff
    style B3 fill:#0d9488,stroke:#0d9488,stroke-width:1px,color:#ffffff
    style B4 fill:#0d9488,stroke:#0d9488,stroke-width:1px,color:#ffffff
    style C1 fill:#1e3a8a,stroke:#1e3a8a,stroke-width:2px,color:#ffffff
    style C2 fill:#10b981,stroke:#10b981,stroke-width:2px,color:#ffffff
- Partition the SD Card: Create two partitions. The first should be a small (256MB) FAT32 partition for the boot files. The second should be an ext4 partition using the remaining space for the root filesystem.
- Copy Boot Files: Mount the FAT32 partition and copy:
- The Raspberry Pi boot firmware files (
start*.elf,fixup*.dat). - The U-Boot binary (
u-boot.bin). - The compiled kernel image (
Image.gz). - The compiled device tree blob (
bcm2712-rpi-5-b.dtb). - A
config.txtfile to configure the Pi firmware.
- The Raspberry Pi boot firmware files (
- Extract RootFS: Mount the ext4 partition and extract the root filesystem.
sudo tar -xf /path/to/buildroot/output/images/rootfs.tar -C /media/user/rootfs/Then, copy the kernel modules you built earlier into this filesystem:sudo cp -r /path/to/rootfs_install/lib/ /media/user/rootfs/ - Connect Serial Console and Boot:Connect a USB-to-serial adapter to the Raspberry Pi 5’s GPIO pins (Ground, TX, RX). Use a terminal emulator like minicom or screen to connect to the serial port (/dev/ttyUSB0 at 115200 baud). Insert the SD card and power on the device. You should see output first from U-Boot, then the Linux kernel decompression message, followed by a flood of kernel boot messages, and finally, a login prompt from your new custom embedded Linux system.
Common Mistakes & Troubleshooting
Building a custom Linux system from components is a rewarding but challenging process. Many subtle issues can arise from the complex interplay between the toolchain, bootloader, kernel, and RootFS. Here are some of the most common pitfalls developers encounter.
Exercises
These exercises are designed to reinforce the concepts covered in this chapter by having you modify and rebuild key components of the system.
- Customizing the RootFS with a New Package: Your first task is to add a new command-line tool to your system.
- Objective: Add the
htopprocess monitoring utility to your Buildroot-generated root filesystem. - Steps:
- Navigate to your Buildroot directory and run
make menuconfig. - Go to
Target packages->Debugging, profiling and benchmark. - Select the
htoppackage by pressing the spacebar. - Save the configuration and exit.
- Run
maketo rebuild the root filesystem. This will be much faster than the first build, as Buildroot will only build the new package.
- Navigate to your Buildroot directory and run
- Verification: Deploy your new
rootfs.tarto the SD card. Boot the Raspberry Pi 5, log in, and typehtop. The interactive process monitor should appear.
- Objective: Add the
- Modifying the Kernel Configuration: In this exercise, you will enable a kernel feature that is not included in the default configuration.
- Objective: Enable the “GPIO character device” driver to allow direct user-space access to GPIO pins via
/dev/gpiochip*. - Steps:
- Navigate to your Linux kernel source directory.
- Run
make ARCH=arm64 CROSS_COMPILE=aarch64-rpi4-linux-gnu- menuconfig. - Go to
Device Drivers->GPIO Support. - Enable
Memory-mapped GPIO driversand then selectGPIO character device. - Save the new configuration and exit.
- Rebuild the kernel image with
make ARCH=arm64 ... Image.gz.
- Verification: Copy the new
Image.gzto your boot partition. Boot the device and runls /dev. You should now see new devices listed, such asgpiochip0,gpiochip1, etc.
- Objective: Enable the “GPIO character device” driver to allow direct user-space access to GPIO pins via
- The Full-Circle Test: Cross-Compiling a “Hello World” Application: This final exercise proves the entire toolchain and system integration works by compiling a program on your host and running it on the target.
- Objective: Write, cross-compile, and run a simple C application on your custom embedded Linux system.
- Code Snippet (
hello.c):#include <stdio.h> #include <unistd.h> int main() { printf("Hello from the cross-compiled world!\n"); printf("I am running on a custom-built Linux system.\n"); return 0; } - Steps:
- On your host machine, compile the program using your cross-compiler:
aarch64-rpi4-linux-gnu-gcc hello.c -o hello - Use the
filecommand to verify the binary:file hello. The output should say it’s forAArch64. - Mount the SD card’s root partition on your host and copy the
helloexecutable to the/bindirectory.
- On your host machine, compile the program using your cross-compiler:
- Verification: Boot the Raspberry Pi 5. At the command prompt, type
hello. The program should execute and print the “Hello, world!” message to your console.
Summary
This chapter has deconstructed the embedded Linux system into its four essential pillars, revealing the intricate process of building a system from source. The key takeaways form the foundation for all advanced embedded Linux work.
- Four Core Components: A functioning embedded Linux system is an integration of a Toolchain, Bootloader, Kernel, and Root Filesystem.
- Cross-Compilation is Essential: Development for embedded targets is performed on a powerful host machine using a cross-compilation toolchain that generates code for the target architecture.
- The Boot Sequence: The system boots in stages, from the on-chip Boot ROM to the U-Boot bootloader, which initializes hardware before loading and running the Linux Kernel.
- Kernel as the Core Manager: The kernel acts as the master controller for all hardware, managing memory, scheduling processes, and providing a stable API to user space through system calls and device drivers.
- The Device Tree’s Role: The Device Tree is a critical data structure that describes the hardware to the kernel, allowing a single kernel image to support multiple boards.
- RootFS Provides the Personality: The root filesystem contains all the user-space applications, libraries, and scripts, including the pivotal
initprocess, which defines what the system actually does. - Automation is Key: Tools like Crosstool-NG and Buildroot are indispensable for managing the complexity of building and integrating these components into a cohesive system.
Further Reading
- The Buildroot Manual: The official and comprehensive documentation for the Buildroot build system. Essential for customizing your root filesystem. (https://buildroot.org/docs.html)
- U-Boot Documentation: The official source for U-Boot documentation, covering configuration, commands, and development. (https://u-boot.readthedocs.io/en/latest/)
- The Linux Kernel Documentation: The definitive, albeit massive, source of information on the Linux kernel’s internals, APIs, and configuration options. (https://www.kernel.org/doc/html/latest/)
- Mastering Embedded Linux Programming, 3rd Edition by Chris Simmonds: An excellent and highly respected book that covers these topics and more in great practical detail.
- Bootlin Blog and Technical Presentations: An outstanding resource for high-quality technical articles, conference papers, and training materials on embedded Linux development. (https://bootlin.com/blog/)
- Raspberry Pi Hardware Documentation: The official documentation from the Raspberry Pi Foundation, providing hardware specifics necessary for low-level development. (https://www.raspberrypi.com/documentation/)
- The Yocto Project Mega-Manual: While we used Buildroot, the Yocto Project is another powerful, industry-standard build system. Its documentation provides an alternative perspective on system building. (https://docs.yoctoproject.org)
