
Chapter 97: Configuring U-Boot for RPi 5: Using defconfig and menuconfig
Chapter Objectives
Upon completing this chapter, you will be able to:
- Understand the role of the Kconfig system in U-Boot and its relationship with
defconfigandmenuconfig. - Establish a cross-compilation toolchain and environment for building the U-Boot bootloader for the ARM64 architecture.
- Generate a default U-Boot configuration for the Raspberry Pi 5 using the provided
defconfigfile. - Navigate the
menuconfiginterface to explore, enable, and disable specific U-Boot features and commands. - Build a custom U-Boot binary from a modified configuration and understand the key output artifacts.
- Deploy and test a custom-built U-Boot on a Raspberry Pi 5, verifying the new configuration via the serial console.
Introduction
In our journey through the embedded Linux ecosystem, we have established that the bootloader is the critical first stage of software that prepares the hardware and launches the Linux kernel. While a pre-compiled bootloader is often sufficient for initial prototypes, the true power of embedded systems development lies in customization—tailoring every component to meet the precise requirements of a product. The Das U-Boot bootloader, a veritable Swiss Army knife for embedded systems, is no exception. Its immense flexibility is both a strength and a challenge; with thousands of possible configuration options, how does a developer create a bootloader that is lean, secure, and perfectly suited for a specific target like the Raspberry Pi 5?
This chapter delves into the heart of U-Boot customization: the configuration system. We will move beyond using pre-built binaries and learn how to shape U-Boot to our will. The process is not one of writing code from scratch, but rather of making informed selections from a vast menu of features. We will explore the powerful Kconfig infrastructure—the same system used by the Linux kernel—to manage this complexity. Through hands-on examples focused on the Raspberry Pi 5, you will learn to use defconfig to establish a sane baseline and menuconfig to interactively sculpt the final binary. By the end of this chapter, you will have transformed U-Boot from a black box into a transparent, configurable tool, empowering you to build more efficient and specialized embedded systems.
Technical Background
At its core, the task of configuring a large, modular software project like U-Boot or the Linux kernel is a significant engineering challenge. The source code contains support for hundreds of different processor architectures, device drivers for thousands of peripherals, and a wide array of features like networking stacks, file system support, and command-line utilities. Compiling all of this code into a single binary would result in a bloated, slow, and inefficient program, entirely unsuitable for the resource-constrained world of embedded systems. The central problem, therefore, is how to selectively include only the code necessary for a specific hardware target and its intended application.
The Kconfig and Kbuild Philosophy
The solution adopted by U-Boot and the Linux kernel is a sophisticated build system often referred to as Kbuild, with its configuration counterpart known as Kconfig. This system elegantly separates the what from the how. The Kconfig system is responsible for defining what features are available and managing their dependencies, while the Kbuild system (driven by Makefiles) interprets the configuration to determine how the source code should be compiled and linked.
Imagine building a custom computer. You don’t start by soldering components randomly. Instead, you begin with a list of choices: which CPU, how much RAM, which graphics card, etc. Your choices are constrained by dependencies; a certain CPU requires a specific motherboard socket, and a high-end graphics card might require a more powerful power supply. Kconfig provides this exact framework for software. It is a language and a set of tools for creating and managing configuration options, which are presented to the developer through interfaces like the text-based menuconfig.
Each configurable option within the source tree is defined in a Kconfig file. These files are distributed throughout the source directories, typically alongside the code they configure. For example, the drivers/gpio/Kconfig file will contain definitions for GPIO-related drivers and features. These files define symbols, their data types (boolean, string, integer), default values, and dependencies on other symbols. A typical entry might look like this:
config CMD_GPIO
    bool "Enable GPIO command"
    depends on DM_GPIO
    help
      This enables the 'gpio' command, which allows for direct
      manipulation and inspection of GPIO lines from the U-Boot
      console. This is useful for hardware bring-up and debugging.
      It requires the Driver Model for GPIO to be enabled.
This snippet defines a boolean symbol named CONFIG_CMD_GPIO. It presents the user with the prompt “Enable GPIO command”. Crucially, it declares a dependency (depends on DM_GPIO), meaning this option will only be available for selection if the symbol CONFIG_DM_GPIO is already enabled. This dependency management is the cornerstone of Kconfig’s power, preventing developers from creating invalid or nonsensical configurations.
From Configuration Choice to Compiled Code
When a developer makes a choice using an interface like menuconfig, the result is stored in a central file named .config at the root of the source tree. This file is a simple text file containing a list of all the selected Kconfig symbols and their assigned values. For example, if the GPIO command were enabled, the .config file would contain the line:
CONFIG_CMD_GPIO=y
If it were disabled, it would be commented out or absent. This .config file is the master build recipe for this specific compilation.

The Kbuild system then takes over. As the Makefiles traverse the source tree to compile the code, they consult the .config file. The magic that links the configuration to the C code is the C preprocessor. The Kconfig symbols are translated directly into preprocessor macros. The line CONFIG_CMD_GPIO=y in the .config file causes the build system to pass a flag to the compiler equivalent to #define CONFIG_CMD_GPIO 1.
Within the C source code, developers use #ifdef directives to conditionally compile blocks of code. For instance, the code that implements the GPIO command would be wrapped as follows:
#ifdef CONFIG_CMD_GPIO

// ... C code for the GPIO command implementation ...

U_BOOT_CMD(
    gpio,   3,  1,  do_gpio,
    "sub-system for GPIO",
    "<input|set|clear|toggle> <pin>"
);

#endif /* CONFIG_CMD_GPIO */
If CONFIG_CMD_GPIO is defined (because it was set to y in .config), the preprocessor includes this entire block of code in the compilation unit. If it is not defined, the preprocessor effectively discards it, and it never becomes part of the final binary. This mechanism, repeated thousands of times across the entire source tree, is how the final bootloader image is precisely tailored from the vast library of available source code.
graph TD
subgraph "1. Configuration Phase"
A[/"Kconfig Files (Distributed in source tree)"/] --> B{menuconfig Tool};
C["User (Developer)"] -- "Selects features" --> B;
B -- "Saves choices" --> D[/".config file (Build Recipe)"/];
end

subgraph "2. Build Phase"
    D --> E{"Kbuild System (Makefiles)"};
    F[("U-Boot C Source Code with<br>#ifdef CONFIG_... directives")] --> E;
    E -- "Conditionally compiles code" --> G[("u-boot.bin (Final Binary)")];
end

%% Styling
style A fill:#0d9488,stroke:#0d9488,stroke-width:1px,color:#ffffff
style B fill:#f59e0b,stroke:#f59e0b,stroke-width:1px,color:#ffffff
style C fill:#1e3a8a,stroke:#1e3a8a,stroke-width:2px,color:#ffffff
style D fill:#8b5cf6,stroke:#8b5cf6,stroke-width:1px,color:#ffffff
style E fill:#f59e0b,stroke:#f59e0b,stroke-width:1px,color:#ffffff
style F fill:#0d9488,stroke:#0d9488,stroke-width:1px,color:#ffffff
style G fill:#10b981,stroke:#10b981,stroke-width:2px,color:#ffffff
Managing Complexity: defconfig
While menuconfig provides a powerful way to customize a build, starting from a blank slate would be an overwhelming task. A developer would have to answer thousands of questions about hardware specifics and desired features. To solve this, U-Boot provides a set of default configurations, or defconfig files, which serve as pre-packaged, known-good starting points for specific boards.
A defconfig file is essentially a minimal .config file. It doesn’t contain every single option, but rather just the essential symbols required to produce a functional bootloader for a particular piece of hardware. These files are stored in the configs/ directory. For the Raspberry Pi 5, the relevant file is rpi_5_defconfig.
When a developer runs a command like make rpi_5_defconfig, the Kconfig system performs two key actions. First, it reads the specified configs/rpi_5_defconfig file to get the board-specific baseline. Second, it processes all the Kconfig files throughout the source tree, calculates all the dependencies based on that baseline, and sets default values for any unspecified options. The final, complete configuration is then written to the main .config file. This process transforms a minimal set of key choices into a fully specified build recipe, ready for either immediate compilation or further customization via menuconfig.
graph TD
A["<b>Start:</b>


User runs make rpi_5_defconfig"] --> B{Kconfig System};
C[/"configs/rpi_5_defconfig


<i>(Minimal board-specific config)</i>"/] --> B;
D[/"All other Kconfig files


<i>(Defines all possible options & dependencies)</i>"/] --> B;
B -- "1. Reads baseline from defconfig


2. Scans all Kconfig files


3. Resolves dependencies


4. Sets defaults for unspecified options" --> E[/".config


<i>(Complete, fully-expanded build recipe)</i>"/];
E --> F["<b>Ready for:</b>


make (to build)


<i>or</i>


make menuconfig (to customize)"];

%% Styling
style A fill:#1e3a8a,stroke:#1e3a8a,stroke-width:2px,color:#ffffff
style B fill:#f59e0b,stroke:#f59e0b,stroke-width:1px,color:#ffffff
style C fill:#0d9488,stroke:#0d9488,stroke-width:1px,color:#ffffff
style D fill:#0d9488,stroke:#0d9488,stroke-width:1px,color:#ffffff
style E fill:#8b5cf6,stroke:#8b5cf6,stroke-width:1px,color:#ffffff
style F fill:#10b981,stroke:#10b981,stroke-width:2px,color:#ffffff
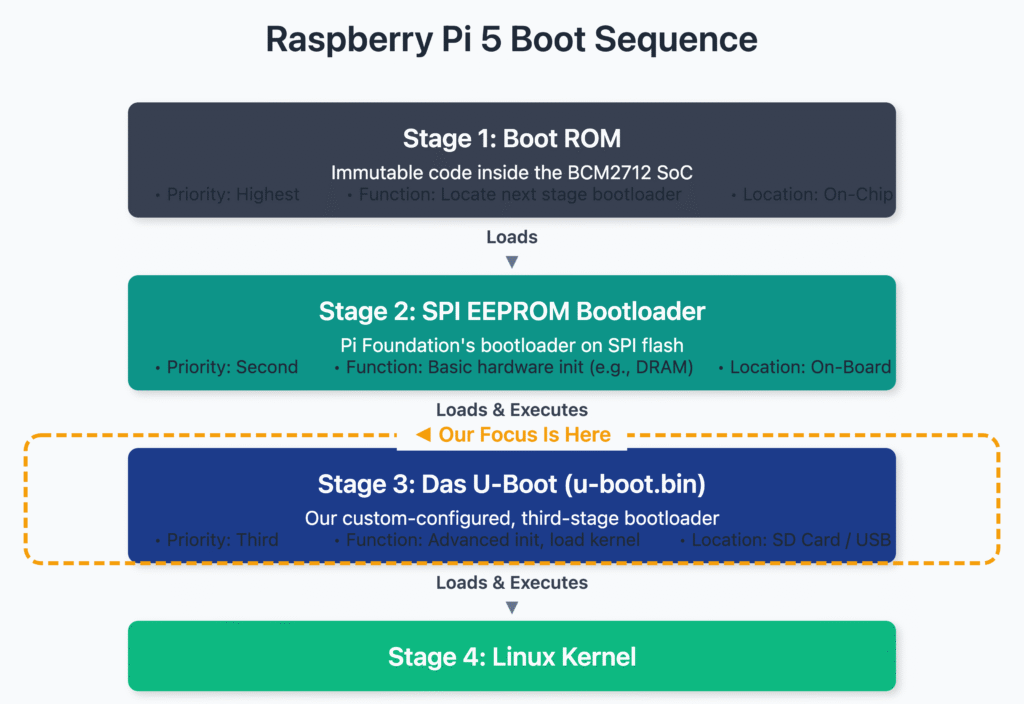
The Raspberry Pi 5 Boot Process Context
Understanding how to configure U-Boot for the Raspberry Pi 5 also requires understanding where it fits into the device’s boot sequence. Unlike many embedded systems where U-Boot is the very first piece of code to run from flash, the Raspberry Pi has a more complex, multi-stage process.
- Boot ROM (SoC Internal): The very first code to execute is burned into the BCM2712 System-on-Chip (SoC) itself. This immutable code’s primary job is to locate the next boot stage.
- SPI EEPROM Bootloader: The Raspberry Pi 5 has an onboard SPI flash memory chip that contains a second-stage bootloader provided by the Raspberry Pi Foundation. This bootloader is responsible for basic hardware initialization, including setting up DRAM. It then looks for the third-stage bootloader (in our case, U-Boot) on a configured boot medium, typically an SD card or USB drive.
- U-Boot: The SPI bootloader loads the U-Boot binary (e.g.,
u-boot.bin) into RAM and transfers execution to it. - Linux Kernel: U-Boot then takes over, performing more advanced hardware initialization, potentially loading a device tree blob, and finally loading and executing the Linux kernel image.
Our configuration efforts are focused entirely on the third stage. We are building the u-boot.bin binary that the Raspberry Pi’s own bootloader will execute. This context is important because it means some very low-level hardware initialization (like DRAM setup) is already handled for us, and our U-Boot configuration can focus on higher-level tasks like setting up network interfaces, managing storage devices, and defining the kernel boot procedure. The rpi_5_defconfig file encapsulates this knowledge, providing a configuration that is aware of the boot environment it will be operating in. By modifying this defconfig, we are fine-tuning this crucial third stage to add features or optimize its behavior for our specific application.
Practical Examples
Theory provides the foundation, but true understanding is forged through practice. In this section, we will walk through the complete, end-to-end process of configuring and building a custom U-Boot image for the Raspberry Pi 5. We will start by setting up the development environment, then create a default build, modify it using menuconfig, and finally deploy and test our changes on the hardware.
Tip: Before proceeding, ensure you have a working Linux development environment (a native installation or a virtual machine) with standard build tools like
make,gcc,bison, andflexinstalled. For Debian/Ubuntu-based systems, this can be done withsudo apt-get install build-essential bison flex.
Step 1: Setting Up the Toolchain and Source Code
The Raspberry Pi 5 uses a 64-bit ARM processor (ARMv8 architecture, or AArch64). Our development host is likely an x86_64 machine. Therefore, we cannot use our host’s native compiler (gcc) to build U-Boot for the Pi. We must use a cross-compiler—a special compiler that runs on our host but generates machine code for a different target architecture.
First, we will install a pre-built AArch64 cross-compiler.
# On Debian/Ubuntu systems, the GCC toolchain for AArch64 is readily available
sudo apt-get update
sudo apt-get install gcc-aarch64-linux-gnu
Next, we need to get the U-Boot source code. We will clone it directly from the official Git repository.
# Clone the U-Boot repository
git clone [https://source.denx.de/u-boot/u-boot.git](https://source.denx.de/u-boot/u-boot.git)
cd u-boot

# It's good practice to check out a specific, stable version for reproducibility
git checkout v2024.04 -b rpi5_lab
Now, we must set up our shell environment to use the cross-compiler for all subsequent make commands. This is done by exporting two key environment variables: ARCH specifies the target architecture, and CROSS_COMPILE provides the prefix for the toolchain executables (like gcc, ld, etc.).
# Set environment variables for cross-compilation
export ARCH=arm64
export CROSS_COMPILE=aarch64-linux-gnu-

# Verify the cross-compiler is in our PATH and accessible
aarch64-linux-gnu-gcc --version
The version command should execute without error, displaying the compiler’s version information. Your shell session is now configured for cross-compiling U-Boot.
Step 2: Creating the Default Configuration
With the environment prepared, our next step is to generate the default configuration for the Raspberry Pi 5. As discussed in the technical background, this is achieved by invoking make with the name of the board’s defconfig file.
# Clean the source tree of any previous build artifacts
make mrproper

# Generate the default configuration for the Raspberry Pi 5
make rpi_5_defconfig
You will see output indicating that a new .config file has been created. Let’s inspect the first few lines of this generated file.
# View the top of the generated .config file
head .config
The output will look something like this:
#
# Automatically generated file; DO NOT EDIT.
# U-Boot 2024.04 Configuration
#
CONFIG_ARM=y
CONFIG_ARCH_BCM2712=y
CONFIG_SYS_TEXT_BASE=0x00080000
# ... and so on
This file is the complete recipe for our build. It was generated by taking the configs/rpi_5_defconfig as a base and expanding it with all the necessary dependencies and default values.
At this point, we could build a functional, standard U-Boot image by simply running make. However, our goal is to customize it.
Step 3: Customizing with menuconfig
Let’s imagine our embedded project requires us to interact with an I2C sensor from the U-Boot command line for factory testing or diagnostics. The default rpi_5_defconfig might not have the I2C command utilities enabled to save space. We will now use menuconfig to enable them.
Launch the menuconfig interface:
make menuconfig
You will be presented with a text-based, navigable menu. Use the arrow keys to move, Enter to descend into a submenu, Esc Esc to go back, and the spacebar to toggle options. The ? key provides help for the currently highlighted item.
Our goal is to enable the I2C command. We can navigate to it through the menu structure:
- Navigate to Command line interface —> and press
Enter. - Scroll down to I2C support —> and press
Enter. - Highlight the option
[*] i2c - I2C sub-systemand press the spacebar until a*appears inside the brackets[*]. This enables the I2C command group.
Tip: If you don’t know where an option is located, you can use the search function. Press the
/key and type a search term, likeI2C_CMD. The search results will show you the location of the symbol and its dependencies.
After enabling the I2C command, we must save our changes.
- Press
Esc Escrepeatedly until you are at the main menu. - Navigate to
< Save >and pressEnter. - Confirm the default filename
.configby pressingEnteragain. - Navigate to
< Exit >and pressEnterto closemenuconfig.
The .config file on disk has now been updated with our selection. We can verify this using the diff command to compare the current .config with the original default. To do this, we first need a copy of the original.
# Save the current, modified .config
mv .config .config-with-i2c

# Regenerate the original default config
make rpi_5_defconfig

# Compare the original with our modified version
diff .config .config-with-i2c
The output will clearly show the line CONFIG_CMD_I2C=y has been added, along with any dependencies that were automatically enabled. After this verification, restore your modified config: mv .config-with-i2c .config.
Step 4: Building the U-Boot Binary
With our custom configuration in place, we are ready to compile. The build process is initiated with a single make command. This can take a few minutes, depending on the performance of your host machine.
# Build U-Boot. The -j flag allows parallel compilation.
# Use a number equivalent to or slightly more than your CPU core count.
make -j$(nproc)
As the build progresses, you will see the compiler being invoked on various C files. If the build completes successfully, the final binaries will be placed at the root of the U-Boot source tree. The most important file for our purposes is u-boot.bin. This is the raw, executable U-Boot image that the Raspberry Pi bootloader will load.
Step 5: Deploying and Testing on Raspberry Pi 5
Now we need to deploy our custom u-boot.bin to an SD card. This requires an SD card that is already prepared with the Raspberry Pi bootloader files.
Warning: These steps will modify the boot process of your Raspberry Pi. It is highly recommended to use a separate SD card for development to avoid rendering your primary Raspberry Pi OS installation unbootable. You will also need a USB-to-TTL serial adapter to view the U-Boot console. Connect the adapter’s RX to the Pi’s TX (GPIO14) and TX to the Pi’s RX (GPIO15), and GND to a GND pin.
- Prepare the SD Card: Use the Raspberry Pi Imager to flash a minimal image like “Raspberry Pi OS Lite (64-bit)”. This will create a FAT32 boot partition with the necessary firmware files (
start4.elf,fixup4.dat, etc.). - Copy U-Boot Binary: Mount the boot partition of the SD card on your host machine. Copy your custom
u-boot.binfile to this partition. - Configure the Pi Firmware: On the same boot partition, open the
config.txtfile in a text editor. We need to tell the Raspberry Pi’s native bootloader to load our U-Boot binary instead of the Linux kernel directly. Add the following line to the end ofconfig.txt:# Load U-Boot as the kernel kernel=u-boot.bin - Boot and Connect: Safely eject the SD card, insert it into the Raspberry Pi 5, and power it on. Connect to the serial console using a tool like
minicomorscreen, configured for the appropriate serial port (e.g.,/dev/ttyUSB0) with a baud rate of 115200.# Connect to the serial console using minicomsudo minicom -b 115200 -o -D /dev/ttyUSB0
If everything was successful, you will see U-Boot’s initialization messages printed to the console, culminating in the U-Boot prompt:
U-Boot 2024.04 (Apr 15 2024 - 12:30:00 -0000)

DRAM:  4 GiB
RPI 5 Model B
...
Hit any key to stop autoboot:  0
U-Boot>
Now for the moment of truth. Type help at the prompt and look for our newly enabled command. You should see i2c listed among the available commands. Typing i2c itself will show the usage information for the command, confirming that our customization was successfully compiled, deployed, and is now running on the target hardware. You have successfully completed a full configure-build-deploy cycle.
Common Mistakes & Troubleshooting
The path to a custom bootloader is often paved with small but frustrating hurdles. Understanding common pitfalls can save hours of debugging. Here are some of the most frequent issues encountered during U-Boot configuration and compilation.
Exercises
These exercises are designed to reinforce the concepts presented in this chapter and build your confidence in working with the U-Boot configuration system.
- Exploring
menuconfig:- Objective: Learn to navigate and search within
menuconfigwithout making changes. - Task: Start
menuconfigfor therpi_5_defconfig. Use the search function (/) to find the symbolCONFIG_BOOTCOMMAND. Note its location, its type, and its default value. What other configuration options does it depend on? Exit without saving any changes. - Verification: You should be able to state the default boot command string and the menu path to find this option.
- Objective: Learn to navigate and search within
- Enabling the GPIO Command:
- Objective: Perform a simple modification, build, and deploy cycle.
- Task: Starting with a clean
rpi_5_defconfig, usemenuconfigto enable the GPIO command (CONFIG_CMD_GPIO). Note any new dependencies that are automatically selected. Save the configuration, build theu-boot.binimage, deploy it to your Raspberry Pi 5, and verify that thegpiocommand is available in the U-Boot shell. - Verification: The
helpcommand in the U-Boot console should listgpio, and typinggpioshould print its usage instructions.
- Changing the Console Baud Rate:
- Objective: Modify a core U-Boot setting and adapt your tools to match.
- Task: The default serial console baud rate for the Raspberry Pi 5 in U-Boot is 115200. Find the relevant configuration option in
menuconfig(Hint: search forBAUDRATE) and change it to9600. Rebuild, deploy, and attempt to connect. - Verification: Your serial client (
minicom,screen, etc.) will only show readable text when you change its configuration to match the new baud rate of 9600.
- Customizing the Boot Command:
- Objective: Modify the default boot behavior of U-Boot.
- Task: The
CONFIG_BOOTCOMMANDdetermines what U-Boot does when its boot delay expires. Modify this string to first print a custom message, wait for 3 seconds, and then proceed with the original boot command. For example:echo "Starting Custom Boot..."; sleep 3; mmc dev ${mmc_dev}; if mmc rescan; then .... Rebuild and deploy. - Verification: When the Pi boots, you should see your custom message printed to the serial console before the kernel loading process begins.
- Creating a Custom
defconfig:- Objective: Learn how to manage and version-control your own custom configurations.
- Task: After making several changes (e.g., enabling GPIO, I2C, and the custom boot command), save a snapshot of your current
.configas a newdefconfigfile. U-Boot provides asavedefconfigtarget for this. Runmake savedefconfig. This will create a minimaldefconfigfile in the root directory. Rename this file tomy_rpi5_defconfigand move it into theconfigs/directory. Now, runmake mrproper, thenmake my_rpi5_defconfig. Compare the resulting.configwith the one you started with to ensure they are identical. - Verification: Building U-Boot from your new
my_rpi5_defconfigshould produce a binary with all your custom features enabled.
Summary
This chapter provided a deep dive into the powerful Kconfig system used to customize the U-Boot bootloader. We have transitioned from simply using a bootloader to actively shaping its functionality to meet specific project needs.
- Kconfig is the Framework: We learned that U-Boot’s configuration is managed by the Kconfig system, which defines a universe of selectable features, options, and their inter-dependencies.
defconfigis the Starting Point: Default configurations, likerpi_5_defconfig, provide a validated, hardware-specific baseline, saving developers from the overwhelming task of starting from scratch.menuconfigis the Tool: Themenuconfigutility offers an interactive, text-based interface to safely navigate the Kconfig tree, enabling or disabling features while automatically handling dependencies.- Configuration Translates to Code: Choices made in
menuconfigare saved to a.configfile. The build system uses this file to define C preprocessor macros, which in turn control the conditional compilation of source code, ensuring only the desired features are included in the final binary. - The Cycle is Key: The embedded development workflow of configure, build, deploy, and test is fundamental. Mastering this cycle is essential for efficient and iterative development.
By successfully building and deploying a U-Boot image with custom commands, you have gained a critical skill in embedded Linux development. This ability to tailor core system components is what distinguishes a bespoke embedded product from a generic single-board computer setup. In subsequent chapters, we will apply this same philosophy to the Linux kernel itself.
Further Reading
- U-Boot Documentation – README: The top-level README file in the U-Boot source tree. It is the authoritative starting point for understanding the U-Boot project, its structure, and build process. (Available in the cloned Git repository).
- Kconfig Language Documentation: The official documentation for the Kconfig language syntax, maintained as part of the Linux kernel source. Since U-Boot uses the same system, this is the definitive reference.
https://www.kernel.org/doc/html/latest/kbuild/kconfig-language.html - Raspberry Pi 5 Documentation – Bootloader: The official documentation from the Raspberry Pi Foundation explaining the boot process and the role of the EEPROM bootloader.
https://www.raspberrypi.com/documentation/computers/raspberry-pi.html#raspberry-pi-bootloader-configuration - Embedded Linux Primer: A Practical Real-World Approach by Christopher Hallinan. A classic textbook that provides an excellent overview of the entire embedded Linux system, including a solid chapter on bootloaders.
- Mastering Embedded Linux Programming, Third Edition by Chris Simmonds. This book offers in-depth, practical guidance on building and customizing all components of an embedded Linux system, with excellent coverage of build systems and toolchains.
- DENX Software Engineering – Das U-Boot: The official homepage for the U-Boot project, providing access to mailing lists, release information, and additional project resources.
https://www.denx.de/wiki/U-Boot/
