
Chapter 98: Building U-Boot: Compilation Process and Output Artifacts
Chapter Objectives
Upon completing this chapter, students will be able to:
- Understand the role of a bootloader in an embedded Linux system and its specific function within the Raspberry Pi 5 boot sequence.
- Configure a cross-compilation toolchain and environment for building ARM64 software on an x86 host machine.
- Compile the Das U-Boot source code from scratch using the appropriate board configuration for the Raspberry Pi 5.
- Analyze and identify the purpose of the key binary artifacts generated during the U-Boot build process, such as
u-boot.binand device tree blobs. - Implement basic customizations to the U-Boot configuration using
menuconfigand understand the impact of these changes. - Debug common issues encountered during the cross-compilation and configuration process.
Introduction
In the intricate dance of an embedded system coming to life, the bootloader performs the opening steps. It is the critical bridge between the moment power is applied to the hardware and the instant the powerful, complex Linux kernel takes control. Before memory management, process scheduling, or filesystems exist, the bootloader must perform the foundational tasks of initializing the hardware, setting up memory, and loading the operating system kernel into a known location. For many embedded systems, including the versatile Raspberry Pi 5, Das U-Boot (The Universal Bootloader) has become the de facto standard for this task due to its power, flexibility, and extensive hardware support.
This chapter delves into the practical process of building U-Boot from its source code, specifically targeting the Raspberry Pi 5. While a pre-compiled binary might suffice for a hobbyist project, a professional embedded developer must understand how this critical software component is constructed. This knowledge is essential for customizing boot behavior, optimizing boot time, adding support for new hardware peripherals, or enabling security features. We will journey from the theoretical underpinnings of the Raspberry Pi 5’s boot sequence and the necessity of cross-compilation to the hands-on steps of configuring the build environment, compiling the source, and dissecting the resulting binary files. By the end of this chapter, you will have transformed the abstract concept of a bootloader into a tangible set of artifacts that you have built and understood, laying a crucial foundation for advanced kernel and system development.
Technical Background
The Journey from Power-On to Kernel Execution
When an embedded processor is powered on, it is a blank slate. It has no concept of a filesystem, a network stack, or even a console to print messages. Its first action is to execute a small piece of code stored in a non-volatile, on-chip memory, often referred to as a Boot ROM. This initial code is immutable, programmed by the silicon vendor, and its primary job is to find the next stage of the boot process from a supported boot medium, such as an SD card, eMMC flash, or a USB device. This is where the bootloader’s role begins.
The bootloader’s responsibilities can be extensive. It must first perform low-level hardware initialization. This includes configuring the system’s clock signals to run the processor at its correct speed, initializing the DRAM controller, and setting up the RAM so that it can be used. Without this crucial step, there would be no main memory available to load the Linux kernel into. Following memory initialization, the bootloader typically sets up a serial console (UART), providing the first point of interaction and diagnostic output for a developer. Finally, its primary objective is to locate the Linux kernel image, along with a hardware description known as a Device Tree Blob (DTB) and an optional initial RAM disk (initrd), load them from the storage medium into RAM, and then execute the kernel, passing control of the system to the operating system.
A Deeper Look at the Raspberry Pi 5 Boot Process
The Raspberry Pi 5 introduces a more sophisticated boot process compared to its predecessors, aligning it more closely with enterprise-grade server architectures. The initial code executed by the Broadcom BCM2712 processor’s Boot ROM now looks for a collection of firmware binaries that constitute the bootloader. This multi-stage process enhances flexibility and security.
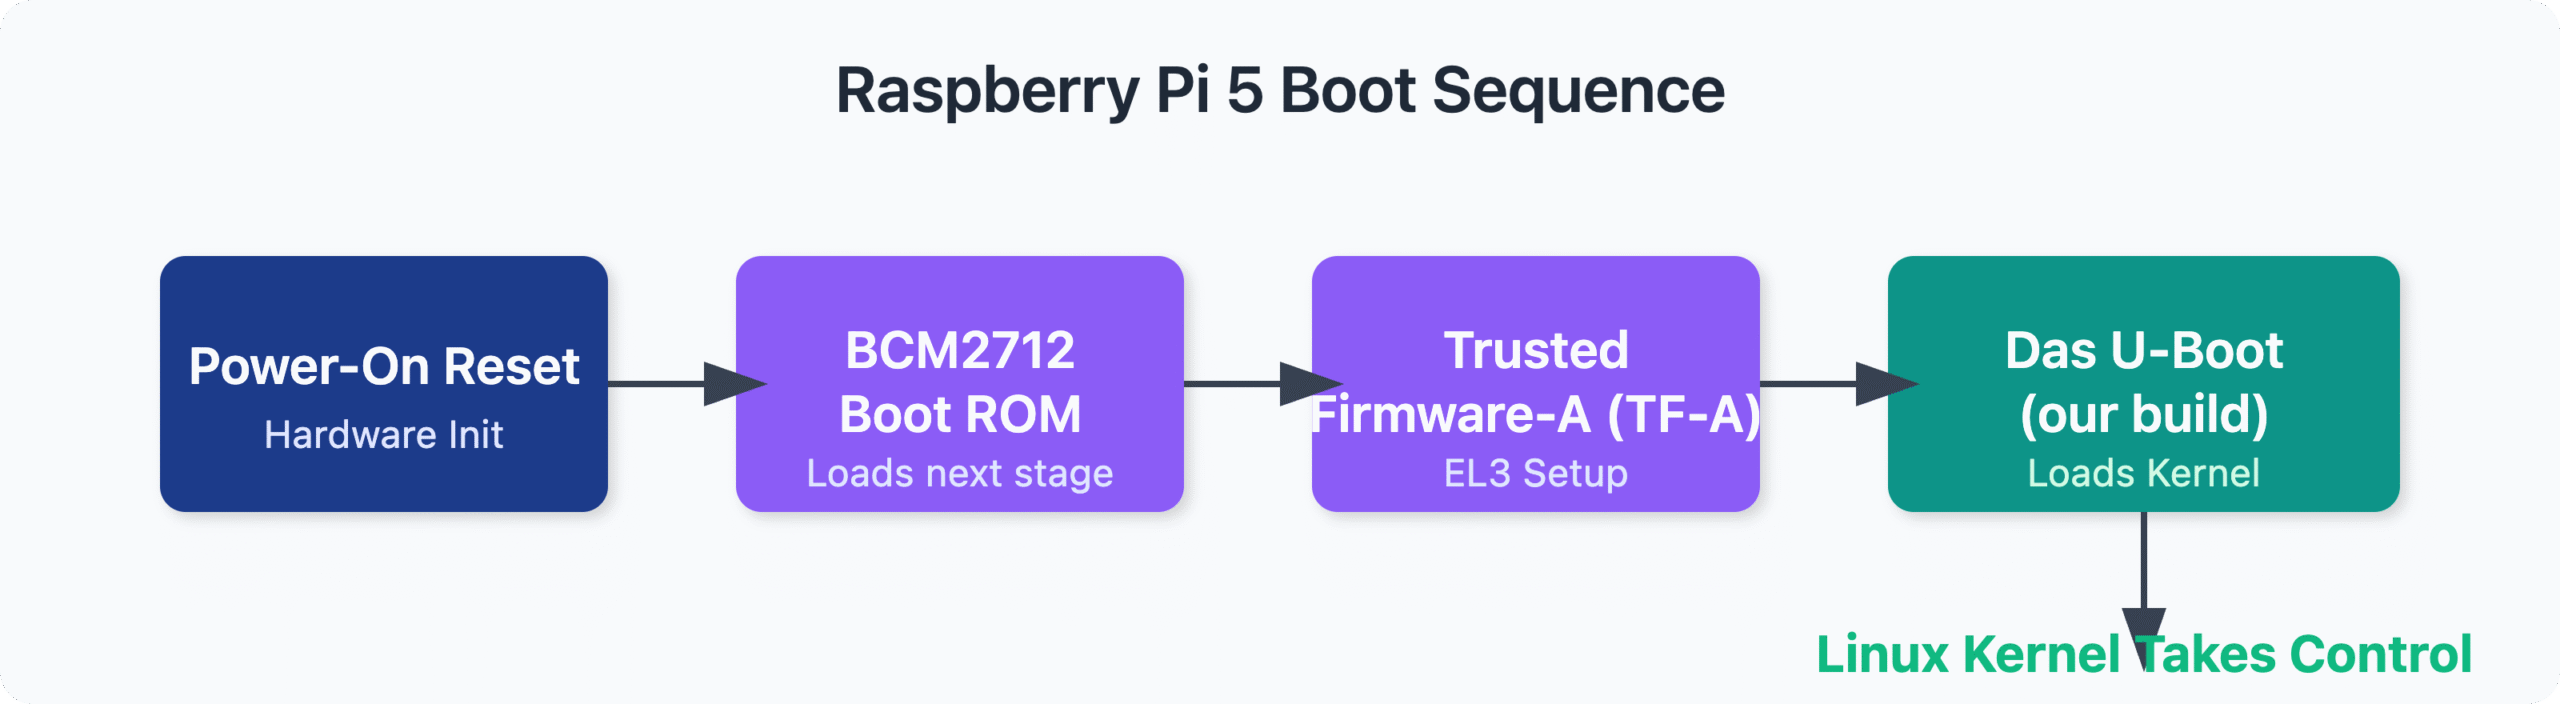
The first component loaded is Trusted Firmware-A (TF-A), an ARM-mandated reference implementation of secure world software. TF-A is responsible for establishing different exception levels (ELs), which are hardware-enforced privilege levels. It sets up the secure monitor at EL3, the highest privilege level, which manages the boundary between the secure and non-secure worlds. This architecture is fundamental for security features like secure boot.
Once TF-A has established the secure environment, it is responsible for loading and executing the main bootloader, which in our case is U-Boot, at a lower privilege level (typically EL2). U-Boot then performs the traditional bootloader tasks: it initializes peripherals not handled by the earlier stages, provides an interactive command-line shell over the serial console for debugging and manual control, and ultimately loads the Linux kernel. This layered approach—Boot ROM to TF-A to U-Boot to Linux—allows each component to specialize. TF-A focuses on security and processor architecture setup, while U-Boot focuses on boot flexibility, device drivers for various storage media, and kernel loading.
The Imperative of Cross-Compilation
Embedded devices like the Raspberry Pi 5 run on processors with a different architecture (ARM AArch64) than the typical developer workstation (x86-64). It is impractical and inefficient to compile large software projects like U-Boot or the Linux kernel on the target device itself. The target often has limited processing power, memory, and storage, making the compilation process extremely slow or even impossible.
The solution is cross-compilation. This is the process of using a compiler on one machine (the host) to generate executable code for a different machine architecture (the target). To accomplish this, we use a specialized set of tools—including a compiler, assembler, linker, and C library—collectively known as a toolchain. For building U-Boot for the Raspberry Pi 5, we need an AArch64 toolchain that runs on our x86-64 development machine. This toolchain understands the AArch64 instruction set, its register layout, and its Application Binary Interface (ABI), allowing it to produce binaries that can run natively on the Raspberry Pi’s BCM2712 processor. When we invoke make to build U-Boot, we must explicitly tell the build system to use this cross-compiler instead of the host’s native compiler (e.g., GCC for x86-64). This is typically done by setting environment variables like ARCH and CROSS_COMPILE, which we will see in the practical examples.
flowchart TD
    subgraph "Host Machine (x86-64)"
        A[<b>Start:</b> Developer Environment]
        B{U-Boot Source Code}
        C[Install AArch64 Cross-Toolchain]
        D["Set Environment Variables<br><i>export ARCH=arm64</i><br><i>export CROSS_COMPILE=aarch64-linux-gnu-</i>"]
        E[Run Build Command<br><b>make rpi_5_defconfig && make</b>]
    end

    subgraph "Target Device (Raspberry Pi 5 - AArch64)"
        G[SD Card with Artifacts]
        H[Power On & Boot]
    end

    A --> B
    A --> C
    C --> D
    B & D --> E
    E --> F{Build Successful?}
    F -- Yes --> F_OK[<b>Success:</b> u-boot.bin generated]
    F -- No --> F_ERR[<b>Error:</b> Check Logs & Toolchain]
    F_OK -- "Deploy to" --> G
    G --> H

    %% Styling
    style A fill:#1e3a8a,stroke:#1e3a8a,stroke-width:2px,color:#ffffff
    style F_OK fill:#10b981,stroke:#10b981,stroke-width:2px,color:#ffffff
    style F_ERR fill:#ef4444,stroke:#ef4444,stroke-width:1px,color:#ffffff
    style H fill:#10b981,stroke:#10b981,stroke-width:2px,color:#ffffff
    style F fill:#f59e0b,stroke:#f59e0b,stroke-width:1px,color:#ffffff
    style B fill:#0d9488,stroke:#0d9488,stroke-width:1px,color:#ffffff
    style C fill:#0d9488,stroke:#0d9488,stroke-width:1px,color:#ffffff
    style D fill:#0d9488,stroke:#0d9488,stroke-width:1px,color:#ffffff
    style E fill:#0d9488,stroke:#0d9488,stroke-width:1px,color:#ffffff
    style G fill:#0d9488,stroke:#0d9488,stroke-width:1px,color:#ffffff
The U-Boot Build System and Kconfig
The U-Boot source code is a vast collection of files supporting hundreds of different boards and processor architectures. Compiling code for every supported feature and driver would result in a bloated, unmanageable binary. To manage this complexity, U-Boot uses a configuration system heavily inspired by the Linux kernel’s, based on Kconfig.
The Kconfig system provides a framework for defining a hierarchical set of configuration options. Each option, such as CONFIG_USB_HOST or CONFIG_CMD_GPIO, can be enabled or disabled. These options often have dependencies; for example, enabling a USB keyboard driver would automatically require the underlying USB host support to be enabled as well. This complex web of features and dependencies is managed through a text-based interface invoked by make menuconfig. This interface allows developers to navigate menus, select the features they need, and save their choices into a .config file in the root of the build directory.
To simplify the process for standard boards, the U-Boot project provides default configuration files, or defconfigs, located in the configs/ directory. For the Raspberry Pi 5, a file named rpi_5_defconfig exists. Running the command make rpi_5_defconfig reads this file and uses it to generate an initial .config file, automatically selecting all the necessary options for a baseline build. This provides a validated, working starting point that can then be further customized with menuconfig if needed. This system of defconfigs and menuconfig makes it feasible to manage a single codebase for a multitude of hardware targets.
Understanding the Output: U-Boot Artifacts
After the compilation process finishes, the u-boot source directory will contain numerous new files and directories. While many are intermediate object files (.o) used during the build, several are final artifacts, each with a specific purpose in the boot process.
The most fundamental artifact is u-boot.bin. This is the raw, position-independent binary of the U-Boot executable. It contains the machine code to be executed by the processor, stripped of any ELF headers or metadata. This is the file that is typically loaded directly into RAM by a preceding boot stage (like TF-A on the Pi 5) and executed.
In some boot scenarios, particularly on systems with very limited on-chip SRAM, U-Boot is split into two stages. The first is a very small Secondary Program Loader (SPL), which produces an artifact like spl/u-boot-spl.bin. The SPL’s only job is to perform the bare minimum hardware initialization (like setting up DRAM) and then load the much larger, full-featured U-Boot binary (u-boot.bin) into main memory and execute it. While the Raspberry Pi 5’s boot process does not strictly rely on the U-Boot SPL (as TF-A serves a similar role), understanding this concept is vital in the broader embedded landscape.
Another critical artifact is the Device Tree Blob (DTB). U-Boot needs to know about the hardware it is running on, and it also needs to pass this information to the Linux kernel. The device tree is a data structure that describes the hardware components of a system in a way that is decoupled from the kernel source code. U-Boot’s own device tree file, u-boot.dtb, is often appended to or integrated with the main binary. This allows U-Boot to understand the board’s memory map, peripherals, and pin configurations. U-Boot then loads the kernel’s separate device tree file (e.g., bcm2712-rpi-5-b.dtb) into memory before jumping to the kernel, providing the OS with the blueprint of the hardware it is about to manage.
Finally, you will often find an ELF executable file simply named u-boot. This file contains all the symbolic information from the compilation and is not intended to be booted directly. However, it is invaluable for debugging with tools like GDB, as it maps memory addresses back to the original source code functions and variables.
Practical Examples
This section provides a step-by-step guide to cross-compiling U-Boot for the Raspberry Pi 5 on a Debian-based host system (like Ubuntu 22.04 LTS).
flowchart TD
    A[<b>Start:</b> Clone U-Boot Repo<br><i>git clone ...</i>] --> B
    B["<b>Step 1:</b> Install Dependencies<br><i>apt install gcc-aarch64-linux-gnu...</i>"] --> C
    C["<b>Step 2:</b> Set Environment<br><i>export ARCH=arm64<br>export CROSS_COMPILE=...</i>"] --> D
    D["<b>Step 3:</b> Generate Configuration<br><i>make rpi_5_defconfig</i>"] --> E
    E{"Customize Configuration?<br>(Optional)"} -->|Yes| E_YES[Run <i>make menuconfig</i><br>Save Changes]
    E -->|No| F
    E_YES --> F
    F["<b>Step 4:</b> Compile the Source Code<br><i>make -j$(nproc)</i>"] --> G
    G{Build Succeeded?}
    G -- Yes --> H[<b>Success!</b>]
    G -- No --> I[<b>Failure:</b><br>Troubleshoot Errors]

    subgraph "Generated Artifacts"
        H --> J["<b>u-boot.bin</b><br><i>(For Deployment)</i>"]
        H --> K["<b>u-boot.elf</b><br><i>(For Debugging)</i>"]
        H --> L["<b>u-boot.dtb</b><br><i>(For U-Boot HW Init)</i>"]
    end

    %% Styling
    style A fill:#1e3a8a,stroke:#1e3a8a,stroke-width:2px,color:#ffffff
    style H fill:#10b981,stroke:#10b981,stroke-width:2px,color:#ffffff
    style I fill:#ef4444,stroke:#ef4444,stroke-width:1px,color:#ffffff
    style E fill:#f59e0b,stroke:#f59e0b,stroke-width:1px,color:#ffffff
    style G fill:#f59e0b,stroke:#f59e0b,stroke-width:1px,color:#ffffff
    style B fill:#0d9488,stroke:#0d9488,stroke-width:1px,color:#ffffff
    style C fill:#0d9488,stroke:#0d9488,stroke-width:1px,color:#ffffff
    style D fill:#0d9488,stroke:#0d9488,stroke-width:1px,color:#ffffff
    style E_YES fill:#eab308,stroke:#eab308,stroke-width:1px,color:#1f2937
    style F fill:#0d9488,stroke:#0d9488,stroke-width:1px,color:#ffffff
    style J fill:#0d9488,stroke:#0d9488,stroke-width:1px,color:#ffffff
    style K fill:#0d9488,stroke:#0d9488,stroke-width:1px,color:#ffffff
    style L fill:#0d9488,stroke:#0d9488,stroke-width:1px,color:#ffffff
Tip: Before starting, it is highly recommended to update your host system’s package list:
sudo apt update && sudo apt upgrade.
Step 1: Install the Cross-Compilation Toolchain and Dependencies
First, we need to install the AArch64 cross-compiler and several other tools required by the U-Boot build system. These include git for downloading the source code, bison and flex for generating parsers, and libssl-dev for cryptographic functionalities.
Execute the following command in your terminal:
sudo apt install git build-essential gcc-aarch64-linux-gnu \
bison flex libssl-dev swig
This command installs the GNU C compiler, binutils, and other utilities necessary to build binaries for the aarch64-linux-gnu target. The build-essential package provides a collection of tools considered fundamental for building software on Debian systems, such as make and the native gcc.
Step 2: Download the U-Boot Source Code
With the toolchain installed, the next step is to obtain the U-Boot source code from the official repository. We will use git to clone the repository, which also makes it easy to switch between different versions or branches in the future.
# Clone the official U-Boot repository
git clone [https://source.denx.de/u-boot/u-boot.git](https://source.denx.de/u-boot/u-boot.git)

# Navigate into the newly created directory
cd u-boot
This will download the latest development version of U-Boot. For a production environment, you would typically check out a specific, stable release tag (e.g., git checkout v2024.04).
Step 3: Configure the Build Environment
The U-Boot build system needs to be told which architecture we are targeting and which compiler to use. This is accomplished by setting two key environment variables.
Warning: These environment variables must be set for every new terminal session. To make them persistent, you can add them to your shell’s startup script (e.g.,
~/.bashrcor~/.zshrc).
# Tell the build system to target the 64-bit ARM architecture
export ARCH=arm64

# Specify the prefix for our cross-compiler toolchain
export CROSS_COMPILE=aarch64-linux-gnu-
The ARCH=arm64 variable instructs the Makefile to use the appropriate architecture-specific code paths within the U-Boot source. The CROSS_COMPILE variable provides the prefix for the compiler binaries; the build system will append tools like gcc, ld, and objcopy to this prefix (e.g., calling aarch64-linux-gnu-gcc).
Step 4: Configure U-Boot for the Raspberry Pi 5
Now we will use the default configuration file provided with U-Boot to create a .config file tailored for the Raspberry Pi 5.
# This command reads configs/rpi_5_defconfig and creates a .config file
make rpi_5_defconfig
Upon successful execution, you will see output indicating that a new configuration has been created. You can inspect the generated .config file to see all the enabled options.
For those who wish to explore further, you can launch the menu-based configuration tool:
make menuconfig
This will open a terminal-based graphical interface where you can browse and modify all available configuration options. For now, we will proceed with the default settings. Simply exit menuconfig without saving any changes.
Step 5: Compile U-Boot
With the environment and configuration in place, we can now start the compilation process. This is done with a single make command. The -j flag can be used to speed up the compilation by running multiple jobs in parallel. It is common to set the number of jobs to the number of CPU cores on your host machine.
# Get the number of CPU cores
NPROC=$(nproc)

# Build U-Boot using all available cores
make -j${NPROC}
The compilation will take a few minutes. You will see a stream of output as the compiler processes each source file. If the build is successful, the process will complete without any error messages.
Step 6: Analyze the Output Artifacts
After the build completes, we can examine the key files generated in the U-Boot source directory.
Let’s list the most important artifacts:
ls -l u-boot.bin u-boot.elf u-boot.dtb tools/mkimage
Here is a breakdown of the primary outputs and their roles:
u-boot.bin: This is the raw binary image of U-Boot. It is ready to be loaded by the Raspberry Pi 5’s firmware (TF-A). This file contains the executable machine code and initialized data, but lacks any format-specific headers like those found in an ELF file. This is the primary deployable artifact for the U-Boot executable itself.u-boot.elf: This is the final U-Boot executable in the ELF (Executable and Linkable Format). It is not used for booting but is essential for debugging. It contains the symbol table, which maps memory addresses to function and variable names, allowing a debugger like GDB to step through the source code.u-boot.dtb: This is the Device Tree Blob for U-Boot. It describes the hardware of the Raspberry Pi 5 in a format that U-Boot itself can understand and use during its initialization phase.tools/mkimage: This is a host utility that is built alongside U-Boot. Its purpose is to create specially formatted images for U-Boot, most notably the U-Boot Image (uImage) format for Linux kernels. It can wrap a raw kernel binary with a header containing information like the OS type, architecture, and load address, which U-Boot can then parse.
File Structure for Booting
To use the compiled U-Boot, you would typically prepare an SD card with a FAT32 boot partition. While a full system image includes the Linux kernel and a root filesystem, the artifacts from this chapter would be placed on this partition alongside the Raspberry Pi’s specific firmware files (start.elf, fixup.dat, etc.) and a configuration file named config.txt.
A minimal config.txt to load our custom U-Boot might look like this:
# Enable UART for serial console
enable_uart=1

# Disable the default kernel loading behavior
kernel_old=1

# Load our U-Boot binary
kernel=u-boot.bin
The Raspberry Pi bootloader would load u-boot.bin into memory as if it were a Linux kernel, and then execute it. U-Boot would then take over, initialize its console, and proceed to execute its bootcmd to load the actual Linux kernel (e.g., Image) and its corresponding device tree.
The directory structure on the SD card’s boot partition would look something like this:
/boot
├── bcm2712-rpi-5-b.dtb   # Linux kernel's device tree
├── config.txt            # RPi configuration file
├── fixup5.dat            # RPi firmware
├── Image                 # Linux kernel image
├── start5.elf            # RPi firmware
└── u-boot.bin            # Our compiled U-Boot binary

This setup demonstrates how our custom-built bootloader integrates into the platform’s boot chain to bridge the gap between the low-level firmware and the operating system.
Common Mistakes & Troubleshooting
Building a bootloader is a precise process, and small errors can lead to build failures or a non-booting device. Here are some of the most common pitfalls and how to resolve them.
Exercises
These exercises are designed to reinforce the concepts covered in this chapter, ranging from basic compilation to simple customization.
- Recompile with a Custom Boot Delay
- Objective: Modify a basic U-Boot setting using
menuconfig. - Steps:
- Navigate to your
u-bootsource directory. - Run
make menuconfig. - Navigate to “Boot options”.
- Change the “Boot delay” from its default value to
5seconds. - Save the new configuration and exit.
- Re-run the
make -j$(nproc)command to recompile U-Boot.
- Navigate to your
- Verification: Although you won’t boot the binary, use the
diffcommand to compare the new.configfile with a saved version of the original (cp .config .config.origbefore you start). This will show you exactly whichCONFIG_variable was changed.
- Objective: Modify a basic U-Boot setting using
- Create a Build Script
- Objective: Automate the configuration and build process with a shell script.
- Steps:
- Create a new file named
build_uboot.sh. - Inside the script, add the necessary commands:
export ARCH=...,export CROSS_COMPILE=...,make distclean,make rpi_5_defconfig, andmake -j$(nproc). - Make the script executable:
chmod +x build_uboot.sh. - Run the script:
./build_uboot.sh.
- Create a new file named
- Verification: The script should execute all steps and successfully produce the
u-boot.binartifact without any manual intervention.
- Investigate an Artifact with
objdump- Objective: Use a binutils tool to inspect the contents of a compiled artifact.
- Steps:
- After a successful build, use the cross-compiler’s
objdumptool to disassemble theu-boot.elffile and redirect the output to a text file:aarch64-linux-gnu-objdump -d u-boot.elf > disassembly.txt. - Open
disassembly.txtin a text editor. - Search for the C function
board_init_f.
- After a successful build, use the cross-compiler’s
- Verification: Observe the AArch64 assembly code corresponding to this important initialization function. You don’t need to understand every instruction, but simply recognize the structure of a compiled function.
- Change the Console Prompt
- Objective: Make a small source code modification to personalize the U-Boot build.
- Steps:
- Run
grep -r "=>" .in the source directory to find where the default U-Boot prompt is defined. You should find it in a file likeinclude/configs/rpi.hor a related configuration header. - The relevant definition will look like
#define CONFIG_SYS_PROMPT "=> ". - Change this to something custom, for example,
#define CONFIG_SYS_PROMPT "RPi5-Custom # ". - Recompile U-Boot.
- Run
- Verification: While you cannot boot the device, this exercise demonstrates how to find and modify compile-time configurations defined in the C source code or headers.
- Save a Custom Defconfig
- Objective: Learn how to store a custom configuration for future use.
- Steps:
- Run
make menuconfigand make a few small, identifiable changes (like the boot delay and console prompt from previous exercises). - Save and exit
menuconfig. - Run the command
make savedefconfig. This will create a new file nameddefconfigin the root directory. - Inspect the new
defconfigfile. It will be a minimal configuration file containing only the options that differ from the default Kconfig values.
- Run
- Verification: Copy this
defconfigfile toconfigs/my_rpi5_custom_defconfig. Now you can runmake my_rpi5_custom_defconfigin the future to load your customized settings in one step.
Summary
This chapter provided a comprehensive guide to the theory and practice of building the U-Boot bootloader for the Raspberry Pi 5.
- The Bootloader’s Role: We established that the bootloader is a critical piece of software that initializes hardware, loads the Linux kernel into memory, and transfers execution control to it.
- Raspberry Pi 5 Boot Sequence: We detailed the modern, multi-stage boot process of the Pi 5, which involves the Boot ROM, Trusted Firmware-A (TF-A), and finally U-Boot.
- Cross-Compilation: The necessity of using a cross-compiler toolchain to build software for a target architecture (AArch64) on a host machine (x86-64) was explained and demonstrated.
- U-Boot Build System: We explored how U-Boot uses the Kconfig system,
defconfigfiles, andmenuconfigto manage the immense complexity of supporting hundreds of devices from a single codebase. - Compilation and Artifacts: A step-by-step practical guide demonstrated how to download, configure, and compile U-Boot, culminating in an analysis of the key output files, especially
u-boot.bin. - Customization and Troubleshooting: We covered common errors related to toolchain paths and dependencies, and through exercises, showed how to begin customizing and automating the build process.
By mastering the skills in this chapter, you have gained fundamental control over one of the most critical components of an embedded Linux system, opening the door to advanced customization, debugging, and system optimization.
Further Reading
- Das U-Boot Official Documentation: The primary source for all U-Boot information, including detailed documentation on its command-line interface, build system, and driver model. https://u-boot.readthedocs.io/
- ARM Trusted Firmware-A Documentation: Essential reading for understanding the initial boot stages on modern ARMv8 systems like the Raspberry Pi 5. https://trustedfirmware-a.readthedocs.io/
- Raspberry Pi 5 Technical Documentation: The official hardware documentation from the Raspberry Pi Foundation provides details on the BCM2712 SoC and the board’s boot modes. https://www.raspberrypi.com/documentation/
- “Mastering Embedded Linux Programming, Third Edition” by Chris Simmonds: A comprehensive book covering many aspects of embedded Linux development, with excellent sections on bootloaders and toolchains.
- The Kconfig Language: The official documentation for the configuration language used by both the Linux kernel and U-Boot. https://www.kernel.org/doc/html/latest/kbuild/kconfig-language.html
- Bootlin’s Embedded Linux and Kernel Training Materials: Bootlin offers high-quality, publicly available training materials that cover bootloaders, kernel development, and build systems in great detail. https://bootlin.com/training/
