
Chapter 121: Azure IoT Hub Integration with ESP-IDF
Chapter Objectives
Upon completing this chapter, you will be able to:
- Understand the fundamentals of Azure IoT Hub and its role in IoT solutions.
- Comprehend the communication protocols and authentication mechanisms used with Azure IoT Hub.
- Configure an ESP32 project to connect to Azure IoT Hub using the ESP-IDF.
- Send telemetry data from an ESP32 device to Azure IoT Hub.
- Receive Cloud-to-Device (C2D) messages from Azure IoT Hub on an ESP32.
- Understand basic concepts of Device Twins and Direct Methods.
- Identify common issues and troubleshoot Azure IoT Hub connectivity problems.
- Apply this knowledge to build practical IoT applications with ESP32 and Azure.
Introduction
Welcome to the world of cloud-connected embedded systems! In previous chapters, we explored various IoT protocols. Now, we take a significant step further by integrating our ESP32 devices with a powerful cloud platform: Microsoft Azure IoT Hub.
Azure IoT Hub is a managed service, hosted in the cloud, that acts as a central message hub for bi-directional communication between your IoT application and the devices it manages. It provides a secure and scalable way to connect, monitor, and manage billions of IoT devices. Connecting your ESP32 to Azure IoT Hub unlocks a vast array of possibilities, from simple data collection and remote device control to sophisticated analytics, machine learning, and integration with other enterprise services. This chapter will guide you through the process of establishing this crucial link.
Theory
What is Azure IoT Hub?
Azure IoT Hub is a cornerstone service within the Microsoft Azure cloud platform, specifically designed to address the challenges of connecting and managing IoT devices. Think of it as a highly secure and scalable “post office” for your IoT devices and your backend applications.
Key features and concepts include:
- Device Management: Azure IoT Hub allows you to provision, authenticate, monitor, and manage individual devices or large fleets of devices. Each device in IoT Hub has a unique identity.
- Telemetry Ingestion (Device-to-Cloud – D2C): Devices can send streams of data (telemetry) to Azure IoT Hub. This could be sensor readings, status updates, or event notifications. IoT Hub can handle massive volumes of such data.
- Commands (Cloud-to-Device – C2D): Your backend applications can send messages (commands) to specific devices through IoT Hub. This enables remote control and actuation.
- Security: Security is paramount. IoT Hub supports per-device authentication, secure credential storage, and encrypted communication channels (typically TLS).
- Scalability: Designed to scale from a few devices to millions, handling high message throughput.
- Protocol Support: Primarily supports MQTT, AMQP, and HTTPS for device communication. We will focus on MQTT, which is well-suited for resource-constrained devices like the ESP32.
- Integration: Seamlessly integrates with other Azure services like Azure Stream Analytics, Azure Functions, Azure Machine Learning, and Power BI for data processing, analysis, and visualization.
graph TB
    subgraph "ESP32 Device"
        direction LR
        ESP32["<center><b>ESP32 Microcontroller</b></center>"] -- "1- Connects to" --> WiFi["<center><b>Wi-Fi Network</b><br>(Internet Access)</center>"]
    end

    subgraph "Azure Cloud"
        direction TB
        IoTHub["<center><b>Azure IoT Hub</b><br>(your-iot-hub.azure-devices.net)</center>"]
        IoTHub -- Authenticates --> DeviceIdentity["<center><b>Device Identity</b><br>(SAS Token / X.509 Cert)</center>"]
        IoTHub -- Manages --> BackendApp["<center><b>Backend Applications</b><br>& Other Azure Services</center>"]
    end

    WiFi -- "2- Establishes Secure MQTT Connection (TLS)" --> IoTHub

    ESP32 -- "3- Device-to-Cloud (D2C) Telemetry<br><tt>devices/{device_id}/messages/events/</tt>" --> IoTHub
    IoTHub -- "4- Cloud-to-Device (C2D) Commands<br><tt>devices/{device_id}/messages/devicebound/#</tt>" --> ESP32

    IoTHub -- "Data Processing / Actions" --> BackendApp

    classDef device fill:#EDE9FE,stroke:#5B21B6,stroke-width:2px,color:#5B21B6;
    classDef network fill:#FEF3C7,stroke:#D97706,stroke-width:1px,color:#92400E;
    classDef cloudService fill:#DBEAFE,stroke:#2563EB,stroke-width:1px,color:#1E40AF;
    classDef cloudApp fill:#D1FAE5,stroke:#059669,stroke-width:1px,color:#065F46;

    class ESP32 device;
    class WiFi network;
    class IoTHub cloudService; class DeviceIdentity cloudService;
    class BackendApp cloudApp;
Communication Protocols
Azure IoT Hub supports several protocols for device communication:
- MQTT (Message Queuing Telemetry Transport): A lightweight, publish-subscribe network protocol ideal for constrained devices and low-bandwidth, high-latency, or unreliable networks. This is the most common choice for ESP32.
- MQTT v3.1.1 and v5.0: IoT Hub supports both versions.
- Topics: IoT Hub defines specific topic name patterns for D2C messages, C2D messages, Device Twin updates, and Direct Method calls.
- Telemetry (D2C):
devices/{device_id}/messages/events/ - Cloud-to-Device (C2D):
devices/{device_id}/messages/devicebound/#
- Telemetry (D2C):
- AMQP (Advanced Message Queuing Protocol): A more feature-rich messaging protocol, often used in enterprise scenarios. It offers reliable messaging and more complex routing capabilities.
- HTTPS (Hypertext Transfer Protocol Secure): Devices can send telemetry and receive C2D messages via HTTPS requests. While simpler for some scenarios, it’s less efficient for frequent communication compared to MQTT or AMQP due to connection overhead.
| Operation | MQTT Topic Pattern | Direction | Description |
|---|---|---|---|
| Send Telemetry (D2C) | devices/{device_id}/messages/events/Optionally: .../{property_bag} |
Device to Cloud | Device publishes messages to this topic to send telemetry data to IoT Hub. Custom properties can be added to the property bag. |
| Receive C2D Messages | devices/{device_id}/messages/devicebound/# |
Cloud to Device | Device subscribes to this topic filter to receive cloud-to-device messages. The # is a multi-level wildcard. |
| Device Twin – Reported Properties | $iothub/twin/PATCH/properties/reported/?$rid={request_id} |
Device to Cloud | Device publishes to this topic to update its reported properties in the Device Twin. {request_id} is a client-generated ID. |
| Device Twin – Get (Response) | $iothub/twin/res/{status}/?$rid={request_id} |
Cloud to Device | Device subscribes to this topic to receive responses after requesting the full Device Twin document or after reporting properties. {status} is the HTTP-like status code. |
| Device Twin – Desired Properties (Notifications) | $iothub/twin/PATCH/properties/desired/# |
Cloud to Device | Device subscribes to this topic to receive notifications when desired properties are updated by the backend. |
| Device Twin – Get Full Document | $iothub/twin/GET/?$rid={request_id} |
Device to Cloud | Device publishes an empty message to this topic to request the full Device Twin document. |
| Direct Method Invocation | $iothub/methods/POST/{method_name}/?$rid={request_id} |
Cloud to Device | Device subscribes to this topic to receive direct method invocations from the cloud. {method_name} is the name of the method. |
| Direct Method Response | $iothub/methods/res/{status}/?$rid={request_id} |
Device to Cloud | Device publishes to this topic to send a response back to the cloud after a direct method invocation. |
Note: {device_id} should be replaced with the actual ID of the device. {request_id} is a client-generated request identifier.
Topic structures can vary slightly based on the specific Azure IoT C SDK version and features used. Always refer to the latest Azure documentation.
Our focus in this chapter will be on MQTT due to its efficiency and suitability for ESP32 applications.
Authentication Methods
Azure IoT Hub requires devices to authenticate before they can connect and exchange data. The primary methods are:
- SAS Tokens (Shared Access Signature Tokens):
- These are security tokens generated using a symmetric key (either the device key or a shared access policy key).
- The token grants limited permissions (e.g., DeviceConnect) for a specific duration.
- The token is typically included in the MQTT
passwordfield, and theusernamefield contains information like the IoT Hub hostname, device ID, and SAS token parameters. - Format of username for SAS token authentication:
{iothubhostname}/{device_id}/?api-version=2021-04-12 - The password field contains the SAS token string, e.g.,
SharedAccessSignature sr={URL-encoded-resourceURI}&sig={signature}&se={expiry}. - Important: SAS tokens are time-sensitive. The ESP32’s internal clock must be synchronized (e.g., using SNTP, covered in Chapter 98) for SAS tokens to be validated correctly, as they have an expiry time.
- X.509 Certificates:
- This method uses industry-standard X.509 certificates for authentication.
- Each device can have its own unique X.509 certificate, or certificates can be signed by a trusted Certificate Authority (CA) registered with IoT Hub.
- This is generally considered more secure than SAS tokens, especially for production deployments, as it avoids embedding shared secrets directly in the device code or configuration.
- Requires more complex setup for certificate generation, provisioning, and management.
| Authentication Method | Key Component(s) | MQTT Usage (Typical) | Pros | Cons | ESP32 Time Sync Required? |
|---|---|---|---|---|---|
| SAS Tokens (Shared Access Signature) |
Device-specific Symmetric Key (from Connection String) or IoT Hub Shared Access Policy Key. |
Username: {iothubhostname}/{device_id}/?api-version=2021-04-12Password: The generated SAS token string (e.g., SharedAccessSignature sr=...)
|
Simpler to implement initially. No complex certificate management on device. Can be generated from device connection string. | Time-sensitive (tokens expire). Device key might be embedded or needs secure storage. Less robust for large-scale production than X.509. | Yes, critically important. SAS token validity depends on accurate device time matching server time. |
| X.509 Certificates | Device X.509 Certificate & Private Key. IoT Hub configured to trust the device certificate (self-signed, CA-signed). |
MQTT client configured for TLS client authentication using the device cert/key. Username might be {iothubhostname}/{device_id}/?api-version=2021-04-12&ClientVersion={...}, password field often empty or not used for auth itself.
|
Industry standard, highly secure. Per-device credentials. Better for production and large deployments. No shared secrets embedded in the same way as device keys for SAS. | More complex setup: certificate generation, provisioning, secure storage of private key on device, and renewal management. | Yes. While not for token expiry, TLS handshake and certificate validation rely on accurate time on both client and server. |
For simplicity in our initial examples, we will primarily use SAS Token authentication.
Device Provisioning Service (DPS)
While you can manually register devices in IoT Hub, for large-scale deployments, Azure offers the IoT Hub Device Provisioning Service (DPS). DPS enables zero-touch, just-in-time provisioning to the right IoT hub without requiring human intervention, allowing customers to provision millions of devices in a secure and scalable manner. DPS supports symmetric key, X.509, and TPM attestation. We won’t delve deep into DPS in this chapter, but it’s a crucial concept for production scenarios.
Message Types
- Device-to-Cloud (D2C) Messages: Data sent from the device to the cloud. This is typically telemetry data like sensor readings, status updates, or alerts.
- Cloud-to-Device (C2D) Messages: Messages sent from the cloud (your backend application or the Azure portal) to a specific device. These can be commands to perform an action (e.g., “turn on LED”) or configuration updates. C2D messages are queued by IoT Hub if the device is offline and delivered when it reconnects (within a configurable expiry time).
Device Twins
A Device Twin is a JSON document that Azure IoT Hub maintains for each connected device. It stores device state information, including:
- Tags: Backend-readable metadata, e.g., deployment location.
- Desired Properties: Set by the backend application and received by the device. The device can then try to conform to this desired state.
- Reported Properties: Set by the device and read by the backend application. This allows the device to report its current state, capabilities, or the result of applying a desired configuration.
graph TD
    subgraph "Cloud / Backend Application"
        direction TB
        BackendApp["<center><b>Backend Application</b><br>(e.g., Azure Function, Web App)</center>"]
    end

    subgraph "Azure IoT Hub"
        direction TB
        DeviceTwin["<center><b>Device Twin (JSON Document)</b><br><i>for esp32-device-01</i></center>"]

        subgraph "Twin Contents"
            direction LR
            Tags["<center><b>Tags</b><br><tt>{ \location\: \lab1\ }</tt><br><i>(Cloud Writable)</i></center>"]
            DesiredProps["<center><b>Desired Properties</b><br><tt>{ \telemetryInterval\: 60,<br>\fanOn\: true }</tt><br><i>(Cloud Writable)</i></center>"]
            ReportedProps["<center><b>Reported Properties</b><br><tt>{ \telemetryInterval\: 60,<br>\fanOn\: true,<br>\firmwareVersion\: \1.2.0\ }</tt><br><i>(Device Writable)</i></center>"]
        end
        DeviceTwin --- Tags
        DeviceTwin --- DesiredProps
        DeviceTwin --- ReportedProps
    end

    subgraph "ESP32 Device"
        direction TB
        DeviceApp["<center><b>Device Application</b><br>(esp32-device-01)</center>"]
    end

    BackendApp -- "1- Reads/Writes Tags" --> Tags;
    BackendApp -- "2- Writes Desired Properties" --> DesiredProps;
    DesiredProps -- "3- IoT Hub notifies device of desired changes<br>(via <tt>$iothub/twin/PATCH/properties/desired/#</tt>)" --> DeviceApp;
    DeviceApp -- "4- Reads Desired Properties<br>& Acts on them" --> DesiredProps;
    DeviceApp -- "5- Writes Reported Properties<br>(current state, applied config)<br>(via <tt>$iothub/twin/PATCH/properties/reported/</tt>)" --> ReportedProps;
    BackendApp -- "6- Reads Reported Properties" --> ReportedProps;
    DeviceApp -- "Can request full twin document<br>(via <tt>$iothub/twin/GET/</tt>)" --> DeviceTwin

    classDef cloudApp fill:#D1FAE5,stroke:#059669,stroke-width:1px,color:#065F46;
    classDef iotHubComponent fill:#DBEAFE,stroke:#2563EB,stroke-width:1px,color:#1E40AF;
    classDef twinProperty fill:#FEF3C7,stroke:#D97706,stroke-width:1px,color:#92400E;
    classDef device fill:#EDE9FE,stroke:#5B21B6,stroke-width:2px,color:#5B21B6;

    class BackendApp cloudApp;
    class DeviceTwin iotHubComponent;
    class Tags twinProperty;
    class DesiredProps twinProperty;
    class ReportedProps twinProperty;
    class DeviceApp device;
Device Twins enable synchronization of device state between the device and the cloud, even when the device is intermittently connected.
Direct Methods
Direct Methods represent a request-reply way of interacting with a device, similar to an RPC (Remote Procedure Call).
- They are initiated by the cloud backend.
- The device receives the method invocation, performs an action, and can return a status and payload immediately.
- Direct Methods are suitable for scenarios requiring immediate confirmation of a command, like turning on a fan or rebooting a device.
- They have a timeout, and if the device doesn’t respond within the timeout, the method is considered to have failed.
sequenceDiagram
    participant BackendApp as Backend Application
    participant IoTHub as Azure IoT Hub
    participant ESP32Device as ESP32 Device

    BackendApp->>IoTHub: 1. Invoke Direct Method<br>(e.g., "rebootDevice", payload: {"delay": 5})
    activate IoTHub
    Note over BackendApp,IoTHub: Request has a timeout (e.g., 30s)

    IoTHub->>ESP32Device: 2. MQTT: <tt>$iothub/methods/POST/rebootDevice/?$rid={req_id}</tt><br>Payload: {"delay": 5}
    activate ESP32Device
    Note over ESP32Device: Device is subscribed to this topic

    ESP32Device->>ESP32Device: 3. Process Method Invocation<br>(e.g., schedule reboot in 5s)
    ESP32Device-->>IoTHub: 4. MQTT: <tt>$iothub/methods/res/200/?$rid={req_id}</tt><br>Payload: {"status": "Rebooting in 5 seconds"}
    deactivate ESP32Device
    Note over ESP32Device,IoTHub: Status 200 indicates success.<br>Payload is optional.

    IoTHub-->>BackendApp: 5. Return Method Response<br>(Status: 200, Payload: {"status": "Rebooting in 5 seconds"})
    deactivate IoTHub

    alt Device Fails or Times Out
        BackendApp->>IoTHub: Invoke Direct Method
        activate IoTHub
        IoTHub->>ESP32Device: MQTT Method Invocation
        activate ESP32Device
        Note over ESP32Device: Device does not respond or errors out
        ESP32Device-->>IoTHub: (Optional) MQTT: <tt>$iothub/methods/res/{error_code}/?$rid={req_id}</tt>
        deactivate ESP32Device
        IoTHub-->>BackendApp: Method Response (Timeout or Error Status)
        deactivate IoTHub
    end
Practical Examples
We’ll now walk through connecting an ESP32 to Azure IoT Hub, sending telemetry, and receiving C2D messages.
Prerequisites
- Azure Account: You need an active Microsoft Azure subscription. A free trial account is available.
- Azure IoT Hub Instance:
- Create an Azure IoT Hub instance through the Azure portal. Choose a pricing and scale tier (the Free tier is sufficient for learning).
- Note down your IoT Hub hostname (e.g.,
your-iot-hub-name.azure-devices.net).
- Register a Device:
- In your IoT Hub, navigate to “Devices” (or “IoT devices” under “Device management”) and add a new device.
- Choose an Device ID (e.g.,
esp32-device-01). - Select Symmetric key as the authentication type. Auto-generate keys.
- Once the device is created, click on its ID to view its details. Copy the Primary Connection String. It will look something like:
HostName=your-iot-hub-name.azure-devices.net;DeviceId=esp32-device-01;SharedAccessKey=your_device_key
- ESP-IDF Setup: Ensure your ESP-IDF v5.x environment is correctly set up with VS Code as per Chapter 2.
- Wi-Fi Credentials: You’ll need the SSID and password for a Wi-Fi network your ESP32 can connect to.
ESP-IDF Azure IoT SDK Component
Espressif provides the esp-azure component, which wraps the Azure IoT C SDK, making it easier to integrate into ESP-IDF projects. This component needs to be added to your project. Often, this is managed as an ESP-IDF component. You can add it to your project’s idf_component.yml file or by manually placing it in the components directory.
For this chapter, we’ll assume you are using the azure-iot-sdk-c as a component, which can be added via the ESP-IDF component manager. If it’s not available by default in your ESP-IDF version, you might need to add it manually or via:
idf.py add-dependency “azure-iot-sdk-c^3.1.0” (The version might vary, check the component registry for the latest compatible version with ESP-IDF v5.x).
Alternatively, the esp-idf-azure-iot-sdk is a more direct wrapper.
Add to main/idf_component.yml:
dependencies:
  idf: ">=5.0"
  espressif/azure-iot-sdk-c: "*" # Check for the latest version compatible with ESP-IDF v5.x
  # or if using the older esp-azure
  # esp-azure: "*"
Then run idf.py reconfigure.
Configuration via menuconfig
- Open your ESP32 project in VS Code.
- Run
idf.py menuconfig. - Navigate to
Component config ---> ESP Azure IoT SDK.- You might need to enable it if it’s not enabled by default.
- Here, you can sometimes configure global settings, but often connection details are passed at runtime.
- Ensure your Wi-Fi settings are configured (e.g.,
Example Connection Configuration --->). - Enable SNTP for time synchronization:
Component config ---> LWIP ---> SNTP ---> Enable SNTP. Set an SNTP server likepool.ntp.org. This is crucial for SAS token validity.
Code Snippet 1: Connecting and Sending Telemetry (D2C)
This example will connect to Wi-Fi, initialize the Azure IoT client, and send a simple JSON telemetry message.
graph TD
    A["<center><b>Start: ESP32 app_main</b></center>"] --> B["<center>1. Init NVS, Wi-Fi, SNTP</center>"];
    B --> C["<center>2. Connect to Wi-Fi & Sync Time</center>"];
    C --> D["<center>3. Create <tt>azure_iot_task</tt></center>"];

    subgraph "azure_iot_task"
        direction TB
        D1["<center><b>4. <tt>platform_init()</tt></b></center>"] --> D2["<center><b>5. <tt>IoTHubDeviceClient_LL_CreateFromConnectionString()</tt></b><br>using MQTT_Protocol</center>"];
        D2 -- Success --> D3["<center><b>6. Set Options (e.g., Trace, Trusted Cert if needed)</b></center>"];
        D3 --> D4["<center><b>7. <tt>IoTHubDeviceClient_LL_SetConnectionStatusCallback()</tt></b></center>"];
        D4 --> D5["<center><b>Loop:</b></center>"];
        D5 --> D6{"<center><b>8. Check <tt>g_iot_hub_connected</tt> flag</b></center>"};
        D6 -- Connected --> D7["<center><b>9. Simulate/Read Sensor Data</b><br>(e.g., temperature, humidity)</center>"];
        D7 --> D8["<center><b>10. Format Telemetry Payload (JSON)</b><br><tt>{\temperature\: 25.5, ...}</tt></center>"];
        D8 --> D9["<center><b>11. <tt>IoTHubMessage_CreateFromString()</tt></b></center>"];
        D9 -- Success --> D10{"<center><b>12. <tt>IoTHubDeviceClient_LL_SendEventAsync()</tt></b><br>with <tt>send_confirm_callback</tt></center>"};
        D10 -- OK --> D11["<center><b>13. <tt>IoTHubMessage_Destroy()</tt></b></center>"];
        D11 --> D12["<center><b>14. <tt>IoTHubDeviceClient_LL_DoWork()</tt></b></center>"];
        D12 --> D13["<center><b>15. Delay (e.g., 10s)</b></center>"];
        D13 --> D5;

        D6 -- Not Connected --> D12;
        D2 -- Failure --> D_Fail["<center><b>Handle Client Creation Error</b><br>Log, platform_deinit, Exit Task</center>"];
        D1 -- Failure --> D_FailPlatform["<center><b>Handle Platform Init Error</b><br>Log, Exit Task</center>"];
        D9 -- Failure --> D_FailMsgCreate["<center><b>Log Message Creation Error</b></center>"] --> D12;
        D10 -- Error --> D_FailSend["<center><b>Log Send Error</b></center>"] --> D11;
    end

    subgraph "Callbacks"
        direction TB
        SendConfirm["<center><b>send_confirm_callback</b><br>Logs success/failure of send</center>"]
        ConnStatus["<center><b>connection_status_callback</b><br>Updates <tt>g_iot_hub_connected</tt></center>"]
    end

    D10 -.-> SendConfirm;
    D4 -.-> ConnStatus;

    A --> F["<center><b>Azure IoT Hub</b><br>(Portal / Backend App listens for D2C messages)</center>"];
    D10 -.->|MQTT Telemetry Message| F;

    classDef startNode fill:#EDE9FE,stroke:#5B21B6,stroke-width:2px,color:#5B21B6;
    classDef processNode fill:#DBEAFE,stroke:#2563EB,stroke-width:1px,color:#1E40AF;
    classDef decisionNode fill:#FEF3C7,stroke:#D97706,stroke-width:1px,color:#92400E;
    classDef cloudNode fill:#D1FAE5,stroke:#059669,stroke-width:1px,color:#065F46;
    classDef errorNode fill:#FEE2E2,stroke:#DC2626,stroke-width:1px,color:#991B1B;
    classDef loopNode fill:#E0E7FF,stroke:#4338CA,stroke-width:1px,color:#3730A3;
    classDef callbackNode fill:#A7F3D0,stroke:#047857,stroke-width:1px,color:#064E3B;

    class A,D1 startNode;
    class B,C,D,D3,D4,D7,D8,D9,D11,D12,D13 processNode;
    class D2,D6,D10 decisionNode;
    class F cloudNode;
    class D_Fail errorNode;
    class D_FailPlatform errorNode;
    class D_FailMsgCreate errorNode;
    class D_FailSend errorNode;
    class D5 loopNode;
    class SendConfirm callbackNode;
    class ConnStatus callbackNode;
main/main.c:
#include <stdio.h>
#include <string.h>
#include "freertos/FreeRTOS.h"
#include "freertos/task.h"
#include "freertos/event_groups.h"
#include "esp_system.h"
#include "esp_wifi.h"
#include "esp_event.h"
#include "esp_log.h"
#include "nvs_flash.h"
#include "esp_sntp.h"

// Azure IoT SDK headers
#include "iothub.h"
#include "iothub_device_client_ll.h"
#include "iothub_client_options.h"
#include "iothub_message.h"
#include "azure_c_shared_utility/threadapi.h"
#include "azure_c_shared_utility/platform.h"
#include "azure_c_shared_utility/crt_abstractions.h" // For mallocAndStrcpy_s

// Using MQTT protocol
#include "iothubtransportmqtt.h"

// Wi-Fi Configuration - Replace with your credentials
#define WIFI_SSID CONFIG_WIFI_SSID
#define WIFI_PASS CONFIG_WIFI_PASSWORD

// Azure IoT Hub Device Connection String - Replace with your device connection string
// It's better to store this in KConfig or retrieve securely, not hardcode in production.
#define AZURE_CONNECTION_STRING CONFIG_AZURE_IOT_CONNECTION_STRING

static const char *TAG = "AZURE_IOT_EXAMPLE";

// Event group for Wi-Fi connection
static EventGroupHandle_t wifi_event_group;
const int WIFI_CONNECTED_BIT = BIT0;

// For Azure IoT
static bool g_iot_hub_connected = false;
static int g_message_count_send_confirmations = 0;

// Callback for D2C message confirmation
static void send_confirm_callback(IOTHUB_CLIENT_CONFIRMATION_RESULT result, void *userContextCallback) {
    (void)userContextCallback;
    if (result == IOTHUB_CLIENT_CONFIRMATION_OK) {
        ESP_LOGI(TAG, "Message sent successfully to Azure IoT Hub.");
        g_message_count_send_confirmations++;
    } else {
        ESP_LOGE(TAG, "Failed to send message to Azure IoT Hub, error: %d", result);
    }
}

// Callback for connection status changes
static void connection_status_callback(IOTHUB_CLIENT_CONNECTION_STATUS result, IOTHUB_CLIENT_CONNECTION_STATUS_REASON reason, void* user_context) {
    (void)user_context;
    ESP_LOGI(TAG, "Connection Status: %s, Reason: %s",
             MU_ENUM_TO_STRING(IOTHUB_CLIENT_CONNECTION_STATUS, result),
             MU_ENUM_TO_STRING(IOTHUB_CLIENT_CONNECTION_STATUS_REASON, reason));

    if (result == IOTHUB_CLIENT_CONNECTION_AUTHENTICATED) {
        g_iot_hub_connected = true;
        ESP_LOGI(TAG, "Successfully connected to Azure IoT Hub.");
    } else {
        g_iot_hub_connected = false;
        ESP_LOGE(TAG, "Azure IoT Hub connection failed.");
    }
}


static void wifi_event_handler(void* arg, esp_event_base_t event_base,
                               int32_t event_id, void* event_data) {
    if (event_base == WIFI_EVENT && event_id == WIFI_EVENT_STA_START) {
        esp_wifi_connect();
    } else if (event_base == WIFI_EVENT && event_id == WIFI_EVENT_STA_DISCONNECTED) {
        ESP_LOGI(TAG, "Disconnected from Wi-Fi. Retrying...");
        esp_wifi_connect();
        xEventGroupClearBits(wifi_event_group, WIFI_CONNECTED_BIT);
    } else if (event_base == IP_EVENT && event_id == IP_EVENT_STA_GOT_IP) {
        ip_event_got_ip_t* event = (ip_event_got_ip_t*) event_data;
        ESP_LOGI(TAG, "Got IP address: " IPSTR, IP2STR(&event->ip_info.ip));
        xEventGroupSetBits(wifi_event_group, WIFI_CONNECTED_BIT);
    }
}

void initialize_sntp(void) {
    ESP_LOGI(TAG, "Initializing SNTP");
    esp_sntp_setoperatingmode(SNTP_OPMODE_POLL);
    esp_sntp_setservername(0, "pool.ntp.org"); // Or your preferred NTP server
    esp_sntp_init();

    // Wait for time to be set
    time_t now = 0;
    struct tm timeinfo = { 0 };
    int retry = 0;
    const int retry_count = 15;
    while (sntp_get_sync_status() == SNTP_SYNC_STATUS_RESET && ++retry < retry_count) {
        ESP_LOGI(TAG, "Waiting for system time to be set... (%d/%d)", retry, retry_count);
        vTaskDelay(2000 / portTICK_PERIOD_MS);
    }
    if (retry == retry_count) {
        ESP_LOGE(TAG, "Failed to synchronize system time with NTP.");
        // Handle error: SAS tokens will likely fail.
    } else {
        time(&now);
        localtime_r(&now, &timeinfo);
        ESP_LOGI(TAG, "System time is set: %s", asctime(&timeinfo));
    }
}


void wifi_init_sta(void) {
    wifi_event_group = xEventGroupCreate();

    ESP_ERROR_CHECK(esp_netif_init());
    ESP_ERROR_CHECK(esp_event_loop_create_default());
    esp_netif_create_default_wifi_sta();

    wifi_init_config_t cfg = WIFI_INIT_CONFIG_DEFAULT();
    ESP_ERROR_CHECK(esp_wifi_init(&cfg));

    esp_event_handler_instance_t instance_any_id;
    esp_event_handler_instance_t instance_got_ip;
    ESP_ERROR_CHECK(esp_event_handler_instance_register(WIFI_EVENT,
                                                        ESP_EVENT_ANY_ID,
                                                        &wifi_event_handler,
                                                        NULL,
                                                        &instance_any_id));
    ESP_ERROR_CHECK(esp_event_handler_instance_register(IP_EVENT,
                                                        IP_EVENT_STA_GOT_IP,
                                                        &wifi_event_handler,
                                                        NULL,
                                                        &instance_got_ip));

    wifi_config_t wifi_config = {
        .sta = {
            .ssid = WIFI_SSID,
            .password = WIFI_PASS,
            .threshold.authmode = WIFI_AUTH_WPA2_PSK, // Adjust as per your network
        },
    };
    ESP_ERROR_CHECK(esp_wifi_set_mode(WIFI_MODE_STA));
    ESP_ERROR_CHECK(esp_wifi_set_config(ESP_IF_WIFI_STA, &wifi_config));
    ESP_ERROR_CHECK(esp_wifi_start());

    ESP_LOGI(TAG, "wifi_init_sta finished.");
    ESP_LOGI(TAG, "Connecting to AP SSID:%s ", WIFI_SSID);

    // Wait for Wi-Fi connection
    xEventGroupWaitBits(wifi_event_group, WIFI_CONNECTED_BIT, pdFALSE, pdFALSE, portMAX_DELAY);
    ESP_LOGI(TAG, "Connected to AP SSID:%s", WIFI_SSID);
}

void azure_iot_task(void *pvParameters) {
    IOTHUB_DEVICE_CLIENT_LL_HANDLE device_ll_handle;

    // Initialize the Azure IoT C SDK platform
    if (platform_init() != 0) {
        ESP_LOGE(TAG, "Failed to initialize the platform.");
        vTaskDelete(NULL);
        return;
    }

    // Create an IoT Hub device client handle
    device_ll_handle = IoTHubDeviceClient_LL_CreateFromConnectionString(AZURE_CONNECTION_STRING, MQTT_Protocol);
    if (device_ll_handle == NULL) {
        ESP_LOGE(TAG, "Failed to create IoT Hub device client handle.");
        platform_deinit();
        vTaskDelete(NULL);
        return;
    }

    // Set options (e.g., enable tracing, set trusted certificates if not using Baltimore CyberTrust Root)
    bool traceOn = true; // Set to false for production to reduce logs
    IoTHubDeviceClient_LL_SetOption(device_ll_handle, OPTION_LOG_TRACE, &traceOn);

    // For most ESP32 setups, the Baltimore CyberTrust Root CA (used by Azure IoT Hub)
    // should be part of the default ESP-IDF certificate bundle.
    // If not, or if using a custom CA for DPS, you'd set it here:
    // IoTHubDeviceClient_LL_SetOption(device_ll_handle, OPTION_TRUSTED_CERT, certificates);

    // Set the connection status callback
    if (IoTHubDeviceClient_LL_SetConnectionStatusCallback(device_ll_handle, connection_status_callback, NULL) != IOTHUB_CLIENT_OK) {
        ESP_LOGE(TAG, "Failed to set connection status callback");
    }

    // Main loop for sending telemetry and handling IoT Hub work
    int message_count = 0;
    while (true) {
        if (g_iot_hub_connected) {
            // Construct the telemetry message
            char telemetry_msg_buffer[128];
            float temperature = 20.0 + ((float)esp_random() / (float)UINT32_MAX) * 10.0; // Simulated temperature
            int humidity = 50 + esp_random() % 20; // Simulated humidity

            snprintf(telemetry_msg_buffer, sizeof(telemetry_msg_buffer),
                     "{\"messageId\":%d, \"temperature\":%.2f, \"humidity\":%d}",
                     message_count++, temperature, humidity);

            IOTHUB_MESSAGE_HANDLE message_handle = IoTHubMessage_CreateFromString(telemetry_msg_buffer);
            if (message_handle == NULL) {
                ESP_LOGE(TAG, "Failed to create IoT Hub message from string.");
            } else {
                // Optional: Add message properties
                // IoTHubMessage_SetProperty(message_handle, "property_key", "property_value");

                ESP_LOGI(TAG, "Sending message: %s", telemetry_msg_buffer);
                if (IoTHubDeviceClient_LL_SendEventAsync(device_ll_handle, message_handle, send_confirm_callback, NULL) != IOTHUB_CLIENT_OK) {
                    ESP_LOGE(TAG, "Failed to send message to Azure IoT Hub.");
                } else {
                    // Message successfully queued for sending
                }
                IoTHubMessage_Destroy(message_handle); // Destroy the message handle once sent
            }
        } else {
            ESP_LOGW(TAG, "Not connected to IoT Hub. Waiting to reconnect...");
        }

        // Call IoTHubDeviceClient_LL_DoWork() periodically to allow the SDK to process messages
        // and maintain the connection. This is crucial for the LL (Lower Layer) client.
        IoTHubDeviceClient_LL_DoWork(device_ll_handle);

        vTaskDelay(pdMS_TO_TICKS(10000)); // Send telemetry every 10 seconds
    }

    // Cleanup (though this loop runs indefinitely in this example)
    IoTHubDeviceClient_LL_Destroy(device_ll_handle);
    platform_deinit();
    vTaskDelete(NULL);
}


void app_main(void) {
    // Initialize NVS (Non-Volatile Storage) - required for Wi-Fi
    esp_err_t ret = nvs_flash_init();
    if (ret == ESP_ERR_NVS_NO_FREE_PAGES || ret == ESP_ERR_NVS_NEW_VERSION_FOUND) {
      ESP_ERROR_CHECK(nvs_flash_erase());
      ret = nvs_flash_init();
    }
    ESP_ERROR_CHECK(ret);

    // Initialize Wi-Fi
    wifi_init_sta();

    // Initialize SNTP for time synchronization (crucial for SAS tokens)
    initialize_sntp();

    // Wait for Wi-Fi and time sync before starting Azure task
    ESP_LOGI(TAG, "Waiting for Wi-Fi and SNTP sync before starting Azure IoT task...");
    xEventGroupWaitBits(wifi_event_group, WIFI_CONNECTED_BIT, pdFALSE, pdFALSE, portMAX_DELAY);
    // Add a small delay to ensure SNTP has a chance to sync if it just connected
    while (sntp_get_sync_status() == SNTP_SYNC_STATUS_RESET) {
        vTaskDelay(500 / portTICK_PERIOD_MS); // Check every 500ms
    }


    ESP_LOGI(TAG, "Creating Azure IoT task.");
    // Start the Azure IoT task
    // Increase stack size if complex operations or deep call stacks are involved in SDK
    if (xTaskCreate(azure_iot_task, "azure_task", 8192, NULL, 5, NULL) != pdPASS) {
        ESP_LOGE(TAG, "Failed to create Azure IoT task.");
    }
}
CMakeLists.txt (in main directory):
Ensure it lists the source file:
idf_component_register(SRCS "main.c"
                    INCLUDE_DIRS ".")
Project CMakeLists.txt (root directory):
No specific changes usually needed if component manager handles dependencies.
sdkconfig.defaults (optional, or configure via idf.py menuconfig):
CONFIG_LOG_DEFAULT_LEVEL_INFO=y
CONFIG_LOG_MAXIMUM_LEVEL_VERBOSE=y # For detailed Azure SDK logs during dev

CONFIG_ESPTOOLPY_FLASHMODE_DIO=y
CONFIG_ESPTOOLPY_FLASHFREQ_80M=y
CONFIG_ESPTOOLPY_FLASHSIZE_4MB=y # Adjust as per your ESP32 module

# Wi-Fi Settings
CONFIG_WIFI_SSID="YourSSID"
CONFIG_WIFI_PASSWORD="YourPassword"

# Azure IoT Hub Connection String
CONFIG_AZURE_IOT_CONNECTION_STRING="HostName=your-iot-hub.azure-devices.net;DeviceId=your-device-id;SharedAccessKey=your-device-key"

# SNTP Configuration
CONFIG_LWIP_SNTP_ENABLE=y
CONFIG_LWIP_DHCP_MAX_NTP_SERVERS=1
CONFIG_LWIP_SNTP_SERVER_ADDRESS="pool.ntp.org"

# For Azure SDK stack size if needed
CONFIG_FREERTOS_TIMER_TASK_STACK_DEPTH=4096
# Might need to increase main task stack if not creating a separate Azure task
CONFIG_ESP_MAIN_TASK_STACK_SIZE=4096
Tip: It’s highly recommended to use
idf.py menuconfigto set sensitive data like Wi-Fi credentials and connection strings rather than hardcoding them directly intosdkconfig.defaultsor source files, especially for anything beyond initial testing. For production, consider secure provisioning methods.
Code Snippet 2: Receiving Cloud-to-Device (C2D) Messages
To receive C2D messages, you need to set a message callback function.
Modify azure_iot_task in main.c:
Add the callback function prototype:
static IOTHUBMESSAGE_DISPOSITION_RESULT c2d_message_callback(IOTHUB_MESSAGE_HANDLE message, void* user_context);
In azure_iot_task, before the while(true) loop, after setting connection status callback:
    // Set the C2D message callback
    if (IoTHubDeviceClient_LL_SetMessageCallback(device_ll_handle, c2d_message_callback, NULL) != IOTHUB_CLIENT_OK) {
        ESP_LOGE(TAG, "Failed to set C2D message callback");
        // Handle error, cleanup, and exit task
        IoTHubDeviceClient_LL_Destroy(device_ll_handle);
        platform_deinit();
        vTaskDelete(NULL);
        return;
    }
    ESP_LOGI(TAG, "C2D message callback set.");
Implement the c2d_message_callback function:
static IOTHUBMESSAGE_DISPOSITION_RESULT c2d_message_callback(IOTHUB_MESSAGE_HANDLE message, void* user_context) {
    (void)user_context; // Unused parameter

    const unsigned char* buffer;
    size_t size;

    if (IoTHubMessage_GetByteArray(message, &buffer, &size) != IOTHUB_MESSAGE_OK) {
        ESP_LOGE(TAG, "Failed to get C2D message byte array.");
        return IOTHUBMESSAGE_REJECTED; // Indicate message processing failure
    } else {
        // Print the received message content
        // Ensure the buffer is null-terminated if printing as a string
        char* msg_str = (char*)malloc(size + 1);
        if (msg_str) {
            memcpy(msg_str, buffer, size);
            msg_str[size] = '\0';
            ESP_LOGI(TAG, "C2D Message Received: <<<%.*s>>>", (int)size, msg_str);
            free(msg_str);

            // Example: Check for a specific command
            if (strncmp((const char*)buffer, "ledon", size) == 0) {
                ESP_LOGI(TAG, "Received command: LED ON");
                // Add code here to turn an LED on
                // gpio_set_level(LED_GPIO_PIN, 1);
            } else if (strncmp((const char*)buffer, "ledoff", size) == 0) {
                ESP_LOGI(TAG, "Received command: LED OFF");
                // Add code here to turn an LED off
                // gpio_set_level(LED_GPIO_PIN, 0);
            }

            // Check for message properties if any
            MAP_HANDLE propMap = IoTHubMessage_Properties(message);
            if (propMap != NULL) {
                const char*const* keys;
                const char*const* values;
                size_t prop_count;
                if (Map_GetInternals(propMap, &keys, &values, &prop_count) == MAP_OK) {
                    if (prop_count > 0) {
                        ESP_LOGI(TAG, "Message Properties:");
                        for (size_t i = 0; i < prop_count; i++) {
                            ESP_LOGI(TAG, "  %s : %s", keys[i], values[i]);
                        }
                    }
                }
            }


        } else {
            ESP_LOGE(TAG, "Failed to allocate memory for C2D message string.");
            return IOTHUBMESSAGE_REJECTED;
        }
        // Indicate that the message was accepted and processed.
        // Other options: IOTHUBMESSAGE_REJECTED, IOTHUBMESSAGE_ABANDONED
        return IOTHUBMESSAGE_ACCEPTED;
    }
}
Warning: The
IoTHubDeviceClient_LL_DoWork()function must be called frequently for the C2D callback to be invoked. The Azure IoT C SDK is not inherently multi-threaded in its “LL” (Lower Layer) version;DoWorkdrives its state machine.
Build Instructions
- Save all your source files (
main.c,CMakeLists.txt,sdkconfig.defaults). - Open a new ESP-IDF Terminal in VS Code (Ctrl+Shift+` or Terminal > New Terminal, then click the ESP-IDF icon).
- Configure: If you haven’t set credentials in
sdkconfig.defaults, runidf.py menuconfig.- Set
Example Connection Configuration ---> SSIDandPassword. - Set
Component config ---> ESP Azure IoT SDK ---> Azure IoT Hub Device Connection String. - Ensure SNTP is enabled:
Component config -> LWIP -> SNTP.
- Set
- Build the project:
idf.py build
Run/Flash/Observe Steps
- Connect your ESP32 device to your computer via USB.
- Flash the firmware:
idf.py -p /dev/ttyUSB0 flash monitor(Replace/dev/ttyUSB0with your ESP32’s serial port, e.g.,COM3on Windows). - Observe Logs:
- You should see Wi-Fi connection messages.
- SNTP time synchronization messages.
- Azure IoT Hub connection status messages.
- “Message sent successfully…” logs for D2C telemetry.
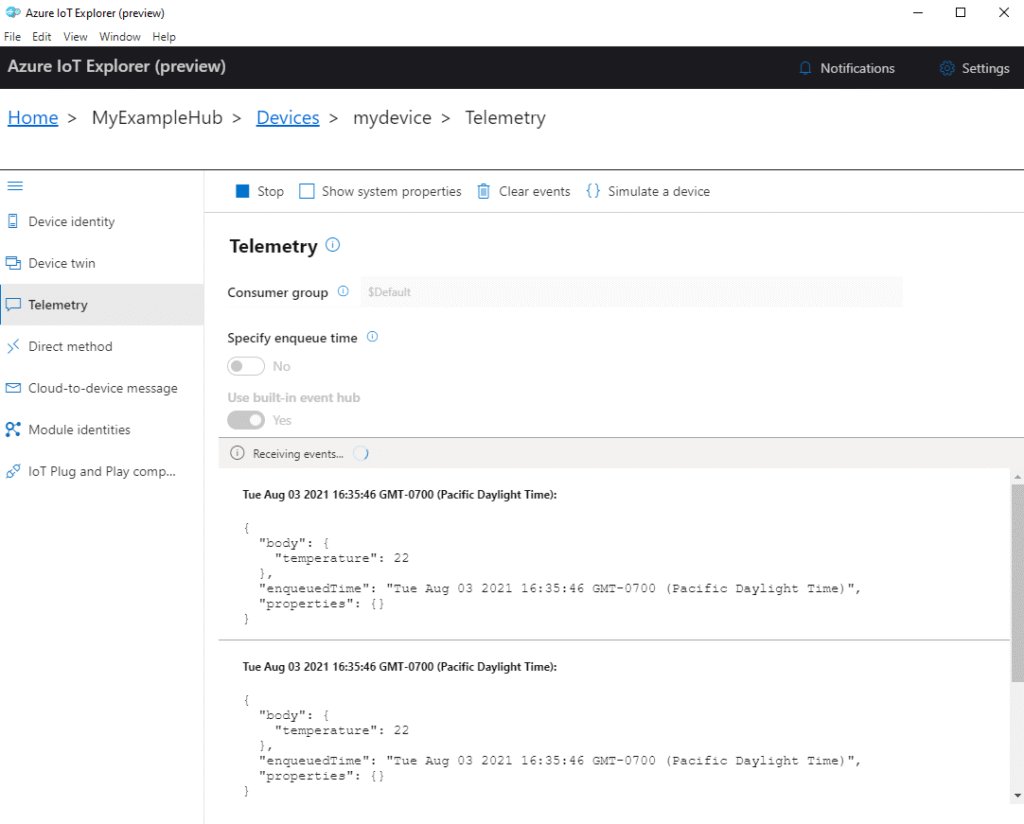
- Check Azure IoT Hub Portal:
- Go to your Azure portal -> Your IoT Hub -> Devices -> Your Device ID.
- You can use “Device Explorer (preview)” or integrate with Azure Stream Analytics / Azure Monitor to see incoming telemetry.
- To send a C2D message: In the device view, click “Message to device”. Enter your message (e.g.,
ledon) and click “Send Message”. Observe the ESP32 serial monitor for the “C2D Message Received” log.
Variant Notes
- ESP32, ESP32-S2, ESP32-S3, ESP32-C3, ESP32-C6: All these variants have Wi-Fi capabilities and sufficient processing power and memory to run the Azure IoT C SDK for basic telemetry and C2D messaging.
- The primary requirement is a stable Wi-Fi connection and enough RAM/Flash for the SDK and your application logic. The Azure IoT C SDK can be resource-intensive.
- For variants with less RAM (like some ESP32-C3 configurations), you might need to be more careful about disabling unused SDK features or optimizing your application to free up memory. Always check the compiled application size and runtime memory usage.
- Ensure the correct toolchain and SDK configurations are used for the specific target chip in
idf.py set-target <chip_name>.
- ESP32-H2: This variant primarily features an IEEE 802.15.4 (Thread/Zigbee) radio and Bluetooth LE. It does not have built-in Wi-Fi.
- To connect an ESP32-H2 to Azure IoT Hub directly, it would typically require an external Wi-Fi module or be part of a more complex setup involving a gateway device (e.g., an ESP32 Wi-Fi variant acting as a border router/gateway that relays data from Thread/Zigbee devices to Azure).
- Azure IoT Hub can support gateway patterns, and protocols like MQTT-SN (Sensor Networks) could be used over 802.15.4, but this is a more advanced scenario beyond the scope of this direct Wi-Fi connection chapter.
Tip: When working with memory-constrained variants, pay close attention to the output of
idf.py size. You can also use heap tracing functions (esp_heap_caps_get_free_size,esp_heap_caps_get_largest_free_block) to monitor available memory at runtime.
Common Mistakes & Troubleshooting Tips
| Mistake / Issue | Symptom(s) | Troubleshooting / Solution |
|---|---|---|
| Incorrect Connection String | Device fails to connect. Authentication errors in device logs or Azure IoT Hub diagnostics. Error code IOTHUB_CLIENT_CONNECTION_BAD_CREDENTIAL or similar. |
Verify the full device connection string is copied correctly from Azure Portal (Device -> Primary Connection String). Ensure it’s not the IoT Hub connection string (which has broader permissions). Check for typos or missing characters. |
| SNTP Time Sync Failure / SAS Token Expiry | Device fails to authenticate. SAS token validation errors. Connection works for a while, then fails after token expiry if not regenerated. Device logs may show TLS errors or auth rejections. |
Critically important: Ensure SNTP is enabled and successfully synchronizes ESP32’s system time before attempting to connect to Azure IoT Hub. Log the device’s current time to verify. Check NTP server accessibility. If generating SAS tokens manually, ensure the expiry time ( se=) is valid and sufficiently in the future. The SDK usually handles token generation from the connection string.
|
| Wi-Fi Connectivity Problems | Device cannot reach Azure IoT Hub. DNS resolution failures, TCP connection timeouts. platform_init() might fail or MQTT connection attempts time out. |
Confirm Wi-Fi SSID/password are correct. Test basic internet connectivity (e.g., ping a public server, simple HTTP GET example). Ensure your network firewall allows outbound connections on TCP port 8883 (MQTT over TLS) or 443 (MQTT over WebSockets/AMQP over WebSockets). |
Azure SDK Not Initialized / DoWork Not Called |
IoTHubDeviceClient_LL_Create... fails. Messages not sent, C2D messages not received. Callbacks not firing. Device appears disconnected or unresponsive to IoT Hub. |
Ensure platform_init() is called once at the start.Verify IoTHubDeviceClient_LL_CreateFromConnectionString() (or other create functions) is successful.Crucially for LL (Lower Layer) SDK: Call IoTHubDeviceClient_LL_DoWork() periodically and frequently in your main application loop or a dedicated task. This function drives the SDK’s internal state machine for network operations.
|
| Stack Overflow / Out of Memory | Random crashes, reboots, Guru Meditation errors. malloc failures. Azure SDK functions return memory allocation errors. |
Increase stack size for the task running Azure IoT client logic (e.g., to 8KB-12KB via xTaskCreate or CONFIG_ESP_MAIN_TASK_STACK_SIZE).Monitor free heap memory ( esp_get_free_heap_size()).Disable unused ESP-IDF components or features. If using Azure SDK features you don’t need, see if they can be disabled via Kconfig to reduce footprint. |
| Incorrect MQTT Topic Usage | D2C messages sent but not visible in Azure. C2D messages sent from Azure but not received by device. Device Twin updates not working. |
Verify exact MQTT topic strings against Azure IoT Hub documentation (e.g., devices/{deviceId}/messages/events/ for D2C).Ensure {deviceId} is correctly substituted.For C2D, ensure device is subscribed to devices/{deviceId}/messages/devicebound/#.For Device Twin/Direct Methods, use the specific $iothub/... topics.
|
| X.509 Certificate Issues (if used) | TLS handshake failures, authentication errors. Device rejected by IoT Hub. |
Ensure correct X.509 device certificate and private key are used. Verify the certificate is properly registered and enabled for the device in Azure IoT Hub. Ensure the private key is securely stored and accessible on the device. Check that the root CA certificate trusted by the device (e.g., Baltimore CyberTrust Root or DigiCert Global Root G2, depending on IoT Hub configuration) is correct and included in the ESP32’s trust store or provided to the SDK. |
| Throttling by Azure IoT Hub | Messages get rejected after a period of high traffic. Error codes indicating throttling (e.g., 429, 503 from service). |
Be aware of Azure IoT Hub message quotas and throttling limits for your chosen tier (e.g., Free tier has lower limits). Implement retry logic with exponential backoff for sending messages if throttled. Optimize message frequency and size. Consider message batching if appropriate (though SDK handles some of this). |
Exercises
- Real Sensor Telemetry:
- Modify the D2C telemetry example to read data from a physical sensor connected to your ESP32 (e.g., a DHT11/DHT22 for temperature/humidity, or the ESP32’s internal temperature sensor via
temprature_sens_read()). Send this real sensor data to Azure IoT Hub.
- Modify the D2C telemetry example to read data from a physical sensor connected to your ESP32 (e.g., a DHT11/DHT22 for temperature/humidity, or the ESP32’s internal temperature sensor via
- C2D LED Control with Feedback:
- Connect an LED to a GPIO pin on your ESP32.
- Extend the C2D message example to toggle this LED based on commands like “ledon” and “ledoff”.
- After processing the command, use Device Twin reported properties to update the LED’s state (e.g.,
{"ledState": "on"}) back to Azure IoT Hub.
- Device Twin Desired Property Handling:
- In Azure IoT Hub, set a desired property for your device (e.g.,
{"telemetryInterval": 30000}for 30 seconds). - Implement code on the ESP32 to listen for Device Twin desired property updates. When the
telemetryIntervalis received, adjust the D2C message sending frequency accordingly. Report back the applied interval using reported properties. - Hint: You’ll need to set a
IoTHubDeviceClient_LL_SetDeviceTwinCallbackfunction.
- In Azure IoT Hub, set a desired property for your device (e.g.,
- X.509 Certificate Authentication (Advanced):
- Research how to generate or obtain an X.509 certificate for your device.
- Configure your Azure IoT Hub and your device for X.509 certificate-based authentication instead of SAS tokens.
- Modify the connection example to use certificates. This will involve using
IoTHubDeviceClient_LL_CreateFromDeviceAuthand setting options likeOPTION_X509_CERTandOPTION_X509_PRIVATE_KEY. - Refer to Azure IoT SDK documentation for details on X.509 provisioning.
Summary
- Azure IoT Hub is a scalable and secure cloud service for bidirectional communication with IoT devices.
- MQTT is a common and efficient protocol for connecting ESP32 devices to Azure IoT Hub.
- Authentication can be achieved using SAS tokens (simpler, time-sensitive) or X.509 certificates (more secure, complex setup).
- Accurate device time (via SNTP) is critical for SAS token authentication.
- The ESP-IDF, with the Azure IoT C SDK component, provides the tools to connect ESP32 to Azure.
- Key operations include sending Device-to-Cloud (D2C) telemetry and receiving Cloud-to-Device (C2D) messages.
- Device Twins allow for state synchronization, and Direct Methods enable RPC-like interactions.
- The
IoTHubDeviceClient_LL_DoWork()function is essential for the LL SDK to operate correctly. - Most Wi-Fi enabled ESP32 variants can connect to Azure IoT Hub, with resource considerations for smaller variants.
Further Reading
- Azure IoT Hub Documentation:
- Official Azure IoT Hub Documentation: https://docs.microsoft.com/azure/iot-hub/
- Understand Azure IoT Hub MQTT support: https://docs.microsoft.com/azure/iot-hub/iot-hub-mqtt-support
- Control access to IoT Hub using Shared Access Signatures: https://docs.microsoft.com/azure/iot-hub/iot-hub-devguide-security#sas-tokens
- Understand and use device twins in IoT Hub: https://docs.microsoft.com/azure/iot-hub/iot-hub-devguide-device-twins
- Azure IoT C SDK:
- Microsoft Azure IoT SDK for C: https://github.com/Azure/azure-iot-sdk-c
- Azure IoT C SDK samples for ESP32 (often found within the SDK repository or ESP-IDF examples): Check the
azure-iot-sdk-c/tree/main/iothub_client/samplesor specific ESP32 ports.
- ESP-IDF Specific:
- ESP-IDF Programming Guide: https://docs.espressif.com/projects/esp-idf/en/v5.4/esp32/api-reference/index.html
- ESP-IDF
esp-azurecomponent (orespressif/azure-iot-sdk-cin the component registry): Search the Espressif component registry for examples and documentation. https://components.espressif.com/
