
Chapter 7: Advantages of Linux in Embedded Systems
Chapter Objectives
Upon completing this chapter, you will be able to:
- Understand the core principles of the open-source philosophy and its impact on embedded systems development.
- Analyze how Linux’s architecture facilitates deep customization of the kernel, user space, and system services for resource-constrained devices.
- Explain the mechanisms behind Linux’s extensive hardware support, including the device driver model and the role of the Device Tree.
- Evaluate the strengths of the Linux networking stack and its importance for creating modern connected devices and IoT products.
- Leverage kernel configuration tools to modify and recompile a custom Linux kernel for the Raspberry Pi 5, optimizing it for a specific use case.
- Implement a basic hardware integration project by enabling kernel support for an I2C peripheral and interacting with it from user space.
Introduction
In the preceding chapters, we have laid the groundwork for building and deploying embedded Linux systems. We have explored the boot process, the role of the kernel, and the landscape of distributions and build systems. A fundamental question, however, may still linger: Why choose Linux in the first place? The world of embedded systems is vast, with a long history of proprietary Real-Time Operating Systems (RTOSs), bare-metal programming, and other specialized firmware solutions. The ascent of Linux from a hobbyist project to the dominant OS in the embedded space was not accidental; it was driven by a powerful confluence of technical superiority, economic pragmatism, and a revolutionary development model.
Making the decision to use Linux is one of the most significant architectural choices in the design of an embedded product. It has profound implications for development cost, time-to-market, product capabilities, and long-term maintenance. To an engineer or project manager, understanding the advantages of Linux is as crucial as understanding its technical implementation. It is the “why” that justifies the “how.”
This chapter will illuminate the core benefits that have made Linux the de facto standard for a new generation of smart, connected devices. We will move beyond the code and commands to explore the strategic value that Linux brings to a project. We will delve into the profound impact of its open-source nature, its unparalleled potential for customization, its vast hardware support, its robust networking capabilities, and the vibrant global community that sustains it. By the end of this chapter, you will not only know how to work with embedded Linux but will also be able to articulate why it is, for so many applications, the most powerful and strategic choice available.
Technical Background
The decision to build an embedded product around Linux is an investment in a rich and mature ecosystem. This ecosystem’s value is derived from several foundational pillars that work in concert to provide a development platform of unparalleled power and flexibility. Understanding these pillars—the open-source model, deep customizability, broad hardware support, robust networking, and the strength of the community—is key to grasping why Linux has become so pervasive.
The Open-Source Advantage: Control and Transparency
The journey begins with the very essence of Linux: its open-source philosophy. Unlike a proprietary RTOS, where the source code is a guarded secret, the Linux kernel and the vast majority of its surrounding software are open for anyone to view, modify, and redistribute. This is governed by licenses, most notably the GNU General Public License (GPL), which ensures that these freedoms are preserved. From a commercial and engineering perspective, this is revolutionary. It means a company is not beholden to a single vendor for features, bug fixes, or support. If a critical bug is discovered, a development team is not left waiting for the vendor’s next release cycle; they have the power to find and fix the problem themselves. If a new feature is required, they can implement it directly. This freedom eliminates vendor lock-in and provides ultimate control over the product’s destiny. It transforms the operating system from a “black box” into a transparent and malleable component of the final product.
Unmatched Customization: Tailoring the System to the Task
This transparency is the direct enabler of the second great advantage: unmatched customization. Because the source code is available, an embedded developer can tailor every aspect of the operating system to the precise needs of the target device. This goes far beyond simply choosing which applications to install. It extends deep into the heart of the kernel itself. Using configuration tools like menuconfig, a developer can meticulously craft a kernel that contains only the specific device drivers and features required for the hardware, and nothing more. For example, a simple IoT sensor node has no need for joystick support, complex graphical framebuffer drivers, or obscure filesystem formats. By disabling these features during the kernel build process, the developer can dramatically reduce the kernel’s memory footprint and storage size, which is a critical consideration for cost-sensitive, high-volume devices.
This process, often referred to as “stripping down,” allows a single, powerful kernel source base to be scaled down to run on a resource-constrained microcontroller with a few megabytes of RAM, or scaled up to manage a complex multi-core server. The customization extends to the user space as well, where the choice of a C library—from the feature-rich glibc to the lightweight musl—can further optimize the system for size and performance. This ability to build a bespoke OS is precisely what build systems like Buildroot and the Yocto Project, which we discussed in the previous chapter, are designed to automate.

Expansive Hardware Support and the Device Tree
The third pillar, expansive hardware support, is a direct consequence of the open-source, collaborative development model. The Linux kernel supports more hardware architectures and peripheral devices than any other operating system in history. This is not the work of a single company, but the collective effort of thousands of developers and companies worldwide. When a semiconductor company releases a new System-on-Chip (SoC), they often contribute the necessary drivers and board support code directly to the mainline kernel. This collaborative effort means that when an engineer selects a processor, sensor, or connectivity module, there is a high probability that a stable, well-tested Linux driver for it already exists. This drastically reduces the development time and risk associated with hardware integration.
A key innovation that makes this manageable, particularly in the ARM-based SoC world, is the Device Tree. Historically, the description of a board’s specific hardware layout—which peripherals were connected to which pins, what clock speeds they used—was often hard-coded into the kernel source itself. This made supporting new boards a cumbersome process. The Device Tree abstracts this hardware description into a separate data structure, a text file (.dts) that is compiled into a binary blob (.dtb) and passed to the kernel at boot time. The kernel then parses this file to learn what hardware is present and which drivers it needs to load. This separation of hardware description from driver logic is a powerful concept. It allows a single, generic kernel image to support numerous different board designs simply by loading a different Device Tree blob. For a platform like the Raspberry Pi 5, this mechanism is what allows the kernel to configure the GPIO pins, I2C and SPI buses, and other on-chip peripherals correctly.
%%{init: {'theme': 'base', 'themeVariables': { 'fontFamily': 'Open Sans'}}}%%
graph TD
    subgraph Bootloader Phase
        A[<b>Start: Power On</b>];
        B{Loads Kernel Image};
        C{"Loads specific<br>Device Tree Blob (.dtb)"};
    end

    subgraph Kernel Initialization
        D[Kernel starts executing];
        E[Parses Device Tree<br>in memory];
        F{Identifies hardware<br>from DTB data};
        G[Probes and loads<br>necessary drivers];
    end

    subgraph System Running
        H[Peripherals like I2C, SPI, GPIO<br>are now available];
        I[Mounts root filesystem];
        J[<b>End: User Space Ready</b>];
    end

    A --> B;
    B --> C;
    C --> D;
    D --> E;
    E --> F;
    F --> G;
    G --> H;
    H --> I;
    I --> J;

    %% Styling
    classDef primary fill:#1e3a8a,stroke:#1e3a8a,stroke-width:2px,color:#ffffff;
    classDef process fill:#0d9488,stroke:#0d9488,stroke-width:1px,color:#ffffff;
    classDef system fill:#8b5cf6,stroke:#8b5cf6,stroke-width:1px,color:#ffffff;
    classDef check fill:#ef4444,stroke:#ef4444,stroke-width:1px,color:#ffffff;
    classDef success fill:#10b981,stroke:#10b981,stroke-width:2px,color:#ffffff;

    class A,B,C primary;
    class D,E,F,G system;
    class H,I process;
    class J success;
Robust Networking for a Connected World
The fourth advantage, particularly relevant in the modern era of the Internet of Things, is Linux’s robust and mature networking capabilities. The Linux networking stack is a testament to decades of development and real-world testing in the most demanding server environments. It provides a comprehensive, high-performance implementation of the TCP/IP suite, along with countless other protocols. For an embedded developer, this means that building a connected device is not a matter of writing a network stack from scratch, but of configuring the one that already exists. Whether the product needs to host a web server, connect to a cloud service via MQTT, establish a secure VPN tunnel, or perform complex packet filtering as a firewall, the tools and libraries are readily available and battle-hardened. The standard Berkeley sockets API provides a portable and powerful interface for network programming, accessible from C, Python, and many other languages. This built-in, industrial-grade networking is a primary reason why Linux was the natural choice for the explosion of IoT devices, from smart home hubs to industrial gateways.
The Power of Community: A Global Development Team
Finally, all these advantages are sustained by the power of the community. The Linux ecosystem is more than just source code; it is a global collective of developers, maintainers, and users. This community provides an unparalleled support network. When a developer encounters an obscure bug, chances are someone else has already faced and solved it. Mailing lists, forums, and platforms like Stack Overflow contain a vast, searchable repository of knowledge. Furthermore, the community acts as a massive, distributed quality assurance and security team. With thousands of experts scrutinizing the code, security vulnerabilities are often found and patched far more quickly than in a closed-source environment. For a company building a product, this means they are leveraging a global R&D and support effort for the cost of participation, a strategic advantage that no proprietary OS vendor can hope to match.
Practical Examples
To truly appreciate these advantages, we must see them in action. In this section, we will use our Raspberry Pi 5 and the Buildroot environment from the previous chapter to demonstrate two key benefits: kernel customization for optimization and leveraging the kernel’s hardware support to interface with a real-world sensor.
Example 1: Kernel Customization for Performance
Our goal is to take the standard Buildroot image and shrink the kernel by removing features that are unnecessary for a simple, headless embedded device.
Build and Configuration Steps
We begin inside our buildroot directory, assuming we have already run make raspberrypi5_defconfig.
1. Launching the Kernel Configuration Menu
Instead of the main make menuconfig, we will use a specific command to configure only the Linux kernel.
make linux-menuconfig
This command will, if necessary, download the kernel source and then launch the kernel’s own menuconfig interface. It will look very similar to the Buildroot menu, but all the options pertain directly to the kernel itself.
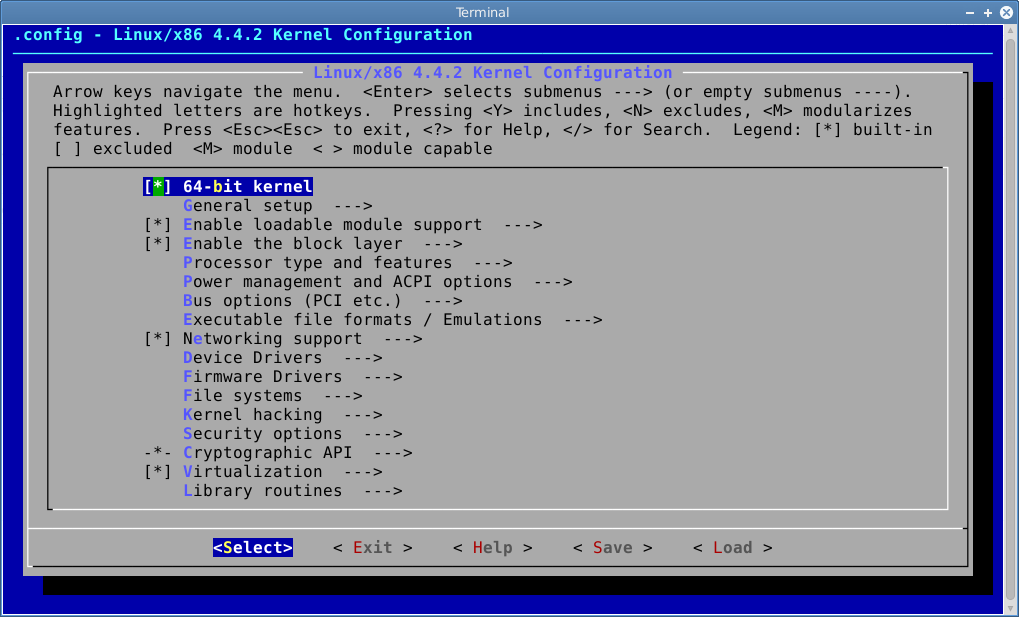
2. Removing Unnecessary Features
Let’s remove a few things a simple device doesn’t need. Use the arrow keys to navigate and the ‘N’ key to disable a feature entirely.
- Disable extraneous filesystems:
- Navigate to
File systems --->. - Scroll down and press ‘N’ on
JFS filesystem support. - Press ‘N’ on
XFS filesystem support. - Press ‘N’ on Btrfs filesystem support.Our system only uses ext4, so these are just wasting space.
- Navigate to
- Disable legacy media support:
- Navigate back to the main menu.
- Go to
Device Drivers --->. - Go to
Multimedia support --->. - Press ‘N’ on
< > Media USB Adapters --->. We are not connecting a USB webcam.
- Disable sound card support:
- In the
Device Driversmenu, press ‘N’ on< > Sound card support --->. Our headless device doesn’t need to play audio.
- In the
3. Saving and Building
After making your changes, navigate to < Exit > repeatedly until you are prompted to save your new configuration. Select < Yes >.
Now, we simply rebuild the entire image. Buildroot will detect that the kernel configuration has changed and will recompile the kernel accordingly.
make
File Structure and Verification
After the build completes, we can compare the size of our new kernel with the original. The kernel image is named Image inside output/images. If you saved the output from your previous build, you could compare the file sizes directly. You will find that the new Image file is noticeably smaller, perhaps by several hundred kilobytes or even a megabyte. This saving is critical in memory-constrained systems.
After booting the new image, we can verify from the target’s command line that our changes took effect. One way is to check the running kernel’s configuration if it was enabled.
# On the Raspberry Pi 5, after booting the new image
zcat /proc/config.gz | grep CONFIG_SOUND
If you see # CONFIG_SOUND is not set, you have successfully removed the entire sound subsystem from your running kernel, making it leaner and more secure.
Example 2: Leveraging Hardware Support (I2C Sensor)
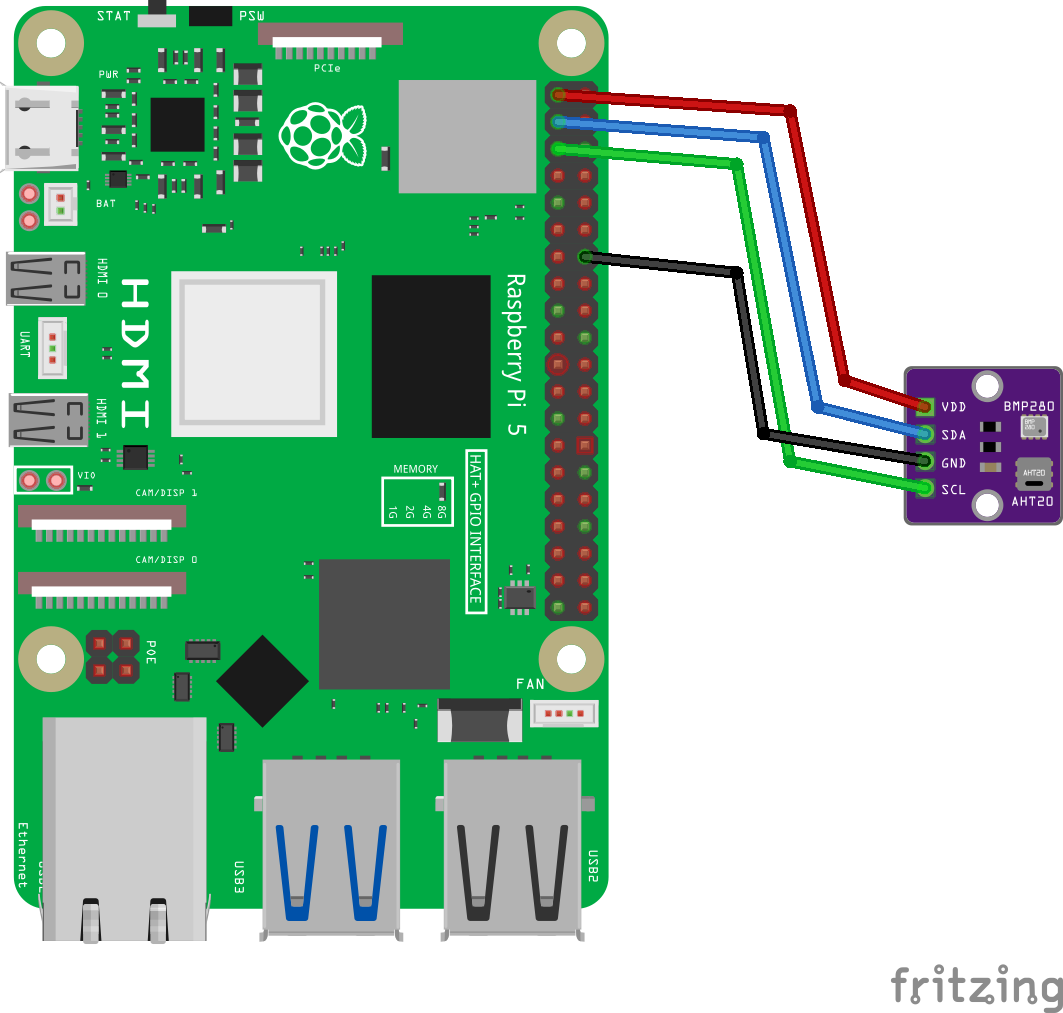
This example demonstrates how easily Linux allows us to interface with hardware by simply enabling the correct drivers and using high-level tools. We will connect a BMP280 temperature and pressure sensor.
Hardware Integration
The BMP280 is a common I2C sensor. You will need a breakout board for it.
Wiring Diagram:
Connect the sensor to the Raspberry Pi 5’s GPIO header as follows:
- VCC (Sensor) -> 3.3V (Pi Pin 1)
- GND (Sensor) -> GND (Pi Pin 9)
- SCL (Sensor) -> I2C1_SCL (Pi Pin 5)
- SDA (Sensor) -> I2C1_SDA (Pi Pin 3)
Warning: Always ensure the Raspberry Pi is powered off when making wiring changes. Connecting to the wrong pins can damage the sensor or the Pi.
Build and Configuration Steps
We need to tell Buildroot to enable I2C support in the kernel and to include Python and some user-space tools in our image.
1. Configure Buildroot
Run make menuconfig from the buildroot directory.
- Enable I2C support:
- Navigate to
Kernel --->. - Ensure
Linux kernel extensions --->is enabled. - Inside, enable
I2C support.
- Navigate to
- Enable hardware tools:
- Navigate to
Target packages --->->Hardware handling --->. - Select
[*] i2c-tools. This gives us thei2cdetectutility for debugging.
- Navigate to
- Enable Python and SMBus library:
- Navigate to
Target packages --->->Interpreter languages and scripting --->. - Select
[*] python3. - Under the
python3options, navigate toExternal python modules --->. - In the text box for “Other python modules”, type
pysmbus. Some versions may have a menu option forpython-smbusorpython-smbus2; if so, select it.
- Navigate to
2. Rebuild the Image
Exit menuconfig, save the configuration, and run make.
Build, Flash, and Boot Procedures
Flash the newly generated sdcard.img to your microSD card and boot the Raspberry Pi 5 with the sensor connected and your serial console attached.
1. Verifying the Hardware
Once you log in as root, we can use the i2c-tools we included to see if the kernel has detected our sensor. The Raspberry Pi 5’s primary user I2C bus is typically number 1.
# On the Raspberry Pi 5
i2cdetect -y 1
Expected Output:
You should see a grid of I2C addresses. The BMP280 will appear at address 0x76 or 0x77.
     0  1  2  3  4  5  6  7  8  9  a  b  c  d  e  f
00:                         -- -- -- -- -- -- -- --
10: -- -- -- -- -- -- -- -- -- -- -- -- -- -- -- --
...
70: -- -- -- -- -- -- 76 -- -- -- -- -- -- -- --
This output confirms that the Linux kernel’s I2C driver is working and can communicate with our hardware.
2. Reading Sensor Data with Python
Now, we will write a simple Python script on the target to read from the sensor.
# Create a new file using vi or nano
vi read_bmp280.py
Code Snippet
Enter the following Python code. This is a simplified example for demonstration. A production script would be more robust.
# read_bmp280.py
# Note: This is a simplified example. A real application would use a proper library
# that handles calibration data for accurate readings.
import smbus2
import time

# BMP280 default address
I2C_ADDR = 0x76

# Get I2C bus
bus = smbus2.SMBus(1)

# A simple read from a known register (the chip ID register 0xD0)
try:
    chip_id = bus.read_byte_data(I2C_ADDR, 0xD0)
    print(f"Successfully read from I2C device at address {hex(I2C_ADDR)}")
    print(f"Chip ID: {hex(chip_id)}") # Should be 0x58 for a BMP280
except Exception as e:
    print(f"Error communicating with I2C device: {e}")
Save the file. Now, run the script:
python3 read_bmp280.py
Expected Output:
Successfully read from I2C device at address 0x76
Chip ID: 0x58
This successful interaction demonstrates the entire chain: the kernel’s modular hardware support (I2C driver), the power of user-space tools (i2c-tools), and the ease of access to hardware from a high-level scripting language (Python). We accomplished this without writing a single line of C driver code, a powerful testament to the Linux ecosystem.
Common Mistakes & Troubleshooting
While Linux provides immense advantages, its complexity can lead to common pitfalls, especially for newcomers.
Exercises
These exercises will help you solidify your understanding of the practical advantages of using Linux.
1. Basic: License Investigation
- Objective: To develop an appreciation for the legal frameworks that underpin the open-source ecosystem.
- Task: The Linux kernel is licensed under the GPLv2. Many modern user-space applications use the GPLv3. Research and write two short paragraphs describing the key differences between these two license versions, particularly concerning software patents and the “Tivoization” clause.
- Verification: Your summary should correctly identify the patent retaliation clauses in GPLv3 and its stricter rules regarding user freedom to modify software on hardware devices.
2. Intermediate: Adding a User and Securing SSH
- Objective: To leverage Linux’s multi-user and security features to improve upon the default Buildroot configuration.
- Task:
- In
make menuconfig, navigate toSystem configuration --->. - Set a password for the
rootuser. - In the same menu, add a new regular user account under
(/bin/sh) Path to read-only users tables. - Rebuild, flash, and boot the image.
- Using the
opensshpackage you added in the previous chapter’s exercise, try to SSH in asroot. Then, try to SSH in as your new user.
- In
- Verification: You should be prompted for a password when logging in as root. You should be able to log in successfully as your new user. This demonstrates the ease of implementing standard security practices.
3. Advanced: Enabling a Kernel Module
- Objective: To understand the difference between building a driver into the kernel versus building it as a loadable module.
- Task:
- Go into
make linux-menuconfig. - Find a simple, non-essential driver. A good choice is under
Device Drivers --->->Character devices --->-><M> Legacy (BSD) PTY support. - Instead of disabling it (‘N’) or building it in (‘*’), build it as a module by pressing ‘M’.
- Rebuild the image. After booting, the driver will not be loaded by default.
- On the target, run
lsmodto see loaded modules. Theptymodule should be absent. - Run
modprobe bsd_ptyto manually load the driver. - Run
lsmodagain.
- Go into
- Verification: The
bsd_ptymodule should now be visible in the output of the secondlsmodcommand, demonstrating your ability to dynamically manage hardware support on a running system.
Summary
- Open-Source Freedom: Linux’s open-source nature, governed by the GPL, eliminates vendor lock-in and gives developers ultimate control over the OS, allowing them to fix bugs and add features directly.
- Deep Customization: The availability of source code allows for meticulous tailoring of the kernel and user space, enabling Linux to be optimized for severely resource-constrained devices by removing all non-essential components.
- Vast Hardware Support: A global community of developers contributes to a massive repository of device drivers. The Device Tree architecture further simplifies hardware enablement by abstracting board-level descriptions from driver code.
- Industrial-Grade Networking: Linux provides a mature, robust, and feature-complete networking stack out of the box, making it the ideal platform for building any kind of connected embedded device or IoT product.
- Community as a Strategic Asset: The worldwide Linux community acts as a massive, distributed support, quality assurance, and security team, providing a knowledge base and a level of scrutiny that no single company can match.
- Practical Power: These advantages translate into tangible benefits: smaller memory footprints, lower system cost, faster development cycles, and more secure, capable, and maintainable products.
Further Reading
- kernel.org: The official repository for the Linux kernel source code. The documentation included with the source is the most authoritative reference for kernel internals. https://www.kernel.org/
- LWN.net: A premier news and information source for the Linux kernel and free software development community. The articles provide deep technical insights into ongoing kernel development. https://lwn.net/
- The Linux Programming Interface by Michael Kerrisk: An exhaustive and definitive guide to the Linux and UNIX system call interface. Essential for any serious C-level development on Linux.
- Free Software Foundation – License Information: The FSF provides clear explanations of various open-source licenses, including the GPL family, which is crucial for compliance. https://www.gnu.org/licenses/licenses.html
- Bootlin – Embedded Linux and Kernel Engineering: Bootlin provides extensive training materials, technical presentations, and blog posts on embedded Linux, including deep dives into the Device Tree, Buildroot, and kernel development. https://bootlin.com/docs/
- Raspberry Pi Foundation Documentation: The official documentation for Raspberry Pi hardware, including details on the Device Tree overlays used to configure hardware interfaces. https://www.raspberrypi.com/documentation/
