
Chapter 96: U-Boot: Introduction, Architecture, and Common Features
Chapter Objectives
By the end of this chapter, you will be able to:
- Understand the role and importance of a bootloader in an embedded Linux system.
- Describe the architecture of the Das U-Boot bootloader, including its multi-stage boot process.
- Configure and cross-compile U-Boot from source for a target platform like the Raspberry Pi 5.
- Interact with the U-Boot command-line interface to inspect system hardware, manage environment variables, and control the boot process.
- Implement U-Boot scripts to automate the loading and execution of a Linux kernel.
- Debug common issues related to bootloader configuration, compilation, and deployment.
Introduction
Every embedded Linux system, from a simple sensor node to a complex industrial controller, begins its life in the same way: with a bootloader. The bootloader is the critical first piece of software that runs after the system powers on. It performs the initial hardware setup, prepares the system memory, and then loads the Linux kernel, handing over control to the full operating system. It is the bridge between the raw, uninitialized hardware and the sophisticated environment of a modern OS. Without a robust and flexible bootloader, the system would never awaken.
In this chapter, we delve into Das U-Boot, or “The Universal Boot Loader,” which has become the de facto standard for a vast number of embedded systems across various processor architectures. Its power lies not just in its ability to boot Linux, but in its rich feature set that transforms it into a miniature operating system for system bring-up, debugging, and recovery. We will explore why U-Boot is more than just a loader; it is an indispensable tool for the embedded developer. We will dissect its architecture, understand its configuration, and learn to wield its powerful command line. Using the Raspberry Pi 5 as our practical platform, you will compile U-Boot from source, deploy it to an SD card, and take control of the system’s boot sequence, setting the stage for custom kernel development and system deployment in subsequent chapters.
Technical Background
The Philosophy and Origins of U-Boot
To truly appreciate U-Boot, one must understand the environment from which it emerged. In the early days of embedded Linux, each new System-on-Chip (SoC) or board often came with its own proprietary, and frequently limited, bootloader. This fragmentation created significant challenges for developers, who had to learn a new toolchain and a new set of commands for each project. U-Boot was created to solve this problem by providing a single, powerful, and highly portable bootloader that could be adapted to a wide range of hardware. Its name, “The Universal Boot Loader,” is a direct reflection of this ambitious goal.
Originally based on the 8xx ROM-Monitor for PowerPC processors, U-Boot has evolved into a massive open-source project with support for dozens of architectures, including ARM, MIPS, x86, RISC-V, and more. Its development philosophy mirrors that of the Linux kernel itself: it is community-driven, licensed under the GPL, and emphasizes flexibility and configurability. This means that while U-Boot can be a simple kernel loader, it can also be configured with a vast array of features, such as networking stacks (TFTP, DHCP, NFS), storage drivers (eMMC, SD, SATA, USB), display drivers, and comprehensive scripting capabilities. This turns the bootloader into a powerful diagnostic and recovery tool, allowing a developer to, for instance, re-flash a device over the network without needing a fully functional operating system.
The Journey of a Two-Stage Boot Process
An embedded processor awakens in a very delicate state. Immediately after power-on-reset, it executes a small piece of code stored in an on-chip Read-Only Memory (ROM), often called the Boot ROM or Primary Program Loader (PPL). This initial code has a very limited view of the world and typically only knows how to access a specific boot medium, like an SD card or eMMC flash. Its primary mission is to find and load the next stage of the boot process. In our case, that next stage is U-Boot.
However, U-Boot itself is often too large to be loaded directly into the processor’s limited internal Static RAM (SRAM). This limitation gives rise to a common two-stage boot architecture within U-Boot itself.
flowchart TD
    subgraph SoC Hardware
        A[Power-On-Reset]
    end

    subgraph On-Chip ROM
        B(SoC Boot ROM Executes)
    end

    subgraph System RAM
        subgraph Internal SRAM
            C((1. U-Boot SPL))
        end
        subgraph Main DRAM
            D((2. U-Boot Proper))
            E((Linux Kernel))
        end
    end

    subgraph "Boot Medium (e.g., SD Card)"
        F[U-Boot SPL Image]
        G[Full U-Boot Image]
        H[Linux Kernel Image]
    end

    A -- "Executes from" --> B;
    B -- "Loads SPL to SRAM" --> F;
    F -- "Loaded into SRAM" --> C;
    C -- "Initializes DRAM" --> D;
    C -- "Loads U-Boot to DRAM" --> G;
    G -- "Loaded into DRAM" --> D;
    D -- "Loads Kernel to DRAM" --> H;
    H -- "Loaded into DRAM" --> E;
    D -- "Jumps to Kernel Entry Point" --> E;

    classDef primary fill:#1e3a8a,stroke:#1e3a8a,stroke-width:2px,color:#ffffff;
    classDef process fill:#0d9488,stroke:#0d9488,stroke-width:1px,color:#ffffff;
    classDef system fill:#8b5cf6,stroke:#8b5cf6,stroke-width:1px,color:#ffffff;
    classDef success fill:#10b981,stroke:#10b981,stroke-width:2px,color:#ffffff;

    class A,B primary;
    class C,D process;
    class E,F,G,H system;
The first stage is known as the Secondary Program Loader (SPL), and sometimes as the Pre-Boot Loader (PBL). The SPL is a very small, minimalist build of U-Boot. The Boot ROM loads this tiny SPL into the internal SRAM. The SPL’s code is highly constrained and has one critical, primary task: to initialize the main system Dynamic RAM (DRAM). DRAM initialization is a complex, timing-sensitive process specific to each SoC and memory chip combination. Once the DRAM is alive and accessible, the SPL has unlocked a vast new space to work in. Its final act is to locate the full U-Boot image (often named u-boot.bin or u-boot-dtb.bin) on the boot medium, copy it into the now-functional DRAM, and jump to its entry point.
The second stage is the full U-Boot proper. Now running from the spacious DRAM, U-Boot has access to all its configured drivers and features. It proceeds with a more comprehensive hardware initialization, setting up peripherals like the serial console (UART), networking interfaces (Ethernet), and storage controllers. It is at this stage that the developer can typically interact with the system for the first time, seeing U-Boot’s output on the serial console and having the ability to interrupt the boot process to access the command line. This full U-Boot environment then carries out its ultimate task: locating the Linux kernel image, loading it into a specific memory address, preparing any necessary boot parameters (such as the device tree blob), and finally, handing over execution control to the kernel.
U-Boot’s Architecture: The Driver Model and Device Tree
Modern embedded systems are incredibly complex. A single SoC can contain dozens of interconnected hardware blocks, or “IP cores,” for everything from USB and networking to graphics and cryptographic acceleration. To manage this complexity in a clean and portable way, U-Boot adopted a sophisticated architecture heavily inspired by the Linux kernel, most notably through its Driver Model and reliance on the Flattened Device Tree (FDT).
The Device Tree is a data structure that describes the hardware present on a system in a hierarchical, tree-like format. Instead of hard-coding hardware details (like memory addresses of registers, interrupt numbers, and clock sources) directly into the driver code, this information is stored in a separate text file called a device tree source (.dts) file. This file is compiled by the Device Tree Compiler (DTC) into a compact binary format known as a Device Tree Blob (.dtb).
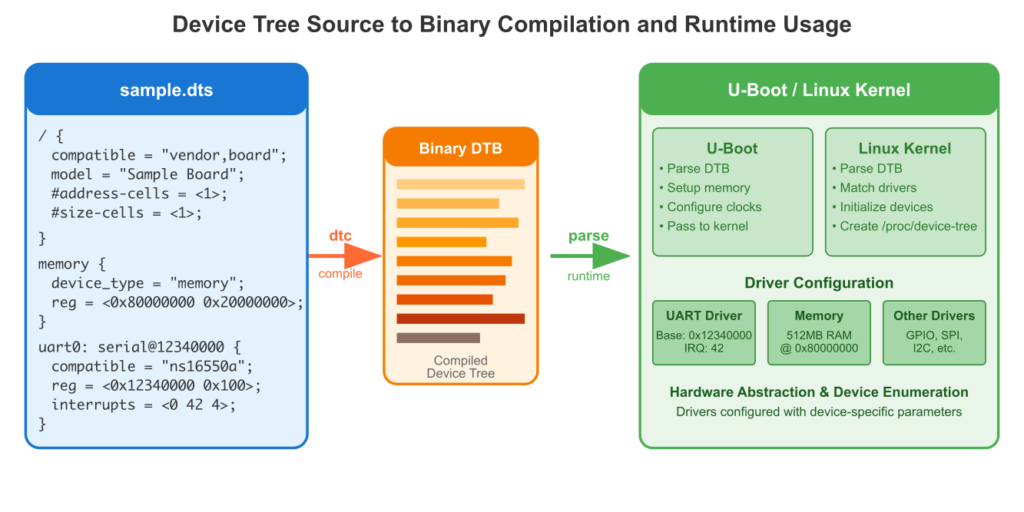
U-Boot loads this .dtb file into memory at boot time. Its Driver Model then walks this tree, “probing” for drivers that match the hardware described. For example, when the Driver Model encounters a node in the tree describing a specific I2C controller, it searches for a compiled I2C driver that has registered itself as compatible with that hardware. If a match is found, the driver’s probe function is called. This function reads the configuration details from the device tree node—such as the controller’s register address—and initializes the hardware. This approach decouples the hardware description from the driver logic, making it possible to use the same driver code for different boards simply by providing a different device tree file.
This is a profound shift from older, board-centric initialization methods. It allows for cleaner, more maintainable, and more reusable code. Furthermore, U-Boot performs a vital service by not only using the device tree for its own purposes but also by making modifications to it in memory before passing it on to the Linux kernel. For instance, U-Boot can determine the actual amount of installed RAM and update the memory node in the device tree accordingly. When it finally boots the kernel, it provides a pointer to this modified, in-memory device tree blob, ensuring the kernel has the most accurate and up-to-date description of the hardware environment.
Core Features and Command-Line Interface
The true power of U-Boot for a developer is revealed through its command-line interface (CLI). By default, U-Boot will attempt to execute a predefined boot command automatically after a short delay. However, pressing any key during this delay interrupts the process and grants you access to the U-Boot prompt.
This CLI is not merely a simple shell; it is a powerful environment for system inspection and control. Commands are available to read from and write to memory (md, mw), communicate over peripherals (i2c, spi), and manage storage devices (mmc, usb). The environment variable system is particularly important. Using the printenv and setenv commands, you can inspect and modify key-value pairs that control U-Boot’s behavior. These variables define things like the IP address of the device, the MAC address of the Ethernet port, and, most critically, the sequence of commands to execute for booting.
A special variable, bootcmd, typically holds the default boot sequence. This might be a series of commands to detect an SD card, load the kernel and device tree files into memory, and then execute the bootm (boot from memory) or booti (boot image) command. By modifying these variables, a developer can easily switch between booting from different storage devices, loading a kernel from the network via TFTP for rapid testing, or passing different arguments to the Linux kernel. Changes made with setenv are only stored in RAM; the saveenv command must be used to write them persistently to a dedicated storage area on the boot medium (e.g., a special partition on the eMMC or SD card).
U-Boot also possesses a capable scripting engine. Complex sequences of commands can be combined with logic, such as if/then/else constructs and loops, either within environment variables or in standalone script files (.scr). These scripts are processed into a special U-Boot image format and can be loaded and executed just like a kernel, allowing for sophisticated and automated boot and update procedures.
Practical Examples: Building and Running U-Boot on Raspberry Pi 5
In this section, we will walk through the entire process of obtaining, configuring, compiling, and deploying U-Boot for the Raspberry Pi 5. This hands-on example will solidify the theoretical concepts discussed previously.
Warning: The Raspberry Pi 5 has a unique boot process that involves its own on-chip Boot ROM and bootloader stages stored in an EEPROM. We are not replacing these early stages. Instead, we will configure the Raspberry Pi bootloader to load our custom-built U-Boot (
u-boot.bin) as the primary payload, which will then be responsible for loading the Linux kernel.
Step 1: Setting up the Development Environment
First, we need a Linux-based host machine (a VM or native installation) and a cross-compilation toolchain. The ARM architecture of the Raspberry Pi 5 is AArch64 (ARM 64-bit), so we need a toolchain capable of generating code for it.
1. Install Essential Tools:
sudo apt update
sudo apt install git build-essential bison flex libssl-dev
2. Install the AArch64 Cross-Compiler:
sudo apt install crossbuild-essential-arm64aarch64-linux-gnu- toolchain, including the GCC compiler (aarch64-linux-gnu-gcc).
3. Clone the U-Boot Source Code:We will clone the official U-Boot repository from their trusted source.
git clone [https://source.denx.de/u-boot/u-boot.git](https://source.denx.de/u-boot/u-boot.git)
cd u-boot
git checkout v2024.04 -b rpi5-devStep 2: Configuring U-Boot for the Raspberry Pi 5
U-Boot uses the same Kconfig system as the Linux kernel for configuration. Pre-defined configurations for various boards are provided as defconfig files.
1. Set Environment Variables:To ensure U-Boot’s build system uses our cross-compiler, we must set the ARCH and CROSS_COMPILE environment variables.
export ARCH=arm64
export CROSS_COMPILE=aarch64-linux-gnu-export commands to your ~/.bashrc file to make them persistent across terminal sessions.
2. Apply the Default Configuration:The Raspberry Pi 5 has a specific defconfig file. We use this to apply the base configuration.
make rpi_5_defconfigconfigs/rpi_5_defconfig and creates a .config file in the root of the U-Boot source tree, which contains hundreds of configuration options tailored for the RPi 5 hardware.
3. (Optional) Customize the Configuration:If you wanted to make changes, such as enabling a specific driver or changing a default setting, you could run make menuconfig. This opens a text-based user interface that allows you to navigate and modify all available configuration options. For now, the default configuration is sufficient.
Step 3: Building U-Boot
With the configuration in place, compiling U-Boot is a straightforward process.
1. Run the Build Command:The make command will invoke the cross-compiler and build all the necessary components.
makeu-boot.bin. This is the raw binary image of the U-Boot bootloader.
Step 4: Preparing the SD Card
We need an SD card formatted with a FAT32 boot partition, which is the standard for the Raspberry Pi.
1. Partition and Format:Use a tool like gparted or fdisk on your host machine to create a single partition on your SD card and format it as FAT32. Ensure it has a boot flag set.
2. Obtain Raspberry Pi Firmware:The Raspberry Pi still requires its own firmware files to initialize the VideoCore GPU and other low-level hardware before U-Boot can run. We need to copy these from the official firmware repository.
git clone [https://github.com/raspberrypi/firmware.git](https://github.com/raspberrypi/firmware.git)/media/user/bootfs) and copy the necessary files from the firmware/boot/ directory.
# Assuming SD card is mounted at /media/user/bootfs
cp firmware/boot/start*.elf /media/user/bootfs/
cp firmware/boot/fixup*.dat /media/user/bootfs/
3. Copy U-Boot to the SD Card:Copy the u-boot.bin file you built to the root of the SD card’s boot partition.
cp u-boot.bin /media/user/bootfs/4. Create the config.txt file:This is the crucial file that tells the Raspberry Pi’s own bootloader what to do. We need to create a file named config.txt on the SD card with the following content. This configuration disables the Pi’s default kernel loading mechanism and instead tells it to load our u-boot.bin file as the main payload.
# config.txt

# Disable the default camera and display drivers to avoid conflicts with U-Boot.
# U-Boot will handle hardware initialization.
disable_camera_led=1

# Instruct the RPi firmware to load u-boot.bin as the kernel.
# The firmware does not distinguish between a Linux kernel and a bootloader
# binary like U-Boot. It just loads the specified binary to memory and executes it.
kernel=u-boot.bin

# Enable the UART for serial console access.
enable_uart=1
Step 5: Booting and Interacting with U-Boot
1. Hardware Connection:You will need a USB-to-TTL serial adapter to communicate with the Raspberry Pi 5’s UART. Connect the adapter as follows:
- Adapter RX to RPi Pin 8 (GPIO14 / TXD0)
- Adapter TX to RPi Pin 10 (GPIO15 / RXD0)
- Adapter GND to any RPi Ground Pin (e.g., Pin 6)
2. Serial Console Setup:On your host machine, use a serial terminal program like minicom or screen. The Raspberry Pi’s UART defaults to a baud rate of 115200.
sudo minicom -b 115200 -o -D /dev/ttyUSB03. First Boot:Insert the prepared SD card into the Raspberry Pi 5 and power it on. You should see boot messages from U-Boot appear in your serial terminal.
U-Boot 2024.04 (Apr 15 2024 - 14:20:10 +0000)

DRAM:  3.9 GiB
RPI 5 Model B
Core:  89 devices, 23 uclasses, devicetree: separate
MMC:   mmcnr@10000: 0, sdhci@fe300000: 1
Loading Environment from FAT... *** Warning - bad CRC, using default environment

In:    serial
Out:   serial
Err:   serial
Net:   eth0: ethernet@fe320000
Hit any key to stop autoboot:  0
=>.
4. Exploring the U-Boot CLI:Now you can issue commands.
printenv: View the default environment variables. Noticebootcmdand others.mmc info: Display information about the detected SD card.help: List all available commands.bdinfo: Show board information, including the available RAM.
5. Creating a Boot Script:U-Boot will fail to boot Linux by default because it doesn’t know where to find the kernel. We can create a script to tell it what to do. First, copy a Linux kernel image (Image) and a device tree blob (.dtb) to your SD card. Then, create a file named boot.cmd on the SD card with the following text content:
# boot.cmd - U-Boot script to load Linux

echo "Loading Kernel and Device Tree from SD Card..."

# Load the device tree blob into memory
load mmc 0:1 ${fdt_addr} bcm2712-rpi-5-b.dtb

# Load the Linux kernel image into memory
load mmc 0:1 ${kernel_addr_r} Image

echo "Booting Linux..."

# Boot the kernel, passing the device tree address
booti ${kernel_addr_r} - ${fdt_addr}boot.scr) using the mkimage tool, which was built alongside U-Boot.
# From your u-boot source directory
./tools/mkimage -C none -A arm64 -T script -d /media/user/bootfs/boot.cmd /media/user/bootfs/boot.scr
bootcmd to execute this script. At the U-Boot prompt:
=> setenv bootcmd 'load mmc 0:1 ${scriptaddr} boot.scr; source ${scriptaddr}'
=> saveenv
=> bootboot.scr file on every startup, which in turn loads and boots the Linux kernel.
Common Mistakes & Troubleshooting
Developing with U-Boot can be challenging, and several common issues can trip up newcomers. Here are some of the most frequent pitfalls and how to resolve them.
Exercises
These exercises are designed to reinforce the concepts covered in this chapter and encourage exploration of U-Boot’s capabilities.
- Modify the U-Boot Boot Delay:
- Objective: Change the amount of time U-Boot waits for user input before executing the automatic boot command.
- Steps: At the U-Boot prompt, inspect the
bootdelayenvironment variable usingprintenv bootdelay. Change its value to 10 seconds using thesetenvcommand. Save your change persistently and reboot the device. - Verification: Upon rebooting, verify that U-Boot now waits for 10 seconds before initiating the autoboot sequence.
- Create a Custom TFTP Boot Command:
- Objective: Configure U-Boot to download and boot a Linux kernel from the network using TFTP, which is extremely useful for rapid development.
- Steps: Set up a TFTP server on your host machine and place a Linux kernel
Imagefile in its root directory. In U-Boot, configure the necessary network environment variables (ipaddr,serverip,netmask). Create a new environment variable namedtftpbootcmdthat contains the command sequencetftp ${kernel_addr_r} Image; booti ${kernel_addr_r} - ${fdt_addr}. - Verification: Run your custom command by typing
run tftpbootcmd. U-Boot should download the kernel over the network and boot it successfully.
- Add a New Custom Command:
- Objective: Extend U-Boot’s functionality by adding a new command directly into its source code.
- Steps: Navigate to the
cmd/directory in the U-Boot source. Create a new filecmd_hello.c. In this file, use theU_BOOT_CMDmacro to define a new command namedgreetthat prints “Hello, Embedded World!” to the console. Add your new file to thecmd/Makefile. Recompile U-Boot and deploy the newu-boot.bin. - Code Snippet (
cmd_hello.c):
#include <common.h>
#include <command.h>

static int do_greet(struct cmd_tbl_s *cmdtp, int flag, int argc, char * const argv[])
{
    printf("Hello, Embedded World from Raspberry Pi 5!\n");
    return 0;
}

U_BOOT_CMD(
    greet, 1, 0, do_greet,
    "Print a friendly greeting",
    ""
);
Verification: After booting the new U-Boot image, type greet at the prompt. Your custom message should be displayed.
Summary
This chapter provided a comprehensive introduction to the Das U-Boot bootloader, a cornerstone of modern embedded Linux development.
- Role of a Bootloader: A bootloader is the essential software that initializes system hardware and loads the Linux kernel into memory.
- U-Boot Architecture: U-Boot employs a two-stage loading process (SPL and U-Boot proper) to manage memory constraints and utilizes a Linux-like Driver Model with the Flattened Device Tree for hardware abstraction and portability.
- Configuration and Build: U-Boot is configured using the Kconfig system (
defconfig,menuconfig) and is cross-compiled for the target architecture using a dedicated toolchain. - Command-Line Interface: The CLI is a powerful tool for debugging, hardware inspection, and manual boot control. Environment variables, especially
bootcmd, are used to control its behavior and can be saved persistently. - Automation: U-Boot’s scripting capabilities allow for the creation of sophisticated, automated boot sequences that can load kernels and other necessary files from various storage devices or the network.
- Practical Deployment: We successfully built and deployed U-Boot on a Raspberry Pi 5, demonstrating the complete workflow from source code to a running, interactive bootloader.
Mastering U-Boot is a critical skill for any embedded Linux engineer, providing the control and flexibility needed to bring up custom hardware, debug kernel issues, and build robust, field-updatable devices.
Further Reading
- Das U-Boot Official Documentation: The definitive source for U-Boot information, including technical specifications, command references, and source code.
- Device Tree Specification: The official specification for the Device Tree data format, essential for understanding how U-Boot and Linux describe hardware.
- “Mastering Embedded Linux Programming” by Chris Simmonds: An excellent book that covers the entire embedded Linux ecosystem, with dedicated sections on bootloaders like U-Boot.
- Raspberry Pi 5 Hardware Documentation: Official documentation from the Raspberry Pi Foundation, useful for understanding the specific hardware and boot process of the target platform.
- “Embedded Linux Systems” by Karim Yaghmour, Jon Masters, et al.: A classic text providing deep insights into the architecture of embedded Linux systems, including the role of the bootloader.
