
Chapter 52: Buffered I/O (stdio library) vs. Unbuffered I/O (Sys. Calls)
Chapter Objectives
By the end of this chapter, you will be able to:
- Understand the fundamental architectural differences between kernel-level system calls and user-space library functions for I/O.
- Explain the concept of buffering in the context of the C standard I/O library (
stdio) and its performance implications. - Implement file and device I/O operations in C using both unbuffered system calls (
open,read,write) and bufferedstdiofunctions (fopen,fread,fwrite). - Analyze the trade-offs between buffered and unbuffered I/O to select the appropriate method for different embedded application scenarios.
- Debug common issues related to I/O buffering, such as data not appearing immediately or mixing I/O methodologies.
- Configure and measure the performance impact of different buffering strategies on a Raspberry Pi 5.
Introduction
In the world of embedded Linux, every interaction with the outside world—be it reading from a sensor, writing to a display, sending data over a network, or storing logs on a flash drive—is managed through Input/Output (I/O) operations. The efficiency of these operations can be the deciding factor in a system’s overall performance and responsiveness. An inefficient I/O strategy can bog down a processor, drain battery life, and introduce unacceptable latency, while a well-designed one ensures smooth, reliable operation. This chapter delves into the two primary methodologies for performing I/O in a Linux environment: direct, unbuffered I/O via kernel system calls and higher-level, buffered I/O provided by the C standard library (stdio).
Understanding the distinction between these two approaches is not merely an academic exercise; it is a fundamental skill for any embedded systems programmer. Unbuffered I/O offers direct, granular control, putting your application in close contact with the Linux kernel and the underlying hardware. This is crucial for certain real-time or device control applications. In contrast, buffered I/O provides a layer of abstraction designed for efficiency, intelligently collecting data in memory before interacting with the kernel. This dramatically reduces system overhead and is often the best choice for file manipulation and stream-based data processing. In this chapter, we will dissect the mechanics of both paradigms, exploring their internal workings, performance characteristics, and ideal use cases. Using the Raspberry Pi 5, we will move from theory to practice, writing code that demonstrates these concepts in tangible ways and empowers you to make informed I/O decisions in your own embedded projects.
Technical Background
At the heart of any Linux system lies the kernel, the core component that manages the system’s resources, including the CPU, memory, and all peripheral devices. For an application running in the sandboxed environment of user space to perform any meaningful action, such as reading a file or sending a network packet, it must request a service from the kernel space. This request mechanism is known as a system call. System calls are the fundamental, primitive interface between a user process and the operating system. When your program needs to perform I/O, it ultimately must invoke a system call.

The World of Unbuffered I/O: Direct System Calls
The most direct way to perform I/O is to use the raw system calls provided by the kernel. The primary functions for this are open(), read(), write(), and close(). These are often referred to as unbuffered I/O because they do not introduce any additional buffering layer within your application’s memory space. Each read() or write() call you make results in a context switch, a computationally expensive operation where the CPU transitions from executing your user-space code to executing kernel-space code, and then back again.
Let’s imagine you need to write 10,000 individual bytes to a file. If you use the write() system call in a loop, writing one byte at a time, you will trigger 10,000 separate context switches. Each switch involves saving the state of your process, loading the kernel’s context, performing the requested operation (which itself involves the kernel writing to its own internal buffers), and then restoring your process’s state. This is akin to going to the grocery store to buy one item, returning home, and then immediately going back for the next item, repeating this 10,000 times. It is incredibly inefficient.
The data flow for unbuffered I/O is direct and explicit. When your process calls write(fd, &my_byte, 1), the single byte my_byte is copied from your process’s memory in user space directly into a kernel buffer. The kernel then takes responsibility for scheduling the physical write to the storage device. Similarly, a call to read() causes the kernel to copy data from its internal buffer (which it fills from the device) directly into the memory buffer you provide in your application. There is no intermediate holding area in your user-space process.
graph TD
    subgraph "Unbuffered I/O (Direct System Calls)"
        U1["User Process<br><i>(e.g., write() loop)</i>"]
        style U1 fill:#1e3a8a,stroke:#1e3a8a,stroke-width:2px,color:#ffffff

        U1 -- "1- write() call<br><b>(Context Switch)</b>" --> K1

        K1(Kernel Space)
        style K1 fill:#8b5cf6,stroke:#8b5cf6,stroke-width:1px,color:#ffffff

        K1 -- "2- Data copied to Kernel Buffer" --> KB1[Kernel Buffer]
        style KB1 fill:#374151,stroke:#374151,stroke-width:1px,color:#ffffff

        KB1 -- "3- Kernel schedules physical write" --> H1((Hardware<br>Device))
        style H1 fill:#10b981,stroke:#10b981,stroke-width:2px,color:#ffffff

        subgraph Legend_Unbuffered
            direction LR
            L1["Many small arrows indicate<br>many context switches.<br>Inefficient for bulk data."]
            style L1 fill:#f8fafc,stroke:#eab308,stroke-width:2px,color:#1f2937
        end

        U1 -.-> L1
        style L1 stroke-dasharray: 5 5
    end
This directness provides a high degree of control. When a write() call returns, you have a strong guarantee that the data has been handed off to the operating system. This can be critical in applications where data integrity is paramount, such as a transaction log for a database. However, the performance penalty for frequent, small I/O operations makes raw system calls unsuitable for many common tasks, such as processing text files or handling bulk data transfers.
The Solution: User-Space Buffering with the stdio Library
To solve the performance problem inherent in making frequent system calls, the C standard library introduced its own I/O API, commonly known as stdio (standard input/output). This library, which provides familiar functions like fopen(), printf(), fread(), fwrite(), and fgets(), is built on top of the kernel’s unbuffered system calls. Its key innovation is the introduction of a user-space buffer.
When you use stdio functions, you are no longer interacting directly with the kernel for every I/O request. Instead, the stdio library maintains a buffer—a region of memory—within your own process. Think of this buffer as a staging area or a shopping cart. When you call fwrite() to write a single byte, the stdio library doesn’t immediately issue a write() system call. Instead, it simply copies that byte into its internal buffer and returns. It continues to collect subsequent bytes from further fwrite() calls in this buffer. Only when the buffer becomes full, or when you explicitly command it, does the stdio library perform a single, large write() system call to hand the entire contents of the buffer over to the kernel.
This approach transforms our inefficient, 10,000-trip shopping analogy. Now, you take your shopping list (the data), fill your cart (the stdio buffer) with all 10,000 items, and then go to the checkout (the write() system call) only once. The number of expensive context switches is drastically reduced, from 10,000 to perhaps just a handful, leading to a massive improvement in performance.
graph TD


    subgraph "Buffered I/O (stdio Library)"
        B1["User Process<br><i>(e.g., fwrite() loop)</i>"]
        style B1 fill:#1e3a8a,stroke:#1e3a8a,stroke-width:2px,color:#ffffff

        B1 -- "1- fwrite() call<br>(Fast, no context switch)" --> SB1

        SB1["stdio Buffer<br><i>(in User Space)</i>"]
        style SB1 fill:#0d9488,stroke:#0d9488,stroke-width:1px,color:#ffffff

        SB1 -- "2- <b>One large write() call</b><br>when buffer is full<br><b>(Single Context Switch)</b>" --> K2

        K2(Kernel Space)
        style K2 fill:#8b5cf6,stroke:#8b5cf6,stroke-width:1px,color:#ffffff

        K2 -- "3- Bulk data copied to Kernel Buffer" --> KB2[Kernel Buffer]
        style KB2 fill:#374151,stroke:#374151,stroke-width:1px,color:#ffffff

        KB2 -- "4- Kernel schedules physical write" --> H2((Hardware<br>Device))
        style H2 fill:#10b981,stroke:#10b981,stroke-width:2px,color:#ffffff

        subgraph Legend_Buffered
            direction LR
            L2["One large arrow indicates<br>few context switches.<br>Very efficient for bulk data."]
            style L2 fill:#f8fafc,stroke:#10b981,stroke-width:2px,color:#1f2937
        end

        SB1 -.-> L2
        style L2 stroke-dasharray: 5 5
    end
The stdio library is smart about how it manages this buffering. It defines three distinct buffering policies:
- Fully Buffered: This is the default policy for I/O operations on files. Data is only sent to the kernel when the
stdiobuffer is completely full. The typical buffer size, defined by theBUFSIZconstant in<stdio.h>, is often 4096 or 8192 bytes. This is the most efficient mode for bulk file processing. - Line Buffered: This policy is typically the default for interactive devices like a terminal. In this mode, data is sent to the kernel whenever a newline character (
\n) is encountered. This is a practical compromise. It allows the library to buffer data for efficiency but ensures that when you press Enter after typing a command, the command is actually sent to the shell for processing. The buffer is also flushed if it becomes full or if input is requested from the stream. - Unbuffered: The
stdiolibrary can also be configured to be unbuffered. In this mode, data is sent to the kernel as soon as possible. It’s important to note that this is not the same as using raw system calls. A call tofwrite()in this mode will still go through thestdiolibrary’s machinery, which will then immediately make awrite()system call. It essentially bypasses the waiting aspect of buffering but still adds a small layer of overhead compared to callingwrite()directly. The standard error stream,stderr, is unbuffered by default, ensuring that error messages are displayed immediately rather than getting stuck in a buffer.
File Pointers vs. File Descriptors
A crucial distinction when working with these two I/O paradigms is the handle you use to refer to your open I/O stream.
When you use the unbuffered system call open(), the kernel returns an integer file descriptor. This is a small, non-negative integer that acts as an index into a per-process table of open files maintained by the kernel. All subsequent system calls (read(), write(), close(), lseek()) use this integer file descriptor to identify the target file or device. File descriptors 0, 1, and 2 are standardized by POSIX conventions to be standard input, standard output, and standard error, respectively.
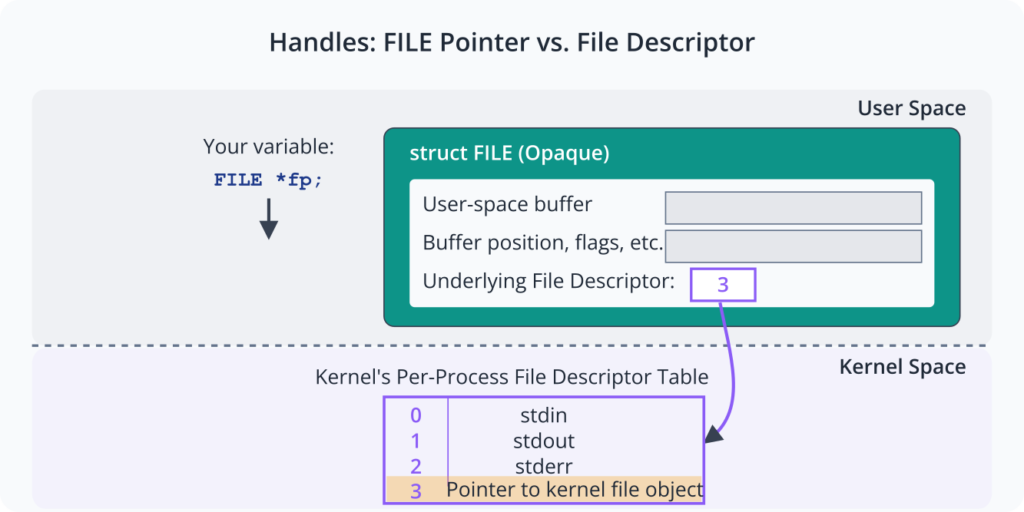
Conversely, when you use the buffered stdio function fopen(), the library returns a pointer to a FILE structure. This FILE structure is an opaque data type defined by the stdio library. It contains all the information needed to manage the buffered stream, including the user-space buffer itself, pointers to the current position within the buffer, flags indicating the stream’s status (e.g., error or end-of-file), and, importantly, the underlying integer file descriptor that the library uses to make the actual system calls to the kernel. You should never attempt to access the members of the FILE structure directly; it is meant to be an abstract handle passed to other stdio functions.
In summary, the file descriptor is a low-level kernel handle, while the FILE pointer is a high-level stdio library handle that wraps the file descriptor and adds the functionality of user-space buffering.
Practical Examples
Theory is best understood through practice. In this section, we will use the Raspberry Pi 5 to write and execute code that demonstrates the concepts and, most importantly, the performance differences between buffered and unbuffered I/O.
Tip: All C code examples can be compiled on your Raspberry Pi 5 using the GCC compiler. For a file named
my_program.c, you can compile it with the command:gcc my_program.c -o my_program.
Example 1: The Performance Cost of Unbuffered I/O
Our first example will vividly illustrate the inefficiency of using unbuffered system calls for frequent, small write operations. We will write a C program that writes 100,000 characters to a file, one byte at a time, using the write() system call.
Code: unbuffered_writer.c
#include <stdio.h>
#include <stdlib.h>
#include <fcntl.h>
#include <unistd.h>
#include <sys/stat.h>
#include <sys/types.h>

// This program demonstrates the performance of unbuffered I/O
// by writing a large number of single bytes to a file using
// the write() system call directly.

int main() {
    const char* filename = "unbuffered_output.txt";
    const int num_writes = 100000;
    const char data = 'U'; // The character to write
    int i;

    // Open the file for writing. Create it if it doesn't exist,
    // truncate it if it does. Set permissions to read/write for the owner.
    // The open() system call returns an integer file descriptor.
    int fd = open(filename, O_WRONLY | O_CREAT | O_TRUNC, 0644);

    if (fd == -1) {
        perror("Error opening file");
        return EXIT_FAILURE;
    }

    printf("Starting %d single-byte writes with unbuffered I/O (write())...\n", num_writes);

    // Loop to write the character num_writes times.
    // Each call to write() is a separate system call to the kernel.
    for (i = 0; i < num_writes; i++) {
        if (write(fd, &data, 1) != 1) {
            perror("Error writing to file");
            close(fd);
            return EXIT_FAILURE;
        }
    }

    // Always close the file descriptor when done.
    if (close(fd) == -1) {
        perror("Error closing file");
        return EXIT_FAILURE;
    }

    printf("Finished writing to %s.\n", filename);

    return EXIT_SUCCESS;
}
Build and Execution Steps
1. Save the code above as unbuffered_writer.c on your Raspberry Pi 5.
2. Compile the program:
gcc unbuffered_writer.c -o unbuffered_writer3. Execute the program and measure its real-world execution time using the time utility:
gcc unbuffered_writer.c -o unbuffered_writerExpected Output
You will see the program’s output, followed by the timing statistics from the time command. The exact time will vary based on your SD card’s speed and system load, but pay close attention to the real, user, and sys times.
Starting 100000 single-byte writes with unbuffered I/O (write())...
Finished writing to unbuffered_output.txt.

real    0m1.532s
user    0m0.015s
sys     0m1.510s
Notice the sys time. This represents the time the CPU spent executing in kernel mode on behalf of the process. In this case, it’s very high because our program forced the CPU to enter kernel mode for every single byte written. The real time is the total wall-clock time, which is dominated by this system call overhead.
Example 2: The Power of Buffered I/O
Now, let’s perform the exact same task—writing 100,000 characters to a file—but this time using the stdio library’s buffered I/O functions.
Code: buffered_writer.c
#include <stdio.h>
#include <stdlib.h>

// This program demonstrates the performance of buffered I/O
// by writing a large number of single bytes to a file using
// the fputc() stdio library function.

int main() {
    const char* filename = "buffered_output.txt";
    const int num_writes = 100000;
    const int data = 'B'; // The character to write (fputc takes an int)
    int i;

    // fopen() is the stdio equivalent of open(). It returns a FILE pointer.
    // "w" mode opens for writing, creates if non-existent, and truncates.
    FILE *fp = fopen(filename, "w");

    if (fp == NULL) {
        perror("Error opening file");
        return EXIT_FAILURE;
    }

    printf("Starting %d single-byte writes with buffered I/O (fputc())...\n", num_writes);

    // Loop to write the character num_writes times.
    // fputc() writes to the user-space stdio buffer. A system call
    // is only made when the buffer is full or the file is closed.
    for (i = 0; i < num_writes; i++) {
        if (fputc(data, fp) == EOF) {
            fprintf(stderr, "Error writing to file\n");
            fclose(fp);
            return EXIT_FAILURE;
        }
    }

    // fclose() flushes any remaining data in the buffer to the kernel
    // and then closes the underlying file descriptor.
    if (fclose(fp) != 0) {
        fprintf(stderr, "Error closing file\n");
        return EXIT_FAILURE;
    }

    printf("Finished writing to %s.\n", filename);

    return EXIT_SUCCESS;
}
Build and Execution Steps
1. Save the code as buffered_writer.c.
2. Compile the program:
gcc unbuffered_writer.c -o unbuffered_writer3. Execute it with the time utility:
time ./buffered_writerExpected Output
Starting 100000 single-byte writes with buffered I/O (fputc())...
Finished writing to buffered_output.txt.

real    0m0.005s
user    0m0.003s
sys     0m0.002s
The difference is staggering. The real time is now in the thousandths of a second, orders of magnitude faster than the unbuffered version. The sys time is minuscule. This is because the stdio library absorbed all 100,000 fputc() calls into its user-space buffer, likely only performing a few dozen write() system calls to the kernel in total. This single comparison powerfully demonstrates the importance of choosing the right I/O strategy.
Example 3: Reading from a Device with Unbuffered I/O
In some embedded scenarios, particularly when interacting with hardware, you need immediate, unbuffered access. Let’s consider reading from a GPIO pin configured as a simple button input. We’ll use the character device interface provided by the kernel’s GPIO subsystem (gpiochip).
Warning: Interfacing with hardware requires care. Ensure your Raspberry Pi is powered off when making connections. For this example, we will connect a tactile button between GPIO 26 and a 3.3V pin. The internal pull-down resistor will be enabled in software.
Hardware Integration
- Device: Raspberry Pi 5
- Component: 1x Tactile Pushbutton
- Connection:
- One leg of the button to Pin 1 (3.3V).
- The other leg of the button to Pin 37 (GPIO 26).
Code: unbuffered_gpio_reader.c
This example requires the libgpiod library, which provides a modern interface to GPIO character devices.
First, install the necessary library and tools on your Pi
sudo apt update
sudo apt install libgpiod-dev gpiod#include <gpiod.h>
#include <stdio.h>
#include <unistd.h>
#include <stdlib.h>
// This program demonstrates reading a GPIO input using the unbuffered
// character device interface via libgpiod. This is suitable for
// applications needing low-latency event detection.
// Use GPIO 26, which is physical pin 37
#define GPIO_LINE_OFFSET 26
int main(int argc, char **argv) {
const char *chipname = "gpiochip4"; // gpiochip for Raspberry Pi 5
struct gpiod_chip *chip;
struct gpiod_line *line;
int value;
int i;
// Open the GPIO chip
chip = gpiod_chip_open_by_name(chipname);
if (!chip) {
perror("Open chip failed");
return EXIT_FAILURE;
}
// Get the GPIO line
line = gpiod_chip_get_line(chip, GPIO_LINE_OFFSET);
if (!line) {
perror("Get line failed");
gpiod_chip_close(chip);
return EXIT_FAILURE;
}
// Request the line for input, with a pull-down resistor
if (gpiod_line_request_input_flags(line, "gpio-reader", GPIOD_LINE_REQUEST_FLAG_PULL_DOWN) < 0) {
perror("Request line as input failed");
gpiod_line_release(line);
gpiod_chip_close(chip);
return EXIT_FAILURE;
}
printf("Monitoring GPIO %d. Press the button to see '1'. Press CTRL+C to exit.\n", GPIO_LINE_OFFSET);
// Loop forever, reading the line value
while (1) {
// gpiod_line_get_value() ultimately performs a read() system call
// on the underlying file descriptor, providing immediate state.
value = gpiod_line_get_value(line);
if (value < 0) {
perror("Read line value failed");
break;
}
printf("\rGPIO value: %d", value);
fflush(stdout); // We must flush stdout to see the output immediately
usleep(50000); // Sleep for 50ms to prevent spamming the console
}
// Release the line and close the chip
gpiod_line_release(line);
gpiod_chip_close(chip);
return EXIT_SUCCESS;
}
Build and Execution
- Save the code as
unbuffered_gpio_reader.c. - Compile, linking against the
gpiodlibrary:gcc unbuffered_gpio_reader.c -o unbuffered_gpio_reader -lgpiod - Run the program:
./unbuffered_gpio_reader
When you press the button, the value will change from 0 to 1 almost instantly. This is because each call to gpiod_line_get_value() results in a direct, unbuffered read from the device file, giving us the most up-to-date state of the pin. Note that even though we use printf (a buffered function), we must explicitly call fflush(stdout) to force the line-buffered stdout stream to write its contents to the terminal immediately.
Common Mistakes & Troubleshooting
Navigating the nuances of buffered and unbuffered I/O can lead to some common pitfalls. Understanding these ahead of time can save hours of debugging.
Exercises
These exercises are designed to reinforce the concepts of this chapter. They range from simple modifications to more complex application design.
- Binary Data Copy: Modify the
buffered_writer.candunbuffered_writer.cexamples to copy a large binary file (like an image or a compiled program) instead of writing text characters. Useread()andwrite()for the unbuffered version, andfread()andfwrite()for the buffered version. Use a buffer size of 1 byte for the unbuffered copy and a larger buffer (e.g., 8192 bytes) for the buffered version. Measure and compare the performance of both programs using thetimeutility. What do you observe? - Controlling Buffer Flush: Write a C program that prints a dot (
.) to the console every second for ten seconds without printing a newline character. First, implement this using a simpleprintf(".")andsleep(1). Observe what happens. Why don’t the dots appear one by one? Now, modify the program to correctly print a single dot each second by usingfflush(stdout). This exercise demonstrates the effect of line-buffering onstdout. - Custom Logging Utility: Create a simple logging function,
void log_message(const char *message). This function should append the given message, prepended with a timestamp, to a file namedapp.log. Implement two versions of this program. In the first, open the log file withfopen()in append mode ("a") and do nothing special. In the second version, after opening the file, usesetvbuf(logfile, NULL, _IOLBF, 1024)to set the log file to be line-buffered. Write amainfunction that callslog_messagemultiple times, some with newline characters and some without. Compare the contents ofapp.logproduced by both versions. - I/O Strategy for Sensor Data: Imagine you are designing an embedded application for the Raspberry Pi 5 that reads temperature data once every minute from a sensor. The data needs to be stored in a CSV file with a timestamp, e.g.,
2025-07-22T10:30:00,25.5. Would you choose buffered (stdio) or unbuffered (system calls) I/O to write to this file? Write a short C program that simulates this scenario by writing a new line of data totemperatures.csvevery 5 seconds. Justify your choice of I/O strategy in the code comments, considering factors like performance, data integrity, and simplicity.
graph TD
    A[Start: I have an I/O task]
    style A fill:#1e3a8a,stroke:#1e3a8a,stroke-width:2px,color:#ffffff

    A --> B{What is the primary concern?}
    style B fill:#f59e0b,stroke:#f59e0b,stroke-width:1px,color:#ffffff

    B -->|Performance & Efficiency<br/>e.g., writing large log files, processing data| C["Use Buffered I/O (stdio)<br/><br/>fopen(), fwrite(), fprintf()"]
    style C fill:#0d9488,stroke:#0d9488,stroke-width:1px,color:#ffffff

    B -->|Low Latency & Direct Control<br/>e.g., reading a GPIO, controlling a device| D{Is data integrity for<br/>each small write critical?}
    style D fill:#f59e0b,stroke:#f59e0b,stroke-width:1px,color:#ffffff

    D -->|Yes, e.g., a<br/>transaction log| E["Use Unbuffered I/O (System Calls)<br/>Consider using O_SYNC flag with open()<br/><br/>open(), write()"]
    style E fill:#8b5cf6,stroke:#8b5cf6,stroke-width:1px,color:#ffffff

    D -->|No, just need<br/>immediate action| F["Use Unbuffered I/O (System Calls)<br/><br/>open(), read(), write()"]
    style F fill:#8b5cf6,stroke:#8b5cf6,stroke-width:1px,color:#ffffff

    C --> G{Do I need to ensure data is<br/>written at a specific moment?}
    style G fill:#f59e0b,stroke:#f59e0b,stroke-width:1px,color:#ffffff

    G -->|Yes| H["Call fflush(stream) after writing"]
    style H fill:#eab308,stroke:#eab308,stroke-width:1px,color:#1f2937

    G -->|No, let the library manage it| I["Rely on fclose() or buffer filling"]
    style I fill:#f8fafc,stroke:#64748b,stroke-width:1px,color:#1f2937

    H --> J((Task Complete))
    I --> J
    E --> J
    F --> J
    style J fill:#10b981,stroke:#10b981,stroke-width:2px,color:#ffffff
Summary
- Two I/O Paradigms: Linux offers two primary methods for I/O: low-level, unbuffered system calls (
open,read,write) and high-level, bufferedstdiolibrary functions (fopen,fread,fwrite). - System Calls and Performance: Every system call incurs the overhead of a context switch between user space and kernel space. Frequent, small I/O operations using system calls are extremely inefficient.
- User-Space Buffering: The
stdiolibrary improves performance dramatically by using a user-space buffer to collect data, minimizing the number of required system calls. A single largewrite()is far more efficient than thousands of small ones. - Buffering Modes:
stdiostreams can be fully buffered (default for files), line buffered (default for terminals), or unbuffered (default forstderr). Thefflush()function is used to force a write of any pending data in a buffer. - Handles: System calls use integer file descriptors as handles, while
stdiofunctions useFILEpointers. Mixing these on the same stream leads to undefined behavior. - Choosing the Right Tool: Use buffered
stdiofor most file-based and stream-based operations due to its superior performance. Use unbuffered system calls when you need low-latency, direct control over a device, or when data integrity guarantees for small writes are critical.
Further Reading
- The Linux Programming Interface by Michael Kerrisk – Chapters 4, 5, and 13 provide an exhaustive and authoritative look at file I/O, system calls, and the
stdiolibrary. - Advanced Programming in the UNIX Environment by W. Richard Stevens and Stephen A. Rago – A classic text whose chapters on I/O are still highly relevant and provide deep insights.
stdio.h– standard input/output – https://www.ibm.com/docs/en/zos/3.1.0?topic=files-stdioh-standard-input-outputwrite(2)– write to a file descriptor – The Linux man-page for thewritesystem call. Access withman 2 write.- Raspberry Pi Documentation – The official hardware documentation for GPIO and other peripherals. (https://www.raspberrypi.com/documentation/)
- libgpiod Documentation – The official documentation for the modern library used to interact with GPIO devices in Linux.
