
Chapter 41: Version Control with Git: Core Concepts
Chapter Objectives
By the end of this chapter, you will be able to:
- Understand the fundamental role of version control systems (VCS) in modern software development, particularly within the embedded Linux ecosystem.
- Explain Git’s distributed architecture and its core concepts, including the repository, working directory, and staging area (index).
- Perform essential Git operations on a Raspberry Pi 5, such as initializing a repository, staging changes, and creating atomic commits.
- Navigate and inspect a project’s history using commands like
git logandgit status. - Configure a local Git environment and manage a simple multi-file embedded project.
- Identify and troubleshoot common beginner mistakes related to commits and staging.
Introduction
managing change is a central challenge in any software engineering discipline. In the world of embedded Linux, where projects often involve large, complex codebases, multiple developers, and long-term maintenance cycles, this challenge is magnified. The Linux kernel itself is a testament to this complexity, with thousands of developers contributing to its evolution over decades. How is this symphony of concurrent development orchestrated without descending into chaos? The answer lies in a powerful tool and methodology: the Version Control System (VCS).
This chapter introduces Git, the de facto standard for version control across the globe. Created by Linus Torvalds, the same visionary behind the Linux kernel, Git was born from the necessity of managing the kernel’s distributed development. For an embedded systems developer, Git is not merely a convenience; it is an essential tool. It provides a safety net, allowing you to experiment and refactor code with the confidence that you can always return to a known-good state. It is the backbone of collaboration, enabling teams to work on different features in parallel and merge their contributions seamlessly. Whether you are patching a kernel driver, developing a user-space application, or managing board configuration files for your Raspberry Pi 5, Git is the mechanism that brings order, traceability, and professionalism to your work. In this chapter, we will move beyond theory and establish the foundational skills needed to make Git an integral part of your embedded development workflow.
Technical Background
The Genesis of Version Control
Before we delve into the mechanics of Git, it is crucial to understand the problem it solves. In the early days of software development, version control was often a manual, ad-hoc process. A developer might save different versions of a file by appending suffixes like _v2, _final, or the dreaded _final_final. This approach is fragile, error-prone, and completely unscalable. It offers no insight into why a change was made, who made it, or how to reliably integrate changes from multiple contributors.
The first evolution brought Centralized Version Control Systems (CVCS), such as Subversion (SVN) and CVS. In this model, a single central server holds the entire history of the project. Developers “check out” a working copy from this server, make their changes, and then “commit” them back. This was a major improvement, providing a single source of truth and preventing developers from overwriting each other’s work. However, it also had a significant weakness: the central server was a single point of failure. If the server went down, collaboration halted. Furthermore, operations like branching and merging were often slow and cumbersome, discouraging the kind of rapid experimentation that fosters innovation.
This limitation paved the way for Distributed Version Control Systems (DVCS), with Git being the most prominent example. The “distributed” nature of Git is its defining characteristic and its primary strength. Instead of just checking out the latest snapshot of the files, a developer clones the entire repository, including its full history. This means every developer has a complete, local backup of the project. This architecture provides immense resilience—if any one server fails, the repository can be restored from any developer’s local clone. More importantly, it fundamentally changes the development workflow. Because all primary operations (committing, creating branches, viewing history) are performed locally, they are lightning-fast. This speed and flexibility encourage developers to commit often, create branches for every new feature, and experiment freely, leading to a more robust and agile development process. This is particularly vital in embedded Linux, where a developer might need to work offline in a lab environment or manage dozens of experimental patches for a custom kernel build.
The Three Trees: Git’s Core Architecture
To truly master Git, one must understand its conceptual model, often referred to as the “three trees.” These are not literal data structures but three virtual areas where your project’s files reside during the development lifecycle.
The first is the Working Directory. This is the most familiar area—it’s the directory on your filesystem that contains the actual files you are currently editing. When you use your text editor to modify a C source file or a Python script, you are interacting directly with the Working Directory. It is your project’s live, active sandbox.
The second area is the Staging Area, also known as the Index. This is a unique and powerful concept in Git that sets it apart from many other version control systems. The Staging Area is an intermediate space where you prepare and assemble the next snapshot of your project that you intend to commit to its history. It acts as a “drafting table” or a “shopping cart.” You can selectively add changes from your Working Directory to the Staging Area. This allows you to craft a precise, well-defined commit. For instance, you might have made ten different changes in five files, but only seven of those changes are related to a single logical feature. The Staging Area lets you add just those seven changes, ignoring the other three for a later commit. This ability to create atomic commits—self-contained snapshots that represent a single logical change—is the cornerstone of a clean, understandable project history.
The third and final area is the Repository itself, specifically the .git directory. This is the heart of your project in Git. It is a hidden directory created in your project’s root when you initialize a repository. The .git directory contains Git’s entire object database—all of your committed snapshots, the full history of every change, branch information, and metadata. When you make a commit, you are taking the snapshot of files currently in the Staging Area and permanently storing it in the repository’s database. This commit becomes a new point in your project’s history, a checkpoint you can always refer to or revert to.
graph TD
    subgraph "Your Local Machine"
        A["Working Directory <br><i>(Your project files)</i>"]
        B["Staging Area (Index) <br><i>(Draft of your next commit)</i>"]
        C["Local Repository (.git) <br><i>(Your project's history)</i>"]
    end

    A -- "git add <i>file</i>" --> B
    B -- "git commit" --> C
    C -- "git checkout <i>file</i>" --> A

    classDef working fill:#f8fafc,stroke:#64748b,stroke-width:2px,color:#1f2937
    classDef staging fill:#0d9488,stroke:#0d9488,stroke-width:1px,color:#ffffff
    classDef repo fill:#1e3a8a,stroke:#1e3a8a,stroke-width:2px,color:#ffffff

    class A working
    class B staging
    class C repo
The Anatomy of a Commit
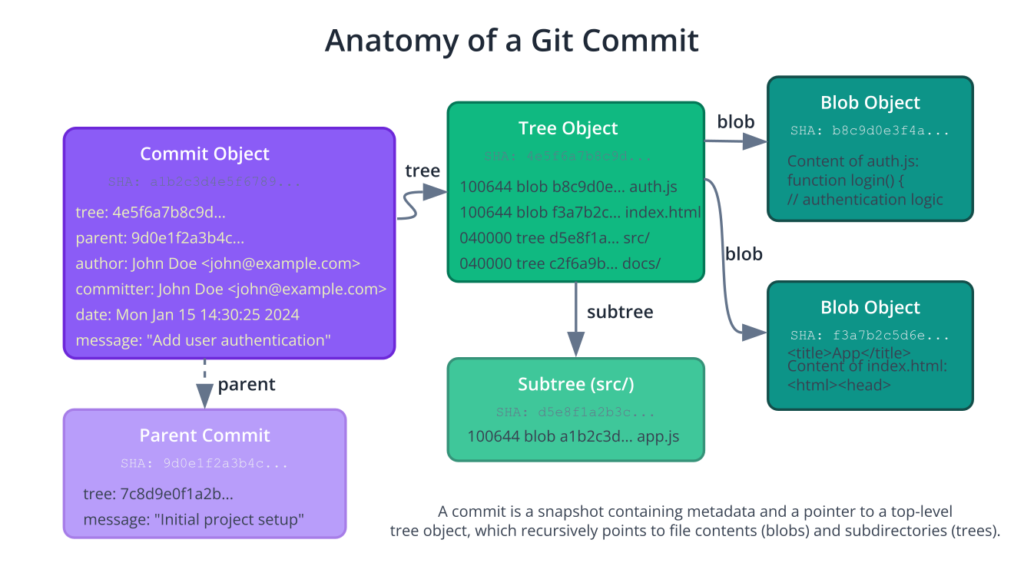
What exactly is a commit? It is not simply a diff or a set of changes. A Git commit is a snapshot of your entire project at a specific point in time. Under the hood, Git’s object database is a content-addressed filesystem. Every object, whether it’s the content of a file or a commit itself, is identified by a unique 40-character checksum, a SHA-1 hash.
Let’s break down the components of this database. The most basic object is a blob (Binary Large Object). A blob represents the content of a single file. When you add a file to Git, Git creates a blob object containing the file’s data and stores it in the database, using the SHA-1 hash of that content as its key. If two files in your project have the exact same content, they will both point to the same blob object, making Git incredibly space-efficient.
The next object type is a tree. A tree object represents a directory. It contains a list of pointers to blobs (for files within that directory) and other tree objects (for subdirectories). A tree effectively captures the state of a directory’s contents at a particular moment.
Finally, we have the commit object. A commit object ties everything together. It contains:
- A pointer to the top-level tree object, which represents the complete snapshot of the project at the time of the commit.
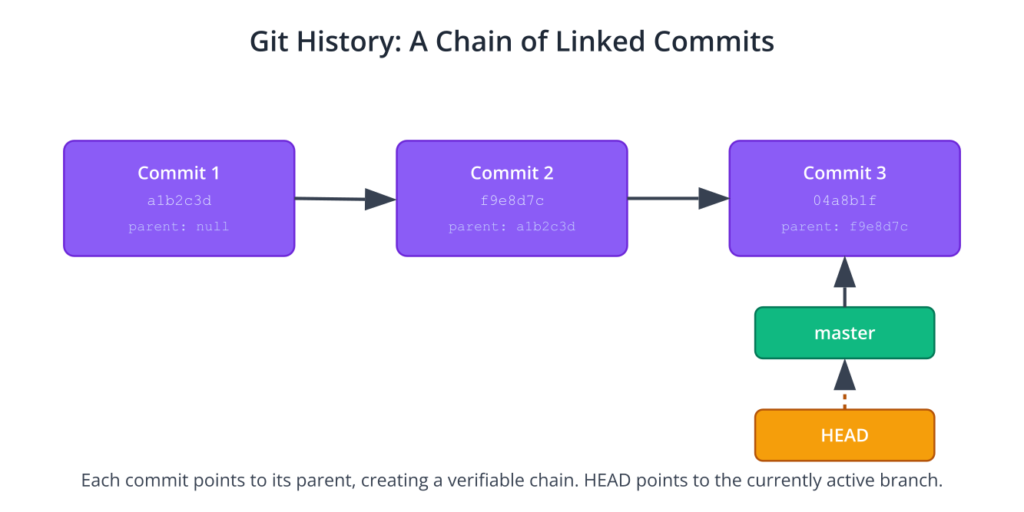
- A pointer to the parent commit (or commits, in the case of a merge). This is what creates the historical chain. The very first commit in a repository has no parent.
- Metadata, including the author’s name and email, the committer’s name and email (usually the same), a timestamp, and, most importantly, the commit message.
The commit message is a vital piece of documentation. It explains the why behind the change. A well-written commit message is a gift to your future self and your collaborators. It should be concise yet descriptive, summarizing the change and providing context. In the embedded world, this might include references to a specific bug tracker ID, a hardware datasheet, or the reason for a performance optimization.
This structure of cryptographically linked objects makes the repository’s history immutable and verifiable. Because each commit’s SHA-1 hash is calculated based on its content and the hash of its parent, it is computationally impossible to alter a previous commit without changing the hash of every subsequent commit. This provides a robust and trustworthy audit trail for your project, which is invaluable for debugging and for projects requiring strict regulatory compliance.
Practical Examples
Now, let’s translate this theory into practice on our Raspberry Pi 5 development platform. We will walk through the entire lifecycle of creating a project, managing it with Git, and inspecting its history.
Initial Git Configuration
Before you can start using Git, you need to perform a one-time configuration to set your user identity. Git embeds this information into every commit you make. Open a terminal on your Raspberry Pi 5.
First, ensure Git is installed. Raspberry Pi OS typically comes with Git pre-installed. You can verify this with:
git --version
If it’s not installed, you can install it easily:
sudo apt update
sudo apt install git
Next, configure your name and email address. Use the same name and email you want to be associated with your work on platforms like GitHub or GitLab.
git config --global user.name "Your Name"
git config --global user.email "youremail@example.com"
The --global flag tells Git to use this configuration for every repository you work on in your user account. You can verify your settings with:
git config --list
Tip: It’s also a good practice to set a default editor for commit messages. If you prefer
nano, for example, you can set it withgit config --global core.editor "nano".
Creating and Initializing a Repository
Let’s create a new project for a simple GPIO utility that will blink an LED connected to the Raspberry Pi 5.
First, create a directory for our project:
mkdir rpi5-gpio-blinker
cd rpi5-gpio-blinker
Right now, this is just a regular directory. To turn it into a Git repository, we use the git init command.
git init
Git will respond with:
Initialized empty Git repository in /home/pi/rpi5-gpio-blinker/.git/This single command creates the .git subdirectory, which contains all the necessary repository files—the object database, branch references, and configuration files. Our project is now under version control.
Let’s look at the file structure that was just created.
ls -la .git
You will see a number of files and directories:
- HEAD: A file that points to the branch you currently have checked out.
- config: Your repository-specific configuration file.
- objects/: The directory where Git’s object database (blobs, trees, commits) is stored.
- refs/: This directory stores pointers to specific commits (e.g., branches and tags).
You typically won’t need to touch these files directly, but it’s helpful to know they exist and what they are for.
The Staging and Committing Workflow
Let’s create our first file, a C program to blink an LED. We’ll assume an LED is connected to GPIO pin 17.
Warning: Always use a current-limiting resistor (e.g., 330Ω) in series with your LED to avoid damaging the GPIO pin or the LED. Connect the resistor to the LED’s anode (longer leg) and the other end to GPIO 17. Connect the LED’s cathode (shorter leg) to a Ground (GND) pin on the Raspberry Pi 5.
Create a file named blinker.c:
// blinker.c
// A simple program to blink an LED connected to a Raspberry Pi 5 GPIO pin.
// This example uses the gpiod library, the modern standard for GPIO control.

#include <gpiod.h>
#include <stdio.h>
#include <unistd.h>

#ifndef	CONSUMER
#define	CONSUMER	"Consumer"
#endif

int main(int argc, char **argv)
{
    // The GPIO chip and line number
    const char *chipname = "gpiochip4"; // On RPi 5, physical GPIOs are on chip4
    unsigned int line_num = 17; // GPIO 17

    struct gpiod_chip *chip;
    struct gpiod_line *line;
    int i, val;

    // Open the GPIO chip
    chip = gpiod_chip_open_by_name(chipname);
    if (!chip) {
        perror("Open chip failed");
        return 1;
    }

    // Get the GPIO line
    line = gpiod_chip_get_line(chip, line_num);
    if (!line) {
        perror("Get line failed");
        gpiod_chip_close(chip);
        return 1;
    }

    // Request the line as output
    if (gpiod_line_request_output(line, CONSUMER, 0) < 0) {
        perror("Request line as output failed");
        gpiod_line_release(line);
        gpiod_chip_close(chip);
        return 1;
    }

    printf("Blinking GPIO %d on %s for 10 seconds...\n", line_num, chipname);

    // Blink the LED
    val = 0;
    for (i = 0; i < 20; i++) {
        if (gpiod_line_set_value(line, val) < 0) {
            perror("Set line value failed");
            break;
        }
        usleep(500000); // 500ms
        val = !val;
    }

    // Release the line and close the chip
    gpiod_line_release(line);
    gpiod_chip_close(chip);

    printf("Done.\n");
    return 0;
}
You’ll need libgpiod to compile this. Install it if you haven’t already: sudo apt install libgpiod-dev.
Now, let’s check the status of our repository with git status. This is your most-used Git command.
git status
The output will be:
On branch master

No commits yet

Untracked files:
  (use "git add <file>..." to include in what will be committed)
	blinker.c

nothing added to commit but untracked files present (use "git add" to track)
Git tells us that blinker.c is “untracked.” This means the file exists in our Working Directory, but Git is not yet tracking its history. To move it to the Staging Area, we use the git add command.
git add blinker.c
Now, run git status again:
On branch master

No commits yet

Changes to be committed:
  (use "git rm --cached <file>..." to unstage)
	new file:   blinker.c
The file is now in the Staging Area, listed under “Changes to be committed.” We have prepared our first snapshot. To permanently store this snapshot in the repository, we use git commit.
git commit -m "Initial commit: Add basic GPIO blinker application"
The -m flag allows you to provide a commit message directly on the command line. If you omit it, Git will open the editor you configured earlier.
The output will look something like this:
[master (root-commit) a1b2c3d] Initial commit: Add basic GPIO blinker application
 1 file changed, 60 insertions(+)
 create mode 100644 blinker.c
We have successfully made our first commit! The string a1b2c3d is the short version of the commit’s unique SHA-1 hash.
sequenceDiagram
    actor User
    participant WD as Working Directory
    participant SA as Staging Area
    participant LR as Local Repository

    User->>WD: 1. Modify files (e.g., edit blinker.c)
    activate WD
    Note right of WD: Files are now "modified"
    deactivate WD

    User->>User: 2. Check status
    User->>LR: git status
    activate LR
    LR-->>User: "Changes not staged for commit"

    User->>SA: 3. Stage changes
    activate SA
    User->>SA: git add blinker.c
    Note left of SA: A snapshot of blinker.c<br>is added to the index.
    deactivate SA

    User->>User: 4. Check status again
    User->>LR: git status
    LR-->>User: "Changes to be committed"
    deactivate LR

    User->>LR: 5. Commit staged changes
    activate LR
    User->>LR: git commit -m "A descriptive message"
    Note right of LR: A new permanent commit object<br>is created in the repository history.
    deactivate LR

    User->>User: 6. View history
    User->>LR: git log
    activate LR
    LR-->>User: Shows the new commit
    deactivate LR
Inspecting the Project History
Now that we have a commit, we can look at our project’s history using git log.
git log
This command shows a chronological list of commits:
commit a1b2c3d4e5f6a7b8c9d0e1f2a3b4c5d6e7f8a9b0 (HEAD -> master)
Author: Your Name <youremail@example.com>
Date:   Tue Jul 8 20:45:10 2025 +0000

    Initial commit: Add basic GPIO blinker application
The log shows the full SHA-1 hash, the author, the date, and the commit message. This is the permanent record of our project’s evolution.
Let’s add a Makefile to simplify compilation. Create a file named Makefile:
# Makefile for the rpi5-gpio-blinker project

CC=gcc
CFLAGS=-Wall -g -lgpiod
TARGET=blinker

all: $(TARGET)

$(TARGET): blinker.c
	$(CC) $(CFLAGS) -o $(TARGET) blinker.c

clean:
	rm -f $(TARGET)

.PHONY: all clean
Now, let’s check the status:
git status
On branch master
Untracked files:
(use "git add <file>..." to include in what will be committed)
Makefile
nothing added to commit but untracked files present (use "git add" to track)
As expected, Makefile is untracked. Let’s add it and commit it in one step.
git add Makefile
git commit -m "Add Makefile for easy compilation"
Now, run git log again. You’ll see both commits in the history.
git log --oneline
The --oneline option provides a more compact view:
f9e8d7c (HEAD -> master) Add Makefile for easy compilation
a1b2c3d Initial commit: Add basic GPIO blinker application
This demonstrates the fundamental rhythm of working with Git: modify, stage, commit. You modify files in your working directory, use git add to stage the changes you want to include in the next snapshot, and use git commit to save that snapshot to your history.
Common Mistakes & Troubleshooting
As with any powerful tool, there are common pitfalls for newcomers. Understanding these ahead of time can save you significant frustration.
flowchart TD
    A[Start: New file created<br>e.g., <i>blinker.o</i>] --> B{Is file path in <i>.gitignore</i>?};

    B -- "Yes" --> C[File is IGNORED];
    B -- "No" --> D[File is UNTRACKED];

    C --> E[Git does not track changes.<br>Not shown in <i>git status</i>.];
    D --> F[Appears in <i>git status</i>.<br>Can be staged with <i>git add</i>.];

    E --> G((End));
    F --> G;

    classDef start fill:#1e3a8a,stroke:#1e3a8a,stroke-width:2px,color:#ffffff
    classDef decision fill:#f59e0b,stroke:#f59e0b,stroke-width:1px,color:#ffffff
    classDef process fill:#0d9488,stroke:#0d9488,stroke-width:1px,color:#ffffff
    classDef ignored fill:#ef4444,stroke:#ef4444,stroke-width:1px,color:#ffffff
    classDef untracked fill:#8b5cf6,stroke:#8b5cf6,stroke-width:1px,color:#ffffff
    classDef end_node fill:#10b981,stroke:#10b981,stroke-width:2px,color:#ffffff

    class A start
    class B decision
    class C ignored
    class D untracked
    class E,F process
    class G end_node
Exercises
- Refine the Project: Add a
README.mdfile to yourrpi5-gpio-blinkerproject. In this file, explain what the project does, how to compile it using theMakefile, and the hardware setup required (which GPIO pin to use). Stage and commit this new file with a clear commit message. - Modify and Stage a Change: Modify the
blinker.cprogram. Change the blinking frequency by altering theusleep()duration from 500,000 microseconds to 250,000 microseconds. Usegit statusto see the change, then usegit diffto see the exact lines that were modified. Stage this change and commit it with the message “Feat: Increase blink speed to 4Hz”. - Explore the History: Use the
git logcommand with different options to explore the project history. Trygit log --oneline --graph --allto see a compact, graphical view of the commit history. Usegit log -p -1to view the most recent commit along with the patch (the changes) it introduced. - Ignoring Build Artifacts: Compile the project using
make. You will now have an executable file namedblinker. Rungit status. Notice that Git sees this new file. Now, create a.gitignorefile and add the nameblinkerto it. Rungit statusagain. The executable should no longer appear as an “untracked file.” Stage and commit your new.gitignorefile. - Correcting a Commit Message: Make a small, trivial change to the
README.mdfile (e.g., fix a typo). Commit this change, but deliberately write a poor commit message like “update.” Immediately after, use the commandgit commit --amendto open your editor and fix the message to be more descriptive, such as “Docs: Fix typo in README instructions.” This command is extremely useful for correcting mistakes in your most recent, un-pushed commit.
Summary
- Version Control is Essential: Version Control Systems are non-negotiable tools for professional software development, providing safety, collaboration, and a detailed project history.
- Git is a Distributed VCS: Unlike centralized systems, Git gives every developer a full copy of the repository history, enabling fast, offline work and robust backups.
- The Three Trees: Git’s workflow revolves around the Working Directory (your live files), the Staging Area (where you prepare your next commit), and the Repository (the permanent, historical record).
- The Core Workflow: The fundamental Git workflow is a cycle of modifying files, using
git addto stage them, and usinggit committo save the snapshot to the repository’s history. - Atomic Commits are Key: A clean, useful history is built from small, self-contained commits, each representing a single logical change. The commit message should explain the why behind the change.
.gitignoreis Crucial: Always use a.gitignorefile to prevent build artifacts, logs, and other non-source files from being accidentally added to your repository.
Further Reading
- Pro Git Book: Scott Chacon & Ben Straub. The definitive, open-source book on Git. It is available online for free and covers everything from beginner concepts to advanced internals. https://git-scm.com/book/en/v2
- Official Git Documentation: The official documentation website is an invaluable reference for command-specific help and tutorials. https://git-scm.com/doc
- Atlassian Git Tutorials: A well-structured set of tutorials from Atlassian (the makers of Bitbucket) that cover conceptual ground and practical usage. https://www.atlassian.com/git/tutorials
- The Git Parable: Tom Preston-Werner. An excellent, short story that explains the “why” behind Git’s design in a very intuitive way. https://tom.preston-werner.com/2009/05/19/the-git-parable.html
- Raspberry Pi Documentation: Official hardware documentation for the Raspberry Pi 5, essential for understanding the GPIO architecture. https://www.raspberrypi.com/documentation/
- gpiod Library Documentation: The kernel documentation for the
gpiodinterface, which is the modern standard for interacting with GPIOs in Linux. https://git.kernel.org/pub/scm/libs/libgpiod/libgpiod.git/about/
