
Chapter 34: Dev. Environment: Native Compilation on RPi5 (GCC, Make)
Chapter Objectives
Upon completing this chapter, you will be able to:
- Understand the role and importance of a native compilation toolchain in embedded systems development.
- Explain the complete C/C++ build process, from preprocessing and compilation to assembly and linking.
- Utilize the GNU Compiler Collection (GCC) to compile single and multi-file C programs directly on the Raspberry Pi 5.
- Construct robust Makefiles to automate the build process, manage dependencies, and streamline project compilation.
- Debug common compilation and linking errors, such as missing headers, unresolved symbols, and library path issues.
- Integrate compiled C code with Raspberry Pi 5 hardware by controlling GPIO pins.
Introduction
The journey from human-readable source code to a machine-executable program is a fundamental process in the world of embedded systems. While cross-compilation—building code on a powerful host machine for a different target architecture—is a dominant paradigm in professional settings, it is not the only path. Native compilation, the process of compiling code directly on the target device, offers a uniquely accessible and immediate development experience. For a platform as powerful as the Raspberry Pi 5, which runs a full-featured Linux distribution, native compilation is not just possible but highly practical for a wide range of applications, prototyping, and learning.
This chapter explores the native development environment, positioning the Raspberry Pi 5 itself as our primary workstation. We will delve into the essential tools that form the bedrock of software development on nearly every Linux system: the GNU Compiler Collection (GCC) and the Make utility. Understanding these tools is not merely an academic exercise; it is a foundational skill for any developer working in the Linux ecosystem. By compiling directly on the hardware, you gain an intimate understanding of the system’s resources, libraries, and architecture. This hands-on approach demystifies the build process, providing a powerful feedback loop for learning and debugging. You will learn to transform simple text files containing C code into executable programs that can blink LEDs, read sensors, and perform complex computational tasks, all from the command line of your Raspberry Pi 5.
Technical Background
The GNU Compiler Collection (GCC): An Overview
At the heart of native compilation on any Linux system is the compiler. The GNU Compiler Collection, universally known as GCC, is the de facto standard open-source compiler suite. Its history is deeply intertwined with the history of free and open-source software itself, originating as a project by Richard Stallman to create a free C compiler for the GNU operating system. Today, GCC is a mature, highly optimized, and versatile collection that supports numerous programming languages, including C, C++, Objective-C, Fortran, Ada, and Go. For the embedded Linux developer, GCC’s C and C++ compilers (gcc and g++ respectively) are the most critical components.
When you invoke gcc on the command line, you are initiating a sophisticated, multi-stage process that transforms your abstract instructions into the precise binary language the processor understands. The power of GCC lies not just in this translation but also in its vast array of options for controlling every aspect of the process. You can direct it to optimize for speed or size, include debugging information, link against specific libraries, and generate warnings for questionable code constructs. This level of control is paramount in embedded systems, where resources are often constrained and performance is critical. On the Raspberry Pi 5, the installed version of GCC is specifically configured to generate code for its ARM Cortex-A76 processor, ensuring that the resulting executables are optimized for the underlying hardware architecture. Understanding GCC is understanding the bridge between your logic and the silicon that executes it.
The Build Process Deconstructed
The transformation of a C source file into an executable program is often viewed as a single action: gcc my_program.c -o my_program. However, this simple command conceals a four-stage pipeline that is essential for a developer to understand, especially when troubleshooting complex build issues.
The first stage is preprocessing. The preprocessor, cpp, scans the source code for directives that begin with a hash symbol (#). Its primary jobs are to handle #include directives by finding and inserting the contents of header files into the source stream, expand #define macros, and conditionally compile code blocks based on #if, #ifdef, and #endif directives. The output of this stage is a single, expanded C source file, which is often transient and deleted after compilation. Understanding this stage is key to resolving “header file not found” errors, which are fundamentally failures of the preprocessor to locate a specified file.
The second stage is compilation. The compiler proper takes the preprocessed source code and translates it into architecture-specific assembly language. This assembly code is a human-readable representation of the machine instructions for the target processor—in our case, the ARMv8 instruction set for the Raspberry Pi 5’s CPU. The compiler’s main task here is syntactic and semantic analysis, ensuring the code is valid according to the C language standard, and then performing numerous optimizations to make the code more efficient. The output is typically an .s file.
graph TD
    subgraph "Stage 1: Preprocessing"
        A[Source Code<br><i>my_program.c</i>] -->|#include, #define| B(Preprocessor<br><b>cpp</b>);
    end

    subgraph "Stage 2: Compilation"
        B --> C["Expanded C Code<br><i>(Intermediate)</i>"];
        C --> D(Compiler<br><b>gcc</b>);
    end

    subgraph "Stage 3: Assembly"
        D --> E[Assembly Code<br><i>my_program.s</i>];
        E --> F(Assembler<br><b>as</b>);
    end

    subgraph "Stage 4: Linking"
        F --> G[Object Code<br><i>my_program.o</i>];
        subgraph "External Code"
            LibC[C Standard Library<br><i>libc.so</i>]
            OtherLibs[Other Libraries<br><i>.so / .a</i>]
        end
        G --> H(Linker<br><b>ld</b>);
        LibC --> H;
        OtherLibs --> H;
        H --> I[Executable File<br><b>my_program</b>];
    end

    %% Styling
    classDef startNode fill:#1e3a8a,stroke:#1e3a8a,stroke-width:2px,color:#ffffff;
    classDef processNode fill:#0d9488,stroke:#0d9488,stroke-width:1px,color:#ffffff;
    classDef systemNode fill:#8b5cf6,stroke:#8b5cf6,stroke-width:1px,color:#ffffff;
    classDef endNode fill:#10b981,stroke:#10b981,stroke-width:2px,color:#ffffff;
    classDef fileNode fill:#f0f9ff,stroke:#0ea5e9,stroke-width:1px,color:#0c4a6e;

    class A,E,G,I fileNode;
    class B,D,F,H processNode;
    class LibC,OtherLibs systemNode;
The third stage is assembly. The assembler, as, takes the assembly code generated by the compiler and translates it into machine code, also known as object code. This object code contains the actual binary instructions that the CPU can execute, but it is not yet a complete program. It exists in a relocatable format, meaning its references to memory locations are not yet absolute. The output of this stage is an object file, which by convention has a .o extension. These files contain the compiled code for a single source file, along with a symbol table that lists the functions and variables it defines and those it references from other files.
The final and most complex stage is linking. The linker, ld, is responsible for taking one or more object files and combining them into a single executable program. Its work is twofold. First, it resolves symbol references. If main.c calls a function defined in helper.c, the main.o object file will contain a reference to that function’s symbol, and the linker’s job is to find the definition in helper.o and connect the two. Second, it arranges the code and data into a final executable file format, such as the Executable and Linkable Format (ELF) used by Linux. The linker is also responsible for incorporating code from libraries, which are pre-compiled collections of object code. This final stage is where “undefined reference to” errors occur, indicating the linker could not find the definition for a function or variable that was used in the code.
Libraries: The Pillars of Code Reusability
A modern application is rarely built from scratch. Instead, it stands on the shoulders of giants by using libraries—collections of pre-compiled, reusable code. Libraries prevent developers from constantly reinventing the wheel for common tasks like printing to the screen, performing mathematical calculations, or handling network connections. In the C world, the most fundamental is the C standard library (libc), which provides functions like printf(), malloc(), and strcpy().
Libraries come in two primary forms: static and dynamic (or shared).
A static library (with an .a extension, for “archive”) is a collection of object files bundled together. When the linker builds a program against a static library, it finds the object files within the library that contain the functions the program needs and copies that code directly into the final executable. The result is a self-contained program that has no external library dependencies at runtime. This can be advantageous in embedded systems for its simplicity and predictability, but it comes at the cost of a larger executable file size. If ten different programs on a system all statically link the same library, that library’s code is duplicated ten times on the disk.
graph LR
        subgraph Dynamic Linking [<b>Dynamic Linking</b>: Executable holds references to shared libraries]
        direction LR
        D_Obj1[main.o]
        D_Obj2[helper.o]

        subgraph D_Linker ["Linker (ld)"]
            direction LR
            D_Linker_Icon{{"<br><b>ld</b><br>"}}
        end

        D_Exe[<b>Small Executable</b><br><br>main code<br>helper code<br><i>stub -> libmath.so</i>]
        D_Lib["Shared Library<br><i>libmath.so</i><br>(Loaded by OS at runtime)"]

        D_Obj1 --> D_Linker_Icon
        D_Obj2 --> D_Linker_Icon
        D_Linker_Icon --> D_Exe
        D_Exe -.->|references| D_Lib
    end


    subgraph Static Linking [<b>Static Linking</b>: Code is copied into the executable]
        direction LR
        S_Obj1[main.o]
        S_Obj2[helper.o]
        S_Lib[Static Library<br><i>libmath.a</i>]

        subgraph S_Linker ["Linker (ld)"]
            direction LR
            S_Linker_Icon{{"<br><b>ld</b><br>"}}
        end

        S_Exe[<b>Large, Self-Contained<br>Executable</b><br><br>main code<br>helper code<br><i>copied library code</i>]

        S_Obj1 --> S_Linker_Icon
        S_Obj2 --> S_Linker_Icon
        S_Lib --> S_Linker_Icon
        S_Linker_Icon --> S_Exe
    end


    %% Styling
    classDef processNode fill:#0d9488,stroke:#0d9488,stroke-width:1px,color:#ffffff;
    classDef systemNode fill:#8b5cf6,stroke:#8b5cf6,stroke-width:1px,color:#ffffff;
    classDef fileNode fill:#f0f9ff,stroke:#0ea5e9,stroke-width:1px,color:#0c4a6e;
    classDef exeNode fill:#dcfce7,stroke:#10b981,stroke-width:1px,color:#14532d;
    classDef staticExeNode fill:#fee2e2,stroke:#ef4444,stroke-width:1px,color:#7f1d1d;

    class S_Linker_Icon,D_Linker_Icon processNode;
    class S_Lib,D_Lib systemNode;
    class S_Obj1,S_Obj2,D_Obj1,D_Obj2 fileNode;
    class D_Exe exeNode;
    class S_Exe staticExeNode;
A dynamic library, also known as a shared object (with an .so extension on Linux), works differently. When linking against a dynamic library, the linker does not copy the library’s code into the executable. Instead, it places a reference, or a stub, in the executable that says, “at runtime, you will need this function from this shared library.” When the program is launched, the operating system’s dynamic loader is responsible for finding the required .so file on the system, loading it into memory, and resolving the references from the executable to the code in the library. The primary advantage is efficiency. If ten programs use the same shared library, only one copy of that library needs to be on the disk and loaded into memory, saving significant space. This is the default linking method on most modern Linux systems, including Raspberry Pi OS. The trade-off is a dependency on the presence of the correct library version on the target system, which can sometimes lead to runtime issues colloquially known as “dependency hell.”
Managing Dependencies with Make
For a project consisting of a single source file, running gcc manually is trivial. But as a project grows to include tens or hundreds of files, manually recompiling becomes tedious and error-prone. How do you remember which files need to be recompiled after a change? If you change a header file, every source file that includes it must be recompiled. The Make utility was created to solve this exact problem.
make is an automation tool that builds executables based on a set of rules defined in a special file named Makefile. A Makefile specifies the relationships and dependencies between files in a project. Each rule in a Makefile has three parts: a target, its prerequisites (or dependencies), and a recipe.
target: prerequisite1 prerequisite2
    recipe (command to execute)
The target is typically the name of a file to be generated, such as an executable or an object file. The prerequisites are the files that the target depends on. The recipe is a shell command that creates the target from the prerequisites.
graph TD
    subgraph Goal
        T[TARGET<br><b>my_app</b>]
    end

    subgraph Object Files
        O1[main.o]
        O2[message.o]
    end

    subgraph Source Files
        S1[main.c]
        S2[message.c]
        H1[message.h]
    end

    T -- depends on --> O1;
    T -- depends on --> O2;

    O1 -- built from --> S1;
    O1 -- depends on --> H1;
    O2 -- built from --> S2;
    O2 -- depends on --> H1;

    %% Styling
    classDef targetNode fill:#10b981,stroke:#10b981,stroke-width:2px,color:#ffffff;
    classDef objectNode fill:#f59e0b,stroke:#f59e0b,stroke-width:1px,color:#ffffff;
    classDef sourceNode fill:#f0f9ff,stroke:#0ea5e9,stroke-width:1px,color:#0c4a6e;

    class T targetNode;
    class O1,O2 objectNode;
    class S1,S2,H1 sourceNode;
When you run make, it looks for a target to build (by default, the first one in the file). It then checks the prerequisites of that target. For each prerequisite, it checks if it is also a target of another rule. This creates a dependency tree. make traverses this tree, and for any given rule, it executes the recipe only if the target file does not exist or if any of its prerequisites have been modified more recently than the target file. This is the core efficiency of make: it performs the minimum amount of work necessary to bring the project up to date.
A well-structured Makefile can manage immense complexity, automatically compiling object files from source files, linking them into a final executable, and even providing “phony” targets for tasks like make clean to remove all generated files and make install to copy the executable to a system directory. It is an indispensable tool for any serious C/C++ developer.
Practical Examples
This section provides hands-on, step-by-step instructions for setting up a native development environment and building C projects on your Raspberry Pi 5.
Setting Up the Development Environment
Raspberry Pi OS comes with most of the tools you need, but it’s always best practice to ensure your system is up-to-date and that the essential build packages are installed.
1. Update Your System: Open a terminal on your Raspberry Pi 5 and run the following commands to update the package list and upgrade existing packages.
sudo apt update
sudo apt upgrade -y
2. Install Build-Essential: This meta-package installs GCC, G++, Make, and other critical libraries and utilities required for compilation.
sudo apt install build-essential -y3. Verify the Installation: Check that GCC and Make are correctly installed and available in your system’s PATH.
gcc --version
make --version
You should see output indicating the installed versions of each tool, confirming your development environment is ready.
gcc (Debian 12.2.0-14) 12.2.0
...
GNU Make 4.3
...
Example 1: The Classic “Hello, World!”
Let’s start with the simplest possible C program to test our toolchain.
1. Create a Source File: Use a text editor like nano or vim to create a file named hello.c.
nano hello.c2. Add the Code: Enter the following C code into the file.
// hello.c
// A classic first program in C.
#include <stdio.h>

int main() {
    // printf is part of the C standard library (libc)
    // It prints a formatted string to the standard output.
    printf("Hello, Embedded World, from Raspberry Pi 5!\n");
    return 0;
}nano, press Ctrl+X, then Y, then Enter).
3. Compile the Program: Use gcc to compile the source file into an executable.
gcc hello.c -o hellogcc: The command to invoke the compiler.
hello.c: The input source file.
-o hello: The output flag, which tells gcc to name the resulting executable hello. If omitted, the default name would be a.out.
4. Run the Executable: Execute the program you just created.
./hello./ is necessary to tell the shell to look for the executable in the current directory. You should see the following output:
Hello, Embedded World, from Raspberry Pi 5!Example 2: A Multi-File Project with a Makefile
Real-world projects are split into multiple files for better organization. This example demonstrates how to manage a multi-file project with make.
1. Create the Project Directory and Files:
mkdir multi_project
cd multi_project
nano main.c
nano message.c
nano message.h
2. Populate the Files:
message.h (The Header File): This file contains the function declaration (or prototype). It acts as a contract, telling other files that a function with this signature exists somewhere.
// message.h
// Header file declaring the print_message function.
#ifndef MESSAGE_H
#define MESSAGE_H

void print_message(void);

#endif // MESSAGE_H
message.c (The Implementation File): This file contains the function definition.
// message.c
// Implementation of the print_message function.
#include <stdio.h>
#include "message.h"

void print_message(void) {
    printf("This message comes from a separate file!\n");
}
main.c (The Main Program Logic): This file contains the main function and calls the function defined in message.c.
// main.c
// The main entry point of the program.
#include "message.h" // Include our custom header

int main() {
    print_message();
    return 0;
}
3. Create the Makefile: This is the key to automating the build. Create a file named Makefile (with a capital ‘M’).
nano Makefile
# Makefile for our multi-file project
# Compiler and compiler flags
CC = gcc
CFLAGS = -Wall -Wextra -std=c11 -g
# The final executable name
TARGET = multi_project
# List of object files
# This uses a substitution to automatically find all .c files and change their
# extension to .o
SRCS = $(wildcard *.c)
OBJS = $(patsubst %.c,%.o,$(SRCS))
# The default rule (the first one)
# The target executable depends on all the object files.
all: $(TARGET)
# Rule to link the final executable
# The recipe links all object files together.
$(TARGET): $(OBJS)
	$(CC) $(CFLAGS) -o $(TARGET) $(OBJS)
# Rule to compile a .c file into a .o file
# This is a pattern rule. It says how to create any .o file from a .c file.
%.o: %.c
	$(CC) $(CFLAGS) -c $< -o $@
# Phony target to clean up the directory
clean:
	rm -f $(TARGET) $(OBJS)
.PHONY: all clean
4. Build the Project with make: Simply run the make command in your project directory.
makemake execute the necessary commands based on the rules:
gcc -Wall -Wextra -std=c11 -g -c main.c -o main.o
gcc -Wall -Wextra -std=c11 -g -c message.c -o message.o
gcc -Wall -Wextra -std=c11 -g -o my_app main.o message.o
```make` first compiled each `.c` file into a `.o` object file, then linked the object files together to create the `my_app` executable.
5. Run and Test:
./my_app
This message comes from a separate file!
message.c. Then run make again. You will see that make is smart enough to only recompile message.c and then relink the final executable, saving time.To clean up all generated files, use the clean target:make clean
Example 3: Hardware Integration – Blinking an LED
This example demonstrates compiling and running a program that interacts with the Raspberry Pi 5’s GPIO pins to blink an LED.
Warning: Always double-check your wiring before powering on your Raspberry Pi. Incorrect connections can damage the Pi or the components. Ensure the LED is connected with the correct polarity (long leg, anode, to the GPIO pin; short leg, cathode, to the resistor).
Hardware Required:
- 1 x Raspberry Pi 5
- 1 x Breadboard
- 1 x LED (any color)
- 1 x 330Ω resistor
- Jumper wires
Wiring:
- Connect a jumper wire from a Ground pin (e.g., Pin 6) on the Raspberry Pi 5 to a rail on the breadboard.
- Connect the 330Ω resistor from the ground rail to a row on the breadboard.
- Plug the LED into the breadboard. Connect its short leg (cathode) to the same row as the resistor.
- Connect the LED’s long leg (anode) to another row.
- Connect a jumper wire from that row to GPIO 17 (Pin 11) on the Raspberry Pi 5.

Software:
We will use the gpiod library, which is the modern, standard way to interact with GPIO on Linux.
1. Install the Library:
sudo apt install gpiod libgpiod-dev -ygpiod provides the command-line tools, and libgpiod-dev provides the development files (headers and library) needed for C programs.
2. Create the Source File:
nano blink.c3. Add the Code:
// blink.c
// A simple LED blinking program using libgpiod.
#include <gpiod.h>
#include <stdio.h>
#include <unistd.h>

// Define the GPIO chip and line number
const char *chipname = "gpiochip4"; // On RPi 5, GPIOs are on gpiochip4
const unsigned int line_num = 17;   // GPIO 17

int main(int argc, char **argv) {
    struct gpiod_chip *chip;
    struct gpiod_line *line;
    int ret, i;

    // Open the GPIO chip
    chip = gpiod_chip_open_by_name(chipname);
    if (!chip) {
        perror("Open chip failed");
        return 1;
    }

    // Get the GPIO line
    line = gpiod_chip_get_line(chip, line_num);
    if (!line) {
        perror("Get line failed");
        gpiod_chip_close(chip);
        return 1;
    }

    // Request the line as an output, with a default value of 0 (off)
    ret = gpiod_line_request_output(line, "blink_example", 0);
    if (ret < 0) {
        perror("Request line as output failed");
        gpiod_line_release(line);
        gpiod_chip_close(chip);
        return 1;
    }

    printf("Blinking GPIO %d on %s. Press Ctrl+C to exit.\n", line_num, chipname);

    // Blink loop
    for (i = 0; i < 10; i++) {
        // Set line to 1 (on)
        gpiod_line_set_value(line, 1);
        sleep(1); // Wait for 1 second

        // Set line to 0 (off)
        gpiod_line_set_value(line, 0);
        sleep(1); // Wait for 1 second
    }

    // Release the line and close the chip
    gpiod_line_release(line);
    gpiod_chip_close(chip);

    return 0;
}
4. Compile and Link: This time, we need to tell GCC to link against the libgpiod library.
gcc blink.c -o blink -lgpiod
-l flag tells the linker to look for a library.
gpiod is the name of the library (the linker automatically prepends lib and appends .so or .a).
5. Run the Program:
./blink
Common GCC Compiler Flags:
Common Mistakes & Troubleshooting
Even with powerful tools, things can go wrong. Understanding common pitfalls is key to efficient debugging.
Exercises
- Simple Math Program: Write a C program named
math_test.cthat includes<math.h>and calculates the square root of 81 and the value of 2 raised to the power of 10, printing the results. Compile it usinggcc.- Hint: You will need to link the math library. The flag is
-lm. - Verification: The program should output the values
9.0and1024.0.
- Hint: You will need to link the math library. The flag is
- Makefile Variables: Modify the
Makefilefrom the multi-file project example. Create a new variable namedLDFLAGSand add the-lmflag to it. Modify the final linking rule to use this new variable. This is good practice for separating compiler and linker flags.- Verification: The project should still compile and run correctly after your changes.
- Expanding the Multi-File Project: Add a new file pair,
utils.handutils.c, to the multi-file project. Inutils.c, create a functionint add(int a, int b)that returns the sum of two numbers. Call this function frommain.cand print the result.- Objective: Test if your
Makefileis generic enough to automatically detect and compile the new files without modification. - Verification: Running
makeshould automatically compileutils.cand link it. The final program should output the message frommessage.cand the result of the addition.
- Objective: Test if your
- GPIO Input: Write a new C program that reads the state of a GPIO pin. Connect a push button to GPIO 23 and a ground pin. Configure the pin as an input with a pull-up resistor. The program should print “Button Pressed!” when the button is pushed (connecting the pin to ground).
- Hint: Use
gpiod_line_request_inputandgpiod_line_get_value. You may need to look up how to enable the internal pull-up resistor withlibgpiod. - Verification: The program should print the message only when the button is held down.
- Hint: Use
- Conditional Compilation: Use preprocessor directives to control the build. In your
main.cfrom the multi-file project, add a block of code surrounded by#ifdef DEBUG ... #endif. This code should print the values of variables or status messages. Modify yourMakefile‘sCFLAGSto include the-DDEBUGflag.- Objective: Learn how to create a “debug build” versus a “release build.”
- Verification: When you run
make, the debug messages should be printed. When you remove-DDEBUGfrom theMakefileand runmake clean && make, the messages should disappear.
Summary
- Native compilation involves using a toolchain on the target hardware itself, which is a practical approach for development on powerful embedded Linux devices like the Raspberry Pi 5.
- The GNU Compiler Collection (GCC) is the standard compiler on Linux. It orchestrates a four-stage process: preprocessing, compilation, assembly, and linking.
- Libraries are essential for code reuse. Static libraries (
.a) are linked into the executable, creating a larger, self-contained file. Dynamic libraries (.so) are loaded at runtime, saving space but creating runtime dependencies. - The Make utility automates the build process by reading a
Makefile, which defines dependencies between files and recipes to build them. It intelligently recompiles only what is necessary. - Practical development involves installing tools with
apt, writing code in a text editor, and usinggccwith flags like-o(output),-l(link library),-I(include path), and-D(define macro). - Common errors include missing headers (uninstalled dev packages), undefined references (unlinked libraries), and incorrect
Makefilesyntax (tabs vs. spaces).
Further Reading
- An Introduction to GCC – The official introductory guide from the GNU Project. Provides a comprehensive overview of GCC’s command-line options.
- GNU
makeManual – The definitive reference formake. Essential for understanding advancedMakefilesyntax and features. - Raspberry Pi Documentation – The GPIO Header – Official documentation detailing the GPIO pinout and capabilities of the Raspberry Pi 5.
libgpiodDocumentation – The official documentation for thelibgpiodlibrary, including API references and examples.- The C Programming Language (2nd Edition) by Brian W. Kernighan and Dennis M. Ritchie – The classic, authoritative book on C. A must-read for any serious C programmer.
- Beej’s Guide to C Programming – A friendly, well-regarded online tutorial that covers C from the ground up.
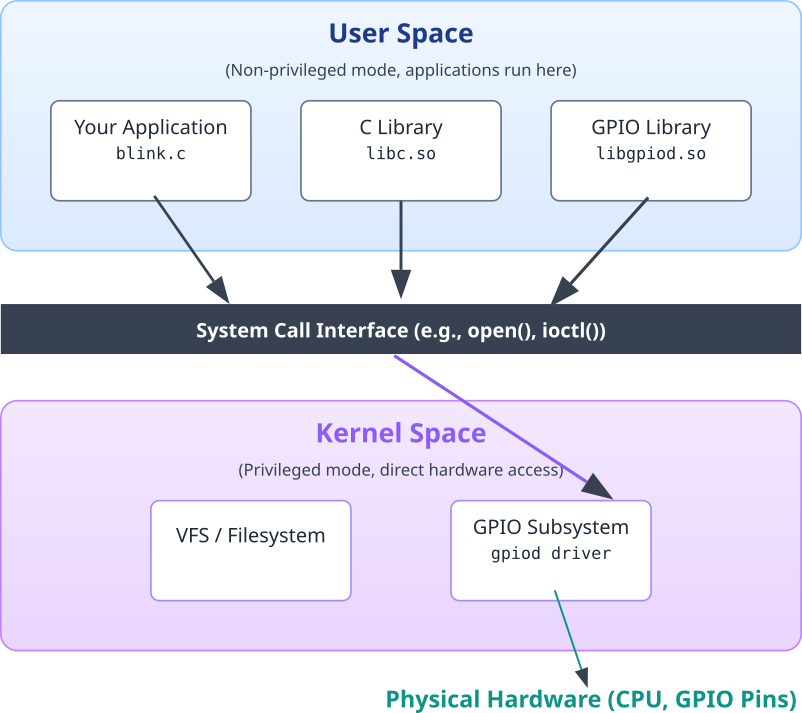
- Linux System Programming, 2nd Edition by Robert Love – An excellent book that covers the Linux system call interface, providing context for how programs interact with the kernel.
