
Chapter 22: Shell Scripting: Loops (for, while, until)
Chapter Objectives
By the end of this chapter, you will be able to:
- Understand the fundamental principles of iteration in shell scripting and its importance in automating embedded tasks.
- Implement
forloops to iterate over static lists, file system objects, and command output. - Construct
whileloops to execute commands repeatedly based on the success of a condition. - Utilize
untilloops to perform actions as long as a condition remains false. - Debug common loop-related issues such as infinite loops, off-by-one errors, and quoting problems.
- Apply looping constructs to solve practical problems on a Raspberry Pi 5, such as polling hardware and processing data.
Introduction
In the world of embedded systems, automation is not a luxury; it is a necessity. Embedded devices often operate autonomously, performing repetitive tasks without human intervention. Whether it’s a weather station periodically logging sensor data, a security camera monitoring for motion, or an industrial controller maintaining a set temperature, the ability to repeat actions is fundamental. This is where the power of shell scripting loops becomes indispensable. Loops provide the control structure needed to execute a block of code multiple times, forming the backbone of automation, monitoring, and data processing scripts.
This chapter delves into the core iterative constructs of the shell: the for, while, and until loops. While they all facilitate repetition, each has a distinct purpose and is suited to different scenarios. The for loop is your tool of choice when you have a known, finite set of items to process, such as a list of files or a range of numbers. The while and until loops, on the other hand, are designed for situations where the number of iterations is unknown beforehand. They continue executing as long as a specific condition is met (or not met), making them perfect for tasks like waiting for a sensor to reach a certain value or polling a network service until it becomes available.
By mastering these looping mechanisms on your Raspberry Pi 5, you will unlock a new level of control over your embedded environment. You will move from executing simple, one-off commands to writing sophisticated scripts that can manage system resources, interact with hardware, and perform complex, stateful operations, bringing your embedded projects to life.
Technical Background
At its heart, a loop is a control flow statement that allows a sequence of instructions to be executed repeatedly. The shell, being a command-line interpreter, provides powerful and flexible looping constructs that are essential for automating tasks. Understanding the nuances of each loop type is crucial for writing efficient, readable, and robust shell scripts.
The for Loop: Iterating Over a Finite World
The for loop is the most intuitive looping construct for many developers. Its primary purpose is to iterate over a predefined, finite list of items. For each item in the list, the loop executes a block of commands, with the current item’s value assigned to a variable. This makes it exceptionally useful for batch processing files, working through a list of servers, or performing an operation a set number of times.
The classic for loop syntax is straightforward:
for variable_name in item1 item2 item3 ...
do
    # Commands to execute for each item
    # The current item is available as $variable_name
done
Here, variable_name is a placeholder that takes on the value of each item in the list sequentially. The do and done keywords enclose the body of the loop.
A common use case in embedded systems is processing a set of data files. Imagine you have a series of log files from a sensor, named sensor_log_20240701.txt, sensor_log_20240702.txt, and so on. A for loop can process each one in turn:
for logfile in sensor_log_*.txt
do
    echo "Processing $logfile..."
    # Further commands to analyze or archive the file
done
The shell’s globbing feature (*) expands sensor_log_*.txt into a list of all matching filenames in the current directory. The for loop then iterates over this dynamically generated list. This is far more efficient and scalable than writing a separate command for each file.
It’s critical to understand how the shell performs word splitting. The in part of the loop expects a space-separated list of “words.” If an item in your list contains spaces (like a filename My Sensor Data.txt), the shell will treat “My,” “Sensor,” and “Data.txt” as three separate items. To handle this correctly, you should always quote the variable when you use it:
echo "Processing '$logfile'..."
Tip: Always double-quote variables (
"$variable_name") inside a loop’s body to prevent unexpected behavior from word splitting and filename expansion, especially when dealing with filenames that might contain spaces or special characters.
Beyond file globbing, for loops can iterate over the output of a command. By using command substitution ($(command)), you can turn the output of any command into a list for the loop. For instance, you could iterate over all subdirectories in the current path:
for dir in $(find . -maxdepth 1 -type d)
do
    echo "Found directory: $dir"
done
Finally, for developers coming from a C/C++ or Java background, the shell also supports a C-style for loop, which is useful for a fixed number of iterations:
for (( i=0; i<5; i++ ))
do
    echo "Iteration number $i"
done
This syntax is often cleaner and less error-prone than generating a sequence of numbers with an external command like seq. It is ideal for tasks like blinking an LED a specific number of times or taking a fixed number of sensor readings.

The while Loop: Repeating While a Condition is True
While the for loop is perfect for known sets of data, many tasks in embedded systems require a loop to run until a certain condition changes. For this, we turn to the while loop. A while loop repeatedly executes a block of code as long as a specified condition evaluates to true (a successful exit code of 0).
The general syntax is:
while [ condition ]
do
    # Commands to execute
done
The condition is typically a test command, often enclosed in square brackets [ ], which is an alias for the test command. The loop continues as long as the test command returns an exit code of 0 (success).
A classic example is a counter-controlled loop, similar to the C-style for loop but constructed differently:
counter=0
while [ $counter -lt 5 ]
do
    echo "Counter is at $counter"
    counter=$((counter + 1))
done
In this example, the condition [ $counter -lt 5 ] checks if the value of counter is less than 5. The arithmetic expansion $((...)) is used to increment the counter in each iteration. The loop will run exactly five times.
However, the true power of while loops in embedded contexts comes from their ability to use any command as the condition. The loop doesn’t care about “true” or “false” in a boolean sense; it only cares about the exit code of the command. A command that successfully completes returns 0, and any other value indicates failure.
This allows for powerful constructs. For example, you can have a loop that waits for a specific device file to appear, which is common during system boot-up when device drivers are loading asynchronously:
while [ ! -e /dev/ttyUSB0 ]
do
    echo "Waiting for USB serial device to appear..."
    sleep 1
done
echo "Device /dev/ttyUSB0 is now available."
Here, [ ! -e /dev/ttyUSB0 ] tests for the non-existence (! -e) of the file /dev/ttyUSB0. The loop will pause for one second (sleep 1) and re-check, continuing until the file is created, at which point the condition fails (returns a non-zero exit code) and the loop terminates.
Another common pattern is reading a file line by line:
while read -r line
do
    echo "Read line: $line"
done < input.txt
%%{init: {'theme': 'base', 'themeVariables': { 'fontFamily': 'Open Sans'}}}%%
graph TD
    A[Start] --> B(Redirect file to loop<br><i>done < input.txt</i>);
    B --> C{while read -r line};
    C -- "Success: Line was read" --> D["Execute Commands<br><i>(using $line)</i>"];
    D --> C;
    C -- "Failure: End of File reached" --> E[Loop Terminates];
    E --> F[Continue Script];

    subgraph "File: input.txt"
        direction LR
        L1[Line 1] --> L2[Line 2] --> L3[...] --> L_EOF(EOF);
    end

    subgraph "Loop Body"
        D
    end

    linkStyle 0 stroke-width:1px;
    style L1 fill:#fff,stroke:#333,stroke-width:1px;
    style L2 fill:#fff,stroke:#333,stroke-width:1px;
    style L3 fill:#fff,stroke:#333,stroke-width:1px;
    style L_EOF fill:#ef4444,stroke:#ef4444,color:#fff;


    %% Styling
    classDef primary fill:#1e3a8a,stroke:#1e3a8a,stroke-width:2px,color:#ffffff;
    classDef success fill:#10b981,stroke:#10b981,stroke-width:2px,color:#ffffff;
    classDef decision fill:#f59e0b,stroke:#f59e0b,stroke-width:1px,color:#ffffff;
    classDef process fill:#0d9488,stroke:#0d9488,stroke-width:1px,color:#ffffff;

    class A,B primary;
    class C decision;
    class D process;
    class E,F success;
In this elegant construct, the read command is the loop’s condition. read returns a successful exit code (0) as long as it can read a line from its standard input. When it reaches the end of the file, it fails, returning a non-zero exit code and terminating the loop. The -r option prevents backslash interpretation, which is a best practice. The redirection < input.txt feeds the file input.txt into the standard input of the while loop.
The until Loop: Repeating While a Condition is False
The until loop is the logical inverse of the while loop. It executes a block of commands as long as its condition evaluates to false (a non-zero exit code). Once the condition becomes true (exit code 0), the loop terminates.
The syntax is nearly identical to while:
until [ condition ]
do
    # Commands to execute
done
You can think of until [ condition ] as being equivalent to while ! [ condition ]. The choice between while and until is often a matter of readability. Sometimes, expressing a condition in the positive (until) is more natural than expressing it in the negative (while !).
For example, let’s revisit the device-waiting script. We could rewrite it with until to wait until the device exists:
until [ -e /dev/ttyUSB0 ]
do
    echo "Waiting for USB serial device to appear..."
    sleep 1
done
echo "Device /dev/ttyUSB0 is now available."
For many, this reads more naturally: “Do this stuff until the file exists.” This can make scripts easier to understand and maintain.
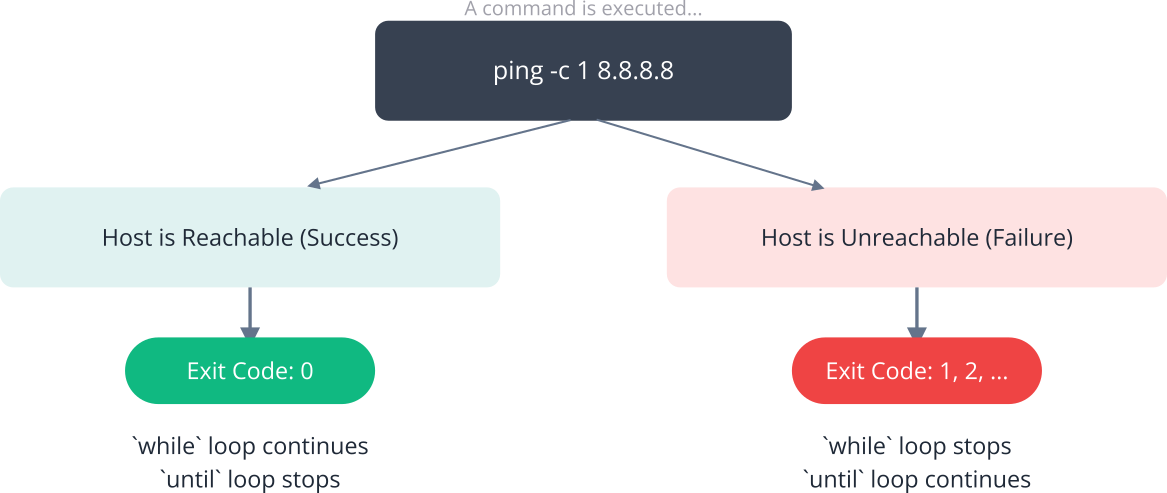
Another practical use case is waiting for a network service to start. An embedded device might need to connect to a server on startup, but the network connection or the server itself might not be ready immediately. An until loop can poll for connectivity:
until ping -c 1 -W 1 8.8.8.8 &> /dev/null
do
    echo "Network is not up yet. Retrying in 5 seconds..."
    sleep 5
done
echo "Network connection established."
In this example, ping -c 1 -W 1 8.8.8.8 sends a single packet to Google’s DNS server with a 1-second timeout. The &> /dev/null part redirects both standard output and standard error to /dev/null, so we don’t see the ping command’s output on the console. The ping command will return a successful exit code (0) only if it receives a reply. The until loop will continue executing its body as long as the ping command fails, making it a robust way to pause a script until network connectivity is confirmed.
%%{init: {'theme': 'base', 'themeVariables': { 'fontFamily': 'Open Sans'}}}%%
graph TD
    subgraph For Loop
        direction LR
        FOR_START(Start Iteration) --> FOR_PROCESS{For each item in list};
        FOR_PROCESS --> FOR_EXEC["Execute Commands<br><i>(using current item)</i>"];
        FOR_EXEC --> FOR_CHECK{More items?};
        FOR_CHECK -- Yes --> FOR_PROCESS;
    end

    subgraph While Loop
        direction TB
        WHILE_START(Start Loop) --> WHILE_COND{Is Condition<br><b>TRUE</b>?};
        WHILE_COND -- Yes --> WHILE_EXEC[Execute Commands];
        WHILE_EXEC --> WHILE_COND;
    end

    subgraph Until Loop
        direction TB
        UNTIL_START(Start Loop) --> UNTIL_COND{Is Condition<br><b>FALSE</b>?};
        UNTIL_COND -- Yes --> UNTIL_EXEC[Execute Commands];
        UNTIL_EXEC --> UNTIL_COND;
    end

    START_NODE[Start Script] --> CHOOSE_LOOP{Choose Loop Type};

    CHOOSE_LOOP -- "Finite List" --> FOR_START;
    CHOOSE_LOOP -- "Condition is True?" --> WHILE_START;
    CHOOSE_LOOP -- "Condition is False?" --> UNTIL_START;

    FOR_CHECK -- No --> END_NODE[Continue Script];
    WHILE_COND -- No --> END_NODE;
    UNTIL_COND -- No --> END_NODE;

    %% Styling
    classDef primary fill:#1e3a8a,stroke:#1e3a8a,stroke-width:2px,color:#ffffff;
    classDef success fill:#10b981,stroke:#10b981,stroke-width:2px,color:#ffffff;
    classDef decision fill:#f59e0b,stroke:#f59e0b,stroke-width:1px,color:#ffffff;
    classDef process fill:#0d9488,stroke:#0d9488,stroke-width:1px,color:#ffffff;

    class START_NODE,FOR_START,WHILE_START,UNTIL_START primary;
    class END_NODE success;
    class CHOOSE_LOOP,FOR_CHECK,WHILE_COND,UNTIL_COND decision;
    class FOR_PROCESS,FOR_EXEC,WHILE_EXEC,UNTIL_EXEC process;
Practical Examples
Theory provides the foundation, but true understanding comes from hands-on application. In this section, we will apply our knowledge of loops to solve practical problems on the Raspberry Pi 5. These examples will involve interacting with the file system, reading hardware status, and managing system processes.
Example 1: Archiving Log Files with a for Loop
Scenario: Your embedded application generates daily log files in /var/log/sensors/. You need a script that runs periodically to compress any uncompressed log files (.log) into .tar.gz archives and then delete the original.
File Structure:
Assume the log directory looks like this:
/var/log/sensors/
├── 2024-07-05.log
├── 2024-07-06.log
├── 2024-07-07.log
└── 2024-07-04.tar.gz
The Script: archive_logs.sh
#!/bin/bash

# A script to archive sensor log files.

LOG_DIR="/var/log/sensors"
ARCHIVE_DIR="/var/log/sensors/archive"

# Ensure the archive directory exists
mkdir -p "$ARCHIVE_DIR"

# Check if we are in the correct directory
if ! cd "$LOG_DIR"; then
    echo "Error: Could not change to log directory $LOG_DIR" >&2
    exit 1
fi

echo "Starting log archival process..."

# Use a for loop to find all .log files
for logfile in *.log; do
    # The glob *.log will literally return "*.log" if no files match.
    # We must check if the file actually exists before processing.
    if [ -f "$logfile" ]; then
        echo "Processing '$logfile'..."

        # Define the name of the archive file
        archive_name="${logfile%.log}.tar.gz"

        # Compress the file
        tar -czf "$ARCHIVE_DIR/$archive_name" "$logfile"

        # Check if tar command was successful (exit code 0)
        if [ $? -eq 0 ]; then
            echo "Successfully created archive '$archive_name'."
            # Remove the original log file
            rm "$logfile"
            echo "Removed original log file '$logfile'."
        else
            echo "Error: Failed to archive '$logfile'." >&2
        fi
        echo "---"
    fi
done

echo "Log archival process finished."
Explanation:
- Shebang and Setup:
#!/bin/bashensures the script is run with Bash. We define variables for the log and archive directories for easy modification. - Directory Management:
mkdir -pcreates the archive directory if it doesn’t already exist. The script then changes into the log directory. This is important because it allows us to use*.logwithout worrying about the full path. - The
forLoop:for logfile in *.log; dostarts the loop. The shell expands*.logto a list of all files in the current directory ending with.log. - Existence Check:
if [ -f "$logfile" ]; thenis a crucial safety check. If no.logfiles exist, the glob*.logwill not expand and the loop will run once withlogfileliterally being the string “*.log”. This check ensures we only process actual files. - Archiving:
tar -czf ...creates a gzipped tarball. The${logfile%.log}is a parameter expansion that removes the.logsuffix from the filename. - Error Checking:
if [ $? -eq 0 ]; thenchecks the exit status of the most recent command (tar). Iftarwas successful (returned 0), we proceed to delete the original file. Otherwise, we print an error. This prevents data loss if the archiving step fails. - Quoting: Note that
"$logfile"is quoted everywhere to handle filenames with spaces or other special characters gracefully.
How to Run:
- Save the code as
archive_logs.sh. - Make it executable:
chmod +x archive_logs.sh. - Create some dummy log files:
touch /var/log/sensors/2024-07-05.log /var/log/sensors/2024-07-06.log. - Run the script:
./archive_logs.sh.
Expected Output:
Starting log archival process...
Processing '2024-07-05.log'...
Successfully created archive '2024-07-05.tar.gz'.
Removed original log file '2024-07-05.log'.
---
Processing '2024-07-06.log'...
Successfully created archive '2024-07-06.tar.gz'.
Removed original log file '2024-07-06.log'.
---
Log archival process finished.
Example 2: Monitoring CPU Temperature with a while Loop
Scenario: You want to monitor the Raspberry Pi 5’s CPU temperature and log a warning if it exceeds a certain threshold (e.g., 75°C). The script should run continuously until manually stopped.
%%{init: {'theme': 'base', 'themeVariables': { 'fontFamily': 'Open Sans'}}}%%
graph TD
    A[Start Script] --> B(Initialize<br>THRESHOLD=75°C);
    B --> C{while true};
    C -- "Loop forever" --> D[Read Temp from<br><i>/sys/class/thermal/thermal_zone0/temp</i>];
    D --> E[Convert to Celsius];
    E --> F{Temp > THRESHOLD?};
    F -- "Yes" --> G[Log Warning to File<br><i>temp_warnings.log</i>];
    G --> H[Wait 5 seconds<br><i>sleep 5</i>];
    F -- "No" --> H;
    H --> C;

    %% Styling
    classDef primary fill:#1e3a8a,stroke:#1e3a8a,stroke-width:2px,color:#ffffff;
    classDef success fill:#10b981,stroke:#10b981,stroke-width:2px,color:#ffffff;
    classDef decision fill:#f59e0b,stroke:#f59e0b,stroke-width:1px,color:#ffffff;
    classDef process fill:#0d9488,stroke:#0d9488,stroke-width:1px,color:#ffffff;
    classDef system fill:#8b5cf6,stroke:#8b5cf6,stroke-width:1px,color:#ffffff;
    classDef warning fill:#eab308,stroke:#eab308,stroke-width:1px,color:#1f2937;

    class A,B primary;
    class C,F decision;
    class D,E,H process;
    class G warning;
Hardware Integration: No external hardware is needed. We will read the temperature from a virtual file in the /sys filesystem.
The Script: monitor_temp.sh
#!/bin/bash

# A script to continuously monitor CPU temperature.

# The file where the CPU temperature is stored (in millidegrees Celsius)
TEMP_FILE="/sys/class/thermal/thermal_zone0/temp"

# The temperature threshold in degrees Celsius.
THRESHOLD=75

# The log file for warnings.
LOG_FILE="/home/pi/temp_warnings.log"

echo "Starting CPU temperature monitor. Press [CTRL+C] to stop."
echo "Warnings will be logged to $LOG_FILE"

# Infinite while loop
while true; do
    # Read the raw temperature value
    raw_temp=$(cat "$TEMP_FILE")

    # Convert from millidegrees to degrees Celsius
    # Bash only handles integers, so we use printf for floating point, or simple integer division.
    # For simplicity, we'll use integer arithmetic.
    current_temp=$((raw_temp / 1000))

    echo "Current CPU Temperature: ${current_temp}°C"

    # Check if the temperature exceeds the threshold
    if [ "$current_temp" -gt "$THRESHOLD" ]; then
        # Get the current timestamp
        timestamp=$(date +"%Y-%m-%d %H:%M:%S")
        warning_msg="WARNING: CPU temperature ($current_temp°C) exceeded threshold (${THRESHOLD}°C)."

        echo "$timestamp - $warning_msg"
        # Append the warning to the log file
        echo "$timestamp - $warning_msg" >> "$LOG_FILE"
    fi

    # Wait for 5 seconds before the next check
    sleep 5
done
Explanation:
- Constants: We define variables for the temperature file path, the threshold, and the log file location. This makes the script easy to configure.
- Infinite Loop:
while true; docreates a loop that will run forever, because thetruecommand always returns a successful exit code (0). This is a standard pattern for continuous monitoring tasks. - Reading Temperature:
raw_temp=$(cat "$TEMP_FILE")reads the temperature. The value in this file is in millidegrees Celsius (e.g.,54321means 54.321°C). - Conversion:
current_temp=$((raw_temp / 1000))performs integer division to get the temperature in whole degrees Celsius. - Conditional Check:
if [ "$current_temp" -gt "$THRESHOLD" ]; thencompares the current temperature to our threshold. - Logging: If the threshold is exceeded, a timestamped warning is printed to the console and appended (
>>) to the log file. - Delay:
sleep 5pauses the loop for 5 seconds. This is crucial to prevent the script from consuming 100% of a CPU core by constantly reading the file.
How to Run:
- Save the code as
monitor_temp.sh. - Make it executable:
chmod +x monitor_temp.sh. - Run the script:
./monitor_temp.sh. - To test the warning, you can temporarily lower the
THRESHOLDto a value below the current temperature. - Press
Ctrl+Cto stop the script.
Expected Output (console):
Starting CPU temperature monitor. Press [CTRL+C] to stop.
Warnings will be logged to /home/pi/temp_warnings.log
Current CPU Temperature: 52°C
Current CPU Temperature: 53°C
Current CPU Temperature: 52°C
...
Example 3: Waiting for a Service with an until Loop
Scenario: You have a custom application that depends on a web server running on localhost:8000. Your startup script needs to wait until this web server is active and responding before proceeding.
%%{init: {'theme': 'base', 'themeVariables': { 'fontFamily': 'Open Sans'}}}%%
graph TD
    A[Start Script] --> B(Initialize<br>HOST, PORT, MAX_RETRIES);
    B --> C{until service responds};
    C -- "Loop while service is down" --> D{Retry count < MAX_RETRIES?};
    D -- "Yes" --> E[Send HTTP Head Request<br><i>curl --head ...</i>];
    E --> F{"Response contains 200 OK?"};
    F -- "No" --> G[Increment Retry Count];
    G --> H[Wait 5 seconds<br><i>sleep 5</i>];
    H --> C;
    F -- "Yes" --> I[Service is Available!<br>Continue Script];
    D -- "No" --> J[Exit with Error<br>Timeout Reached];

    %% Styling
    classDef primary fill:#1e3a8a,stroke:#1e3a8a,stroke-width:2px,color:#ffffff;
    classDef success fill:#10b981,stroke:#10b981,stroke-width:2px,color:#ffffff;
    classDef decision fill:#f59e0b,stroke:#f59e0b,stroke-width:1px,color:#ffffff;
    classDef process fill:#0d9488,stroke:#0d9488,stroke-width:1px,color:#ffffff;
    classDef network fill:#0d9488,stroke:#0d9488,stroke-width:1px,color:#ffffff;
    classDef error fill:#ef4444,stroke:#ef4444,stroke-width:1px,color:#ffffff;

    class A,B primary;
    class I success;
    class C,D,F decision;
    class E network;
    class G,H process;
    class J error;
The Script: wait_for_service.sh
#!/bin/bash

# A script to wait for a local web service to become available.

HOST="localhost"
PORT="8000"
MAX_RETRIES=12
RETRY_COUNT=0

echo "Waiting for service at $HOST:$PORT..."

# Loop until the service is reachable or we run out of retries.
# We use curl to check for a response.
until curl -s --head "http://${HOST}:${PORT}" | grep "200 OK" > /dev/null; do
    RETRY_COUNT=$((RETRY_COUNT + 1))
    if [ $RETRY_COUNT -ge $MAX_RETRIES ]; then
        echo "Error: Service at $HOST:$PORT did not become available after $MAX_RETRIES retries." >&2
        exit 1
    fi

    echo "Service not ready yet. Retrying in 5 seconds... (Attempt ${RETRY_COUNT}/${MAX_RETRIES})"
    sleep 5
done

echo "Service at $HOST:$PORT is now available. Proceeding with script."
# Add subsequent commands here...
Explanation:
- Configuration: We set the
HOST,PORT, and aMAX_RETRIESlimit to prevent the script from waiting forever. - The
untilLoop: The loop’s condition iscurl -s --head "http://${HOST}:${PORT}" | grep "200 OK" > /dev/null. Let’s break this down:curl -s --head ...:curlattempts to fetch the headers from the specified URL.-smakes it silent (no progress meter), and--headtells it to only fetch headers, not the full page content, which is faster.| grep "200 OK": The output ofcurlis piped togrep.grepsearches for the string “200 OK”, which is part of a standard successful HTTP response header.> /dev/null: We discard the output ofgrep, as we only care about its exit code.- Logic:
grepwill return a successful exit code (0) only if it finds “200 OK”. Theuntilloop continues as long as this command fails (i.e., as long as the service is not responding with “200 OK”).
- Retry Limit: The
ifstatement inside the loop checks if we’ve exceeded our maximum number of retries. This is a critical safety measure to prevent an infinite loop if the service never starts. If the limit is reached, it prints an error and exits with a non-zero status. - Success: Once
grepfinds “200 OK”, its exit code is 0, theuntilcondition becomes true, and the loop terminates.
How to Run:
- Save the code as
wait_for_service.shand make it executable. - In one terminal, run the script:
./wait_for_service.sh. It will start waiting. - In a second terminal, start a simple Python web server to simulate the service:
python3 -m http.server 8000. - Observe the first terminal. As soon as the server starts, the script will detect it and exit.
Expected Output:
Waiting for service at localhost:8000...
Service not ready yet. Retrying in 5 seconds... (Attempt 1/12)
Service not ready yet. Retrying in 5 seconds... (Attempt 2/12)
Service at localhost:8000 is now available. Proceeding with script.
Common Mistakes & Troubleshooting
Loops are powerful, but they are also a common source of bugs. Understanding these pitfalls can save you hours of debugging.
Exercises
These exercises are designed to be completed on your Raspberry Pi 5. They will reinforce the concepts covered in this chapter.
- LED Blinker with a
forLoop:- Objective: Write a shell script that blinks an LED connected to a GPIO pin 10 times.
- Guidance:
- You will need to use the
gpiodetect,gpioset, andgpiogetcommands. Find the GPIO chip for the pin you want to use (e.g.,gpiochip0). - Use a C-style
forloop that iterates from 1 to 10. - Inside the loop, use
gpiosetto turn the LED on,sleepfor a short duration (e.g., 0.5 seconds), usegpiosetagain to turn it off, andsleepagain.
- You will need to use the
- Verification: The LED should blink exactly 10 times.
- User Countdown with a
whileLoop:- Objective: Write a script that prompts the user for a number and then counts down to zero from that number.
- Guidance:
- Use the
read -pcommand to ask the user for a starting number. - Use a
whileloop with an integer comparison ([ "$number" -ge 0 ]). - Inside the loop,
echothe current number and then decrement it usingnumber=$((number - 1)). - Include a
sleep 1in the loop to make the countdown visible.
- Use the
- Verification: If the user enters
5, the script should print5,4,3,2,1,0at one-second intervals.
- System Uptime Waiter with an
untilLoop:- Objective: Write a script that waits until the system has been running for at least 5 minutes before executing a command.
- Guidance:
- The system uptime in seconds can be found in
/proc/uptime. The first number on the line is the uptime. You can extract it withcut -d' ' -f1 /proc/uptime. - Use an
untilloop. The condition should check if the uptime is greater than 300 seconds. - Inside the loop, print a status message like “System not ready, uptime is X seconds…” and
sleepfor 10 seconds. - After the loop terminates, print a message like “System has been up for over 5 minutes. Starting main task.”
- The system uptime in seconds can be found in
- Verification: The script should repeatedly print status messages until the 5-minute mark is passed.
- File Content Processor:
- Objective: Create a script that reads a configuration file line by line and prints only the lines that are not comments (i.e., do not start with
#) and are not empty. - Guidance:
- Create a sample configuration file
config.txtwith a mix of settings, comments, and blank lines. - Use a
while read -r lineloop to process the file. - Inside the loop, use an
ifstatement with two conditions. You can check if a line starts with#using a pattern match:[[ "$line" =~ ^# ]]. You can check for a non-empty line with[ -n "$line" ]. - Combine the conditions to print the line only if it’s not a comment AND it’s not empty.
- Create a sample configuration file
- Verification: The script’s output should be only the valid configuration lines from your sample file.
- Objective: Create a script that reads a configuration file line by line and prints only the lines that are not comments (i.e., do not start with
- Batch Rename Utility:
- Objective: Write a script that renames all
.jpegfiles in a directory to.jpg. - Guidance:
- Create a directory and populate it with some dummy
.jpegfiles:touch image1.jpeg image2.jpeg. - Use a
forloop to iterate over all*.jpegfiles. - Inside the loop, use parameter expansion to construct the new filename:
new_name="${file%.jpeg}.jpg". - Use the
mvcommand to perform the rename:mv "$file" "$new_name". - Add
echostatements to report what is being renamed.
- Create a directory and populate it with some dummy
- Verification: After running the script,
lsshould show that all the files now have a.jpgextension.
- Objective: Write a script that renames all
Summary
- Loops are fundamental for automation in embedded Linux, enabling repetitive tasks like monitoring, polling, and batch processing.
- The
forloop is best for iterating over a known, finite set of items, such as files on the filesystem (for f in *.txt), a static list of strings (for s in one two three), or a sequence of numbers (for ((i=0; i<10; i++))). - The
whileloop executes a block of code as long as a condition is true (returns a zero exit code). It is ideal for tasks where the number of iterations is unknown, such as reading a file line-by-line (while read) or running until a state changes (while [ -d /tmp/processing ]). - The
untilloop is the inverse ofwhile, executing as long as a condition is false (returns a non-zero exit code). It often improves readability for “wait-for” logic (until ping -c 1 server). - Quoting variables (
"$var") is critical to prevent errors from word splitting and globbing, especially when dealing with filenames. - Always consider exit conditions to avoid infinite loops, implementing timeouts or retry counters as a safety measure.
Further Reading
- Bash Manual (Loops): The official GNU Bash documentation is the definitive source.
- The Linux Command Line by William Shotts: A highly regarded, comprehensive book on the shell. Chapter 27 is dedicated to loops.
- Raspberry Pi Documentation – The
gpiozerolibrary (for Python context): While not shell scripting, understanding how hardware is controlled in a high-level language provides good context for what you might automate with shell scripts. - Advanced Bash-Scripting Guide: An in-depth, classic resource covering many advanced topics, including subtleties of loops.
- Greg’s Wiki – BashFAQ: An excellent resource that answers frequently asked questions with best-practice solutions, including many related to loops.
man test: The manual page for thetestcommand (and its[alias) is essential reading for writing correct conditions forwhileanduntilloops. Access it directly on your Raspberry Pi.man bash: The full manual for the Bash shell, available on your device. It contains the most authoritative information.
