
Chapter 17: Linux Commands: Process Management (ps, top, kill)
Chapter Objectives
By the end of this chapter, you will be able to:
- Understand the concept of a process in a Linux environment, including process IDs (PIDs), parent-child relationships, and process states.
- Utilize the
pscommand with various options to list and inspect running processes on your Raspberry Pi 5. - Employ the
topcommand to monitor system resource utilization (CPU, memory) in real-time and identify resource-intensive processes. - Manage process lifecycle using the
kill,pkill, andkillallcommands to send signals for graceful termination or forceful stopping. - Write, compile, and manage a simple C application as a background process.
- Debug common issues related to process management, such as zombie processes and permission errors.
Introduction
In any modern operating system, the fundamental unit of execution is the process. An embedded Linux system, from a simple IoT sensor to a complex industrial controller, is a bustling environment of concurrent tasks. The Linux kernel masterfully orchestrates these tasks, giving each a slice of the processor’s time and managing access to system resources. For an embedded systems developer, the ability to see inside this bustling environment is not a luxury—it is an essential skill for development, debugging, and optimization. Understanding what your system is doing at any given moment is the first step toward making it do what you want, efficiently and reliably.
This chapter introduces the foundational toolkit for process management on your Raspberry Pi 5. We will move beyond simply running commands and delve into the “why” behind them. Why does a seemingly idle system have dozens of running processes? How can you tell if your custom application is consuming too much memory or monopolizing the CPU? What is the correct way to stop a misbehaving program without destabilizing the entire system? The tools we will explore—ps, top, and kill—are not merely utilities; they are your windows into the kernel’s scheduler and your levers for controlling system behavior. Mastering them is a critical step in transitioning from a user of an embedded system to its architect. Throughout this chapter, we will connect the theoretical concepts of process management to practical, hands-on examples on your Raspberry Pi, giving you the confidence to monitor, manage, and troubleshoot any embedded Linux system.
Technical Background
The Anatomy of a Linux Process
To truly manage processes, we must first understand what they are. In the Linux world, a process is much more than just a running program. It is an abstraction maintained by the kernel that represents a program in execution. This abstraction includes the program’s code (also known as the text segment), its current activity (represented by the processor’s registers and the program counter), its data (global variables), and a dedicated memory space known as the stack, which is used for local variables. When you execute a program, the kernel loads its code from the storage device (like the microSD card on your Raspberry Pi) into memory, allocates resources, and creates a unique entry in its process table. This entry, the process, is the living, breathing instance of your static program file.
Every single process on a Linux system is assigned a unique integer identifier called the Process ID, or PID. This PID is the primary way the kernel, system utilities, and users refer to a specific process. The very first process started by the kernel after booting is called init (or its modern equivalent, systemd), and it is always assigned PID 1. Every other process on the system is a descendant of this initial process. This creates a hierarchical, tree-like structure. When one process creates another (using a system call called fork()), the creator is known as the parent process, and the new process is the child process. Each child process keeps a record of its parent’s PID, known as the Parent Process ID (PPID). This lineage is crucial for understanding how processes are related and for tracing the origin of system activity.
graph TD
    subgraph Process Tree
        A[/"PID 1<br><b>systemd</b> (init)"/];
        B[/"<b>sshd</b><br>PID: 850<br>PPID: 1"/];
        C[/"<b>Login Shell (bash)</b><br>PID: 2100<br>PPID: 850"/];
        D[/"<b>User App (./looper)</b><br>PID: 2155<br>PPID: 2100"/];
        E[/"<b>System Service (e.g., cron)</b><br>PID: 910<br>PPID: 1"/];
        F[/"<b>Another Service (e.g., networking)</b><br>PID: 925<br>PPID: 1"/];

        A --> B;
        A --> E;
        A --> F;
        B --> C;
        C --> D;
    end

    %% Styling
    classDef start fill:#1e3a8a,stroke:#1e3a8a,stroke-width:2px,color:#ffffff;
    classDef process fill:#0d9488,stroke:#0d9488,stroke-width:1px,color:#ffffff;

    class A start;
    class B,C,D,E,F process;
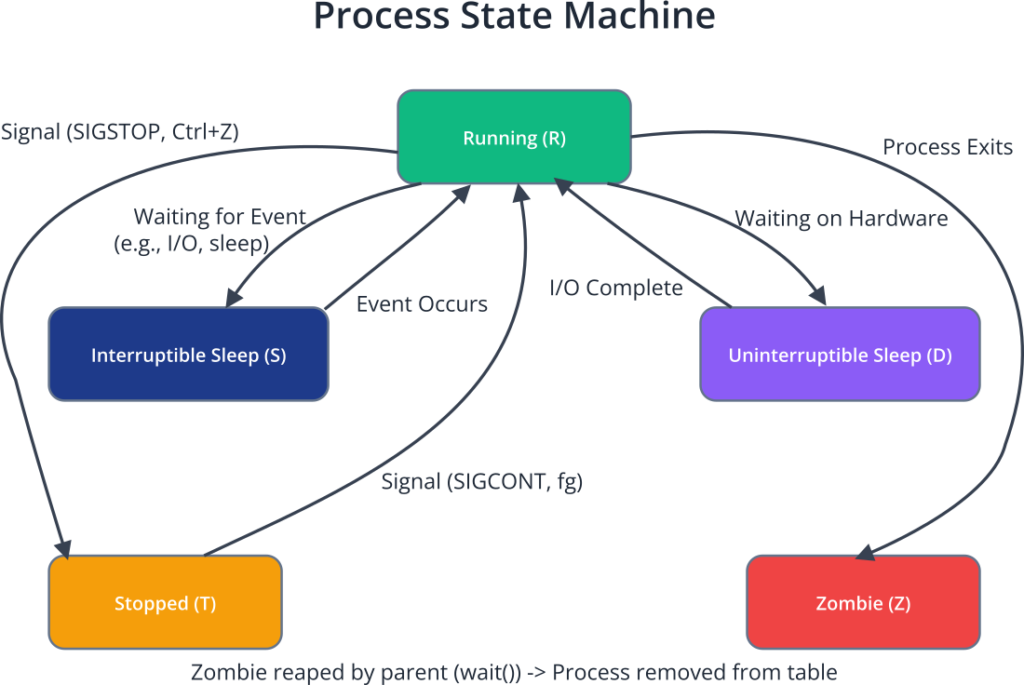
Processes do not run continuously; they transition through various states as the kernel’s scheduler manages access to the CPU. A process might be Running (R), meaning it is either currently executing on a CPU core or is in the scheduler’s run queue, ready to be executed. If a process is waiting for an event, such as data from a file, a network connection, or a hardware device, it enters a Sleeping (S) state. This is an interruptible sleep; it can be woken up by a signal. A less common state is Uninterruptible Sleep (D), where a process is waiting directly on I/O and cannot be disturbed, which can sometimes indicate a problem with a hardware driver. A process that has been stopped, typically by a user or another process, is in the Stopped (T) state. Finally, and most notoriously, is the Zombie (Z) state. A zombie process has completed its execution, but its entry remains in the process table because its parent has not yet acknowledged its termination. This is a normal, transient state, but a persistent zombie process often indicates a bug in the parent application, as it is failing to “reap” its children.
Viewing the Process Landscape: The ps Command
The ps (process status) command is the quintessential tool for taking a static snapshot of the processes running on the system at a specific moment in time. Its origins trace back to the earliest days of Unix, and while its functionality has expanded, its core purpose remains the same: to report on the status of processes. Due to its long history and the merging of different Unix philosophies (BSD vs. System V), ps has a notoriously complex set of options. However, for most embedded development work, a few key combinations are sufficient.
The most common and useful invocation is ps aux. This command provides a comprehensive list of all processes on the system in a user-friendly format. Let’s break down what these options mean. The a option selects all processes associated with a terminal, including those of other users. The u option provides detailed, user-oriented output, including the process owner and CPU/memory usage. The x option adds processes that are not associated with any terminal, such as system daemons that start at boot. Without x, you would miss a significant portion of the system’s activity.
The output of ps aux is a table with several important columns. USER indicates the owner of the process. PID is the unique Process ID. %CPU and %MEM show the percentage of CPU and physical memory the process is currently using, respectively. These are often estimates averaged over the process’s lifetime. VSZ (Virtual Set Size) and RSS (Resident Set Size) provide more detail on memory usage. VSZ is the total virtual memory the process is using, while RSS is the portion of that memory currently held in RAM. For embedded systems with limited RAM, monitoring RSS is critical. The TTY column shows the controlling terminal for the process; a ? indicates no controlling terminal. STAT displays the current process state (R, S, D, T, Z). Finally, COMMAND shows the command that was used to start the process.
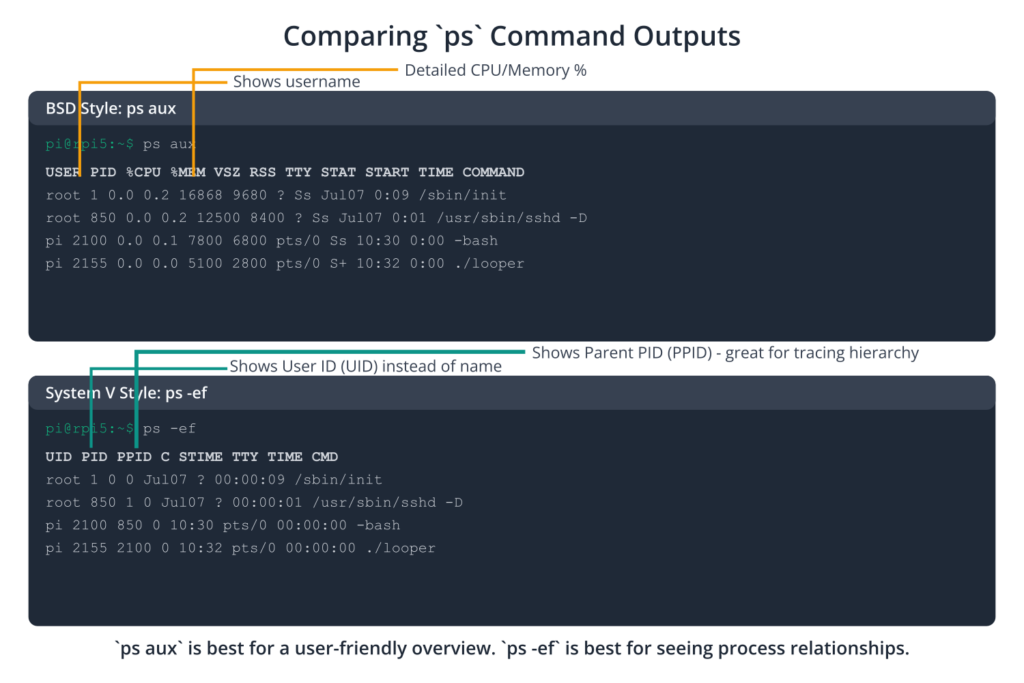
Another powerful variant is ps -ef, which uses System V style options. This command also lists all processes (-e) and provides a full-format listing (-f). The output is similar to ps aux but provides different information, such as the UID (User ID), PPID (Parent Process ID), and the start time of the process (STIME). Displaying the PPID is particularly useful for tracing the lineage of processes and understanding their relationships within the system’s process tree.
Real-Time Monitoring: The top Command
While ps provides a valuable snapshot, embedded systems are dynamic. A problem might only manifest under a specific load or for a brief period. For this, we need a tool that provides a continuous, real-time view of system activity. This is the role of the top command. It presents a dynamic dashboard of the system’s health, refreshing automatically every few seconds.
When you launch top, the screen is divided into two main sections. The top few lines provide a system summary. This includes the system uptime, the number of logged-in users, and the load average. The load average is a key metric, showing the average number of processes in the run queue over the last 1, 5, and 15 minutes. On a multi-core system like the Raspberry Pi 5, a load average consistently above the number of cores (which is four) indicates the system is heavily loaded and tasks are waiting for CPU time. The summary also shows the total number of tasks and their states (running, sleeping, etc.), as well as a breakdown of CPU usage (user, system, idle) and memory/swap usage.

Below the summary is a process list, similar to ps, but sorted by a specific column, typically CPU usage by default. This immediately brings the most resource-intensive processes to the “top,” making it incredibly easy to spot performance bottlenecks. The columns are similar to ps, but with some important additions. PR is the process’s priority as seen by the kernel, and NI is its “nice” value, a user-space value that influences its priority. VIRT, RES, and SHR correspond to virtual, resident, and shared memory, respectively. top is interactive; you can press M to sort by memory usage, P to sort by CPU usage, and q to quit.
Controlling Processes: The kill Command
Monitoring is only half the battle. Once you’ve identified a misbehaving, hung, or unnecessary process, you need a way to control it. The primary tool for this is the kill command. The name is somewhat of a misnomer; kill does not directly terminate a process. Instead, it sends a signal to a process. A signal is a software interrupt, a message sent by the kernel or another process. It’s then up to the target process to decide how to handle that signal. A well-behaved program will have signal handlers—code routines that catch specific signals and perform cleanup actions, like saving data, closing files, and exiting gracefully.
There are many different signals, but a few are particularly important for process management. The default signal sent by kill (if you don’t specify one) is SIGTERM (15). This is a polite request for the process to terminate. The process can catch this signal and perform a clean shutdown. This is almost always the preferred way to stop a program.
If a process is unresponsive and ignores SIGTERM, you may need to escalate. The next step is often SIGINT (2), the interrupt signal. This is the same signal that is sent when you press Ctrl+C in the terminal. While many processes that ignore SIGTERM will also ignore SIGINT, it’s worth trying before resorting to more drastic measures.
The final resort is SIGKILL (9). This signal is special because it cannot be caught or ignored by the process. When the kernel delivers SIGKILL to a process, it immediately ceases execution without any opportunity for cleanup. This is a forceful, “hard kill.” While effective, it should be used with caution. Terminating a process this way can leave files in an inconsistent state, corrupt data, or orphan child processes. Using kill -9 (or kill -SIGKILL) should be a last resort when a process is completely unresponsive and causing system instability.
To use kill, you need the PID of the target process. For example, kill 1234 sends SIGTERM to the process with PID 1234. To send a different signal, you specify it by number or name, such as kill -9 1234 or kill -SIGKILL 1234.
For convenience, Linux also provides the pkill and killall commands. Instead of a PID, these utilities take a process name. pkill my_app will find any process whose name matches “my_app” and send it a SIGTERM signal. killall is similar but can be more strict in its matching. These are powerful but can be dangerous. A typo could result in you accidentally terminating a critical system process, so they should be used with care, especially on a production embedded device.
Practical Examples
This section provides hands-on, step-by-step examples for your Raspberry Pi 5. We will assume you have a standard Raspberry Pi OS (or a similar Debian-based distribution) installed and are connected via SSH or using the local terminal.
Example 1: Creating a Process and Finding It
First, let’s create a simple process that we can observe. We’ll write a small C program that prints its PID and then enters an infinite loop. This will simulate a long-running application.
Code Snippet: looper.c
Create a file named looper.c using a text editor like nano.
// looper.c: A simple program that loops indefinitely.
// Used to demonstrate process management commands.

#include <stdio.h>
#include <unistd.h> // Required for getpid() and sleep()

int main() {
    // Get the process ID of this program
    pid_t my_pid = getpid();

    // Print the PID to the console
    printf("Process starting with PID: %d\n", my_pid);
    printf("I will now loop forever. Use 'kill %d' to stop me.\n", my_pid);

    // Infinite loop to keep the process alive
    while (1) {
        // Print a message every 10 seconds to show it's alive
        printf("...looping...\n");
        sleep(10); // Sleep for 10 seconds to avoid flooding the CPU
    }

    // This part of the code is unreachable in this simple example,
    // as the loop is infinite. A real application would have an exit condition.
    return 0;
}
Build and Execution Steps
1. Compile the Code: Open a terminal on your Raspberry Pi 5 and compile the program using GCC. The -o flag specifies the name of the output executable.
gcc looper.c -o looper2. Run in the Background: We want to run this program and still have access to our terminal. To run a process in the background, we add an ampersand (&) at the end of the command.
./looper &
Inspecting the Process with ps
1. Basic Check: Now that our looper program is running, let’s find it using ps. A common technique is to pipe the output of ps into grep to filter for our program’s name.
ps aux | grep looperlooper process itself. The other is for the grep looper command you just ran! This is a classic “gotcha.” Look for the line that doesn’t include grep.
2. View Parent-Child Relationship: Let’s use the ps -ef format to see the PPID.
ps -ef | grep looperbash), because your shell is what launched looper.
Example 2: Monitoring with top
Now, let’s see how looper appears in top.
- Launch
top: Simply typetopin your terminal.top - Find the Process: By default,
topsorts by CPU usage. Since ourlooperprogram spends most of its time sleeping, it will have very low CPU usage and may not be visible on the first screen. Whiletopis running, pressfto enter the fields management screen, use the arrow keys to navigate toCOMMAND, presssto select it as the sort field, and then pressEnterto confirm. This is not the most intuitive way. A simpler method is to usetop‘s filtering capabilities. - Filter by User: Press
uwhiletopis running, and then type your username (e.g.,pi) and pressEnter. This will show only processes owned by you, makingloopermuch easier to spot. - Observe Memory Usage: Look at the
RES(Resident Memory) column for yourlooperprocess. It will be very small, as the program is trivial. For a real embedded application, this column is critical for detecting memory leaks over time. - Exit
top: Pressqto quit and return to the command line.
Example 3: Terminating the Process with kill
Our looper process will run forever unless we stop it. Let’s do that now using the kill command.
1. Find the PID (if you forgot it): If you don’t have the PID from when you launched the program, you can find it again. The pgrep command is perfect for this, as it just returns the PIDs of matching processes.
pgrep looperlooper process. Let’s assume the PID is 24501 for this example.
2. Send the SIGTERM Signal (Graceful Shutdown): First, we’ll try the polite way.
kill 24501looper program didn’t have a special signal handler for SIGTERM, so it performed the default action, which is to terminate.
3. Verify Termination: Run the pgrep command again.
pgrep looper
Example 4: The Unkillable Process (SIGKILL)
Let’s modify our program to be less cooperative. We will add a signal handler that ignores the SIGTERM signal.
graph TD
    subgraph "Example 4: The 'stubborn' Process Workflow"
        A(Start);
        B["Compile 'stubborn.c'<br><i>gcc stubborn.c -o stubborn</i>"];
        C["Run in Background<br><i>./stubborn &</i>"];
        D["Get Process ID (PID)<br><i>pgrep stubborn</i>"];
        E{"Attempt Graceful Shutdown<br><i>kill <PID></i>"};
        F{Process Terminated?};
        G["<b>Success!</b><br>Process handled SIGTERM properly."];
        H["<b>Ignored!</b><br>Process caught SIGTERM<br>but refused to exit."];
        I{"Escalate: Forceful Shutdown<br><i>kill -9 <PID></i>"};
        J["<b>Success!</b><br>SIGKILL forcefully<br>terminated the process."];
        K(End);

        A --> B;
        B --> C;
        C --> D;
        D --> E;
        E --> F;
        F -- "Yes (Not in this example)" --> G;
        F -- "No" --> H;
        H --> I;
        I --> J;
        G --> K;
        J --> K;
    end

    %% Styling
    classDef startNode fill:#1e3a8a,stroke:#1e3a8a,stroke-width:2px,color:#ffffff;
    classDef endNode fill:#10b981,stroke:#10b981,stroke-width:2px,color:#ffffff;
    classDef decisionNode fill:#f59e0b,stroke:#f59e0b,stroke-width:1px,color:#ffffff;
    classDef processNode fill:#0d9488,stroke:#0d9488,stroke-width:1px,color:#ffffff;
    classDef checkNode fill:#ef4444,stroke:#ef4444,stroke-width:1px,color:#ffffff;

    class A startNode;
    class K endNode;
    class B,C,D,I processNode;
    class E,H,G,J processNode;
    class F decisionNode;

    style G fill:#10b981,stroke:#10b981,stroke-width:1px,color:#ffffff
    style H fill:#eab308,stroke:#eab308,stroke-width:1px,color:#1f2937
    style J fill:#10b981,stroke:#10b981,stroke-width:1px,color:#ffffff
Code Snippet: stubborn.c
// stubborn.c: A program that ignores the SIGTERM signal.

#include <stdio.h>
#include <unistd.h>
#include <signal.h> // Required for signal handling

// This is our custom signal handler function.
// It will be called when the process receives SIGTERM.
void handle_sigterm(int signum) {
    printf("\nReceived SIGTERM, but I am ignoring it! Try kill -9 %d\n", getpid());
}

int main() {
    // Register our custom handler for the SIGTERM signal.
    signal(SIGTERM, handle_sigterm);

    pid_t my_pid = getpid();
    printf("Process starting with PID: %d\n", my_pid);

    while (1) {
        printf("...still here...\n");
        sleep(5);
    }

    return 0;
}
Build, Run, and Kill Steps
1. Compile and Run:
gcc stubborn.c -o stubborn
./stubborn &
2. Get the PID:
pgrep stubborn24812.
3. Attempt Graceful Shutdown:
kill 24812
4. Use SIGKILL: Now we must use the unblockable signal.
kill -9 24812
Common Mistakes & Troubleshooting
Even with simple tools, there are common pitfalls that can confuse newcomers. Understanding these ahead of time can save hours of frustration.
Exercises
- Process Tree Exploration: Use the
pscommand to explore the process hierarchy on your Raspberry Pi.- Objective: Understand parent-child process relationships.
- Steps:
- Run the command
ps -ef. - Find the process for your current shell (e.g.,
bashorzsh). Note its PID. - Find another process, such as
sshdif you are connected via SSH. - Identify the PPID of your shell. Does it match the PID of
sshd? Trace the lineage of your shell all the way back to PID 1 (systemd).
- Run the command
- Verification: Draw a simple diagram on paper showing the chain of processes from
systemdto your current shell.
- Resource Monitoring with
top: Identify the top 3 memory-consuming processes on your system.- Objective: Learn to use
top‘s interactive commands to analyze resource usage. - Steps:
- Launch
top. - Let it run for about 15 seconds to stabilize.
- Press the
Mkey (uppercase). This sorts the process list by resident memory usage. - Note the
COMMANDname for the top 3 processes.
- Launch
- Verification: List the names of the top 3 memory-consuming processes. Are they user applications or system services?
- Objective: Learn to use
- Scripting with
pkill: Write a simple shell script that starts thelooperapplication from our earlier example, waits for 15 seconds, and then automatically kills it.- Objective: Practice scripting process management tasks.
- Steps:
- Create a file named
manage_looper.sh. - Write the script using a text editor. It should contain commands to run
./looper &, thensleep 15, and finallypkill looper. - Make the script executable:
chmod +x manage_looper.sh. - Run the script:
./manage_looper.sh.
- Create a file named
- Verification: Observe the output. The script should print the startup message from
looper, pause, and then you should see the “Terminated” message whenpkilldoes its job.
- Handling Multiple Processes with
killall:- Objective: Understand how to manage multiple instances of the same program.
- Steps:
- In one terminal, run
./looper &. - In a second terminal (or the same one), run
./looper &again. - Use
pgrep looperto verify that twolooperprocesses are running. You should see two different PIDs. - Use the
killall loopercommand to terminate both of them with a single command.
- In one terminal, run
- Verification: Run
pgrep looperagain. It should produce no output.
- Creating a Zombie: This is an advanced exercise to demonstrate a programming error that leads to a zombie process.
- Objective: Understand the cause of zombie processes.
- Code (
zombie_maker.c):#include <stdio.h> #include <stdlib.h> #include <unistd.h> #include <sys/wait.h> int main() { pid_t child_pid = fork(); // Create a child process if (child_pid > 0) { // This is the parent process printf("Parent PID: %d, Child PID: %d\n", getpid(), child_pid); printf("Parent is now sleeping and will not reap the child.\n"); sleep(30); // Sleep for a long time, ignoring the child } else if (child_pid == 0) { // This is the child process printf("Child is exiting now.\n"); exit(0); } else { perror("fork"); exit(1); } printf("Parent is exiting.\n"); return 0; } - Steps:
- Compile and run
./zombie_maker. - Immediately in another terminal, run
ps aux | grep zombie_maker. - You should see the parent process in a
S(sleep) state and the child process in aZ(zombie) state. Its command name might appear as<defunct>.
- Compile and run
- Verification: Observe the zombie process. It will disappear after 30 seconds when the parent process finally exits.
Summary
- Processes are the fundamental unit of execution in Linux, each with a unique PID, a parent (PPID), and a specific state (Running, Sleeping, Zombie).
- The
pscommand provides a static snapshot of running processes.ps auxis a powerful combination for viewing all processes with user-friendly details.ps -efis useful for seeing the parent-child hierarchy. - The
topcommand offers a real-time, interactive dashboard of system health, ideal for identifying processes consuming the most CPU or memory. - The
killcommand sends signals to processes to manage their lifecycle.kill <PID>sends a graceful termination signal (SIGTERM). kill -9 <PID>sends the SIGKILL signal, which forcefully terminates a process and should be used as a last resort when a process is unresponsive.- Utilities like
pkillandkillallprovide a convenient way to signal processes by name rather than by PID, but must be used with care. - Proper process management is a cornerstone of building stable and efficient embedded systems.
Further Reading
- The Linux Command Line, 2nd Edition by William Shotts – An excellent, comprehensive guide to the Linux command line, with detailed chapters on process management.
- Linux man pages – The official documentation built into your system. Access them by typing
man ps,man top, orman killin your terminal. They are the ultimate source of truth for command options. - Advanced Programming in the UNIX Environment by W. Richard Stevens and Stephen A. Rago – A classic, deep-dive text on how processes, signals, and system calls work at a fundamental level.
- Robert Love’s “Linux Kernel Development” – For those who want to understand how the kernel’s scheduler and process management subsystems are actually implemented.
- Brendan Gregg’s Blog (brendangregg.com) – A world-renowned expert on system performance. His articles on using tools like
psandtopfor performance analysis are invaluable for professionals. - Raspberry Pi Documentation – The official documentation often contains tutorials and guides relevant to system monitoring on the Raspberry Pi platform. https://www.raspberrypi.com/documentation/
