
Chapter 14: Linux Commands: File System Navigation (ls, cd, pwd)
Chapter Objectives
By the end of this chapter, you will be able to:
- Understand the structure of the Linux Filesystem Hierarchy Standard (FHS) and the purpose of its key directories.
- Explain the concepts of absolute and relative paths, the current working directory, and special directory shortcuts.
- Utilize the
pwdcommand to confidently identify your current location within the filesystem. - Master the
cdcommand to navigate efficiently between directories using various pathing techniques. - Implement the
lscommand with its most common options to inspect the contents of directories and the metadata of files. - Debug common navigation errors related to permissions, paths, and syntax.
Introduction
Welcome to the command line, the most powerful and fundamental interface to any Linux system. In the world of embedded systems, a graphical user interface (GUI) is often a luxury that is unavailable or impractical. Resources like processing power, memory, and storage are meticulously allocated, and a GUI consumes a significant portion of them. Furthermore, embedded devices like the Raspberry Pi 5 are frequently deployed in “headless” configurations—operating without a connected monitor, keyboard, or mouse. Your primary means of interaction will be a remote terminal session, a text-based window into the heart of the operating system.
This is why mastering the command line is not just a useful skill; it is an absolute necessity for an embedded Linux developer. Your journey begins with the three most essential commands for navigation: pwd, cd, and ls. These commands are the foundational tools that allow you to orient yourself, move through the intricate directory structure, and examine the contents of the filesystem. They are your eyes and feet in the text-based world of Linux. In this chapter, we will move beyond simply learning command syntax. We will explore the logical structure of the Linux filesystem, understand the critical difference between absolute and relative paths, and build a mental model of how to move through it with precision and efficiency. By mastering these simple commands, you unlock the ability to configure systems, deploy applications, and debug issues directly on your embedded hardware.
Technical Background
The Linux Filesystem Hierarchy: A World Organized
Before we can navigate, we must first understand the map. The Linux filesystem is not a random collection of files and folders; it is a highly organized, tree-like structure that is standardized to ensure consistency across different Linux distributions. This standard is called the Filesystem Hierarchy Standard (FHS). It defines the main directories and their contents, providing a predictable environment for both software and system administrators.
The entire hierarchy begins at a single point: the root directory, denoted by a single forward slash (/). Every single file, directory, and device on a Linux system is located somewhere under this root directory. Think of it as the trunk of a massive tree, from which all other branches (directories) grow. When you first log into your Raspberry Pi 5 via a terminal, you are placed within this structure, specifically in your user’s home directory.
Let’s explore the purpose of the most important top-level directories that branch from /. Understanding their roles is crucial for knowing where to find system utilities, configuration files, and application data.
- /bin (Essential User Binaries): This directory contains the essential command-line programs, or binaries, that are required for the system to function, even in single-user mode. Here you will find the very commands we are about to learn—
ls,pwd—along with others likecp(copy),mv(move), andrm(remove). These are the fundamental tools available to all users. - /sbin (System Binaries): Similar to
/bin, this directory contains essential binaries, but these are intended for system administration. Commands for shutting down the system (shutdown), managing network interfaces (ifconfig), or partitioning disks (fdisk) reside here. While any user can try to run them, they typically require superuser (or “root”) privileges to function correctly. - /etc (Et Cetera/Configuration Files): This is one of the most critical directories for an embedded developer. It contains the vast majority of system-wide configuration files. From network settings (
/etc/network/interfaces) to user management (/etc/passwd) and system startup scripts, the files in/etcdefine the behavior and personality of your Linux system. You will spend a significant amount of time editing files in this directory to customize your embedded device. - /dev (Device Files): Linux follows a powerful philosophy: “everything is a file.” This is most evident in the
/devdirectory. It doesn’t contain traditional files, but rather special files that represent hardware devices. Your serial ports (/dev/ttyS0), SD card partitions (/dev/mmcblk0p1), and I2C or SPI buses are all exposed as file-like interfaces here. Interacting with hardware at a low level often involves reading from or writing to these device files. - /proc (Process Information) and /sys (System Information): These are not real directories stored on your disk. They are virtual filesystems created by the Linux kernel in memory. The
/procdirectory provides a window into the running processes and kernel parameters. Each running process gets a directory named after its process ID (PID), containing detailed information about its state. The/sysdirectory provides a structured view of the system’s hardware and device drivers, which is often used to configure hardware on-the-fly. For example, you can control GPIO pins by writing values to files within/sys/class/gpio. - /usr (User Programs): This directory’s name is a bit of a historical misnomer; it doesn’t contain user home directories. Instead,
/usr(Unix System Resources) is where most of the user-installed software and its associated libraries and documentation reside. When you install a new application using a package manager, its binaries often go into/usr/bin, its libraries into/usr/lib, and its documentation into/usr/share/doc. - /home (User Home Directories): This is the standard location for users’ personal files. On a typical desktop system, you would have
/home/susanand/home/john. On your Raspberry Pi, you will have a directory like/home/pi, which serves as your personal workspace. It is the one place in the filesystem where you, as a non-root user, have full permission to create, modify, and delete files and directories without restriction. - /var (Variable Files): As its name suggests, this directory holds files whose content is expected to grow or change, or vary, during system operation. This includes system logs (
/var/log), mail spools, and temporary files used by applications. When troubleshooting a problem, the log files in/var/logare often the first place you should look. - /tmp (Temporary Files): This directory is a sandbox for any user or application to create temporary files. The key feature of
/tmpis that its contents are often deleted automatically whenever the system reboots, so it should never be used for storing important data.

The Concept of “Where Am I?”: Paths and the Working Directory
Now that we have a map, we need a way to describe locations. In Linux, a location is specified by a path. A path is a unique sequence of directories that leads to a specific file or directory. Your “current location” at any given moment on the command line is known as the current working directory. When you execute a command, it operates relative to this location unless you tell it otherwise.
There are two fundamental types of paths you must understand:
- Absolute Path: An absolute path provides the complete, unambiguous address of a file or directory, starting from the absolute beginning—the root directory (
/). It traces the entire route from the trunk of the filesystem tree. For example,/home/pi/documents/project.txtis an absolute path. It doesn’t matter where you currently are in the filesystem; this path will always point to the exact sameproject.txtfile. You can identify an absolute path instantly because it always begins with a/. - Relative Path: A relative path describes a location relative to your current working directory. It’s a set of directions from where you are standing right now. For example, if your current working directory is
/home/pi, and you want to refer to the sameproject.txtfile, you could use the relative pathdocuments/project.txt. This path is shorter and more convenient, but it is only valid from that specific starting location. If you were in the/etcdirectory, the pathdocuments/project.txtwould be meaningless, as there is nodocumentssubdirectory there. Relative paths never start with a/.
This distinction is not merely academic; it is central to efficient command-line use. Absolute paths are excellent for scripts or situations where you need to be certain you are referencing the correct file regardless of context. Relative paths are faster to type and are perfect for working within a specific project’s directory structure.
%%{init: {'theme': 'base', 'themeVariables': { 'fontFamily': 'Open Sans'}}}%%
graph LR


    subgraph Example Scenario
        direction TB
        A["Current Directory:<br><b>/home/pi</b>"] --> B{Want to access:<br><b>/home/pi/MyProjects/src</b>};
        B --> B_Abs["Use Absolute Path:<br><code>cd /home/pi/MyProjects/src</code>"];
        B --> B_Rel["Use Relative Path:<br><code>cd MyProjects/src</code>"];
        B_Abs --> Result_B["<b>Result:</b><br>Success! You are in /home/pi/MyProjects/src"];
        B_Rel --> Result_B;
    end

    subgraph Common Pitfall
        direction TB
        C["Current Directory:<br><b>/var/log</b>"] --> D{Want to access:<br><b>/home/pi/MyProjects/src</b>};
        D --> D_Abs["Use Absolute Path:<br><code>cd /home/pi/MyProjects/src</code>"];
        D --> D_Rel["Use Relative Path:<br><code>cd MyProjects/src</code>"];
        D_Abs --> Result_D_Success["<b>Result:</b><br>Success!"];
        D_Rel --> Result_D_Fail["<b>Result:</b><br><i>'No such file or directory'</i><br>because /var/log/MyProjects does not exist."];
    end

        subgraph How to Choose a Path
        direction LR
        Start(Start: Need to<br>access a file/dir) --> C1{{"Does the path<br>start with a '/' ?"}};

        C1 --"Yes"--> Abs_Path[("<b>Absolute Path</b><br>e.g., <i>/home/pi/MyProjects/src</i><br><br>Starts from the root.<br>Always points to the same location.")];
        C1 --"No"--> Rel_Path[("<b>Relative Path</b><br>e.g., <i>MyProjects/src</i><br><br>Starts from the current directory.<br>Meaning depends on where you are now.")];

        Abs_Path --> P1[Process: Use when location must be unambiguous, like in scripts];
        Rel_Path --> P2[Process: Use for convenience when working inside a project directory];

        P1 --> End([Success: Location is certain]);
        P2 --> End;
    end

    %% Styling
    classDef default fill:#ffffff,stroke:#4b5563,stroke-width:1px,color:#1f2937;
    classDef Start fill:#1e3a8a,stroke:#1e3a8a,stroke-width:2px,color:#ffffff;
    classDef C1 fill:#f59e0b,stroke:#f59e0b,stroke-width:1px,color:#ffffff;
    classDef Abs_Path,Rel_Path fill:#0d9488,stroke:#0d9488,stroke-width:1px,color:#ffffff;
    classDef P1,P2 fill:#8b5cf6,stroke:#8b5cf6,stroke-width:1px,color:#ffffff;
    classDef End fill:#10b981,stroke:#10b981,stroke-width:2px,color:#ffffff;
    classDef Result_D_Fail fill:#ef4444,stroke:#ef4444,stroke-width:1px,color:#ffffff;
    classDef Result_D_Success fill:#10b981,stroke:#10b981,stroke-width:1px,color:#ffffff;

    class Start Start;
    class C1 C1;
    class Abs_Path,Rel_Path Abs_Path,Rel_Path;
    class P1,P2 P1,P2;
    class End End;
    class Result_D_Fail Result_D_Fail;
    class Result_D_Success Result_D_Success;
The Holy Trinity of Navigation: pwd, cd, and ls
With the concepts of the filesystem hierarchy and paths firmly in mind, we can now introduce the commands that put this theory into practice.
pwd (Print Working Directory)
The pwd command is the simplest of the three. Its sole purpose is to answer the question, “Where am I right now?” When you execute it, it prints the absolute path of your current working directory to the screen.
$ pwd
/home/pi
This command is your compass. In the complex, nested structure of a Linux filesystem, it is easy to lose your bearings. Before you perform a critical operation, like deleting files, it is always a good practice to use pwd to confirm your location. It requires no arguments or options and is your most reliable tool for orientation.
cd (Change Directory)
The cd command is your vehicle for moving around the filesystem. It takes a single argument: the path to the directory you wish to move into. This path can be absolute or relative.
%%{init: {'theme': 'base', 'themeVariables': { 'fontFamily': 'Open Sans'}}}%%
graph TD
    A(Start: I need to move) --> B{What is my destination?};

    B --> C["Go to my <b>Home</b> directory<br><i>(e.g., /home/pi)</i>"];
    C --> C_CMD{"<code style='font-family:monospace; color:white; background-color:#374151; padding: 2px 5px; border-radius:4px;'>cd</code> or <code style='font-family:monospace; color:white; background-color:#374151; padding: 2px 5px; border-radius:4px;'>cd ~</code>"};

    B --> D["Go <b>Up</b> one level<br><i>(to the parent directory)</i>"];
    D --> D_CMD{"<code style='font-family:monospace; color:white; background-color:#374151; padding: 2px 5px; border-radius:4px;'>cd ..</code>"};

    B --> E["Go to a <b>Specific Directory</b><br><i>(using its path)</i>"];
    E --> E_CHOICE{Is the path...};
    E_CHOICE -- "Absolute (starts with /)" --> E_ABS_CMD{"<code style='font-family:monospace; color:white; background-color:#374151; padding: 2px 5px; border-radius:4px;'>cd /path/to/dir</code>"};
    E_CHOICE -- "Relative (from here)" --> E_REL_CMD{"<code style='font-family:monospace; color:white; background-color:#374151; padding: 2px 5px; border-radius:4px;'>cd subdir/other_dir</code>"};

    B --> F["Go back to the<br><b>Previous</b> directory I was in"];
    F --> F_CMD{"<code style='font-family:monospace; color:white; background-color:#374151; padding: 2px 5px; border-radius:4px;'>cd -</code>"};

    B --> G["Stay in the <b>Current</b> directory<br><i>(less common for cd)</i>"];
    G --> G_CMD{"<code style='font-family:monospace; color:white; background-color:#374151; padding: 2px 5px; border-radius:4px;'>cd .</code>"};

    C_CMD & D_CMD & E_ABS_CMD & E_REL_CMD & F_CMD & G_CMD --> Z([Done! New location set.]);

    %% Styling
    classDef default fill:#ffffff,stroke:#4b5563,stroke-width:1px,color:#1f2937;
    classDef A fill:#1e3a8a,stroke:#1e3a8a,stroke-width:2px,color:#ffffff;
    classDef B,E_CHOICE fill:#f59e0b,stroke:#f59e0b,stroke-width:1px,color:#ffffff;
    classDef C,D,E,F,G fill:#0d9488,stroke:#0d9488,stroke-width:1px,color:#ffffff;
    classDef C_CMD,D_CMD,E_ABS_CMD,E_REL_CMD,F_CMD,G_CMD fill:#8b5cf6,stroke:#8b5cf6,stroke-width:1px,color:#ffffff;
    classDef Z fill:#10b981,stroke:#10b981,stroke-width:2px,color:#ffffff;

    class A A;
    class B,E_CHOICE B;
    class C,D,E,F,G C;
    class C_CMD,D_CMD,E_ABS_CMD,E_REL_CMD,F_CMD,G_CMD C_CMD;
    class Z Z;
To move using an absolute path, you provide the full path from the root. For example, to move to the system’s main log directory, you would use:
$ cd /var/log
After running this command, your new working directory is /var/log. You can verify this with pwd.
To move using a relative path, you provide the path from your current location. If you are in /home/pi and you have a directory named projects, you can move into it with:
$ cd projects
The cd command also understands several special shortcuts that dramatically improve navigation efficiency:
cd(with no arguments): Typingcdby itself is a shortcut to immediately return to your home directory (/home/pi) from anywhere in the filesystem.cd ~: The tilde (~) character is a special symbol that represents your home directory.cd ~is functionally identical to typingcdwith no arguments. You can also use it to construct paths, likecd ~/projects.cd .: A single dot (.) represents the current directory itself. Whilecd .doesn’t move you anywhere, the.is useful in other commands for specifying the current location.cd ..: Two dots (..) represent the parent directory—the directory one level up from your current location. This is one of the most frequently used navigation tools. If you are in/home/pi/projects, executingcd ..will take you up to/home/pi. You can chain them together;cd ../..would take you up two levels.cd -: A single hyphen (-) is a special shortcut that takes you to the previous directory you were in. This is incredibly useful when you are toggling back and forth between two directories deep within the filesystem.
ls (List)
Once you have navigated to a directory, you need to see what’s inside. The ls command is your tool for this. In its simplest form, it lists the names of the files and subdirectories in the current working directory.
$ ls
Desktop  Documents  Downloads  Music  Pictures  Projects  Public  Templates  Videos
While useful, the true power of ls is unlocked through its many options, which are typically single letters prefixed with a hyphen. You can combine multiple options. For example, ls -l -a is the same as ls -la.
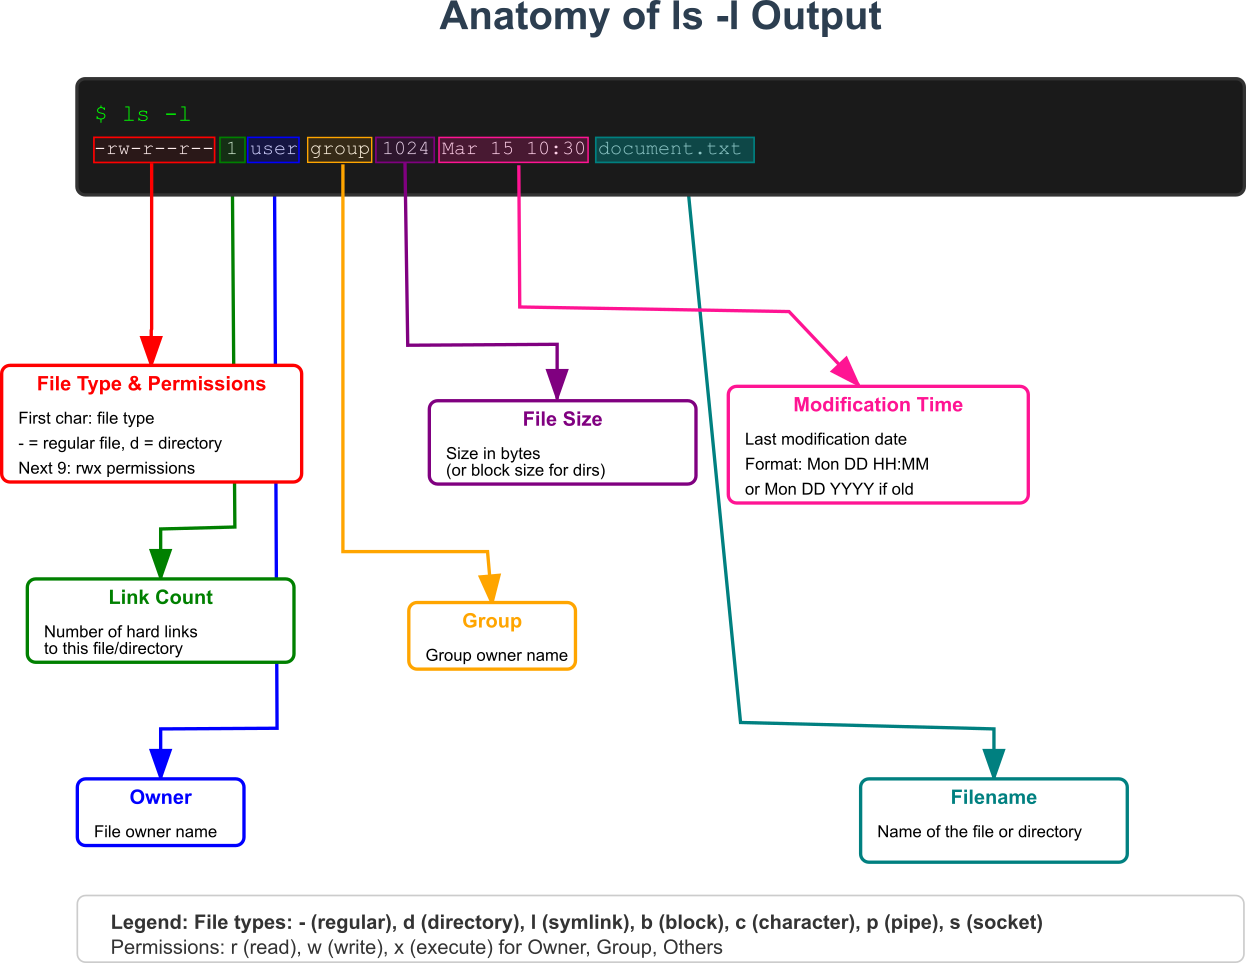
ls -l(Long Listing Format): This is perhaps the most important option. It provides a detailed, “long” list of the directory’s contents, showing much more than just the names.$ ls -l total 36 drwxr-xr-x 2 pi pi 4096 Jul 8 01:10 Desktop drwxr-xr-x 2 pi pi 4096 Jul 8 01:10 Documents drwxr-xr-x 2 pi pi 4096 Jul 8 01:10 Downloads -rw-r--r-- 1 pi pi 8980 Jul 8 01:15 my_script.py drwxr-xr-x 2 pi pi 4096 Jul 8 01:12 Projects
$ ls -l
total 36
drwxr-xr-x 2 pi pi 4096 Jul  8 01:10 Desktop
drwxr-xr-x 2 pi pi 4096 Jul  8 01:10 Documents
drwxr-xr-x 2 pi pi 4096 Jul  8 01:10 Downloads
-rw-r--r-- 1 pi pi 8980 Jul  8 01:15 my_script.py
drwxr-xr-x 2 pi pi 4096 Jul  8 01:12 Projects
- Each line provides a wealth of metadata:
- File Type and Permissions: The first character indicates the type (
dfor directory,-for a regular file). The next nine characters represent the read (r), write (w), and execute (x) permissions for the owner, the group, and all other users, respectively. - Number of Hard Links: The number of links pointing to this file. For directories, it’s the number of subdirectories plus
.and... - Owner: The username of the person who owns the file (e.g.,
pi). - Group: The group that owns the file (e.g.,
pi). - File Size: The size of the file in bytes.
- Modification Time: The date and time the file was last modified.
- File Name: The name of the file or directory.
- File Type and Permissions: The first character indicates the type (
ls -a(All): By default,lshides files and directories whose names begin with a dot (.). These are often configuration files (e.g.,.bashrc). The-aoption forceslsto show all files, including these hidden ones.ls -h(Human-Readable): When used with-l, the-hoption displays file sizes in a more human-friendly format (e.g.,4.0K,1.2M,2.5G) instead of raw bytes, making large files easier to identify.ls -R(Recursive): This powerful option lists the contents of the current directory and then “recursively” descends into every subdirectory, listing their contents as well. This can produce a very long output but is useful for getting a complete overview of a directory tree.
These three commands—pwd, cd, and ls—form a synergistic trio. You use pwd to get your bearings, ls to look around and see your options, and cd to move to your next destination. This cycle is the fundamental rhythm of command-line navigation.
%%{init: {'theme': 'base', 'themeVariables': { 'fontFamily': 'Open Sans'}}}%%
graph TD
    subgraph The Command-Line Navigation Cycle
        A[Start Here] --> B("1- Orient: Where am I?");
        B --> C{"<code style='font-family:monospace; color:white; background-color:#374151; padding: 2px 5px; border-radius:4px;'>pwd</code>"};
        C --> D[Output: <br><i>/home/pi/MyProjects</i>];

        D --> E("2- Observe: What's here?");
        E --> F{"<code style='font-family:monospace; color:white; background-color:#374151; padding: 2px 5px; border-radius:4px;'>ls -l</code>"};
        F --> G[Output: <br><i>drwxr-xr-x ... docs</i><br><i>drwxr-xr-x ... src</i>];

        G --> H("3- Decide & Move: Go there.");
        H --> I{"<code style='font-family:monospace; color:white; background-color:#374151; padding: 2px 5px; border-radius:4px;'>cd src</code>"};
        I --> J((Cycle Repeats));
        J --> B;
    end

    %% Styling
    classDef default fill:#ffffff,stroke:#4b5563,stroke-width:1px,color:#1f2937;
    classDef A fill:#1e3a8a,stroke:#1e3a8a,stroke-width:2px,color:#ffffff;
    classDef B,E,H fill:#0d9488,stroke:#0d9488,stroke-width:1px,color:#ffffff;
    classDef C,F,I fill:#8b5cf6,stroke:#8b5cf6,stroke-width:1px,color:#ffffff;
    classDef D,G fill:#f8fafc,stroke:#64748b,stroke-width:1px,color:#1f2937;
    classDef J fill:#f59e0b,stroke:#f59e0b,stroke-width:1px,color:#ffffff;

    class A A;
    class B,E,H B;
    class C,F,I C;
    class D,G D;
    class J J;
Practical Examples
Theory is essential, but proficiency is built through practice. In this section, we will walk through a series of hands-on examples using a standard Raspberry Pi 5 setup.
Connecting to Your Raspberry Pi 5
Before we can navigate, we need to access the command line. For a headless Raspberry Pi 5, the most common method is using Secure Shell (SSH). You will need the IP address of your Pi and an SSH client on your computer.
- Power on your Raspberry Pi 5. Ensure it is connected to the same network as your main computer.
- Find your Pi’s IP address. You can often find this from your router’s administration page or by using a network scanning tool.
- Open a terminal (on macOS or Linux) or an SSH client like PuTTY (on Windows).
- Connect using SSH. The default username for Raspberry Pi OS is
pi. Replace[PI_IP_ADDRESS]with the actual IP address.ssh pi@[PI_IP_ADDRESS] - You may be prompted about the authenticity of the host. Type
yes. - Enter the default password (the one you set during the initial setup of your Raspberry Pi OS).
Upon successful login, you will be greeted by the command-line prompt, positioned in your home directory.
pi@raspberrypi:~ $
The ~ in the prompt is a visual indicator that your current working directory is your home directory. Let’s prove it.
Example 1: Basic Orientation and Exploration
Our first task is to get comfortable with our surroundings, using the three core commands in a typical workflow.
1. Confirm Your Starting Point: Use pwd to print the absolute path of your home directory.
pi@raspberrypi:~ $ pwd
/home/pi
2. List the Contents: Now, let’s see what’s inside this directory. Use the ls command with the -l and -h options.
pi@raspberrypi:~ $ ls -lh
total 20K
drwxr-xr-x 2 pi pi 4.0K Jul  8 01:10 Desktop
drwxr-xr-x 2 pi pi 4.0K Jul  8 01:10 Documents
drwxr-xr-x 2 pi pi 4.0K Jul  8 01:10 Downloads
drwxr-xr-x 2 pi pi 4.0K Jul  8 01:10 Music
drwxr-xr-x 2 pi pi 4.0K Jul 8 01:10 Pictures-lh combination gives us a detailed, human-readable list. We can see several directories (drwxr-xr-x), their permissions, owner (pi), group (pi), size (4.0K), modification date, and name.
3. Reveal Hidden Files: Standard directories are useful, but important configuration files are often hidden. Use the -a flag to see everything.
pi@raspberrypi:~ $ ls -lah
total 88K
drwxr-xr-x 10 pi pi 4.0K Jul  8 01:35 .
drwxr-xr-x  3 root root 4.0K Jul  8 01:05 ..
-rw-------  1 pi pi 5.7K Jul  8 01:35 .bash_history
-rw-r--r--  1 pi pi  220 Jul  8 01:05 .bash_logout
-rw-r--r--  1 pi pi 3.5K Jul  8 01:05 .bashrc
drwxr-xr-x  2 pi pi 4.0K Jul  8 01:10 Desktop
drwxr-xr-x  2 pi pi 4.0K Jul  8 01:10 Documents
...
-rw-r--r-- 1 pi pi 807 Jul 8 01:05 .profile. (current directory), .. (parent directory), and several files starting with a dot, like .bashrc. This file is a script that runs every time you open a new terminal, and it’s a common place to customize your command-line environment.
Example 2: Creating and Navigating a Project Structure
Embedded development projects require organization. Let’s create a simple directory structure for a hypothetical sensor project and navigate through it.
1. Create a Project Directory: First, we’ll use the mkdir (make directory) command to create a main directory for our projects. We’ll do this in our home directory.
pi@raspberrypi:~ $ mkdir MyProjects
pi@raspberrypi:~ $ ls
Desktop  Documents  Downloads  Music  MyProjects  Pictures
MyProjects directory is now visible.
2. Navigate Into the New Directory: Use cd to enter the MyProjects directory.
pi@raspberrypi:~ $ cd MyProjects
pi@raspberrypi:~/MyProjects $ pwd
/home/pi/MyProjects~ to ~/MyProjects, giving you a constant, helpful hint about your relative location. The pwd command confirms the absolute path.
3. Create a Nested Structure: Real projects have subdirectories for source code, documentation, and data. Let’s create them.
pi@raspberrypi:~/MyProjects $ mkdir src
pi@raspberrypi:~/MyProjects $ mkdir docs
pi@raspberrypi:~/MyProjects $ mkdir data
pi@raspberrypi:~/MyProjects $ ls
data  docs  src
4. Navigate the Structure: Now let’s practice moving through our new tree.
Move into the source code directory:
pi@raspberrypi:~/MyProjects $ cd src
pi@raspberrypi:~/MyProjects/src $ pwd
/home/pi/MyProjects/src
Move back up to the parent directory (MyProjects) using a relative path:
pi@raspberrypi:~/MyProjects/src $ cd ..
pi@raspberrypi:~/MyProjects $ pwd
/home/pi/MyProjects
Move into the docs directory from here:
pi@raspberrypi:~/MyProjects $ cd docs
pi@raspberrypi:~/MyProjects/docs $
Now, let’s jump directly to the /etc directory using an absolute path:
pi@raspberrypi:~/MyProjects/docs $ cd /etc
pi@raspberrypi:/etc $ pwd
/etc
Finally, let’s jump straight back to our home directory with the cd shortcut:
pi@raspberrypi:/etc $ cd
pi@raspberrypi:~ $ pwd
/home/pi
Tip: Use the Tab key! The Linux shell has a powerful feature called tab completion. If you start typing a command, filename, or directory name and press the
Tabkey, the shell will attempt to auto-complete it for you. If there are multiple possibilities, pressingTabtwice will show you all of them. For example, instead of typingcd MyProjects, you can typecd MyPand pressTab. This will save you countless keystrokes and prevent typing errors.
Example 3: Inspecting System Files
Let’s use our navigation skills to safely explore some important system areas.
1. Navigate to the System Log Directory: We’ll use an absolute path to go to /var/log.
pi@raspberrypi:~ $ cd /var/log
pi@raspberrypi:/var/log $
2. List the Log Files: Let’s see the logs. We’ll use ls -lh to see their sizes, which can be an indicator of system activity or problems.
pi@raspberrypi:/var/log $ ls -lh
total 1.2M
drwxr-xr-x 2 root root 4.0K Jul  8 01:05 apt
-rw-r--r-- 1 root root 23K Jul  8 01:15 auth.log
-rw-r----- 1 root adm  101K Jul  8 01:30 daemon.log
-rw-r----- 1 root adm  355K Jul  8 01:30 messages
-rw-r----- 1 root adm  651K Jul  8 01:30 syslog
...
syslog and auth.log are particularly important for diagnosing system-level issues and security events.
3. Attempt to Create a File: Let’s see what happens if we try to create a file here using the touch command (which creates an empty file).
pi@raspberrypi:/var/log $ touch mytestfile
touch: cannot touch 'mytestfile': Permission deniedls -l output showed that the owner of this directory is root. As the pi user, we have read and execute permissions (which allow us to cd into it and ls its contents), but not write permission. The system correctly denies our request. This is a fundamental security feature of Linux.
4. Toggle Between Directories: Now, let’s go back to our project’s source directory using its absolute path.
pi@raspberrypi:/var/log $ cd /home/pi/MyProjects/src
pi@raspberrypi:~/MyProjects/src $
/var/log again. Instead of retyping the whole path, we can use the cd - shortcut.
pi@raspberrypi:~/MyProjects/src $ cd -
/var/log
pi@raspberrypi:/var/log $
Common Mistakes & Troubleshooting
As you begin your journey, you will inevitably encounter errors. This is a normal part of the learning process. Here are some of the most common pitfalls related to filesystem navigation and how to overcome them.
Exercises
- The Filesystem Scavenger Hunt:
- Objective: Find a specific kernel configuration file without using any search tools, only
lsandcd. - Task: The Linux kernel exposes its running configuration through a virtual file in the
/procdirectory. The file is namedconfig.gz. Starting from your home directory, usecdandlsto navigate into/procand find this file. - Verification: Once you believe you have found it, use
ls -l config.gzto verify its existence and view its properties. Do not try to view its contents yet. What is the path to this file?
- Objective: Find a specific kernel configuration file without using any search tools, only
- Replicating a Directory Structure:
- Objective: Create a specific, nested directory structure using
mkdirand then navigate it. - Task: From your home directory, create the following structure:
Firmware/ ├── RPi5/ │ ├── bootloader/ │ └── kernel/ └── Tools/ └── cross-compiler/ - Verification: Use
ls -R Firmwarefrom your home directory to display the entire tree you just created. The output should match the structure above. Then, use a singlecdcommand with a relative path to move from your home directory directly into thebootloaderdirectory. Usepwdto confirm your final location.
- Objective: Create a specific, nested directory structure using
- Path-Finding Challenge:
- Objective: Practice efficient navigation using
.,.., and~. - Task:
- Navigate from your home directory into the
Firmware/RPi5/kerneldirectory you created in Exercise 2. - From there, using only one
cdcommand, move to thecross-compilerdirectory. (Hint: use..). - From
cross-compiler, using only onecdcommand, navigate to the system’s/usr/bindirectory. (Hint: use an absolute path). - From
/usr/bin, using only onecdcommand, navigate back to your home directory’sDocumentsfolder. (Hint: use~).
- Navigate from your home directory into the
- Verification: Use
pwdafter eachcdcommand to verify you have arrived at the correct destination.
- Objective: Practice efficient navigation using
- Inspecting File Permissions:
- Objective: Use
lsto identify executable programs in the system. - Task: Navigate to the
/bindirectory. Usels -land examine the permissions string for several files. - Verification: Identify three commands (e.g.,
ls,pwd,cat) and write down their full permissions string. What character in the string tells you that you are allowed to execute them?
- Objective: Use
- The Long Way Home:
- Objective: Combine navigation commands to perform a sequence of actions.
- Task:
- From your home directory, navigate to
/var/log. - List all the files in this directory (including hidden ones) in long format, sorted by time (use
ls -lt). - Navigate from
/var/logto the parent directory of your home directory (/home). - List the contents of
/home. - Return to your home directory.
- From your home directory, navigate to
- Verification: Perform these steps in sequence. The final
pwdcommand should show/home/pi.
Summary
- The Linux Filesystem Hierarchy Standard (FHS) provides a predictable tree structure for all files and directories, starting from the root (
/). - Your location on the command line is the current working directory. Paths can be absolute (starting with
/) or relative (starting from your current location). pwd(Print Working Directory) is your compass; it shows you the absolute path of your current location.cd(Change Directory) is your vehicle for moving around.cd ..moves up one level,cd ~orcdgoes home, andcd -goes to your previous location.ls(List) is your set of eyes.ls -lprovides detailed information,ls -ashows hidden files,ls -hmakes sizes readable, andls -Rexplores recursively.- Mastering this trio of commands is the absolute first step toward proficiency in any Linux environment, and it is non-negotiable for headless embedded systems work.
Further Reading
- The Filesystem Hierarchy Standard (FHS) Official Documentation: For a definitive reference on the purpose of each directory.
- GNU Coreutils Manual: The official, in-depth documentation for the core commands (
ls,cd,pwd, and many others) from the creators of the tools. - Raspberry Pi Documentation – The Command Line: Official guides from the Raspberry Pi Foundation on using the command line.
- The Linux Command Line by William Shotts: A highly-regarded, free book that provides a comprehensive introduction to the shell.
- DigitalOcean Community Tutorials – Basic Linux Navigation and File Management: A well-written tutorial with practical examples.
- Red Hat System Administrator’s Guide – The Filesystem Hierarchy Standard: An industry-standard explanation from a leading enterprise Linux vendor.
