
Chapter 13: Initial Config of Raspberry Pi 5 & Remote Access (SSH)
Chapter Objectives
Upon completing this chapter, you will be able to:
- Understand the critical importance of initial system configuration for security, networking, and usability in an embedded Linux environment.
- Configure fundamental system settings on a Raspberry Pi 5, including the hostname, user passwords, system locale, and time zone.
- Implement wireless network connectivity by configuring Wi-Fi settings from the command line.
- Explain the principles of the Secure Shell (SSH) protocol and its role in secure remote administration.
- Enable the SSH server on the Raspberry Pi 5 and establish a secure remote connection from a host computer.
- Debug common connectivity and configuration issues related to networking and SSH.
Introduction
Welcome to the foundational stage of your embedded Linux journey. In previous chapters, we have explored the hardware architecture of the Raspberry Pi 5 and successfully flashed the operating system onto an SD card. Now, we transition from theory to practice, transforming that generic OS image into a personalized, secure, and accessible development environment. This process, known as initial configuration, is one of the most critical first steps in any embedded project. It is analogous to laying the foundation for a house; without a solid, well-defined base, any subsequent development will be unstable and insecure.
In the world of embedded systems, devices are often “headless”—that is, they operate without a dedicated monitor, keyboard, or mouse. From industrial controllers on a factory floor to environmental sensors in remote locations, direct physical interaction is impractical or impossible. Therefore, establishing a reliable method for remote access is not a convenience but a necessity. This chapter focuses on the industry-standard protocol for this task: the Secure Shell (SSH). We will delve into how SSH provides an encrypted, authenticated channel for command-line access, allowing you to manage your Raspberry Pi 5 from anywhere on the network as if you were sitting right in front of it.
By the end of this chapter, you will have configured your Raspberry Pi 5 with a unique identity on the network, secured it with a new password, customized it for your region, and connected it to your local Wi-Fi network. Most importantly, you will master the skill of logging in remotely using SSH, a fundamental capability that will underpin all future development work in this course.
graph TD
    subgraph "Phase 1: Initial Hardware Setup"
        A[Start: Flash OS to SD Card] --> B{Connect Peripherals};
        B -- Keyboard, Mouse, Monitor --> C[Power On Raspberry Pi 5];
    end

    subgraph "Phase 2: Core System Configuration (via raspi-config)"
        C --> D[Login with Default/New User];
        D --> E[Run 'sudo raspi-config'];
        E --> F(1- System Options: Change Password);
        F --> G(1- System Options: Set Hostname);
        G --> H(5- Localisation: Set Locale & Timezone);
        H --> I(5- Localisation: Set WLAN Country);
        I --> J(1- System Options: Configure Wi-Fi Credentials);
        J --> K(3- Interface Options: Enable SSH Server);
    end

    subgraph "Phase 3: Finalizing and Remote Access"
        K --> L{Finish & Reboot};
        L --> M[Pi Reboots & Connects to Wi-Fi];
        M --> N(Login Locally & Find IP with 'ip addr');
        N --> O{{SSH from Host PC}};
        O -- ssh user@ip --> P([End: Secure Remote Shell Access]);
    end

    %% Styling
    classDef primary fill:#1e3a8a,stroke:#1e3a8a,stroke-width:2px,color:#ffffff;
    classDef success fill:#10b981,stroke:#10b981,stroke-width:2px,color:#ffffff;
    classDef decision fill:#f59e0b,stroke:#f59e0b,stroke-width:1px,color:#ffffff;
    classDef process fill:#0d9488,stroke:#0d9488,stroke-width:1px,color:#ffffff;
    classDef check fill:#ef4444,stroke:#ef4444,stroke-width:1px,color:#ffffff;

    class A,B,C,D,E,L,M,N,O primary;
    class F,G,H,I,J,K process;
    class P success;
Technical Background
The Identity of a System: Hostnames and User Accounts
Every device on a network requires a unique identifier to distinguish it from others. In the realm of TCP/IP networking, the primary identifier is the IP address. However, remembering numerical addresses like 192.168.1.105 is cumbersome and inefficient for humans. To solve this, we use hostnames. A hostname is a human-readable label assigned to a device, such as rpi5-dev or sensor-node-alpha. When you first boot a fresh Raspberry Pi OS image, it typically has a default hostname like raspberrypi. In a network with multiple Raspberry Pis, this immediately creates confusion. Changing the hostname is therefore one of the first and most important steps in personalizing your device and making it easily identifiable. This name is used by network services like DNS (Domain Name System) to resolve the friendly name to its corresponding IP address, simplifying network communication.
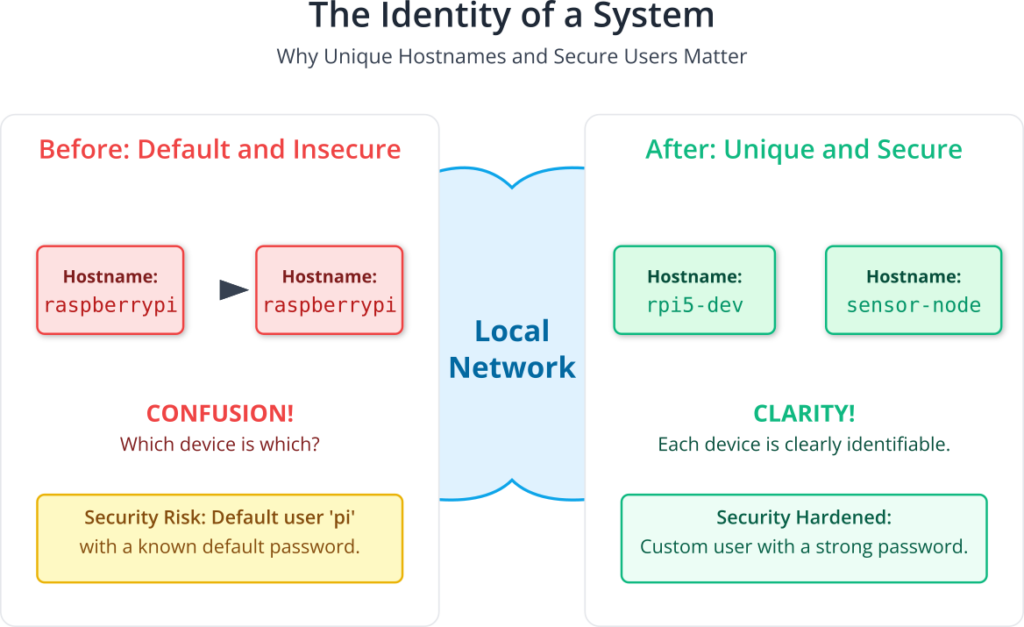
Just as the device has an identity, so too do its users. A fresh Raspberry Pi OS installation comes with a default user account, typically pi, with a well-known default password. From a security perspective, this is a significant vulnerability. Any malicious actor on the network who knows the default credentials can gain immediate access to your device. Therefore, the principle of least privilege and fundamental security hygiene dictate that the very first action you take is to change the default password to something strong and unique. Modern embedded Linux systems are moving towards eliminating default user accounts entirely, forcing the creation of a new user on first boot. This process hardens the device against unauthorized access from the moment it joins the network.
Understanding System Locale and Time Zone
An often-overlooked aspect of initial configuration is setting the system locale. A locale is a set of parameters that defines the user’s language, region, and any special variant preferences for their user interface. It governs how text is displayed, how numbers and currency are formatted, and how dates and times are presented. For example, the locale en_US.UTF-8 specifies American English using the UTF-8 character encoding, while en_GB.UTF-8 specifies British English. Setting the correct locale ensures that system messages, application interfaces, and text processing behave as expected. The UTF-8 part is particularly important, as it is a universal character encoding standard capable of representing almost any character from any language, preventing garbled text and ensuring compatibility across different systems and applications.

Equally important is the time zone. Embedded systems often perform time-sensitive tasks, such as logging data with accurate timestamps, scheduling jobs with cron, or participating in network protocols that require synchronized clocks. If the system’s time zone is incorrect, all timestamps will be offset, potentially corrupting data and causing scheduled tasks to run at the wrong times. The system clock in Linux is typically maintained in Coordinated Universal Time (UTC), and the time zone setting is used to calculate the correct local time for display and for applications that require it. Configuring the correct time zone, for instance, America/New_York or Europe/London, ensures that your device operates in sync with its real-world environment.
The Architecture of Network Connectivity
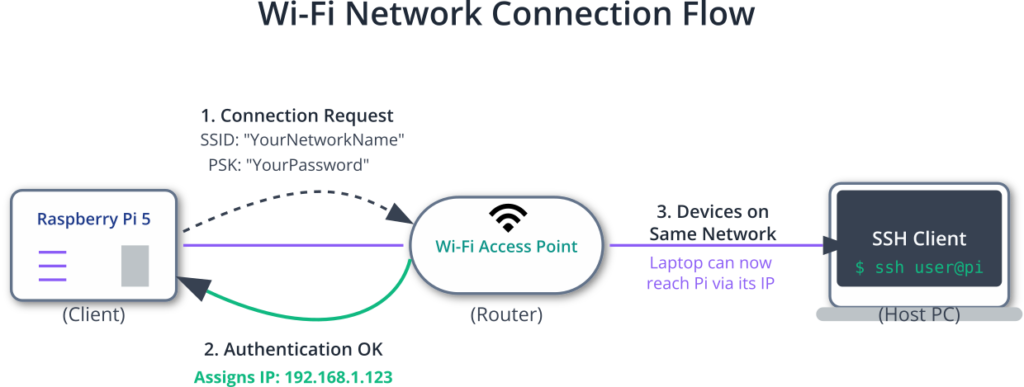
For an embedded device to be remotely accessible, it must first be connected to a network. The Raspberry Pi 5 offers two primary methods for this: a wired Ethernet connection and a built-in wireless (Wi-Fi) interface. While an Ethernet connection is often as simple as plugging in a cable, Wi-Fi requires a configuration process involving two key pieces of information: the SSID (Service Set Identifier) and the passphrase (password).
The SSID is the public name of a wireless network. When your device scans for available networks, it is looking for the SSIDs being broadcast by nearby access points. Once you have identified the correct SSID, you must provide the corresponding passphrase to authenticate and gain access. This handshake is typically managed by a security protocol, most commonly WPA2 (Wi-Fi Protected Access 2) or the newer WPA3.
In a Linux system like Raspberry Pi OS, network interfaces are managed by a service. For Wi-Fi, a program called a supplicant is responsible for handling the authentication process with the access point. The primary supplicant used in most Linux distributions is wpa_supplicant. Its configuration is stored in a plain text file, typically /etc/wpa_supplicant/wpa_supplicant.conf. This file contains one or more network blocks, each specifying an SSID and its corresponding passphrase (PSK, or Pre-Shared Key). By editing this file, you can pre-configure your Raspberry Pi to automatically connect to a known Wi-Fi network on boot, a crucial step for deploying a headless device.
The Secure Shell (SSH) Protocol: Your Remote Command Line
Once your device is on the network, you need a secure way to communicate with it. In the early days of networking, protocols like Telnet were used for remote login. Telnet, however, has a fatal flaw: it transmits all data, including usernames and passwords, in plain text. Anyone “sniffing” the network traffic could easily capture these credentials and compromise the system.
This is the problem that the Secure Shell (SSH) protocol was designed to solve. SSH provides a secure, encrypted channel over an unsecured network. It operates on a client-server model. The SSH server runs on the device you want to access (the Raspberry Pi 5), listening for incoming connections on a specific network port (by default, port 22). The SSH client is the program you run on your host computer (e.g., your laptop) to initiate the connection.
sequenceDiagram
    actor Client as SSH Client<br>(Your Laptop)
    participant Server as SSH Server<br>(Raspberry Pi 5)

    title SSH Connection and Encryption Handshake

    Client->>Server: Initiate Connection (TCP Port 22)
    activate Server
    Server-->>Client: Server's Public Host Key + Fingerprint
    deactivate Server

    alt First Connection
        Client->>Client: Display Host Key Fingerprint to User
        actor User
        User-->>Client: Manually Verify & Accept Fingerprint
        Client->>Client: Store Host Key in 'known_hosts'
    else Subsequent Connections
        Client->>Client: Compare Server's Host Key with<br>stored key in 'known_hosts'
        alt Host Key Mismatch
             Client-->>User: WARNING: HOST ID CHANGED!
             Client--xServer: Terminate Connection
        end
    end

    activate Client
    Client->>Server: Request Secure Channel
    activate Server
    Server-->>Client: Agree on Symmetric Encryption Algorithm
    deactivate Server
    deactivate Client

    Note over Client,Server: All further communication is encrypted!

    Client->>Server: User Authentication Request (e.g., password)
    activate Server
    Server-->>Client: Challenge (Prompt for Password)
    deactivate Server

    Client->>User: Prompt for Password
    User-->>Client: Enter Password
    Client->>Server: Send Encrypted Password
    activate Server
    Server->>Server: Verify Password
    Server-->>Client: Authentication Successful
    deactivate Server

    rect rgb(230, 255, 230)
        Note over Client,Server: Secure Shell Session is Active
        Client->>Server: ls -l (Encrypted Command)
        Server-->>Client: directory_listing (Encrypted Response)
        Client->>Server: exit (Encrypted Command)
    end
    Server-->>Client: Close Connection
The security of SSH is built on a foundation of public-key cryptography. When a client first connects to a server, the server presents its host key. The client can check this key’s fingerprint to verify that it is connecting to the correct machine and not an impostor in a “man-in-the-middle” attack. After this initial verification, the client and server negotiate a symmetric encryption key to encrypt all subsequent traffic for that session. This ensures three core security principles:
- Confidentiality: All data transmitted, including commands, file contents, and passwords, is encrypted and unreadable to eavesdroppers.
- Integrity: The protocol ensures that the data sent is not tampered with or altered in transit.
- Authentication: It provides strong mechanisms to verify the identity of both the user and the server.
Authentication in SSH can be handled in two primary ways. The most common method, especially for initial setup, is password-based authentication. You simply provide the username and password for an account on the server. While secure due to the encrypted channel, this method is still vulnerable to brute-force attacks if the password is weak.
A more secure and highly recommended method is public-key authentication. In this scheme, the user generates a cryptographic key pair: a private key and a public key. The private key is kept secret and secure on the client machine. The public key is copied to the server and added to a special file in the user’s home directory (~/.ssh/authorized_keys). When the user tries to connect, the server uses the public key to issue a challenge that can only be solved by the corresponding private key. The client uses its private key to solve the challenge and prove its identity, all without ever sending the private key over the network. This method is immune to password-guessing attacks and is the standard for professional and automated environments.
Practical Examples
This section provides a step-by-step guide to performing the initial configuration of your Raspberry Pi 5. We will use the raspi-config command-line utility, which is the standard tool for system configuration on Raspberry Pi OS.
Initial Setup with raspi-config
For these steps, you will need to have your Raspberry Pi 5 connected to a monitor and keyboard for the initial configuration. After this, all further interaction can be done remotely via SSH.
- Boot Up and Log In: Power on your Raspberry Pi 5. Once it has booted to the command-line prompt, log in using the default credentials if you are using an older image, or the user you created during the initial setup process.
- Launch
raspi-config: At the command prompt, type the following command and press Enter:
sudo raspi-config- This command uses
sudo(Superuser Do) to runraspi-configwith administrative privileges, which are required to modify system-level configuration files. You will be presented with a text-based user interface.
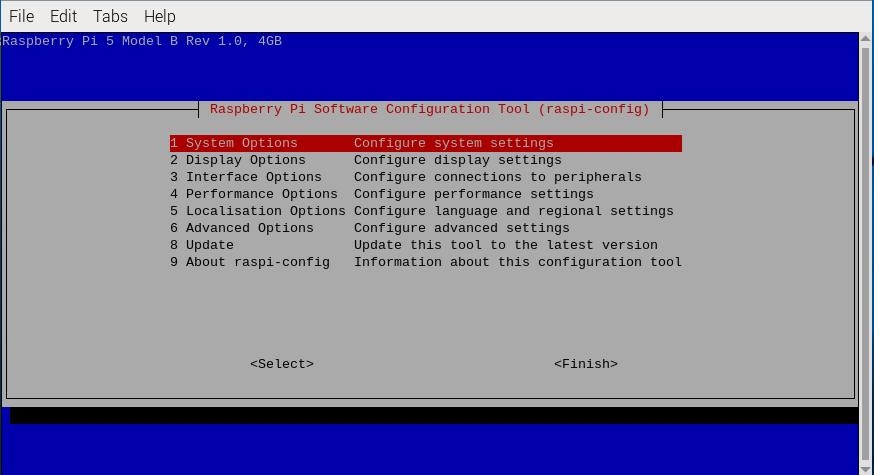
Step 1: Change the Default Password
Security first. If you are logged in as the default pi user, changing the password is the highest priority.
- In the
raspi-configmenu, navigate to1 System Optionsand press Enter. - Select
S3 Passwordand press Enter. - You will be prompted to enter a new password. Type your new password and press Enter. You will be asked to re-enter it for confirmation.
Tip: Choose a strong password that is a mix of uppercase letters, lowercase letters, numbers, and symbols. Avoid common words or easily guessable phrases.
Step 2: Set the Hostname
Give your Raspberry Pi a unique name on the network.
- From the main menu, select
1 System Options. - Select
S4 Hostname. - You will be shown a dialog explaining the valid characters for a hostname. Press Enter to acknowledge.
- Delete the default
raspberrypihostname and enter your desired name, for example,rpi5-dev. - Press Enter to confirm.
Step 3: Configure Locale and Time Zone
Customize the system for your geographical region.
- Set Locale:
- From the main menu, select
5 Localisation Options. - Select
L1 Locale. - You will be presented with a long list of locales. Scroll down and find the locale for your region. For example, for the United States, find and select
en_US.UTF-8 UTF-8by pressing the spacebar. An asterisk[*]will appear. - Press Tab to move to the
<Ok>button and press Enter. - On the next screen, you will be asked to choose the default locale for the system environment. Select the one you just enabled (e.g.,
en_US.UTF-8) and press Enter. The system will now generate the locale definitions.
- From the main menu, select
- Set Time Zone:
- From the
Localisation Optionsmenu, selectL2 Timezone. - First, select your geographic area (e.g.,
America). - Next, select the city or region that corresponds to your time zone (e.g.,
New_York).
- From the
Step 4: Configure Wi-Fi
Connect your Raspberry Pi to your wireless network.
- From the
Localisation Optionsmenu, selectL4 WLAN Countryand set your country. This is important as it configures the Wi-Fi radio to use the correct frequencies and channels allowed in your region. - Return to the main menu and select
1 System Options. - Select
S1 Wireless LAN. - Enter the SSID (the name of your Wi-Fi network). Be careful with capitalization. Press Enter.
- Enter the passphrase (the password for your Wi-Fi network). Press Enter.
The system will now save this configuration. Behind the scenes, raspi-config is editing the /etc/wpa_supplicant/wpa_supplicant.conf file for you. The resulting configuration will look something like this:
File: /etc/wpa_supplicant/wpa_supplicant.conf
ctrl_interface=DIR=/var/run/wpa_supplicant GROUP=netdev
update_config=1
country=US

network={
    ssid="YourNetworkName"
    psk="YourWiFiPassword"
    key_mgmt=WPA-PSK
}
Warning: The Wi-Fi password is stored in plain text in this file. It is crucial that your system is physically secure and that file permissions are set correctly to prevent unauthorized users from reading it.
Step 5: Enable the SSH Server
The final step is to enable remote access.
- From the main menu, select
3 Interface Options. - Select
I2 SSH. - You will be asked if you want to enable the SSH server. Use the arrow keys to select
<Yes>and press Enter. - You will receive a confirmation that the SSH server is enabled.
Step 6: Reboot and Find Your IP Address
For all these changes to take effect, you need to reboot the system.
- In
raspi-config, navigate to the<Finish>button on the main menu and press Enter. - You will be asked if you want to reboot now. Select
<Yes>and press Enter.
Your Raspberry Pi will now restart. Once it has rebooted, it will automatically connect to the Wi-Fi network you configured. To connect to it via SSH, you need to find its IP address. Log in one last time with your keyboard and monitor and run the following command:
ip addr show wlan0
Look for the output under the wlan0 interface. You should see a line that starts with inet, followed by the IP address.
3: wlan0: <BROADCAST,MULTICAST,UP,LOWER_UP> mtu 1500 qdisc ...
    link/ether ...
    inet 192.168.1.123/24 brd 192.168.1.255 scope global ...
       valid_lft forever preferred_lft forever
    inet6 ...
In this example, the IP address is 192.168.1.123. Make a note of this address.
Step 7: Connecting via SSH
Now you can move to your main computer (Windows, macOS, or Linux) and connect to the Raspberry Pi. Ensure your computer is connected to the same network.
On macOS or Linux:
Open a terminal and use the ssh command. Replace your_username with the user you configured and your_pi_ip_address with the IP you just found.
ssh your_username@your_pi_ip_address
# Example: ssh myuser@192.168.1.123
On Windows:
Modern versions of Windows 10 and 11 include an OpenSSH client. You can open either Command Prompt or PowerShell and use the same command as on macOS/Linux.
ssh your_username@your_pi_ip_address
# Example: ssh myuser@192.168.1.123
The very first time you connect, you will see a message like this:
The authenticity of host '192.168.1.123 (192.168.1.123)' can't be established.
ED25519 key fingerprint is SHA256:AbCdEfGhIjKlMnOpQrStUvWxYz1234567890abc.
Are you sure you want to continue connecting (yes/no/[fingerprint])?
This is SSH’s security mechanism at work. It’s asking you to verify the server’s host key. Type yes and press Enter. The key will be saved to your computer’s known_hosts file. You will then be prompted for your password. Enter the new password you set earlier, and you will be greeted with the command prompt of your Raspberry Pi, now fully accessible over the network.
Common Mistakes & Troubleshooting
Even with a straightforward process, issues can arise. Here are some common pitfalls and how to resolve them.
Exercises
- Change Your Hostname and Theme:
- Objective: To practice basic system personalization.
- Steps:
- SSH into your Raspberry Pi.
- Run
sudo raspi-config. - Change your hostname to something new (e.g.,
rpi5-project). - Explore the
Display Optionsand change the splash screen (boot screen) to a different option. - Reboot and SSH back in. Notice how the command prompt reflects the new hostname.
- Manually Add a Second Wi-Fi Network:
- Objective: To understand how to configure networking without relying on
raspi-config. - Steps:
- Using a text editor like
nano, open the wpa_supplicant configuration file:sudo nano /etc/wpa_supplicant/wpa_supplicant.conf. - Add a second
network={...}block for another Wi-Fi network (e.g., a mobile hotspot). - You can assign a
priorityto the networks (e.g.,priority=5). The network with the higher number will be preferred if both are available. - Reboot the Pi near the new network and verify that it connects.
- Using a text editor like
- Objective: To understand how to configure networking without relying on
- Find Your Pi Without a Monitor (Network Scanning):
- Objective: To learn how to discover a headless device on the network.
- Steps:
- On your host computer, install a network scanning tool. For Linux/macOS,
nmapis standard (sudo apt-get install nmaporbrew install nmap). For Windows,nmapor other tools like "Advanced IP Scanner" are available. - Run a scan of your local network to find devices with port 22 (SSH) open. With
nmap, the command would benmap -p 22 --open 192.168.1.0/24(replace the IP range with your network's). - Identify your Raspberry Pi in the scan results and connect to it.
- On your host computer, install a network scanning tool. For Linux/macOS,
- Set Up SSH Key-Based Authentication:
- Objective: To implement a more secure authentication method.
- Steps:
- On your host computer, generate an SSH key pair if you don't have one:
ssh-keygen -t ed25519. Just press Enter to accept the defaults. - Use the
ssh-copy-idutility to automatically copy your public key to the Raspberry Pi:ssh-copy-id your_username@your_pi_ip_address. You will be prompted for your password one last time. - Now, try to SSH into your Pi again. It should log you in directly without asking for a password.
- On your host computer, generate an SSH key pair if you don't have one:
- Disable Password Authentication:
- Objective: To harden the SSH server by allowing only key-based logins.
- Steps:
- Important: First, ensure your key-based login from Exercise 4 is working correctly. If you make a mistake here, you could lock yourself out.
- On the Raspberry Pi, edit the SSH server configuration file:
sudo nano /etc/ssh/sshd_config. - Find the line that says
#PasswordAuthentication yes. - Uncomment it (remove the
#) and change the value tono. - Save the file and restart the SSH service:
sudo systemctl restart ssh. - Try to open a new terminal and connect with a password; it should be rejected. Your key-based login should still work.
Summary
- Initial configuration is essential for creating a secure, identifiable, and usable embedded system.
- The
raspi-configutility provides a user-friendly interface for managing core system settings like passwords, hostnames, locales, and interfaces. - A hostname gives your device a human-readable name on the network, while changing the default password is a critical first step in securing your device.
- Locale and time zone settings ensure that system output and time-sensitive operations are correct for your region.
- Connecting to a Wi-Fi network requires the network's SSID and passphrase, which are managed by the
wpa_supplicantservice. - SSH (Secure Shell) is the industry standard for secure remote command-line access, providing confidentiality, integrity, and authentication over an unsecured network.
- Enabling the SSH server on the Raspberry Pi allows you to manage it remotely from any client computer on the same network.
- Public-key authentication is a more secure alternative to passwords and is the recommended practice for professional environments.
Further Reading
- Raspberry Pi Documentation - The
raspi-configtool: https://www.raspberrypi.com/documentation/computers/configuration.html#raspi-config - Raspberry Pi Documentation - Securing your Raspberry Pi: https://www.raspberrypi.com/documentation/computers/configuration.html#securing-your-raspberry-pi
- SSH (Secure Shell) Protocol Overview: https://www.ssh.com/academy/ssh
- OpenSSH Official Website: https://www.openssh.com/
- Arch Linux Wiki - wpa_supplicant: https://wiki.archlinux.org/title/Wpa_supplicant (An excellent, in-depth technical resource on
wpa_supplicant). - DigitalOcean - Understanding the SSH Encryption and Connection Process: https://www.digitalocean.com/community/tutorials/understanding-the-ssh-encryption-and-connection-process
- The
sshd_configMan Page: A definitive reference for all SSH server options. On a Linux system, you can access it with the commandman sshd_config.
