
Chapter 273: Variant-Specific Peripherals
Chapter Objectives
By the end of this chapter, you will be able to:
- Identify the unique, high-value peripherals available on specific ESP32 variants.
- Understand the capabilities and use cases for USB On-The-Go (OTG), LCD/Camera interfaces, and AI acceleration.
- Differentiate between the various connectivity options beyond standard Wi-Fi and BLE, such as Thread, Zigbee, and Ethernet.
- Write code that leverages variant-specific peripherals like the native USB port.
- Use preprocessor directives to create portable code that can be compiled for multiple ESP32 targets.
- Locate and enable these specialized peripherals within the
menuconfigsystem.
Introduction
In the preceding chapters, we discussed how to select an ESP32 variant based on broad categories like cost, CPU performance, and memory. Now, we zoom in on the features that truly set the different ESP32 families apart: their unique hardware peripherals. While all variants share a common foundation of GPIO, I2C, SPI, and UART, it is the specialized peripherals that unlock advanced capabilities and enable you to create more sophisticated and integrated products.
Features like native USB, hardware-accelerated machine learning, and dedicated camera interfaces are not available on every chip. Understanding which variant offers which peripheral is fundamental to modern ESP32 development. Choosing a chip with the right built-in hardware can dramatically simplify your PCB design, lower your Bill of Materials (BOM) cost, and provide performance that would be impossible to achieve with external components. This chapter is your guide to these powerful, variant-specific tools.
Theory: A Tour of Specialized Hardware
Let’s explore the most significant peripherals that are unique to certain ESP32 families. The presence or absence of these features is often the single deciding factor in choosing a chip.
| Feature / Peripheral | ESP32 (Original) | ESP32-S2 | ESP32-S3 | ESP32-C3 | ESP32-C6 | ESP32-H2 |
|---|---|---|---|---|---|---|
| Native USB OTG | ✗ | ✓ | ✓ | ✗ | ✗ | ✗ |
| Parallel LCD/Camera | ✗ | ✓ (LCD only) |
✓ | ✗ | ✗ | ✗ |
| AI Acceleration | ✗ | ✗ | ✓ | ✗ | ✗ | ✗ |
| 802.15.4 (Thread/Zigbee) | ✗ | ✗ | ✗ | ✗ | ✓ | ✓ |
| Ethernet MAC | ✓ | ✗ | ✗ | ✗ | ✗ | ✗ |
| Bluetooth Classic | ✓ | ✗ | ✗ | ✗ | ✗ | ✗ |
| Wi-Fi | ✓ (Wi-Fi 4) |
✓ (Wi-Fi 4) |
✓ (Wi-Fi 4) |
✓ (Wi-Fi 4) |
✓ (Wi-Fi 6) |
✗ |
1. USB On-The-Go (OTG)
The Universal Serial Bus (USB) is the most common interface for wired peripherals. While most ESP32s can communicate with a computer via an external USB-to-UART chip, some variants have a USB controller built directly into the silicon.
| Consideration | Standard Approach (e.g., ESP32-C3) | Native USB Approach (ESP32-S3) |
|---|---|---|
| Primary Chip | ESP32-C3 Module | ESP32-S3 Module |
| USB Interface Chip | Required. An external USB-to-UART bridge chip (e.g., CH340, CP2102) is needed. | Not Required. The USB peripheral is built into the ESP32-S3 silicon. |
| External Components | USB connector, resistors, and capacitors for the bridge chip. | USB connector and minimal passive components for line protection. |
| BOM Cost & PCB Space | Higher cost and larger board area due to the extra chip and its components. | Lower cost and smaller board area. |
| Capabilities | – Serial communication (UART) – Automatic flashing circuit |
– All standard features, PLUS: – Native HID (Keyboard/Mouse) – Native MSC (USB Drive) – DFU Firmware Updates |
- Availability: ESP32-S2 and ESP32-S3.
- What It Is: A full-featured USB 2.0 OTG peripheral capable of operating at Full Speed (12 Mbit/s). “OTG” means it can act as either a USB Device (like a mouse or serial port) or a limited USB Host (to read a flash drive, for example).
- Why It Matters:
- Reduced BOM Cost: Eliminates the need for an external USB-to-UART bridge (e.g., CP2102, CH340) and its associated components, saving cost and PCB space.
- New Device Classes: Allows your ESP32 to appear to a computer as a native USB device, not just a COM port. You can create:
- Communication Device Class (CDC): A virtual serial port for logging and data transfer.
- Mass Storage Class (MSC): Make the ESP32’s flash or an SD card appear as a USB flash drive.
- Human Interface Device (HID): Emulate a keyboard, mouse, or joystick.
- Direct Firmware Updates: The ESP32-S2 and S3 can be put into a bootloader mode where firmware can be flashed directly over the USB interface using DFU (Device Firmware Upgrade) protocol.
graph TD
    subgraph Computer
        direction LR
        PC_OS[Operating System]
        PC_USB_Port(USB Port)
        PC_OS -- Manages --> PC_USB_Port
    end

    subgraph ESP32-S3 Device
        S3(<b>ESP32-S3</b><br>with Native USB)
        TINYUSB[TinyUSB Stack]
        S3 -- Runs --> TINYUSB
    end

    TINYUSB -->|Can emulate| CDC(<b>CDC Device</b><br>Virtual COM Port)
    TINYUSB -->|Can emulate| HID(<b>HID Device</b><br>Keyboard, Mouse)
    TINYUSB -->|Can emulate| MSC(<b>MSC Device</b><br>USB Flash Drive)

    CDC -- Connects to --> PC_USB_Port
    HID -- Connects to --> PC_USB_Port
    MSC -- Connects to --> PC_USB_Port

    %% Styling
    classDef primary fill:#EDE9FE,stroke:#5B21B6,stroke-width:2px,color:#5B21B6;
    classDef process fill:#DBEAFE,stroke:#2563EB,stroke-width:1px,color:#1E40AF;
    classDef success fill:#D1FAE5,stroke:#059669,stroke-width:2px,color:#065F46;

    class S3,PC_OS primary;
    class TINYUSB,PC_USB_Port process;
    class CDC,HID,MSC success;
Tip: The ESP-IDF integrates the popular TinyUSB stack, providing a clean, high-level API for managing these different USB device classes.
2. LCD and Camera Interfaces
For any product with a screen or a camera, the interface between the sensor/display and the SoC is critical for performance.
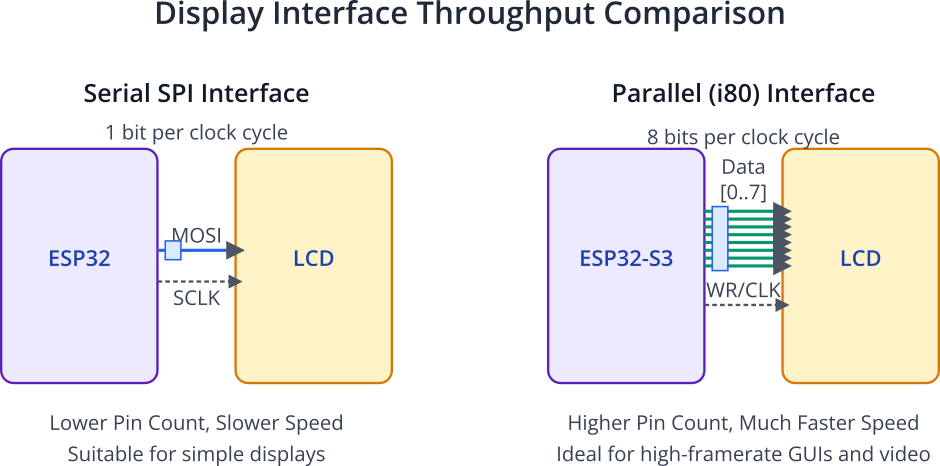
- Availability: Primarily the ESP32-S3. While other variants can drive displays via SPI, the S3 has a dedicated parallel interface for much higher throughput.
- What It Is:
- LCD Controller: A parallel (8-bit, 16-bit) interface that complies with the Intel 8080 (i80) standard. It can write data to all pixels of a display much faster than a serial SPI interface.
- Camera Interface: A parallel Digital Video Port (DVP) that can connect directly to many common image sensors (e.g., OV2640).
- Why It Matters:
- High-Performance HMI: The parallel LCD interface allows for high-resolution, high-framerate video playback and smooth graphical user interfaces (GUIs) that would be slow and choppy over SPI.
- Machine Vision: The dedicated camera interface allows the ESP32-S3 to capture image frames directly into its memory (especially PSRAM) at high speed, which is a prerequisite for any real-time image processing or AI vision task.
3. AI Acceleration
Machine learning at the edge is a rapidly growing field. The ESP32-S3 was specifically designed to meet this demand.
- Availability: ESP32-S3.
- What It Is: The dual-core Tensilica LX7 processor in the ESP32-S3 includes vector instructions. These are specialized CPU instructions that can perform mathematical operations (like dot products) on multiple data points simultaneously (Single Instruction, Multiple Data – SIMD). These operations are the foundation of neural network calculations.
- Why It Matters: These hardware extensions provide a significant speedup (4-5x or more) for matrix multiplications and convolutions compared to running the same calculations on a standard CPU core. This makes it feasible to run real-time AI workloads like keyword spotting, voice command recognition, and simple object detection directly on the device without needing to stream data to the cloud.
4. IEEE 802.15.4 Radio (Thread/Zigbee)
For years, IoT has been a fragmented landscape of competing protocols. The Matter standard, built on the Thread protocol, aims to unify them.
- Availability: ESP32-C6 and ESP32-H2.
- What It Is: An additional 2.4 GHz radio that implements the IEEE 802.15.4 physical layer. This is the foundation for low-power mesh networking protocols like Thread and Zigbee.
- Why It Matters:
- Matter Compatibility: This is the key feature for building next-generation smart home devices that are certified for the Matter ecosystem.
- Robust Mesh Networking: Thread/Zigbee are designed to create reliable, self-healing mesh networks where nodes can relay messages for each other, extending range and improving reliability compared to a traditional star Wi-Fi network.
- The ESP32-C6 is the “all-in-one” chip, featuring Wi-Fi 6, BLE, and 802.15.4 radios. It can act as a Thread border router or a bridge between Wi-Fi and Thread networks.
- The ESP32-H2 is the “specialist” chip, featuring only BLE and 802.15.4. It’s designed for ultra-low-power, battery-operated end nodes (like a door sensor) within a Thread/Zigbee network.
flowchart TD
    subgraph "Internet / Cloud"
        CLOUD([Cloud Services])
    end

    subgraph "Home Wi-Fi Network"
        direction LR
        ROUTER(Wi-Fi Router) --- C6
        PHONE(Smartphone) --- ROUTER
    end

    subgraph "Thread Mesh Network (802.15.4)"
        direction TB
        C6(<b>ESP32-C6</b><br>Thread Border Router)
        H2_1(<b>ESP32-H2</b><br>Light Bulb)
        H2_2(<b>ESP32-H2</b><br>Door Sensor)
        H2_3(<b>ESP32-H2</b><br>Thermostat)

        C6 --- H2_1
        C6 --- H2_2
        H2_1 --> |"Relay"| H2_3
    end

    CLOUD <--> ROUTER

    linkStyle 0 stroke:#2563EB,stroke-width:2px
    linkStyle 1 stroke:#2563EB,stroke-width:2px
    linkStyle 2 stroke:#059669,stroke-width:2px,stroke-dasharray: 5 5
    linkStyle 3 stroke:#059669,stroke-width:2px,stroke-dasharray: 5 5
    linkStyle 4 stroke:#059669,stroke-width:2px,stroke-dasharray: 5 5
    linkStyle 5 stroke:#5B21B6,stroke-width:2px

    %% Styling
    classDef primary fill:#EDE9FE,stroke:#5B21B6,stroke-width:2px,color:#5B21B6;
    classDef process fill:#DBEAFE,stroke:#2563EB,stroke-width:1px,color:#1E40AF;
    classDef endpoint fill:#D1FAE5,stroke:#059669,stroke-width:2px,color:#065F46;

    class CLOUD,ROUTER,PHONE process;
    class C6 primary;
    class H2_1,H2_2,H2_3 endpoint;
5. Other Notable Peripherals
- Ethernet MAC: Original ESP32 only. The first-generation ESP32 includes a Media Access Control (MAC) layer for 10/100 Mbps Ethernet. You only need to add an external PHY (Physical Layer) chip to create a wired internet connection. This feature is absent in all newer variants (S2, S3, C3, etc.), making the original ESP32 the go-to choice for applications demanding the reliability of a wired connection.
- Bluetooth Classic (BR/EDR): Original ESP32 only. As mentioned in previous chapters, if your product needs to stream audio (A2DP profile) or connect to legacy Bluetooth devices (SPP profile), the original ESP32 is your only option.
- TWAI (CAN Bus): Available on ESP32, ESP32-S2, ESP32-S3, ESP32-C3, and ESP32-C6. This is a common bus in automotive and industrial applications. While not unique to one variant, its wide availability is a key feature for these sectors. It requires an external transceiver chip to interface with the physical CAN bus.
Practical Examples
Example 1: USB CDC “Hello World” on ESP32-S3
This example demonstrates how to set up a virtual COM port over the native USB interface on an ESP32-S3. When you connect the S3’s USB port to your computer, a new serial port will appear, and the device will print a message to it every second.
1. Enable USB CDC in menuconfig:
- Run
idf.py menuconfig. - Go to
Component config->ESP System Settings. - Under
Channel for console output, selectUSB Serial/JTAG Controller. - Save and exit.
2. Code:
#include <stdio.h>
#include "freertos/FreeRTOS.h"
#include "freertos/task.h"
#include "esp_log.h"

static const char* TAG = "USB_CDC_EXAMPLE";

void app_main(void)
{
    ESP_LOGI(TAG, "USB CDC Example Started.");

    // The USB driver is automatically initialized when you select it
    // for console output in menuconfig. The standard printf() will now
    // be routed to the USB serial port.

    int i = 0;
    while(1) {
        printf("Hello from ESP32-S3! Count: %d\r\n", i++);
        vTaskDelay(pdMS_TO_TICKS(1000));
    }
}
3. Build and Flash:
Build and flash the code as usual. Note that you may need to manually put the S3 into bootloader mode (hold BOOT, press and release RESET) to flash over UART if you have already set the console to USB.
4. Observe:
Connect the ESP32-S3’s native USB port (not the UART one) to your computer. Open a serial monitor (like PuTTY, CoolTerm, or the VS Code monitor) and connect to the newly appeared COM port. You will see the “Hello” messages printed every second.
Example 2: Using Preprocessor Directives for Portability
This shows how to write code that uses a variant-specific feature but can still compile on a chip that lacks it.
#include "esp_log.h"

// This is a configuration macro set by the build system
// It will only be defined if the project is built for an ESP32-S3
#ifdef CONFIG_ESP32S3_DEFAULT_CPU_FREQ_240
    // Include a header that only exists for S3 projects
    #include "esp_private/periph_ctrl.h"
#endif

void check_for_ai_acceleration() {
#if CONFIG_IDF_TARGET_ESP32S3
    // This code will only be included in the final binary
    // if the target is an ESP32-S3.
    ESP_LOGI("AI_CHECK", "This is an ESP32-S3. AI acceleration is available.");

    // Example of calling an S3-specific function
    periph_module_enable(PERIPH_AI_MODULE); // Fictional function for illustration

#elif CONFIG_IDF_TARGET_ESP32C3
    ESP_LOGW("AI_CHECK", "This is an ESP32-C3. AI acceleration is NOT available.");

#else
    ESP_LOGW("AI_CHECK", "Running on a different chip. No AI acceleration.");
#endif
}

void app_main(void)
{
    check_for_ai_acceleration();
}
This pattern allows you to maintain a single codebase for multiple products, with features being enabled or disabled automatically based on the target hardware.
Common Mistakes & Troubleshooting Tips
| Mistake / Issue | Symptom(s) | Troubleshooting / Solution |
|---|---|---|
| Enabling Peripheral Without Hardware | – Project fails to build/compile. – Linker errors like “undefined reference to `usb_…`”. |
1. Check the datasheet for your specific ESP32 variant (e.g., C3, S3). 2. Ensure the peripheral (e.g., Native USB, Camera) physically exists on the chip. 3. Only enable drivers in menuconfig for hardware you actually have. |
| Forgetting `menuconfig` Activation | – Code fails to compile with “undefined reference” or “unknown type name” errors for peripheral-specific functions (e.g., twai_message_t). | 1. Run idf.py menuconfig. 2. Navigate to Component config → [Driver Name] (e.g., TWAI Driver, TinyUSB). 3. Enable the driver, save, and rebuild. |
| Insufficient Memory for Buffers | – Application crashes with “out of memory” errors. – malloc calls fail (return NULL), especially when initializing camera or LCD. |
1. Use a variant with PSRAM (e.g., ESP32-S3-WROOM) for memory-intensive tasks. 2. Ensure PSRAM is enabled in menuconfig. 3. Allocate large buffers in external PSRAM using heap_caps_malloc(…, MALLOC_CAP_SPIRAM). |
| Incorrect Pin Assignments | – A peripheral (e.g., LCD, Camera) behaves erratically or doesn’t initialize. – Device may fail to boot if a strapping pin is misused as a general I/O pin. |
1. Consult the module’s datasheet for the correct pinout. 2. Do not use pins reserved for internal flash, PSRAM, or other dedicated functions as GPIOs. |
| Poor High-Speed Signal Integrity | – USB device fails to enumerate or has an unstable connection. – Camera interface shows corrupted data (“sparkles”). |
1. Follow the official Espressif Hardware Design Guidelines. 2. Route high-speed signals (e.g., USB D+/D-) as controlled-impedance differential pairs. 3. Keep traces short and avoid stubs. |
Exercises
- Peripheral Matching: For each of the following applications, state which single ESP32 variant is the most suitable choice and name the key variant-specific peripheral that justifies your choice.
- A device that streams music from a phone to wired headphones.
- A smart home sensor that must connect to a Zigbee network.
- An industrial controller that requires a reliable, hard-wired internet connection.
- A handheld device that emulates a USB keyboard.
menuconfigNavigation: You want to build a data logger using an ESP32-S2 that saves sensor readings to a USB flash drive. Inmenuconfig, what specific options would you need to enable to support this? (Hint: Look for TinyUSB, Mass Storage, and Host mode options). Describe the path to these settings.- Conceptual Challenge: Explain why an ESP32-S3 is far superior to an original ESP32 for building a video doorbell. Mention at least three specific hardware peripherals or features of the S3 and how they contribute to better performance for this application.
Summary
- ESP32-S2/S3 are USB Natives: They include a built-in USB OTG peripheral, eliminating the need for an external bridge and enabling HID, MSC, and other device classes.
- ESP32-S3 is the AI/HMI King: Its key differentiators are the parallel LCD/Camera interfaces and the AI acceleration instructions in its LX7 cores, making it ideal for vision and voice applications.
- ESP32-C6/H2 own the 802.15.4 Space: These are the go-to chips for building devices for modern IoT ecosystems like Matter, using Thread and Zigbee for low-power mesh networking.
- The Original ESP32 Still Has Its Niche: It is the only variant that supports Bluetooth Classic (for audio/SPP) and a built-in Ethernet MAC.
- Hardware and Software are Linked: To use these specialized peripherals, you must enable their drivers in
menuconfigand often provide sufficient memory (PSRAM) and careful PCB layout. - Use Preprocessor Directives: Write portable and maintainable code by checking for target-specific
CONFIG_IDF_TARGET_macros.
Further Reading
- ESP-IDF USB Host and Device Drivers (TinyUSB): Official documentation for using the native USB peripheral.
- ESP-DL (Deep Learning) Library: A library optimized for running deep learning models on Espressif chips, with specific optimizations for the ESP32-S3.
- ESP-IDF Thread/Zigbee Documentation: Guide for developing 802.15.4 applications.
- ESP32-S3 Technical Reference Manual: The definitive source for all hardware details of the S3.
