
Chapter 236: Digital Signature & Certificate Management
Chapter Objectives
By the end of this chapter, you will be able to:
- Explain the role of digital signatures and certificates in establishing trust.
- Understand the fundamentals of Public Key Infrastructure (PKI) and chains of trust.
- Use the mbedTLS library in ESP-IDF to cryptographically verify a data signature.
- Embed and manage X.509 certificates in your firmware for secure TLS connections.
- Utilize the
esp_http_clientto connect to secure HTTPS servers. - Appreciate the role of hardware acceleration for cryptography on different ESP32 variants.
Introduction
In the previous chapter on Secure Boot, we were introduced to the power of digital signatures as a mechanism to verify firmware authenticity. We learned that by signing our code with a secret private key, we could create a hardware-enforced guarantee that only our code would run on the device. This is, however, just one application of this powerful cryptographic primitive.
In the broader world of connected devices, digital signatures and the certificates that manage them form the backbone of secure communication. They are the tools we use to answer critical questions like: “Is this OTA update really from my server, or from an attacker?” or “Is the cloud endpoint I’m sending sensor data to the genuine server, or an impostor?”
This chapter moves beyond Secure Boot to explore the general use of digital signatures and certificate management. We will delve into the concepts of Public Key Infrastructure (PKI), learn how to handle X.509 certificates, and use the built-in mbedTLS library to perform cryptographic verification, enabling your ESP32 to securely interact with the digital world.
Theory
While we’ve touched on digital signatures, it’s essential to formalize the framework that makes them useful on a global scale: Public Key Infrastructure (PKI).
Digital Signatures Revisited: The “What” and “Why”
A digital signature provides two cryptographic guarantees:
- Authenticity: It proves that the data was created by the holder of the corresponding private key.
- Integrity: It proves that the data has not been altered in any way since it was signed.
This works through the now-familiar process of signing a hash of the data with a private key and verifying it with the public key. But this leads to a fundamental question: if I receive a public key from someone, how do I know that key is authentic? How do I trust the key itself?
X.509 Certificates: Binding Identity to a Key
An X.509 certificate is a standardized digital document that solves the key distribution problem. Think of it as a digital passport. It securely binds an identity (like a person’s name or a server’s domain name) to a public key.
A certificate contains several key pieces of information:
| Certificate Field | Description | Example |
|---|---|---|
| Subject | The primary identity being certified. It includes details like the Common Name (CN), organization, and country. | CN=www.google.com, O=Google LLC, C=US |
| Issuer | The entity (Certificate Authority) that verified the identity and signed the certificate. | CN=GTS CA 1D4, O=Google Trust Services LLC, C=US |
| Public Key | The public key of the subject. This is the key a client will use to encrypt data or verify the subject’s signature. | RSA (2048 bit) or ECDSA (nistp256) |
| Validity Period | The timeframe during which the certificate is considered valid, defined by a “Not Before” and “Not After” date. | Not Before: Jan 1 2023 Not After: Dec 31 2023 |
| Signature Algorithm | The algorithm used by the issuer to sign the certificate (e.g., SHA-256 with RSA). | sha256WithRSAEncryption |
| Signature | The digital signature created by the issuer’s private key. This signature covers all other fields, ensuring their integrity. | A long hexadecimal string. |
The Chain of Trust and Certificate Authorities (CAs)
So, who is the issuer? In the global PKI system, the issuer is a Certificate Authority (CA), a trusted third party whose job is to verify identities and issue certificates.
This creates a chain of trust.
- Your device needs to connect to
my-secure-server.com. - The server presents its certificate, which says, “I am
my-secure-server.com, and here is my public key.” This certificate was signed by an Intermediate CA. - The Intermediate CA’s certificate says, “I am a trusted Intermediate, and here is my public key.” This certificate, in turn, was signed by a Root CA.
- The Root CA is the anchor of trust. Its certificate is self-signed. Your ESP32 device must have a pre-installed list of trusted Root CA certificates to validate the entire chain.
The verification process on your ESP32 works backward:
- Does it trust the Root CA? (i.e., is the Root CA certificate in its trust store?)
- If yes, it uses the public key from the Root CA cert to verify the signature on the Intermediate CA cert.
- If that’s valid, it uses the public key from the Intermediate CA cert to verify the signature on the server’s cert.
- If all signatures are valid, the device now trusts the server’s public key and can proceed with establishing a secure TLS connection.
graph TD
    subgraph ESP32 Trust Store
        A["<b>Root CA Certificate</b><br><i>(Self-Signed)</i><br>Pre-installed on device"]
    end

    B[<b>Intermediate CA Certificate</b><br>Signed by Root CA's Private Key]
    C["<b>End-Entity / Server Certificate</b><br><i>(e.g., www[.]google.com)</i><br>Signed by Intermediate's Private Key"]

    A -- "Signs" --> B;
    B -- "Signs" --> C;

    subgraph Verification Process
        direction LR
        C -- "1- Presented by Server" --> V;
        V{<b>Verify Server Cert</b><br>using Intermediate Public Key};
        V -- "Success" --> V2;
        V2{<b>Verify Intermediate Cert</b><br>using Root Public Key};
        V2 -- "Success" --> V3[<b>Trust Established</b><br>Proceed with TLS Handshake];
    end

    style A fill:#EDE9FE,stroke:#5B21B6,stroke-width:2px,color:#5B21B6
    style B fill:#DBEAFE,stroke:#2563EB,stroke-width:1px,color:#1E40AF
    style C fill:#DBEAFE,stroke:#2563EB,stroke-width:1px,color:#1E40AF
    style V fill:#FEF3C7,stroke:#D97706,stroke-width:1px,color:#92400E
    style V2 fill:#FEF3C7,stroke:#D97706,stroke-width:1px,color:#92400E
    style V3 fill:#D1FAE5,stroke:#059669,stroke-width:2px,color:#065F46
Practical Example 1: Verifying a Data Signature
Let’s start with a low-level example of verifying a signature using mbedTLS directly, without any networking. Imagine an external device sends your ESP32 a message and a signature, and you must validate it.
graph TD
    Start[("Start: app_main")]
    InitPK["Initialize PK Context<br><br><b>mbedtls_pk_init()</b>"]
    ParseKey["Parse PEM Public Key<br><br><b>mbedtls_pk_parse_public_key()</b>"]
    CheckParse{Key Parsed?};
    CalcHash["Calculate SHA-256 Hash of Message<br><br><b>mbedtls_md()</b>"]
    CheckHash{Hash OK?};
    VerifySig["Verify Signature with Hash<br><br><b>mbedtls_pk_verify()</b>"]
    CheckVerify{Signature Valid?};
    Success["<b>SUCCESS</b><br>Print Signature VERIFIED"]
    FailParse["<b>FAIL</b><br>Print Failed to parse key"]
    FailHash["<b>FAIL</b><br>Print Failed to calculate hash"]
    FailVerify["<b>FAIL</b><br>Print Signature FAILED"]
    End[("End")]

    Start --> InitPK;
    InitPK --> ParseKey;
    ParseKey --> CheckParse;
    CheckParse -- "Yes" --> CalcHash;
    CheckParse -- "No" --> FailParse;
    CalcHash --> CheckHash;
    CheckHash -- "Yes" --> VerifySig;
    CheckHash -- "No" --> FailHash;
    VerifySig --> CheckVerify;
    CheckVerify -- "Yes (ret == 0)" --> Success;
    CheckVerify -- "No" --> FailVerify;

    Success --> End;
    FailParse --> End;
    FailHash --> End;
    FailVerify --> End;

    classDef start-end fill:#EDE9FE,stroke:#5B21B6,stroke-width:2px,color:#5B21B6;
    classDef process fill:#DBEAFE,stroke:#2563EB,stroke-width:1px,color:#1E40AF;
    classDef decision fill:#FEF3C7,stroke:#D97706,stroke-width:1px,color:#92400E;
    classDef success fill:#D1FAE5,stroke:#059669,stroke-width:2px,color:#065F46;
    classDef fail fill:#FEE2E2,stroke:#DC2626,stroke-width:1px,color:#991B1B;

    class Start,End start-end;
    class InitPK,ParseKey,CalcHash,VerifySig process;
    class CheckParse,CheckHash,CheckVerify decision;
    class Success success;
    class FailParse,FailHash,FailVerify fail;
First, we need to generate a keypair and a signature on a host PC using OpenSSL.
# 1. Generate a 2048-bit RSA private key
openssl genrsa -out private_key.pem 2048

# 2. Extract the public key from the private key
openssl rsa -in private_key.pem -pubout -out public_key.pem

# 3. Create a message to sign
echo -n "This is a test message for ESP32" > message.txt

# 4. Sign the message (create a signature)
openssl dgst -sha256 -sign private_key.pem -out signature.bin message.txt

# 5. Display the signature in hex format to copy into our C code
hexdump -v -e '/1 "%02X"' signature.bin
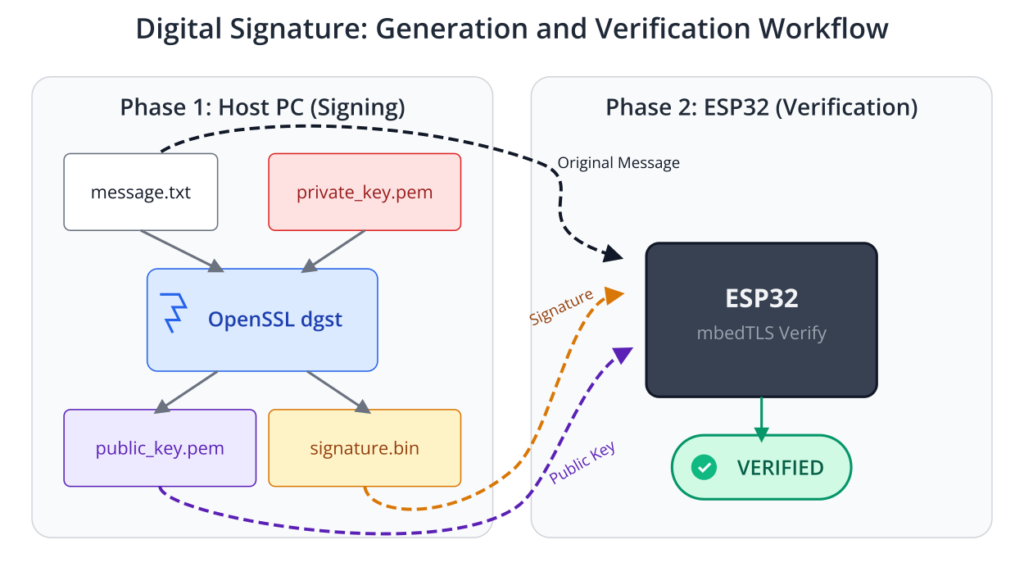
Now, we use the public key and the generated signature in our ESP32 application.
#include <stdio.h>
#include <string.h>
#include "mbedtls/pk.h"
#include "mbedtls/md.h"
#include "mbedtls/error.h"

// The public key we generated with openssl
// Copy the contents of public_key.pem here
const char *PUBLIC_KEY_PEM = \
"-----BEGIN PUBLIC KEY-----\n"
"MIIBIjANBgkqhkiG9w0BAQEFAAOCAQ8AMIIBCgKCAQEAy... (rest of your key) ...\n"
"-----END PUBLIC KEY-----\n";

// The message that was signed
const char *message = "This is a test message for ESP32";

// The signature generated by openssl, converted from hex string to a C array
unsigned char signature[] = {
    0xAB, 0xCD, 0xEF, /* ... copy the hex output here ... */
};

void app_main(void)
{
    int ret;
    mbedtls_pk_context pk;
    unsigned char hash[32];
    char error_buf[100];

    // Initialize the public key context
    mbedtls_pk_init(&pk);

    // Parse the PEM-formatted public key
    ret = mbedtls_pk_parse_public_key(&pk, (const unsigned char *)PUBLIC_KEY_PEM, strlen(PUBLIC_KEY_PEM) + 1);
    if (ret != 0) {
        mbedtls_strerror(ret, error_buf, sizeof(error_buf));
        printf("Failed to parse public key: -0x%04X - %s\n", (unsigned int)-ret, error_buf);
        goto exit;
    }

    // Calculate the SHA-256 hash of the message
    const mbedtls_md_info_t *md_info = mbedtls_md_info_from_type(MBEDTLS_MD_SHA256);
    ret = mbedtls_md(md_info, (const unsigned char *)message, strlen(message), hash);
    if (ret != 0) {
        printf("Failed to calculate hash\n");
        goto exit;
    }

    // Verify the signature against the hash
    ret = mbedtls_pk_verify(&pk, MBEDTLS_MD_SHA256, hash, sizeof(hash), signature, sizeof(signature));
    if (ret == 0) {
        printf("Signature VERIFIED successfully!\n");
    } else {
        mbedtls_strerror(ret, error_buf, sizeof(error_buf));
        printf("Signature FAILED: -0x%04X - %s\n", (unsigned int)-ret, error_buf);
    }

exit:
    mbedtls_pk_free(&pk);
}
Practical Example 2: Certificate Management for HTTPS
A more common use case is validating a server’s certificate for a TLS connection. The esp-tls and esp_http_client components make this straightforward.
Here, we will connect to a known secure server and provide the necessary Root CA certificate to validate its identity.
Step 1: Obtain the Root CA Certificate
- Go to the target website in your browser (e.g.,
https://www.google.com). - Click the padlock icon in the address bar and view the certificate details.
- Inspect the certificate path. Find the topmost Root CA (e.g., “GTS Root R1”).
- Download this Root CA certificate in PEM format. You can usually find these in repositories like the Mozilla trust store. Save it as
google_root_ca.pem.
Step 2: Embed the Certificate in Firmware
The easiest way to include a certificate is to use CMake to embed it as a text file.
- Create a
certsdirectory in your project’smainfolder. - Place
google_root_ca.peminsidemain/certs/. - Modify your
main/CMakeLists.txtfile by adding:idf_component_register(...) target_add_binary_data( ${COMPONENT_TARGET} "certs/google_root_ca.pem" TEXT )
This makes the certificate available in your code as a symbol.
graph TD
    A[Start HTTPS Task]
    B["Define HTTP Client Config<br><b>esp_http_client_config_t</b><br>- URL: (https[:]//www[.]google[.]com)<br>- Handler: <i>http_event_handler</i><br>- Certificate: <i>google_root_ca_pem_start</i>"]
    C["Initialize HTTP Client<br><b>esp_http_client_init()</b>"]
    D["Perform HTTPS Request<br><b>esp_http_client_perform()</b>"]
    E{"<b>Internal TLS Handshake</b><br><i>(Handled by esp-tls)</i>"}
    F[Parse Server Certificate Chain]
    G{Validate Chain using<br>Embedded Root CA?}
    H[<b>Handshake Success</b><br>Connection Secure]
    I[Send HTTP Request<br>Receive HTTP Response]
    J["Process Response Data<br><i>(HTTP_EVENT_ON_DATA)</i>"]
    K["Connection Finished<br><i>(HTTP_EVENT_ON_FINISH)</i>"]
    L["Cleanup Client<br><b>esp_http_client_cleanup()</b>"]
    M[End Task]
    N["<b>Handshake Failed</b><br>Log Error, e.g., esp_tls_conn_new failed"]

    A --> B --> C --> D --> E;
    E --> F --> G;
    G -- "Trust Path OK" --> H;
    H --> I --> J --> K --> L --> M;
    G -- "Trust Path Invalid" --> N;
    N --> L;

    style A fill:#EDE9FE,stroke:#5B21B6,stroke-width:2px,color:#5B21B6
    style B fill:#DBEAFE,stroke:#2563EB,stroke-width:1px,color:#1E40AF
    style C fill:#DBEAFE,stroke:#2563EB,stroke-width:1px,color:#1E40AF
    style D fill:#DBEAFE,stroke:#2563EB,stroke-width:1px,color:#1E40AF
    style L fill:#DBEAFE,stroke:#2563EB,stroke-width:1px,color:#1E40AF
    style I fill:#DBEAFE,stroke:#2563EB,stroke-width:1px,color:#1E40AF
    style J fill:#DBEAFE,stroke:#2563EB,stroke-width:1px,color:#1E40AF
    style K fill:#DBEAFE,stroke:#2563EB,stroke-width:1px,color:#1E40AF
    style E fill:#FEF3C7,stroke:#D97706,stroke-width:1px,color:#92400E
    style F fill:#FEF3C7,stroke:#D97706,stroke-width:1px,color:#92400E
    style G fill:#FEE2E2,stroke:#DC2626,stroke-width:1px,color:#991B1B
    style H fill:#D1FAE5,stroke:#059669,stroke-width:2px,color:#065F46
    style N fill:#FEE2E2,stroke:#DC2626,stroke-width:2px,color:#991B1B
    style M fill:#EDE9FE,stroke:#5B21B6,stroke-width:2px,color:#5B21B6
Step 3: Write the HTTP Client Code
#include <stdio.h>
#include "esp_log.h"
#include "esp_http_client.h"
#include "esp_netif.h"
#include "esp_event.h"
#include "nvs_flash.h"
// Assume WiFi is already connected from a previous chapter's code

static const char *TAG = "HTTPS_EXAMPLE";

// The build system converts the PEM file into these symbols
extern const char google_root_ca_pem_start[] asm("_binary_google_root_ca_pem_start");
extern const char google_root_ca_pem_end[]   asm("_binary_google_root_ca_pem_end");

esp_err_t http_event_handler(esp_http_client_event_t *evt)
{
    switch(evt->event_id) {
        case HTTP_EVENT_ERROR:
            ESP_LOGI(TAG, "HTTP_EVENT_ERROR");
            break;
        case HTTP_EVENT_ON_CONNECTED:
            ESP_LOGI(TAG, "HTTP_EVENT_ON_CONNECTED");
            break;
        case HTTP_EVENT_ON_DATA:
            ESP_LOGI(TAG, "HTTP_EVENT_ON_DATA, len=%d", evt->data_len);
            // To see the data, uncomment the following line
            // printf("%.*s", evt->data_len, (char*)evt->data);
            break;
        case HTTP_EVENT_ON_FINISH:
            ESP_LOGI(TAG, "HTTP_EVENT_ON_FINISH");
            break;
        default:
            break;
    }
    return ESP_OK;
}

void https_client_task(void *pvParameters)
{
    esp_http_client_config_t config = {
        .url = "https://www.google.com",
        .event_handler = http_event_handler,
        .cert_pem = google_root_ca_pem_start, // Point to our embedded Root CA
    };

    esp_http_client_handle_t client = esp_http_client_init(&config);
    esp_err_t err = esp_http_client_perform(client);

    if (err == ESP_OK) {
        ESP_LOGI(TAG, "HTTPS Status = %d, content_length = %lld",
                esp_http_client_get_status_code(client),
                esp_http_client_get_content_length(client));
    } else {
        ESP_LOGE(TAG, "HTTPS request failed: %s", esp_err_to_name(err));
    }

    esp_http_client_cleanup(client);
    vTaskDelete(NULL);
}
When this code runs, the HTTP client will establish a TLS connection. The esp-tls layer will use the provided cert_pem to build a trusted certificate chain, successfully authenticating Google’s server.
Variant Notes
Cryptography is computationally expensive. Espressif chips include hardware accelerators to offload these calculations from the main CPU cores.
| ESP32 Variant | RSA | SHA-2 | AES | ECC (ECDSA) | Key Advantage |
|---|---|---|---|---|---|
| ESP32 | ✔ | ✔ | ✔ | ✘ | Mature and robust core feature set. |
| ESP32-S2 | ✔ | ✔ | ✔ | ✘ | Adds DPA protection and an improved crypto engine. |
| ESP32-S3 | ✔ | ✔ | ✔ | ✔ | Adds ECC acceleration for faster, modern TLS. |
| ESP32-C3 / C6 / H2 | ✔ | ✔ | ✔ | ✔ | RISC-V core with a full suite of modern crypto accelerators. |
- ESP32: Includes hardware acceleration for RSA, SHA (SHA-1/256/384/512), AES, and other cryptographic primitives. mbedTLS is configured to use these automatically.
- ESP32-S2: Features similar hardware acceleration capabilities as the original ESP32.
- ESP32-S3: Adds hardware acceleration for Elliptic Curve Cryptography (ECC), including ECDSA. ECC provides equivalent security to RSA with smaller key sizes, leading to faster TLS handshakes and lower memory usage. This is a significant advantage for modern IoT applications.
- ESP32-C3 / C6 / H2 (RISC-V): These newer variants also include a full suite of cryptographic accelerators, including for RSA, SHA, AES, and ECC, ensuring high performance for secure communications.
The great advantage of the ESP-IDF is that these hardware differences are abstracted. Your mbedTLS C code remains the same across all variants, while the framework automatically dispatches the operations to the hardware accelerator if one is available.
Common Mistakes & Troubleshooting Tips
| Mistake / Issue | Symptom(s) | Troubleshooting / Solution |
|---|---|---|
| Certificate Formatting | mbedtls_pk_parse_key() or esp_tls_conn_new() fails with a parsing error like -0x3F80 or -0x2700. | Solution: Avoid manually pasting certificates into strings. Use CMake’s target_add_binary_data to embed the .pem file directly and correctly. This eliminates formatting mistakes. |
| Certificate Expiration | Device suddenly cannot connect to a server it previously could. Error logs show TLS handshake failure or certificate validation error. | Solution: Check the validity period of the Root CA embedded in the firmware. Implement an OTA update mechanism to periodically refresh the “certificate bundle” on the device. |
| Root CA Mismatch | TLS handshake fails. esp_http_client returns ESP_ERR_ESP_TLS_CANNOT_RESOLVE_HOSTNAME or a generic TLS error. | Solution: Use a browser to inspect the certificate chain of your target server (e.g., api.your-service.com). Identify the exact Root CA and ensure that specific CA is what you have in .cert_pem. |
| High RAM Usage / Heap Exhaustion | Device reboots unexpectedly during a TLS connection. Log shows “out of memory” or heap allocation errors. | Solution: Use esp_get_free_heap_size() to monitor RAM. If memory is tight, request your server admin to use Elliptic Curve (ECC) certificates, which are smaller and less memory-intensive than RSA. |
| Incorrect Signature Verification | mbedtls_pk_verify() consistently fails. | Solution:
|
Exercises
- Sign and Verify: Complete the first practical example. Generate your own RSA key pair, sign a short message of your choice, and use the ESP32 to verify its signature.
- Connect to Espressif: Modify the second practical example to connect to
https://www.espressif.com. You will need to find and embed the correct Root CA certificate for their website. - Investigate the Certificate Bundle: ESP-IDF provides a component called
esp_crt_bundlethat contains a collection of common Root CA certificates from Mozilla’s trust store. Research how to enable and use this bundle with theesp_http_clientinstead of a customcert_pem. What are the pros and cons of this approach?
Summary
- Digital signatures provide authenticity and integrity, while X.509 certificates bind an identity to a public key.
- Public Key Infrastructure (PKI) is the system of Certificate Authorities (CAs) and certificate chains that enables global, scalable trust.
- ESP-IDF includes the mbedTLS library for all low-level cryptographic operations.
- The
esp-tlsandesp_http_clientcomponents provide high-level abstractions for establishing secure TLS connections. - Properly managing certificates—embedding them, ensuring they are valid, and planning for updates—is essential for the security of any connected product.
- Modern ESP32 variants feature powerful hardware accelerators that make secure communications fast and efficient, with the complexity handled by the ESP-IDF framework.
Further Reading
- ESP-IDF
esp-tlsDocumentation: https://docs.espressif.com/projects/esp-idf/en/latest/esp32/api-reference/protocols/esp_tls.html - ESP-IDF Certificate Bundle (
esp_crt_bundle): https://docs.espressif.com/projects/esp-idf/en/latest/esp32/api-reference/protocols/esp_crt_bundle.html - mbedTLS Official Documentation: https://mbed-tls.readthedocs.io/en/latest/
- An Introduction to PKI: https://www.digicert.com/what-is-pki
