
Chapter 148: LCD/OLED Display Integration with ESP-IDF
Chapter Objectives
Upon completing this chapter, you will be able to:
- Understand the differences between common display technologies like LCD, TFT, and OLED.
- Identify common communication interfaces (SPI, I2C, Parallel) used for displays.
- Understand the role of display controller ICs (e.g., SSD1306, ST7789, ILI9341).
- Configure and use the ESP-IDF
esp_lcdcomponent to interface with displays. - Initialize a display and draw basic graphics or text.
- Understand the concept of a frame buffer and its implications.
- Get an overview of the LVGL graphics library and its integration with ESP-IDF.
- Recognize variant-specific display capabilities, especially the LCD peripheral on ESP32-S3.
- Troubleshoot common issues when working with displays.
Introduction
Displays are fundamental to providing rich user interaction and feedback in embedded systems. From simple segment displays to vibrant color graphical screens, they transform how users perceive and operate devices. ESP32 microcontrollers, with their processing power and versatile peripherals, are well-suited for driving a wide variety of displays, enabling applications ranging from IoT device dashboards and wearable interfaces to interactive control panels.
This chapter delves into the integration of common display types, such as Liquid Crystal Displays (LCDs) and Organic Light Emitting Diode (OLED) displays, with ESP32 variants using the ESP-IDF. We will explore the underlying theory, communication protocols, the esp_lcd driver component, and touch upon the powerful LVGL (Light and Versatile Graphics Library) for creating sophisticated graphical user interfaces (GUIs).
Theory
Display Technologies
Several display technologies are prevalent in embedded systems:
- Liquid Crystal Displays (LCDs):
- Character LCDs: Simple displays showing alphanumeric characters in fixed grids (e.g., 16×2, 20×4). They often use parallel interfaces or I2C/SPI via an expander.
- Graphical LCDs (Monochrome): Allow pixel-level control but are typically monochrome. Common in older devices or low-power applications.
- Thin-Film-Transistor LCDs (TFT LCDs): A type of active-matrix LCD providing high image quality, good response times, and full-color capabilities. Widely used for graphical interfaces. They require a backlight.
- Organic Light Emitting Diode (OLED) Displays:
- Each pixel emits its own light, eliminating the need for a backlight.
- Offer excellent contrast ratios (true blacks), wider viewing angles, and faster response times compared to LCDs.
- Can be more power-efficient, especially when displaying dark content.
- Available in monochrome and full color, though smaller OLEDs are often monochrome.
- Susceptible to burn-in over extended periods with static content.

| Feature | Character LCDs | Graphical LCDs (Monochrome) | TFT LCDs | OLED Displays |
|---|---|---|---|---|
| Display Type | Segment-based characters | Pixel-addressable, monochrome | Pixel-addressable, full color | Pixel-addressable, monochrome or color |
| Light Source | Requires backlight (often LED) | Requires backlight | Requires backlight | Self-emissive (each pixel emits light) |
| Color | Typically monochrome (text on background) | Monochrome | Full color | Monochrome or Full color |
| Contrast | Moderate | Moderate | Good | Excellent (true blacks) |
| Viewing Angle | Limited | Moderate | Moderate to Good | Wide |
| Response Time | Slow to Moderate | Moderate | Good | Fast |
| Power Consumption | Low (backlight is main consumer) | Low to Moderate | Moderate to High (backlight significant) | Generally lower, especially with dark content; varies with brightness and content |
| Common Use Cases | Simple status readouts, menus | Low-power info displays, older devices | Graphical User Interfaces (GUIs), video | Wearables, small info displays, high-contrast GUIs |
| Pros |
|
|
|
|
| Cons |
|
|
|
|
Communication Interfaces
ESP32 MCUs communicate with display modules (which include the display panel and a controller IC) using various interfaces:
- Serial Peripheral Interface (SPI):
- A common high-speed synchronous serial interface.
- Typically uses 3 to 5 wires: SCLK (clock), MOSI (Master Out Slave In, for sending data to display), MISO (Master In Slave Out, optional for reading from display), CS (Chip Select), and often D/C (Data/Command) to distinguish between pixel data and control commands.
- Suitable for high-resolution color displays due to its speed.
- DMA (Direct Memory Access) is often used with SPI for efficient data transfer without CPU intervention.
sequenceDiagram
    participant ESP32 as ESP32 (Master)
    participant DisplayCtrl as Display Controller (Slave)

    ESP32->>+DisplayCtrl: 1. Assert CS (Chip Select Low)
    Note over ESP32,DisplayCtrl: SPI Bus Active

    ESP32->>DisplayCtrl: 2. Set D/C Line (Low for Command, High for Data)
    alt Send Command
        ESP32->>DisplayCtrl: D/C = Low (Command Mode)
        ESP32->>DisplayCtrl: 3a. Send Command Byte(s) via MOSI (clocked by SCLK)
        Note right of DisplayCtrl: Processes Command
    else Send Data
        ESP32->>DisplayCtrl: D/C = High (Data Mode)
        ESP32->>DisplayCtrl: 3b. Send Data Byte(s) via MOSI (clocked by SCLK)
        Note right of DisplayCtrl: Processes Data, writes to RAM
    end

    opt Read Data (if MISO connected and supported)
        ESP32->>DisplayCtrl: Send Read Command (if necessary)
        DisplayCtrl->>ESP32: Return Data Byte(s) via MISO (clocked by SCLK)
    end

    ESP32->>DisplayCtrl: 4. De-assert CS (Chip Select High)
    Note over ESP32,DisplayCtrl: SPI Bus Inactive for this slave
deactivate DisplayCtrl- Inter-Integrated Circuit (I2C):
- A two-wire serial interface: SDA (data) and SCL (clock).
- Slower than SPI, making it more suitable for smaller, lower-resolution displays like monochrome OLEDs or character LCDs.
- Uses fewer pins, which can be advantageous in pin-constrained designs.
- Parallel Interface (e.g., 8080 or 6800):
- Transfers multiple bits of data (e.g., 8 or 16) simultaneously over parallel data lines, plus control lines (CS, WR, RD, D/C).
- Offers very high data transfer rates, suitable for large, high-resolution displays.
- Consumes a large number of GPIO pins.
- The ESP32-S3 has a dedicated LCD peripheral that can directly drive parallel RGB displays, and its I2S peripheral can also be creatively used to emulate parallel interfaces for some displays on other ESP32 variants.
| Feature | SPI (Serial Peripheral Interface) | I2C (Inter-Integrated Circuit) | Parallel Interface (e.g., 8080/6800) |
|---|---|---|---|
| Typical Wires | 3-5 wires: SCLK, MOSI, MISO (opt.), CS, D/C (often) | 2 wires: SDA, SCL | 8-16+ data lines + control lines (CS, WR, RD, D/C, etc.) |
| Speed | High (e.g., 10-80 MHz+) | Low to Medium (e.g., 100 kHz, 400 kHz, up to 1-3.4 MHz) | Very High |
| GPIO Pins Required | Moderate (3-5 pins) | Low (2 pins + pull-ups) | High (many pins, e.g., 12-20+) |
| Complexity | Moderate | Relatively Simple (protocol can be complex) | Hardware simple, software can be complex due to timing; many pins |
| Data Transfer | Full-duplex (if MISO used) | Half-duplex | Half-duplex (typically) |
| Suited For | High-resolution color displays, fast updates, DMA common | Smaller, lower-resolution displays (OLEDs, character LCDs), devices where pin count is critical | Large, high-resolution displays requiring maximum data throughput (e.g., direct drive RGB panels) |
| ESP32 Support | Multiple SPI peripherals, DMA support | Multiple I2C peripherals | General GPIOs (bit-banging), I2S peripheral (emulation), ESP32-S3 dedicated LCD peripheral |
| Pros | Fast, widely supported, good for graphics | Few pins, multiple devices on one bus | Highest speed, direct drive capabilities |
| Cons | More pins than I2C | Slower, not ideal for high-resolution graphics | Consumes many GPIO pins, can be complex to route |


Display Controller ICs
Most display panels are not driven directly by the microcontroller’s GPIOs for every pixel. Instead, they are paired with a display controller IC (e.g., SSD1306 for monochrome OLEDs; ST7735, ST7789, ILI9341, ILI9488 for TFT LCDs). This IC is responsible for:
- Receiving commands and pixel data from the MCU via SPI, I2C, or parallel interface.
- Storing a portion of the image data in an internal frame buffer (its own RAM).
- Generating the precise voltage and timing signals required to activate individual pixels on the display panel.
- Handling initialization sequences, power management, and sometimes basic graphics acceleration functions.
| Controller IC | Typical Display Type | Common Interfaces | Key Features / Typical Use | ESP-IDF Driver (esp_lcd) |
|---|---|---|---|---|
| SSD1306 | Monochrome OLED | I2C, SPI | Small, low-power displays (e.g., 128×64, 128×32). Widely used for status readouts. | esp_lcd_new_panel_ssd1306 |
| SH1106 / SH1107 | Monochrome OLED | I2C, SPI | Similar to SSD1306, often found in 1.3″ 128×64 OLEDs. SH1107 supports higher resolutions. | (May require custom init or use generic IO with specific commands; some community drivers exist for esp_lcd) Often compatible with SSD1306 drivers with minor tweaks. |
| ST7735 / ST7735S | Color TFT LCD | SPI | Smaller color displays (e.g., 1.8″ 128×160, 0.96″ 80×160). Cost-effective. | esp_lcd_new_panel_st7735 |
| ST7789 / ST7789V | Color TFT LCD | SPI | Medium-sized color displays (e.g., 1.3″ 240×240, 1.54″ 240×240, 2.0″ 240×320). Popular for IPS panels. | esp_lcd_new_panel_st7789 |
| ILI9341 | Color TFT LCD | SPI, Parallel (8/16-bit) | Common for 2.2″ to 3.2″ displays (typically 240×320). Many modules include touch controllers. | esp_lcd_new_panel_ili9341 |
| ILI9488 | Color TFT LCD | SPI, Parallel (8/9/16/18-bit), RGB | Larger TFTs (e.g., 3.5″ 320×480). Requires more bandwidth. | (Driver available in ESP-IoT-Solution or may require custom porting to esp_lcd for specific interfaces) |
| GC9A01 | Color TFT LCD (Round) | SPI | Round displays (e.g., 1.28″ 240×240). Popular for wearables. | (Driver available in ESP-IoT-Solution, community drivers for esp_lcd exist) |
| SSD1331 | Full-color OLED | SPI | Small full-color OLEDs (e.g., 0.96″ 96×64). | (May require custom driver or adaptation for esp_lcd) |
| HD44780 (Compatible) | Character LCD | Parallel (4-bit or 8-bit), I2C via expander (e.g. PCF8574) | Classic character displays (e.g., 16×2, 20×4). | (Typically handled by dedicated libraries; esp_lcd focuses more on graphical panels, but I2C expander can be used with general I2C functions) |
The ESP32 communicates with this controller, not directly with the display glass. Datasheets for these controller ICs are essential for understanding command sets and initialization procedures.
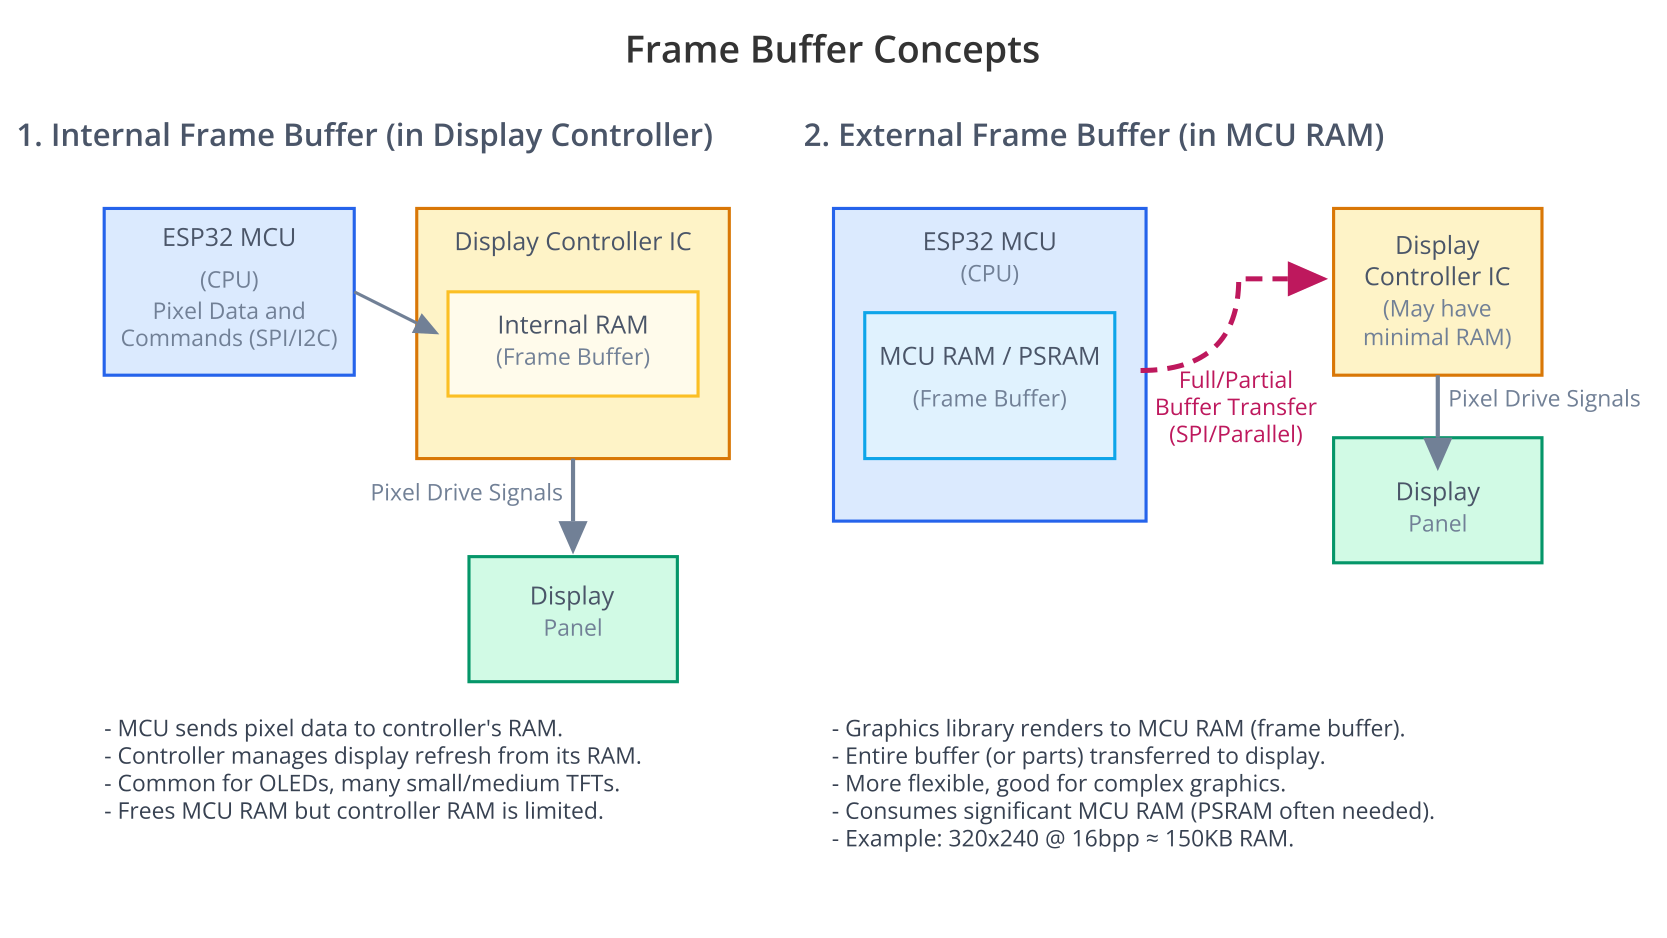
Frame Buffer
A frame buffer is a region of memory that stores the pixel data for an entire screen image.
- Internal Frame Buffer (Display Controller RAM): Many display controllers have their own RAM to store the frame buffer. The MCU writes pixel data to this RAM. This is common for OLEDs and many small to medium TFTs.
- External Frame Buffer (MCU RAM): For displays without sufficient internal RAM or for more complex graphics operations, the frame buffer can be located in the MCU’s RAM (or PSRAM if available). The MCU’s graphics library manipulates this buffer, and then the entire buffer (or portions of it) is transferred to the display. This gives more flexibility but consumes significant MCU RAM. For a 320×240 display with 16-bit color (2 bytes per pixel), the frame buffer would require 320 * 240 * 2 = 153,600 bytes (approx 150 KB), which is a substantial amount for many MCUs.
Graphics Libraries
While you can manually send commands and pixel data to a display controller, it’s often tedious for anything beyond simple operations. Graphics libraries simplify this:
- Low-Level Drivers (
esp_lcd): ESP-IDF provides theesp_lcdcomponent, which offers a unified interface for various display controllers and bus interfaces (SPI, I2C, parallel). It handles the low-level communication and panel initialization. - Higher-Level Graphics Libraries: These build on top of low-level drivers to provide functions for drawing shapes, text, images, and managing user interface elements.
- LVGL (Light and Versatile Graphics Library): A powerful, open-source embedded graphics library with a rich set of widgets (buttons, sliders, charts, etc.), advanced styling, and an animation engine. ESP-IDF has excellent support for LVGL, making it a preferred choice for complex GUIs on ESP32.
- Other Libraries: Libraries like Adafruit GFX and U8g2 are popular in the Arduino ecosystem and can be adapted, but LVGL is more deeply integrated with ESP-IDF.
graph TD
    subgraph Application Layer
        AppCode["User Application <br> (e.g., main.c, UI logic)"]
    end
    style AppCode fill:#EDE9FE,stroke:#5B21B6,stroke-width:2px,color:#5B21B6

    subgraph Graphics Library Layer
        LVGL["LVGL Core <br> (Widgets, Drawing, Events)"]
    end
    style LVGL fill:#DBEAFE,stroke:#2563EB,stroke-width:1px,color:#1E40AF

    subgraph ESP-IDF Driver Layer
        LVGLPort["LVGL Porting Layer <br> (flush_cb, tick_inc, input_read_cb)"]
        ESPLCD["esp_lcd Component <br> (Panel IO, Panel Drivers, Bus Drivers)"]
        SPI_I2C_DRV["SPI/I2C/GPIO Drivers <br> (Low-level peripheral control)"]
    end
    style LVGLPort fill:#FEF3C7,stroke:#D97706,stroke-width:1px,color:#92400E
    style ESPLCD fill:#FEF3C7,stroke:#D97706,stroke-width:1px,color:#92400E
    style SPI_I2C_DRV fill:#FEF3C7,stroke:#D97706,stroke-width:1px,color:#92400E

    subgraph Hardware Layer
        ESP32HW["ESP32 SoC <br> (SPI/I2C Peripherals, GPIOs, CPU, RAM)"]
        DisplayCtrl["Display Controller IC <br> (e.g., ST7789, SSD1306)"]
        DisplayPanel["Physical Display Panel <br> (LCD/OLED Glass)"]
    end
    style ESP32HW fill:#D1FAE5,stroke:#059669,stroke-width:2px,color:#065F46
    style DisplayCtrl fill:#D1FAE5,stroke:#059669,stroke-width:2px,color:#065F46
    style DisplayPanel fill:#D1FAE5,stroke:#059669,stroke-width:2px,color:#065F46

    AppCode -->|Uses API| LVGL
    LVGL -->|Calls Port Functions| LVGLPort
    LVGLPort -->|Uses| ESPLCD
    ESPLCD -->|Uses| SPI_I2C_DRV
    SPI_I2C_DRV -->|Controls| ESP32HW

    ESP32HW -- "SPI/I2C/Parallel Bus" --> DisplayCtrl
    DisplayCtrl -- "Pixel Drive Signals" --> DisplayPanel

    classDef default fill:#F9FAFB,stroke:#D1D5DB,stroke-width:1px,color:#374151
Practical Examples
We’ll focus on using the esp_lcd component, which is the standard way to interface with displays in ESP-IDF v5.x. This component provides drivers for common display controllers and bus interfaces.
graph TD
    A[Start: Integrate Display] --> B{Hardware Setup};
    B -- Correct Wiring --> C[Configure ESP-IDF Project];
    B -- Incorrect Wiring --> HW_ERR[Error: Check Connections!];
    C -- SPI/I2C/Parallel Pins --> D[Initialize Bus Interface];
    style A fill:#EDE9FE,stroke:#5B21B6,stroke-width:2px,color:#5B21B6
    style HW_ERR fill:#FEE2E2,stroke:#DC2626,stroke-width:2px,color:#991B1B
    style D fill:#DBEAFE,stroke:#2563EB,stroke-width:1px,color:#1E40AF

    D -- esp_lcd_new_panel_io_spi / _i2c --> E[Initialize Panel IO Handle];
    E --> F[Configure Panel Device];
    F -- Controller Type, Reset Pin, Resolution --> G[Create Panel Handle];
    style E fill:#DBEAFE,stroke:#2563EB,stroke-width:1px,color:#1E40AF
    style F fill:#DBEAFE,stroke:#2563EB,stroke-width:1px,color:#1E40AF
    style G fill:#DBEAFE,stroke:#2563EB,stroke-width:1px,color:#1E40AF

    G --> H[Reset Panel];
    H --> I["Initialize Panel (Controller Init Commands)"];
    I --> J[Turn Display On / Backlight On];
    style H fill:#DBEAFE,stroke:#2563EB,stroke-width:1px,color:#1E40AF
    style I fill:#DBEAFE,stroke:#2563EB,stroke-width:1px,color:#1E40AF
    style J fill:#DBEAFE,stroke:#2563EB,stroke-width:1px,color:#1E40AF

    J --> K{Use Graphics Library?};
    style K fill:#FEF3C7,stroke:#D97706,stroke-width:1px,color:#92400E

    K -- Yes (e.g., LVGL) --> L[Initialize Graphics Library];
    L --> M["Configure LVGL Display Driver <br> (flush_cb using esp_lcd_panel_draw_bitmap)"];
    M --> N[Create UI Elements / Draw Graphics via LVGL API];
    N --> O[Periodically Call lv_timer_handler];
    style L fill:#DBEAFE,stroke:#2563EB,stroke-width:1px,color:#1E40AF
    style M fill:#DBEAFE,stroke:#2563EB,stroke-width:1px,color:#1E40AF
    style N fill:#DBEAFE,stroke:#2563EB,stroke-width:1px,color:#1E40AF
    style O fill:#DBEAFE,stroke:#2563EB,stroke-width:1px,color:#1E40AF

    K -- No (Manual Drawing) --> P["Prepare Pixel Data (Frame Buffer in MCU RAM or direct commands)"];
    P --> Q["Use esp_lcd_panel_draw_bitmap() <br> or send specific commands/data"];
    style P fill:#DBEAFE,stroke:#2563EB,stroke-width:1px,color:#1E40AF
    style Q fill:#DBEAFE,stroke:#2563EB,stroke-width:1px,color:#1E40AF

    N --> R{Display Update};
    Q --> R;
    R --> S[Success: Visual Output on Display];
    style S fill:#D1FAE5,stroke:#059669,stroke-width:2px,color:#065F46


    classDef LStartStyle fill:#EDE9FE,stroke:#5B21B6,stroke-width:1.5px,color:#5B21B6
    classDef LProcessStyle fill:#DBEAFE,stroke:#2563EB,stroke-width:1px,color:#1E40AF
    classDef LDecisionStyle fill:#FEF3C7,stroke:#D97706,stroke-width:1px,color:#92400E
    classDef LErrorStyle fill:#FEE2E2,stroke:#DC2626,stroke-width:1px,color:#991B1B
Prerequisites:
- ESP-IDF v5.x installed and configured with VS Code.
- An ESP32 development board (ESP32, ESP32-S2, ESP32-S3, etc.).
- A display module, for example:
- An SPI-based TFT LCD like one using an ST7789 or ILI9341 controller.
- An I2C-based OLED like one using an SSD1306 controller.
- Jumper wires for connecting the display.
Example 1: SPI TFT LCD (ST7789) with esp_lcd
This example demonstrates initializing an ST7789-based TFT LCD via SPI and drawing a solid color. Many common 1.3-inch, 1.54-inch, or 2.0-inch TFT displays use this controller with a 240×240 or 320×240 resolution.
1. Connections (Example for ST7789):
- VCC -> 3.3V (ESP32)
- GND -> GND (ESP32)
- SCL/CLK -> ESP32 SPI CLK pin (e.g., GPIO18 for VSPI_CLK)
- SDA/MOSI -> ESP32 SPI MOSI pin (e.g., GPIO23 for VSPI_MOSI)
- RES (Reset) -> Any ESP32 GPIO (e.g., GPIO4)
- DC (Data/Command) -> Any ESP32 GPIO (e.g., GPIO2)
- CS (Chip Select) -> ESP32 SPI CS pin (e.g., GPIO5 for VSPI_CS)
- BLK/LED (Backlight Control, optional) -> Any ESP32 GPIO or tied to 3.3V for always on.
Warning: Always check your specific display module’s pinout and voltage requirements. Some displays might be 5V tolerant on logic pins, but many are 3.3V only. ESP32 GPIOs are 3.3V.
2. Project Configuration (menuconfig):
No specific menuconfig settings are usually required just for esp_lcd with generic SPI, unless you are using a pre-defined board profile that includes display settings. Ensure SPI driver support is enabled (default).
3. Code (main/st7789_example_main.c):
#include <stdio.h>
#include "freertos/FreeRTOS.h"
#include "freertos/task.h"
#include "esp_system.h"
#include "esp_log.h"
#include "driver/spi_master.h"
#include "driver/gpio.h"
#include "esp_lcd_panel_io.h"
#include "esp_lcd_panel_vendor.h"
#include "esp_lcd_panel_ops.h"

static const char *TAG = "ST7789_Example";

// SPI Bus configuration (VSPI_HOST is SPI3 on ESP32 classic, HSPI_HOST is SPI2)
// For ESP32-S2/S3, these are SPI2_HOST and SPI3_HOST
#define LCD_HOST       SPI2_HOST // Or SPI3_HOST, check your variant's default SPI pins

// Pin Configuration (Update these to match your wiring)
#define PIN_NUM_MOSI   23
#define PIN_NUM_SCLK   18
#define PIN_NUM_CS     5
#define PIN_NUM_DC     2
#define PIN_NUM_RST    4
#define PIN_NUM_BCKL   -1 // -1 if not used or tied to VCC

// Display Resolution
#define LCD_H_RES              240
#define LCD_V_RES              240 // Or 320 for other ST7789 variants

// Bit Banging configuration for D/C line
#define LCD_CMD_BITS           8
#define LCD_PARAM_BITS         8

// Function to send a full screen of a single color
static void fill_screen_color(esp_lcd_panel_handle_t panel_handle, uint16_t color)
{
    // Allocate a buffer for one row of pixels
    // Each pixel is 16 bits (RGB565)
    uint16_t *buffer = malloc(LCD_H_RES * sizeof(uint16_t));
    if (!buffer) {
        ESP_LOGE(TAG, "Failed to allocate buffer for screen fill");
        return;
    }
    for (int i = 0; i < LCD_H_RES; i++) {
        buffer[i] = color; // Set all pixels in the row to the specified color
    }

    // Draw the color row by row
    for (int y = 0; y < LCD_V_RES; y++) {
        esp_lcd_panel_draw_bitmap(panel_handle, 0, y, LCD_H_RES, y + 1, buffer);
    }
    free(buffer);
}


void app_main(void)
{
    ESP_LOGI(TAG, "Initializing SPI bus for ST7789 LCD...");
    spi_bus_config_t buscfg = {
        .mosi_io_num = PIN_NUM_MOSI,
        .miso_io_num = -1, // MISO not used for ST7789 write-only
        .sclk_io_num = PIN_NUM_SCLK,
        .quadwp_io_num = -1,
        .quadhd_io_num = -1,
        .max_transfer_sz = LCD_H_RES * LCD_V_RES * 2 + 8 // Max transfer size
    };
    ESP_ERROR_CHECK(spi_bus_initialize(LCD_HOST, &buscfg, SPI_DMA_CH_AUTO));

    ESP_LOGI(TAG, "Initializing ST7789 panel via esp_lcd_panel_io_spi...");
    esp_lcd_panel_io_handle_t io_handle = NULL;
    esp_lcd_panel_io_spi_config_t io_config = {
        .cs_gpio_num = PIN_NUM_CS,
        .dc_gpio_num = PIN_NUM_DC,
        .spi_mode = 0, // SPI mode 0
        .pclk_hz = 40 * 1000 * 1000, // Clock frequency (e.g., 40MHz, ST7789 supports up to 62.5MHz)
        .trans_queue_depth = 10,
        .on_color_trans_done = NULL, // No callback needed for this example
        .user_ctx = NULL,
        .lcd_cmd_bits = LCD_CMD_BITS,
        .lcd_param_bits = LCD_PARAM_BITS,
    };
    ESP_ERROR_CHECK(esp_lcd_new_panel_io_spi((esp_lcd_spi_bus_handle_t)LCD_HOST, &io_config, &io_handle));

    ESP_LOGI(TAG, "Initializing ST7789 driver...");
    esp_lcd_panel_handle_t panel_handle = NULL;
    esp_lcd_panel_dev_config_t panel_config = {
        .reset_gpio_num = PIN_NUM_RST,
        .rgb_endian = LCD_RGB_ENDIAN_RGB, // Check your display, some might be BGR
        .bits_per_pixel = 16, // RGB565
    };
    ESP_ERROR_CHECK(esp_lcd_new_panel_st7789(io_handle, &panel_config, &panel_handle));

    // Reset the display
    ESP_ERROR_CHECK(esp_lcd_panel_reset(panel_handle));
    // Initialize LCD panel
    ESP_ERROR_CHECK(esp_lcd_panel_init(panel_handle));

    // Turn on display
    ESP_ERROR_CHECK(esp_lcd_panel_disp_on_off(panel_handle, true));
    // ESP_ERROR_CHECK(esp_lcd_panel_disp_on(panel_handle)); // Alternative for IDF v5.0+

    // Optional: Backlight control
    if (PIN_NUM_BCKL >= 0) {
        gpio_set_direction(PIN_NUM_BCKL, GPIO_MODE_OUTPUT);
        gpio_set_level(PIN_NUM_BCKL, 1); // Turn backlight on
    }

    ESP_LOGI(TAG, "ST7789 initialized. Filling screen with colors.");

    // Fill screen with different colors
    uint16_t colors[] = {0xF800, 0x07E0, 0x001F, 0xFFE0, 0xF81F, 0x07FF}; // Red, Green, Blue, Yellow, Magenta, Cyan
    int color_index = 0;

    while (1) {
        ESP_LOGI(TAG, "Filling screen with color 0x%04X", colors[color_index]);
        fill_screen_color(panel_handle, colors[color_index]);
        color_index = (color_index + 1) % (sizeof(colors) / sizeof(colors[0]));
        vTaskDelay(pdMS_TO_TICKS(2000));
    }
}
4. CMakeLists.txt (in main directory):
idf_component_register(SRCS "st7789_example_main.c"
                    INCLUDE_DIRS ".")
You also need to ensure that the esp_lcd component is part of your project. It usually is by default, but if you encounter linking errors, you might need to add REQUIRES esp_lcd to your idf_component_register.
5. Build, Flash, and Observe Steps:
- Connect the ST7789 display to your ESP32 board according to the pin configuration in the code.
- Build the project (Espressif IDF: Build Project).
- Flash the project (Espressif IDF: Flash Device).
- Observe the display. It should cycle through filling the screen with red, green, blue, yellow, magenta, and cyan.
Tip: The
esp_lcd_panel_draw_bitmap()function is used here to send pixel data. For more complex graphics, you would typically use a graphics library like LVGL, which would call this function (or similar ones) internally.
Introduction to LVGL (Light and Versatile Graphics Library)
LVGL is a feature-rich, open-source graphics library for embedded systems. ESP-IDF provides excellent support for LVGL, making it relatively easy to create sophisticated GUIs.
Key Features of LVGL:
- Wide range of widgets: buttons, labels, charts, sliders, images, etc.
- Advanced styling and theming capabilities.
- Supports various input devices (touchscreens, encoders, keypads).
- Memory-efficient, with configurable buffer modes.
- Animations and effects.
- Written in C, with bindings for other languages like MicroPython.
Integration with esp_lcd:
LVGL requires a display driver to tell it how to send pixel data to the screen. The esp_lcd component can serve as this driver. You configure esp_lcd for your specific display and bus, and then you configure LVGL to use callback functions that leverage esp_lcd (e.g., a flush_cb that calls esp_lcd_panel_draw_bitmap).
Setting up LVGL:
ESP-IDF includes LVGL as a component. You can add it to your project typically through the IDF Component Manager or by including it directly.
- Add LVGL to your project:If not already present, you might need to add it to your idf_component.yml file:
dependencies: lvgl/lvgl: "^8.3" # Or the latest compatible version # esp_lvgl_port component might also be usefulThen runidf.py add-dependency lvgl/lvgloridf.py reconfigure. - Configure LVGL:
menuconfig->Component config->LVGL. Here you can set screen resolution, color depth, theme, font support, etc. - Porting Layer: You need to provide a “porting” layer that initializes LVGL, sets up its display driver (using
esp_lcd), input driver (if any), and a timer tick for LVGL’s internal tasks. ESP-IDF examples often provide a good starting point for this porting layer (e.g., inlvgl_helpers.cor similar).
A full LVGL example is extensive, but the general workflow involves:
- Initialize
esp_lcdfor your display (as in Example 1). - Initialize LVGL core (
lv_init()). - Create an LVGL display driver (
lv_disp_drv_t) and assign itsflush_cbto a function that usesesp_lcd_panel_draw_bitmap()to send rendered portions of the screen (draw buffers) to the display. - Register the display driver with LVGL (
lv_disp_drv_register()). - Create LVGL UI elements (widgets) on the screen.
- Periodically call
lv_timer_handler()in a FreeRTOS task.
Refer to the official ESP-IDF LVGL examples for complete implementations.
Variant Notes
- ESP32 (Original):
- Supports SPI and I2C for displays.
- Relies on software bit-banging or SPI/I2C peripherals.
- Sufficient for many small to medium displays, but performance for large, high-resolution displays might be limited by SPI speed and CPU involvement if DMA is not optimally used.
- ESP32-S2:
- Improved SPI peripheral compared to original ESP32.
- Good for driving SPI displays.
- No dedicated parallel LCD interface.
- ESP32-S3:
- Dedicated LCD Peripheral: Can drive parallel RGB (up to RGB888) and 8080/6800 interface displays directly, offering high performance for larger screens. This is a significant advantage for applications requiring rich GUIs.
- Improved SPI and I2S peripherals: Can also be used for SPI displays or emulating parallel interfaces.
- Often has more PSRAM options, which is beneficial for large frame buffers or complex LVGL UIs.
- Ideal for demanding display applications.
- ESP32-C3 / ESP32-C6 / ESP32-H2 (RISC-V and newer Arm):
- Support SPI and I2C.
- Generally more resource-constrained (RAM, Flash, CPU speed) compared to ESP32/S2/S3.
- Suitable for smaller OLEDs or TFTs. Driving large, high-resolution displays with complex GUIs might be challenging or require careful optimization.
- The
esp_lcdcomponent supports these variants for SPI/I2C displays.
| ESP32 Variant | Key Display-Related Features | Common Display Use Cases | Notes |
|---|---|---|---|
| ESP32 (Original) |
|
Small to medium SPI/I2C displays (TFTs, OLEDs). | Performance for large, high-res displays might be limited by SPI speed and CPU involvement if DMA isn’t optimally used. |
| ESP32-S2 |
|
Good for driving SPI displays. Suitable for many GUI applications. | No dedicated parallel LCD interface. Relies on SPI/I2C or I2S emulation for parallel. |
| ESP32-S3 |
|
Ideal for demanding display applications: large screens, rich GUIs, high refresh rates. | The LCD peripheral is a significant advantage for complex visual outputs. PSRAM is highly beneficial for large frame buffers (e.g., with LVGL). |
| ESP32-C3 |
|
Smaller OLEDs or TFTs via SPI/I2C. Low-power GUIs. | More resource-constrained (RAM, Flash, CPU speed) compared to ESP32/S2/S3. Careful optimization needed for complex GUIs. |
| ESP32-C6 |
|
Similar to ESP32-C3: Smaller OLEDs/TFTs. IoT device interfaces. | Resource-constrained. Focus on simpler displays or UIs. Display often secondary to connectivity features. |
| ESP32-H2 |
|
Similar to C-series: Low-power, smaller displays for IoT end-nodes. | Resource-constrained. Display capabilities are secondary to its low-power wireless features. |
Common Mistakes & Troubleshooting Tips
| Mistake / Issue | Symptom(s) | Troubleshooting / Solution |
|---|---|---|
| Incorrect Wiring |
|
|
| SPI Clock Speed Too High/Low |
|
|
| Reset or Initialization Sequence Issues |
|
|
| Incorrect D/C (Data/Command) Pin Handling |
|
|
| LVGL Buffer Configuration / Flush Issues |
|
|
| Forgetting lv_timer_handler() (LVGL) |
|
|
| Incorrect Color Format / Endianness |
|
|
| I2C Address Issues (for I2C displays) | Display not found, initialization fails. |
|
| Power Issues |
|
|
Exercises
- I2C OLED Text Display (SSD1306):
- Connect an I2C SSD1306 OLED display (e.g., 128×64 pixels) to your ESP32.
- Use
esp_lcdto initialize it (e.g.,esp_lcd_new_panel_ssd1306). - Write a program to clear the screen and display “Hello, ESP32!” at a specific coordinate. (Hint: You might need to implement a simple character drawing function or use a minimal graphics library that works with
esp_lcd_panel_draw_bitmap).
- Basic Shapes on ST7789:
- Using the ST7789 example as a base, write functions to draw:
- A filled rectangle of a given color at specified coordinates.
- A horizontal line.
- A vertical line.
- Test by drawing a few shapes on the screen.
- Using the ST7789 example as a base, write functions to draw:
- LVGL “Hello World” Button:
- Set up an LVGL project for your SPI TFT display.
- Create a simple UI with a single button labeled “Click Me”.
- When the button is clicked (if you have a touch interface, or just for display initially), print a message to the serial console.
- Displaying Sensor Data with LVGL:
- Integrate a sensor (e.g., internal temperature sensor, or an external ADC/I2C sensor) with your LVGL project.
- Create an LVGL label widget on the screen.
- Periodically read the sensor data and update the label to display the current reading (e.g., “Temp: 25.5 C”).
- ESP32-S3 Parallel RGB Display Exploration (Conceptual/Research):
- If you have an ESP32-S3 and a parallel RGB TFT display:
- Research the
esp_lcdAPI for configuring the LCD peripheral (esp_lcd_new_rgb_panel()). - Identify the key configuration parameters (timing, signal polarity, data width).
- Outline the steps needed to initialize such a display. This is more of a research task if you don’t have the hardware, focusing on understanding the ESP-IDF documentation for this advanced feature.
- Research the
- If you have an ESP32-S3 and a parallel RGB TFT display:
Summary
- Displays like LCDs and OLEDs provide visual output for embedded systems, interfaced via SPI, I2C, or parallel buses.
- Display controller ICs (e.g., ST7789, SSD1306) manage the pixel data and drive the display panel.
- The ESP-IDF
esp_lcdcomponent offers a standardized API for initializing and controlling various displays and their IO interfaces. esp_lcd_panel_draw_bitmap()is a key function for sending pixel data to the display.- LVGL is a powerful graphics library well-supported in ESP-IDF for creating rich GUIs, building upon
esp_lcdfor display access. - ESP32 variants differ in their display capabilities, with ESP32-S3 offering a dedicated parallel LCD peripheral for high-performance applications.
- Proper wiring, configuration, and understanding of the display controller are crucial for successful integration.
Further Reading
- ESP-IDF Programming Guide – LCD & Touch Panel:
- https://docs.espressif.com/projects/esp-idf/en/v5.4/esp32/api-reference/peripherals/lcd.html (Navigate to S2/S3/C3 etc. sections for variant-specific notes).
- LVGL Official Documentation:
- ESP-IDF LVGL Examples:
- Check the
examples/peripherals/lcd/lvgldirectory within your ESP-IDF installation or on GitHub: https://github.com/espressif/esp-idf/tree/v5.x/examples/peripherals/lcd/lvgl
- Check the
- Datasheets for common display controllers:
- SSD1306 (OLED)
- ST7789 (TFT LCD)
- ILI9341 (TFT LCD)
- ESP-IoT-Solution – LCD Components:
- https://github.com/espressif/esp-iot-solution/tree/master/components/display (Contains drivers for more display controllers).
